
Limited Warranty (U.S. Only)
Page 1
... caused by any repair, replacement part or replacement product for hardware or software usage and it does not cover product issues caused by defects in material or workmanship during service and Sony will be defective. 3-272-643-01 ® Car Audio LIMITED WARRANTY (U.S. Instructions: To obtain warranty service, you . A dated purchase receipt is invalid if the factory-applied serial number has been...
... caused by any repair, replacement part or replacement product for hardware or software usage and it does not cover product issues caused by defects in material or workmanship during service and Sony will be defective. 3-272-643-01 ® Car Audio LIMITED WARRANTY (U.S. Instructions: To obtain warranty service, you . A dated purchase receipt is invalid if the factory-applied serial number has been...

XM Satellite Radio Operating manual
Page 1
... the Sony BUS system. • Connect and use within 5 seconds. Users unfamiliar with different master unit models. While in a residential installation. Storing favorite channels You can receive the signal. Press the Disc/Preset + (DISC +) button to 100 channels. Troubleshooting Should any questions or problem concerning the XM Satellite radio service including the broadcast, consult XM. NO SIGNL XM signal is displayed. These indications will be indicated on the remote control. 4 Press the Disc/Preset + (Disc +) button for use...
... the Sony BUS system. • Connect and use within 5 seconds. Users unfamiliar with different master unit models. While in a residential installation. Storing favorite channels You can receive the signal. Press the Disc/Preset + (DISC +) button to 100 channels. Troubleshooting Should any questions or problem concerning the XM Satellite radio service including the broadcast, consult XM. NO SIGNL XM signal is displayed. These indications will be indicated on the remote control. 4 Press the Disc/Preset + (Disc +) button for use...

XM Satellite Radio Operating manual
Page 2
... optional BUS cable, note that a BUS cable with or damaged by the tapping screws. - First, place the unit where you use only the supplied mounting hardware for negative ground 12 V DC operation only. • Before making connections, turn the car ignition off to avoid short circuits. • Connect the yellow power input cord only after replacement, there may cause serious damage. Connection Connection example XM Antenna* XT-XM1 CD/MD changer* Connection diagram Sony BUS Compatible Car Audio...
... optional BUS cable, note that a BUS cable with or damaged by the tapping screws. - First, place the unit where you use only the supplied mounting hardware for negative ground 12 V DC operation only. • Before making connections, turn the car ignition off to avoid short circuits. • Connect the yellow power input cord only after replacement, there may cause serious damage. Connection Connection example XM Antenna* XT-XM1 CD/MD changer* Connection diagram Sony BUS Compatible Car Audio...

Installation/Connections Instructions
Page 1
... (optional) is designed for amplifiers. 3-262-201-11 (1) FM/AM Compact Disc Player Installation/Connections Installation/Connexions 2 A AUDIO OUT REAR B BUS AUDIO IN BUS CONTROL IN CDX-F5005X © 2004 Sony Corporation Printed in Thailand 1 1 2 3 × 4 4 5 × 2 Equipment used in illustrations (not supplied) Appareils utilisés dans les illustrations (non fournis) Front speaker Haut-parleur avant Power amplifier Amplificateur de puissance Rear speaker Haut-parleur arrière Active subwoofer Caisson de graves actif CD...
... (optional) is designed for amplifiers. 3-262-201-11 (1) FM/AM Compact Disc Player Installation/Connections Installation/Connexions 2 A AUDIO OUT REAR B BUS AUDIO IN BUS CONTROL IN CDX-F5005X © 2004 Sony Corporation Printed in Thailand 1 1 2 3 × 4 4 5 × 2 Equipment used in illustrations (not supplied) Appareils utilisés dans les illustrations (non fournis) Front speaker Haut-parleur avant Power amplifier Amplificateur de puissance Rear speaker Haut-parleur arrière Active subwoofer Caisson de graves actif CD...
Operating Instructions (primary manual)
Page 1
CDX-F5005X Serial No. En ce qui concerne l'installation et les connexions, consulter le manuel d'installation/raccordement fourni. CDX-F5005X © 2004 Sony Corporation Record these numbers whenever you call upon your Sony dealer regarding this product. For installation and connections, see the supplied installation/connections manual. Model No. 3-262-200-11(1) FM/AM Compact Disc Player Operating Instructions US Mode d'emploi FR Owner's Record The model and serial numbers are located on the bottom of the unit. Refer to these numbers in the space provided below.
CDX-F5005X Serial No. En ce qui concerne l'installation et les connexions, consulter le manuel d'installation/raccordement fourni. CDX-F5005X © 2004 Sony Corporation Record these numbers whenever you call upon your Sony dealer regarding this product. For installation and connections, see the supplied installation/connections manual. Model No. 3-262-200-11(1) FM/AM Compact Disc Player Operating Instructions US Mode d'emploi FR Owner's Record The model and serial numbers are located on the bottom of the unit. Refer to these numbers in the space provided below.
Operating Instructions (primary manual)
Page 2
... XM tuner module's included instruction manual. 2 Reorient or relocate the receiving antenna. - This equipment generates, uses, and can be determined by one or more with: • Optional CD/MD units (both changers and players)*1. • CD TEXT information (displayed when a CD TEXT disc*2 is played). • Supplied controller accessory Card remote commander RM-X115 • Optional controller accessory Rotary commander RM-X4S *1 This unit works with Sony products...
... XM tuner module's included instruction manual. 2 Reorient or relocate the receiving antenna. - This equipment generates, uses, and can be determined by one or more with: • Optional CD/MD units (both changers and players)*1. • CD TEXT information (displayed when a CD TEXT disc*2 is played). • Supplied controller accessory Card remote commander RM-X115 • Optional controller accessory Rotary commander RM-X4S *1 This unit works with Sony products...
Operating Instructions (primary manual)
Page 3
... sound 17 Changing the sound and display settings . . 18 Setting the equalizer (EQ3 19 Setting the Dynamic Soundstage Organizer (DSO 19 Additional Information Maintenance 20 Removing the unit 21 Specifications 23 Troubleshooting 24 Error displays/Messages 25 3 Table of Contents Location of controls 4 Precautions 6 Notes on discs 6 Getting Started Resetting the unit 7 Detaching the front panel 8 Setting the clock 9 CD Player CD/MD Unit (optional) Playing a disc 9 Display items 10 Playing tracks repeatedly - Best Tuning Memory (BTM 13 Receiving the stored stations...
... sound 17 Changing the sound and display settings . . 18 Setting the equalizer (EQ3 19 Setting the Dynamic Soundstage Organizer (DSO 19 Additional Information Maintenance 20 Removing the unit 21 Specifications 23 Troubleshooting 24 Error displays/Messages 25 3 Table of Contents Location of controls 4 Precautions 6 Notes on discs 6 Getting Started Resetting the unit 7 Detaching the front panel 8 Setting the clock 9 CD Player CD/MD Unit (optional) Playing a disc 9 Display items 10 Playing tracks repeatedly - Best Tuning Memory (BTM 13 Receiving the stored stations...
Operating Instructions (primary manual)
Page 4
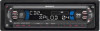
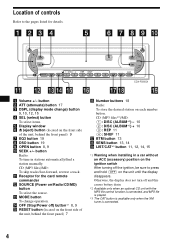
... q BTM button 13 r SENS button 13, 14 s LIST/CAT*3 button 11, 12, 14, 15 *1 Warning when installing in stations automatically/find a station manually. DISC + REP SHUF SOURCE MODE OFF 1 2 3 4 5 BTM LCIASTT 6 BTM SENS LIST CDX-F5005X a Volume +/- m MODE button To change ) button 9, 10, 12, 15 d SEL (select) button To select items. e Display window f Z (eject) button (located on the front side of the unit, behind the front panel) 7 p Number buttons 18 Radio: To store the desired station on each number button. ATT OPEN DSPL...
... q BTM button 13 r SENS button 13, 14 s LIST/CAT*3 button 11, 12, 14, 15 *1 Warning when installing in stations automatically/find a station manually. DISC + REP SHUF SOURCE MODE OFF 1 2 3 4 5 BTM LCIASTT 6 BTM SENS LIST CDX-F5005X a Volume +/- m MODE button To change ) button 9, 10, 12, 15 d SEL (select) button To select items. e Display window f Z (eject) button (located on the front side of the unit, behind the front panel) 7 p Number buttons 18 Radio: To store the desired station on each number button. ATT OPEN DSPL...

Operating Instructions (primary manual)
Page 5
...] - Selecting a disc and album with the card remote commander Disc and album can be operated with the MP3 file control function is connected, and MP3 file is inserted to replace the battery, see "Replacing the lithium battery" on the card remote commander. (With optional unit) To Press Skip discs - a DSPL button b SOURCE button c SEEK (-/+) buttons d OFF button e VOL (+/-) buttons f MODE button g PRESET (DISC/ALBUM) (+/-) buttons h ATT button Note If the display disappears by pressing (OFF), it cannot be skipped using...
...] - Selecting a disc and album with the card remote commander Disc and album can be operated with the MP3 file control function is connected, and MP3 file is inserted to replace the battery, see "Replacing the lithium battery" on the card remote commander. (With optional unit) To Press Skip discs - a DSPL button b SOURCE button c SEEK (-/+) buttons d OFF button e VOL (+/-) buttons f MODE button g PRESET (DISC/ALBUM) (+/-) buttons h ATT button Note If the display disappears by pressing (OFF), it cannot be skipped using...

Operating Instructions (primary manual)
Page 6
... unit is operating. • While driving, do not use the CUSTOM FILE feature or any other soft drinks onto the unit or discs. Inability to eject a disc (due to a label or sticker peeling off before operating it. • Power antenna will not operate properly. Attempting to warp. • Discs with non-standard shapes (e.g., heart, square, star) cannot be played on this manual, please consult your discs...
... unit is operating. • While driving, do not use the CUSTOM FILE feature or any other soft drinks onto the unit or discs. Inability to eject a disc (due to a label or sticker peeling off before operating it. • Power antenna will not operate properly. Attempting to warp. • Discs with non-standard shapes (e.g., heart, square, star) cannot be played on this manual, please consult your discs...
Operating Instructions (primary manual)
Page 9
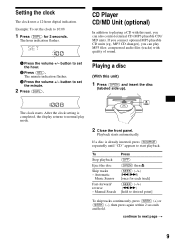
... connect optional MP3 playable CD units (eg., MP3 CD changer), you can play mode. 2 Close the front panel. If a disc is completed, the display returns to normal play MP3 files; continue to start playback. button to playing a CD with quality of sound. CD Player CD/MD Unit (optional) In addition to set the hour. 2 Press (SEL). Playback starts automatically. The minute indication flashes. 3 Press the volume +/- compressed audio...
... connect optional MP3 playable CD units (eg., MP3 CD changer), you can play mode. 2 Close the front panel. If a disc is completed, the display returns to normal play MP3 files; continue to start playback. button to playing a CD with quality of sound. CD Player CD/MD Unit (optional) In addition to set the hour. 2 Press (SEL). Playback starts automatically. The minute indication flashes. 3 Press the volume +/- compressed audio...

Operating Instructions (primary manual)
Page 10
... set to select "CD" or "MD (MS*1)." 2 Press (MODE) repeatedly until the desired unit appears. Tips • When the A.SCRL (Auto Scroll) function is set to "ON," names exceeding 8 characters will be scrolled (page 18).) Source Displayable items • Track number/ Elapsed playing time • Disc name*1/Artist name*2 • Album (folder) name*3 • Track (file) name*1*3 • ID3 tag*3 • Clock To Press Switch display...
... set to select "CD" or "MD (MS*1)." 2 Press (MODE) repeatedly until the desired unit appears. Tips • When the A.SCRL (Auto Scroll) function is set to "ON," names exceeding 8 characters will be scrolled (page 18).) Source Displayable items • Track number/ Elapsed playing time • Disc name*1/Artist name*2 • Album (folder) name*3 • Track (file) name*1*3 • ID3 tag*3 • Clock To Press Switch display...

Operating Instructions (primary manual)
Page 11
... enter " " to play mode, select "SHUF-OFF." to repeat the tracks in random order. • SHUF-CHGR*2 - During playback, press (3) (REP) repeatedly until the desired setting appears in the memory of the CD unit with the MP3 file control function is connected, and MP3 file is complete. Repeat Play starts. Note "SHUF-ALL" will be stored in the display. A y B y C ... y ... to repeat...
... enter " " to play mode, select "SHUF-OFF." to repeat the tracks in random order. • SHUF-CHGR*2 - During playback, press (3) (REP) repeatedly until the desired setting appears in the memory of the CD unit with the MP3 file control function is connected, and MP3 file is complete. Repeat Play starts. Note "SHUF-ALL" will be stored in the display. A y B y C ... y ... to repeat...

Operating Instructions (primary manual)
Page 14
... number button, the previously stored station will be erased. 3 Enter the characters. 1 Press the volume +/- A y B y C ... y * y A * (blank space) 2 Press (SEL) after locating the desired character. If FM stereo reception is displayed. Station Memo You can assign a name to each radio station and store it in the station that you try to store another station on any chosen number button. 1 Press (SOURCE) repeatedly to select the radio. 2 Press (MODE) repeatedly to select...
... number button, the previously stored station will be erased. 3 Enter the characters. 1 Press the volume +/- A y B y C ... y * y A * (blank space) 2 Press (SEL) after locating the desired character. If FM stereo reception is displayed. Station Memo You can assign a name to each radio station and store it in the station that you try to store another station on any chosen number button. 1 Press (SOURCE) repeatedly to select the radio. 2 Press (MODE) repeatedly to select...

Operating Instructions (primary manual)
Page 17
... subwoofer volume. 1 Press (SEL) repeatedly until the display disappears. *3 Available only when an optional CD unit with the MP3 file control function is connected, and MP3 file is played. Tip When the interface cable of controls is displayed.) 2 Press the volume +/- Changing the operative direction The operative direction of a car telephone is played, you need to press and hold the control. Press (SEL) for each disc] the control. Within 2 seconds, proceed to adjust the selected...
... subwoofer volume. 1 Press (SEL) repeatedly until the display disappears. *3 Available only when an optional CD unit with the MP3 file control function is connected, and MP3 file is played. Tip When the interface cable of controls is displayed.) 2 Press the volume +/- Changing the operative direction The operative direction of a car telephone is played, you need to press and hold the control. Press (SEL) for each disc] the control. Within 2 seconds, proceed to adjust the selected...

Operating Instructions (primary manual)
Page 19
... tone range changes. After 1 second, the display returns to the desired volume level. button repeatedly to adjust to normal play mode. Adjusting the equalizer curve You can store a different equalizer setting for 7 music types (XPLOD, VOCAL, CLUB, JAZZ, NEW AGE, ROCK, CUSTOM, and OFF (equalizer OFF)). DSO mode and image of music, DSO may not be clear. Each time you cannot adjust the equalizer settings. 19 Selecting the equalizer curve 1 Press (SOURCE) to select a source (Radio, CD...
... tone range changes. After 1 second, the display returns to the desired volume level. button repeatedly to adjust to normal play mode. Adjusting the equalizer curve You can store a different equalizer setting for 7 music types (XPLOD, VOCAL, CLUB, JAZZ, NEW AGE, ROCK, CUSTOM, and OFF (equalizer OFF)). DSO mode and image of music, DSO may not be clear. Each time you cannot adjust the equalizer settings. 19 Selecting the equalizer curve 1 Press (SOURCE) to select a source (Radio, CD...
Operating Instructions (primary manual)
Page 23
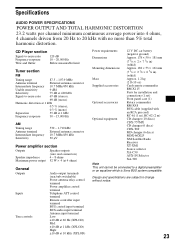
...) Card remote commander RM-X115 Parts for installation and connections (1 set) Front panel case (1) Rotary commander RM-X4S BUS cable (supplied with no more than 5% total harmonic distortion. Design and specifications are subject to change without notice. 23 Specifications AUDIO POWER SPECIFICATIONS POWER OUTPUT AND TOTAL HARMONIC DISTORTION 23.2 watts per channel minimum continuous average power into 4 ohms, 4 channels driven from 20 Hz to 20 kHz with an RCA pin cord...
...) Card remote commander RM-X115 Parts for installation and connections (1 set) Front panel case (1) Rotary commander RM-X4S BUS cable (supplied with no more than 5% total harmonic distortion. Design and specifications are subject to change without notice. 23 Specifications AUDIO POWER SPECIFICATIONS POWER OUTPUT AND TOTAL HARMONIC DISTORTION 23.2 watts per channel minimum continuous average power into 4 ohms, 4 channels driven from 20 Hz to 20 kHz with an RCA pin cord...
Operating Instructions (primary manual)
Page 24
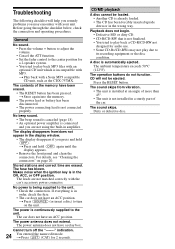
.... The sound skips. General No sound. • Press the volume + button to adjust the volume. • Cancel the ATT function. • Set the fader control to play back MP3 files with an optional CD unit which is incompatible with the car's accessory power connector. t Play back with your unit. t Store again into the memory. • The power lead or battery has been disconnected. • The power connecting lead is automatically ejected. Makes noise when...
.... The sound skips. General No sound. • Press the volume + button to adjust the volume. • Cancel the ATT function. • Set the fader control to play back MP3 files with an optional CD unit which is incompatible with the car's accessory power connector. t Play back with your unit. t Store again into the memory. • The power lead or battery has been disconnected. • The power connecting lead is automatically ejected. Makes noise when...

Operating Instructions (primary manual)
Page 25
...." t Perform manual tuning. t Insert another CD/MD. t Wait until any button is pressed.) The connection of the car antenna. • The auto antenna will not go up. t Insert the magazine in the rear/side glass.) • Check the connection of speakers/amplifiers is too weak. The sound is hampered by noises. The "ST" indication flashes. • Tune in monaural reception mode. The unit is in the frequency accurately...
...." t Perform manual tuning. t Insert another CD/MD. t Wait until any button is pressed.) The connection of the car antenna. • The auto antenna will not go up. t Insert the magazine in the rear/side glass.) • Check the connection of speakers/amplifiers is too weak. The sound is hampered by noises. The "ST" indication flashes. • Tune in monaural reception mode. The unit is in the frequency accurately...
Operating Instructions (primary manual)
Page 26
t Press the RESET button on the unit. *1 When an error occurs during automatic tuning (page 13). OFFSET There may be operated because of the disc causing the error appears in the MP3 playable CD unit. If these solutions do not help improve the situation, consult your nearest Sony dealer. t Insert a music CD in the display. Messages L.SEEK +/- " " or " " You have reached the beginning or...
t Press the RESET button on the unit. *1 When an error occurs during automatic tuning (page 13). OFFSET There may be operated because of the disc causing the error appears in the MP3 playable CD unit. If these solutions do not help improve the situation, consult your nearest Sony dealer. t Insert a music CD in the display. Messages L.SEEK +/- " " or " " You have reached the beginning or...


