Operating Instructions
Page 1
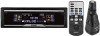
... regarding this product. For installation and connections, see the supplied installation/connections manual. Refer to these numbers in the space provided below. CDX-CA860X CDX-CA850X © 2001 Sony Corporation 3-229-198-11 (1) FM/AM Compact Disc Player Operating Instructions US Mode d'emploi FR Manual de instrucciones ES Owner's Record The model and serial numbers are located on the bottom...
... regarding this product. For installation and connections, see the supplied installation/connections manual. Refer to these numbers in the space provided below. CDX-CA860X CDX-CA850X © 2001 Sony Corporation 3-229-198-11 (1) FM/AM Compact Disc Player Operating Instructions US Mode d'emploi FR Manual de instrucciones ES Owner's Record The model and serial numbers are located on the bottom...
Operating Instructions
Page 2
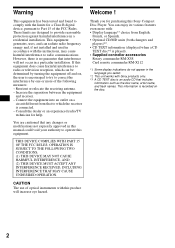
.... - You can enjoy its various features even more of the following measures: - This information is encouraged to try to operate this Sony Compact Disc Player. Increase the separation between the equipment and receiver. - THIS DEVICE COMPLIES WITH PART 15 OF THE FCC RULES. Welcome ! If this...antenna. - CAUTION The use of the FCC Rules. These limits are cautioned that any changes or modifications not expressly approved in this manual could void your authority to correct the interference by turning the equipment off and on, the user is recorded on a circuit different from...
.... - You can enjoy its various features even more of the following measures: - This information is encouraged to try to operate this Sony Compact Disc Player. Increase the separation between the equipment and receiver. - THIS DEVICE COMPLIES WITH PART 15 OF THE FCC RULES. Welcome ! If this...antenna. - CAUTION The use of the FCC Rules. These limits are cautioned that any changes or modifications not expressly approved in this manual could void your authority to correct the interference by turning the equipment off and on, the user is recorded on a circuit different from...
Operating Instructions
Page 6
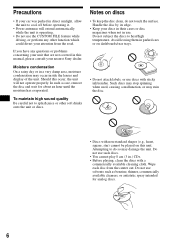
... before operating it. • Power antennas will not operate properly. Should this manual, please consult your discs in their cases or disc magazines when not in use discs with sticky ink/residue. Handle the disc by its edge. • Keep your nearest Sony dealer. Do not use solvents such as benzine, thinner, commercially available cleaners, or...
... before operating it. • Power antennas will not operate properly. Should this manual, please consult your discs in their cases or disc magazines when not in use discs with sticky ink/residue. Handle the disc by its edge. • Keep your nearest Sony dealer. Do not use solvents such as benzine, thinner, commercially available cleaners, or...
Operating Instructions
Page 9
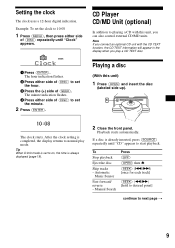
The minute indication flashes. 4 Press either side of (DISC) to start playback. If a disc is always displayed (page 19). 2 Close the front panel. Manual Search Press (OFF) (OPEN) then Z (SEEK) (./>) [once for each track] (SEEK) (m/M) [hold to desired point] continue to on, the time is ...The clock starts. Playback starts automatically. Note If you connect an optional CD unit with this unit) 1 Press (OPEN) and insert the disc (labeled side up). CD Player CD/MD Unit (optional) In addition to set the minute. 2 Press (ENTER). Example: To set to next page t 9 After the...
The minute indication flashes. 4 Press either side of (DISC) to start playback. If a disc is always displayed (page 19). 2 Close the front panel. Manual Search Press (OFF) (OPEN) then Z (SEEK) (./>) [once for each track] (SEEK) (m/M) [hold to desired point] continue to on, the time is ...The clock starts. Playback starts automatically. Note If you connect an optional CD unit with this unit) 1 Press (OPEN) and insert the disc (labeled side up). CD Player CD/MD Unit (optional) In addition to set the minute. 2 Press (ENTER). Example: To set to next page t 9 After the...
Operating Instructions
Page 14
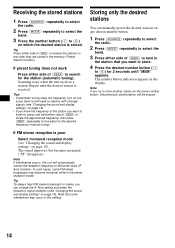
...Press (MODE) repeatedly to select the band. 3 Press either side of (DISC) to (6)) on the same number button, the previously stored station will be erased. 14 Tip To always hear FM stereo broadcasts in stereo, you can manually preset the desired stations on page 19). Receiving the stored stations 1 Press... Search function). Tip Press either side of the station you want to store. 4 Press the desired number button ((1) to the desired frequency (manual tuning). Note If you want to listen to, press and hold either side of (SEEK) to locate the approximate frequency, then press (SEEK...
...Press (MODE) repeatedly to select the band. 3 Press either side of (DISC) to (6)) on the same number button, the previously stored station will be erased. 14 Tip To always hear FM stereo broadcasts in stereo, you can manually preset the desired stations on page 19). Receiving the stored stations 1 Press... Search function). Tip Press either side of the station you want to store. 4 Press the desired number button ((1) to the desired frequency (manual tuning). Note If you want to listen to, press and hold either side of (SEEK) to locate the approximate frequency, then press (SEEK...
Operating Instructions
Page 17
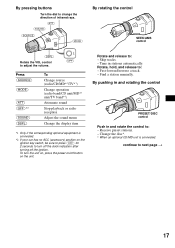
Tune in and rotate the control to next page t 17 Change the disc*. * When an optional CD/MD unit is connected. *2 If your car has no ACC (accessory) position on ... release to : - Rotate, hold, and release to : - continue to : - Skip tracks. - By pushing in and rotating the control PRESET/DISC control Push in stations automatically. By pressing buttons Turn the dial to change the direction of infrared rays. (ATT) (SOUND) (SOURCE) (MODE) By... the display item *1 Only if the corresponding optional equipment is connected. Receive preset stations. - Find a station manually.
Tune in and rotate the control to next page t 17 Change the disc*. * When an optional CD/MD unit is connected. *2 If your car has no ACC (accessory) position on ... release to : - Rotate, hold, and release to : - continue to : - Skip tracks. - By pushing in and rotating the control PRESET/DISC control Push in stations automatically. By pressing buttons Turn the dial to change the direction of infrared rays. (ATT) (SOUND) (SOURCE) (MODE) By... the display item *1 Only if the corresponding optional equipment is connected. Receive preset stations. - Find a station manually.
Operating Instructions
Page 28
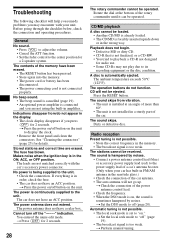
...• The broadcast signal is too weak. The leads are not matched correctly with your car has built-in FM/AM antenna in the wrong way. No power is continuously supplied to the unit. • Check the connection. ... (LIST) for details. t Set the DSO mode to off the "--------" indication. t Press the power on ." Dirty or defective disc. The stations cannot be ejected. Makes noise when the ignition key is too weak. CD will not go up. t Set the ...Automatic tuning is not possible. • The local seek mode is automatically ejected. t Perform manual tuning.
...• The broadcast signal is too weak. The leads are not matched correctly with your car has built-in FM/AM antenna in the wrong way. No power is continuously supplied to the unit. • Check the connection. ... (LIST) for details. t Set the DSO mode to off the "--------" indication. t Press the power on ." Dirty or defective disc. The stations cannot be ejected. Makes noise when the ignition key is too weak. CD will not go up. t Set the ...Automatic tuning is not possible. • The local seek mode is automatically ejected. t Perform manual tuning.


