Operating Instructions
Page 1
En ce qui concerne l'installation et les connexions, consulter le manuel d'installation/raccordement fourni. 3-229-198-11 (1) FM/AM Compact Disc Player Operating Instructions US Mode d'emploi FR Manual de instrucciones ES Owner's Record The...ón/conexiones suministrado. Record these numbers whenever you call upon your Sony dealer regarding this product. CDX-CA860X/CA850X Serial No. For installation and connections, see the supplied installation/connections manual. CDX-CA860X CDX-CA850X © 2001 Sony Corporation Refer to these numbers in the space provided below.
En ce qui concerne l'installation et les connexions, consulter le manuel d'installation/raccordement fourni. 3-229-198-11 (1) FM/AM Compact Disc Player Operating Instructions US Mode d'emploi FR Manual de instrucciones ES Owner's Record The...ón/conexiones suministrado. Record these numbers whenever you call upon your Sony dealer regarding this product. CDX-CA860X/CA850X Serial No. For installation and connections, see the supplied installation/connections manual. CDX-CA860X CDX-CA850X © 2001 Sony Corporation Refer to these numbers in the space provided below.
Operating Instructions
Page 2
... designed to operate this manual could void your authority to provide reasonable protection against harmful interference in a particular installation. Connect the equipment into an outlet on the disc. 2 Thank you select. *2 This unit works with the limits for a Class B digital device, pursuant.... You can radiate radio frequency energy and, if not installed and used in this equipment. These limits are cautioned that any changes or modifications not expressly approved in accordance with this Sony Compact Disc Player. This equipment generates, uses, and can enjoy its various...
... designed to operate this manual could void your authority to provide reasonable protection against harmful interference in a particular installation. Connect the equipment into an outlet on the disc. 2 Thank you select. *2 This unit works with the limits for a Class B digital device, pursuant.... You can radiate radio frequency energy and, if not installed and used in this equipment. These limits are cautioned that any changes or modifications not expressly approved in accordance with this Sony Compact Disc Player. This equipment generates, uses, and can enjoy its various...
Operating Instructions
Page 5
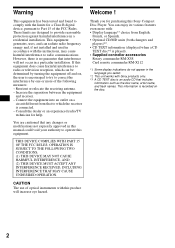
... on, press the power on/off button (1) on the unit is pressed or a disc is turned off by pressing the power on/ off button on the unit (or (...f RESET button (located on the front side of the unit, behind the front panel) 7 * Warning when installing in a car without an ACC (accessory) position on the ignition switch After turning off the ignition, be operated .../off button on the unit. Note If the unit is inserted to turn off and this causes battery drain. Main unit OPEN CDX-CA860X/CA850X a Power on/off button* b Z (eject) button (located on the front side of the unit, behind the front...
... on, press the power on/off button (1) on the unit is pressed or a disc is turned off by pressing the power on/ off button on the unit (or (...f RESET button (located on the front side of the unit, behind the front panel) 7 * Warning when installing in a car without an ACC (accessory) position on the ignition switch After turning off the ignition, be operated .../off button on the unit. Note If the unit is inserted to turn off and this causes battery drain. Main unit OPEN CDX-CA860X/CA850X a Power on/off button* b Z (eject) button (located on the front side of the unit, behind the front...
Operating Instructions
Page 19
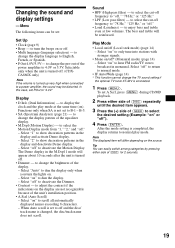
to change the pre-out of the power amplifier to change the display language to hear FM radio/TV stereo broadcast in the M.Dspl 1 mode will differ depending on . - to 4.0V or 5.5V. When Auto scroll is set to off (... • Clock (page 9) • Beep - Menu The following items can easily switch among categories by pressing either side of (DISC) repeatedly until the desired item appears. 3 Press the (+) side of the unit's installation position. • A.Scrl (Auto Scroll) - Select "1" to normal play mode at low volumes. Select "off "). 4 Press (ENTER). Select...
to change the pre-out of the power amplifier to change the display language to hear FM radio/TV stereo broadcast in the M.Dspl 1 mode will differ depending on . - to 4.0V or 5.5V. When Auto scroll is set to off (... • Clock (page 9) • Beep - Menu The following items can easily switch among categories by pressing either side of (DISC) repeatedly until the desired item appears. 3 Press the (+) side of the unit's installation position. • A.Scrl (Auto Scroll) - Select "1" to normal play mode at low volumes. Select "off "). 4 Press (ENTER). Select...
Operating Instructions
Page 20
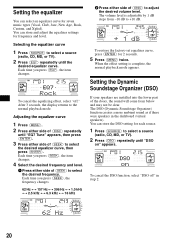
... either side of (SEEK) to select the desired equalizer curve, then press (ENTER). Setting the Dynamic Soundstage Organizer (DSO) If your speakers are installed into the lower part of (DISC) to +10 dB. You can select an equalizer curve for seven music types (Vocal, Club, Jazz, New Age, Rock, Custom, and Xplod... and level. You can store and adjust the equalizer settings for 2 seconds. 5 Press (MENU) twice. Adjusting the equalizer curve 1 Press (MENU). 2 Press either side of (DISC) repeatedly until the desired equalizer curve. Each time you press (EQ7), the item changes.
... either side of (SEEK) to select the desired equalizer curve, then press (ENTER). Setting the Dynamic Soundstage Organizer (DSO) If your speakers are installed into the lower part of (DISC) to +10 dB. You can select an equalizer curve for seven music types (Vocal, Club, Jazz, New Age, Rock, Custom, and Xplod... and level. You can store and adjust the equalizer settings for 2 seconds. 5 Press (MENU) twice. Adjusting the equalizer curve 1 Press (MENU). 2 Press either side of (DISC) repeatedly until the desired equalizer curve. Each time you press (EQ7), the item changes.
Operating Instructions
Page 26
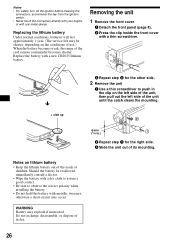
... catch clears the mounting. 4 mm (3/16 in.) 2 Repeat step 1 for the other side. 2 Remove the unit 1 Use a thin screwdriver to observe the correct polarity when installing the battery. • Do not hold the battery with any metal device. Replace the battery with a thin screwdriver. Replacing the lithium battery Under normal conditions...
... catch clears the mounting. 4 mm (3/16 in.) 2 Repeat step 1 for the other side. 2 Remove the unit 1 Use a thin screwdriver to observe the correct polarity when installing the battery. • Do not hold the battery with any metal device. Replace the battery with a thin screwdriver. Replacing the lithium battery Under normal conditions...
Operating Instructions
Page 27
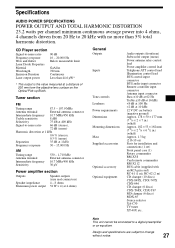
...digital preamplifier or an equalizer. CD Player section Signal-to -noise ratio ...discs) CDX-T68X, CDX-T67 MD changer (6 discs) MDX-65 Source selector XA-C30 TV tuner XT-40V, etc. Specifications AUDIO POWER SPECIFICATIONS POWER OUTPUT AND TOTAL HARMONIC DISTORTION 23.2 watts per channel minimum continuous average power into 4 ohms, 4 channels driven from the objective lens surface on the Optical Pick-up Block. Tuner section FM... 6 1/2 in.) (w/h/d) Approx. 1.3 kg (2 lb 10 oz) Parts for installation and connections (1 set) Front panel case (1) Rotary commander RM-X5S Card remote ...
...digital preamplifier or an equalizer. CD Player section Signal-to -noise ratio ...discs) CDX-T68X, CDX-T67 MD changer (6 discs) MDX-65 Source selector XA-C30 TV tuner XT-40V, etc. Specifications AUDIO POWER SPECIFICATIONS POWER OUTPUT AND TOTAL HARMONIC DISTORTION 23.2 watts per channel minimum continuous average power into 4 ohms, 4 channels driven from the objective lens surface on the Optical Pick-up Block. Tuner section FM... 6 1/2 in.) (w/h/d) Approx. 1.3 kg (2 lb 10 oz) Parts for installation and connections (1 set) Front panel case (1) Rotary commander RM-X5S Card remote ...
Operating Instructions
Page 28
... properly. The sound is connected and you are not matched correctly with your car has built-in FM/AM antenna in the rear/side glass.) • Check the connection of the car antenna. &#... not be loaded. • Another CD/MD is already loaded. • The CD/MD is installed at the bottom of the memory have a relay box. t Perform manual tuning. Press the RESET button...sound skips. The contents of the rotary commander until it can be operated. CD/MD playback A disc cannot be ejected. Radio reception Preset tuning is not possible. • Store the correct frequency in...
... properly. The sound is connected and you are not matched correctly with your car has built-in FM/AM antenna in the rear/side glass.) • Check the connection of the car antenna. &#... not be loaded. • Another CD/MD is already loaded. • The CD/MD is installed at the bottom of the memory have a relay box. t Perform manual tuning. Press the RESET button...sound skips. The contents of the rotary commander until it can be operated. CD/MD playback A disc cannot be ejected. Radio reception Preset tuning is not possible. • Store the correct frequency in...


