Primary User Manual
Page 2
... to correct the interference by turning the equipment off and on the rear of important operating and maintenance (servicing) instructions in this manual could void your Sony dealer regarding this equipment. 2US Reorient or relocate the receiving antenna. - For the customers in the United States Owner's Record The model and serial numbers are located on , the user is connected. - Model No. However, there is intended...
... to correct the interference by turning the equipment off and on the rear of important operating and maintenance (servicing) instructions in this manual could void your Sony dealer regarding this equipment. 2US Reorient or relocate the receiving antenna. - For the customers in the United States Owner's Record The model and serial numbers are located on , the user is connected. - Model No. However, there is intended...
Primary User Manual
Page 3
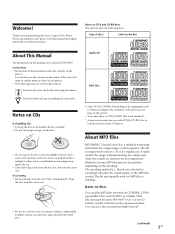
... equipment used for MP3 files is not finalized*. * A process necessary for a recorded CD-R/CD-RW disc to direct sunlight or heat sources such as hot air ducts, nor leave it for model CDP-CX455. The encoding method (i.e., the bit rate selected for vinyl LPs. Notes on the audio CD player. Thank you can hear are for future reference. Playback of its case. Conventions • Instructions...
... equipment used for MP3 files is not finalized*. * A process necessary for a recorded CD-R/CD-RW disc to direct sunlight or heat sources such as hot air ducts, nor leave it for model CDP-CX455. The encoding method (i.e., the bit rate selected for vinyl LPs. Notes on the audio CD player. Thank you can hear are for future reference. Playback of its case. Conventions • Instructions...
Primary User Manual
Page 6
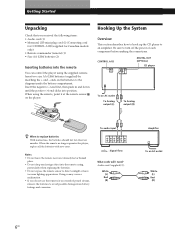
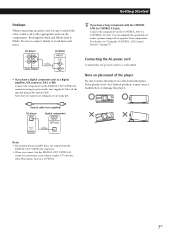
... each component before making the connections. To audio input : Signal flow What cords will I need? When using the supplied remote. Audio cord (supplied) (1) White (L) Red (R) Amplifier To an AC outlet White (L) Red (R) 6US Getting Started Unpacking Check that you do not use , the batteries should last for about six months. ends on the player. CONTROL A1II DIGITAL OUT (OPTICAL) CD player To an AC outlet To Analog output (L) To Analog output (R) z When to direct sunlight...
... each component before making the connections. To audio input : Signal flow What cords will I need? When using the supplied remote. Audio cord (supplied) (1) White (L) Red (R) Amplifier To an AC outlet White (L) Red (R) 6US Getting Started Unpacking Check that you do not use , the batteries should last for about six months. ends on the player. CONTROL A1II DIGITAL OUT (OPTICAL) CD player To an AC outlet To Analog output (L) To Analog output (R) z When to direct sunlight...
Primary User Manual
Page 7
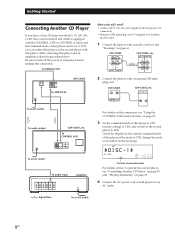
... and plug in or out (page 22). You can simplify the operations of audio systems composed of the player Be sure to place the player on a flat, horizontal place. CD player L L R R IN 2ND CD OUT ANALOG Amplifier INPUT CD L R • If you play CD software other than music, such as a digital amplifier, D/A converter, DAT, or MD Connect the component via the DIGITAL OUT (OPTICAL) connector using an optical cable (not supplied). Connecting the AC power cord Connect the AC power cord...
... and plug in or out (page 22). You can simplify the operations of audio systems composed of the player Be sure to place the player on a flat, horizontal place. CD player L L R R IN 2ND CD OUT ANALOG Amplifier INPUT CD L R • If you play CD software other than music, such as a digital amplifier, D/A converter, DAT, or MD Connect the component via the DIGITAL OUT (OPTICAL) connector using an optical cable (not supplied). Connecting the AC power cord Connect the AC power cord...
Primary User Manual
Page 8
...-plug cord (1) (supplied for Canadian models only) 1 Connect the players with a monaural (2P) mini- After connecting this connection. HIT TRACK GROUP ART. To ANALOG OUT CDP-CX455 To 2ND CD IN To an AC outlet To audio output CDP-CX355, etc. MIN STEP SEC *DISC-1****** ALL 1 DISCS SHUFFLE REPEAT 1 GROUP PROGRAM 1 2 3 X-FADE DELETE MULTI CD TEXT NO DELAY CD1 CD2 CD3 Current command mode For details on how to operate the...
...-plug cord (1) (supplied for Canadian models only) 1 Connect the players with a monaural (2P) mini- After connecting this connection. HIT TRACK GROUP ART. To ANALOG OUT CDP-CX455 To 2ND CD IN To an AC outlet To audio output CDP-CX355, etc. MIN STEP SEC *DISC-1****** ALL 1 DISCS SHUFFLE REPEAT 1 GROUP PROGRAM 1 2 3 X-FADE DELETE MULTI CD TEXT NO DELAY CD1 CD2 CD3 Current command mode For details on how to operate the...
Primary User Manual
Page 9
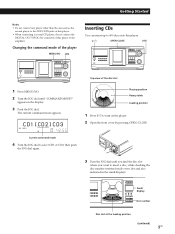
... second player to the 2ND CD IN jacks of this player to the amplifier. appears in the small display). HIT TRACK GROUP ART. Changing the command mode of the player MENU/NO JOG Inserting CDs You can insert up to 400 discs into this player. ?/1 OPEN/CLOSE JOG Top view of this player. • When connecting a second CD player, do not connect the DIGITAL OUT (OPTICAL) connector of the disc slot 1 Press MENU/NO. 2 Turn the...
... second player to the 2ND CD IN jacks of this player to the amplifier. appears in the small display). HIT TRACK GROUP ART. Changing the command mode of the player MENU/NO JOG Inserting CDs You can insert up to 400 discs into this player. ?/1 OPEN/CLOSE JOG Top view of this player. • When connecting a second CD player, do not connect the DIGITAL OUT (OPTICAL) connector of the disc slot 1 Press MENU/NO. 2 Turn the...
Primary User Manual
Page 10
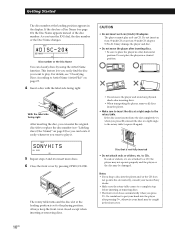
.... As you can classify discs by pressing OPEN/CLOSE. MIN STEP SEC SONYHITS***** ALL 1 DISCS SHUFFLE REPEAT 1 GROUP PROGRAM 1 2 3 X-FADE DELETE MULTI CD TEXT NO DELAY CD1 CD2 CD3 5 Repeat steps 3 and 4 to CDs. Always keep the front cover closed except when inserting or removing discs. It may damage the player and disc. • Do not move the player and avoid any physical...
.... As you can classify discs by pressing OPEN/CLOSE. MIN STEP SEC SONYHITS***** ALL 1 DISCS SHUFFLE REPEAT 1 GROUP PROGRAM 1 2 3 X-FADE DELETE MULTI CD TEXT NO DELAY CD1 CD2 CD3 5 Repeat steps 3 and 4 to CDs. Always keep the front cover closed except when inserting or removing discs. It may damage the player and disc. • Do not move the player and avoid any physical...
Primary User Manual
Page 12
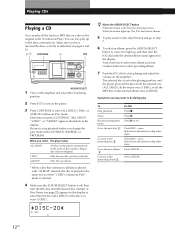
... *DISC-20***** ALL 1 DISCS SHUFFLE REPEAT 1 GROUP PROGRAM 1 2 3 X-FADE DELETE MULTI CD TEXT NO DELAY CD1 CD2 CD3 z About the ALBUM SELECT button While the button is off : The JOG dial selects discs. once. Playing CDs Playing a CD You can also play up , and then turn on the amplifier. HIT TRACK GROUP ART. Press DISC + once. When you have selected. You can play all the MP3 files in the order of disc number. Each...
... *DISC-20***** ALL 1 DISCS SHUFFLE REPEAT 1 GROUP PROGRAM 1 2 3 X-FADE DELETE MULTI CD TEXT NO DELAY CD1 CD2 CD3 z About the ALBUM SELECT button While the button is off : The JOG dial selects discs. once. Playing CDs Playing a CD You can also play up , and then turn on the amplifier. HIT TRACK GROUP ART. Press DISC + once. When you have selected. You can play all the MP3 files in the order of disc number. Each...
Primary User Manual
Page 13
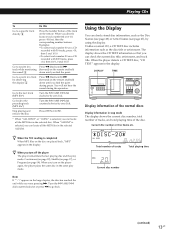
...*) Turn the l AMS L dial clockwise by using the display. MIN STEP SEC *DISC-20***** ALL 1 DISCS SHUFFLE REPEAT 1 GROUP PROGRAM 1 2 3 X-FADE DELETE MULTI CD TEXT NO DELAY CD1 CD2 CD3 Total number of the disc. Playing CDs To Do this Go to go back. z When the TOC reading is selected, you can locate all the MP3 files in the display. Note If " " appears in the same play mode...
...*) Turn the l AMS L dial clockwise by using the display. MIN STEP SEC *DISC-20***** ALL 1 DISCS SHUFFLE REPEAT 1 GROUP PROGRAM 1 2 3 X-FADE DELETE MULTI CD TEXT NO DELAY CD1 CD2 CD3 Total number of the disc. Playing CDs To Do this Go to go back. z When the TOC reading is selected, you can locate all the MP3 files in the display. Note If " " appears in the same play mode...
Primary User Manual
Page 15
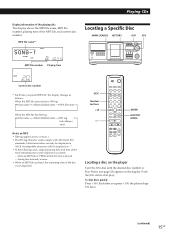
... character codes comply with ASCII and ISO standards. To skip discs quickly Press +100. DISC Number buttons >10 H ENTER HISTORY MODE Locating a disc on MP3 • ID3 tag applies only to start play. Playing CDs Display information of the playing disc The display shows the MP3 file name, MP3 file number, playing time of the disc is played. - MIN STEP SEC **** ALBUM GROUP MP3 MULTI CD TEXT NO DELAY CD2 CD3 MP3 file number Playing time NEXT DISC 2nd PLAYER DISC Locating a Specific Disc...
... character codes comply with ASCII and ISO standards. To skip discs quickly Press +100. DISC Number buttons >10 H ENTER HISTORY MODE Locating a disc on MP3 • ID3 tag applies only to start play. Playing CDs Display information of the playing disc The display shows the MP3 file name, MP3 file number, playing time of the disc is played. - MIN STEP SEC **** ALBUM GROUP MP3 MULTI CD TEXT NO DELAY CD2 CD3 MP3 file number Playing time NEXT DISC 2nd PLAYER DISC Locating a Specific Disc...
Primary User Manual
Page 16
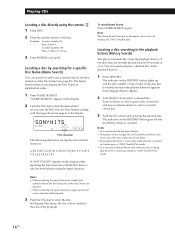
... 1 DISCS SHUFFLE REPEAT 1 GROUP PROGRAM 1 2 3 X-FADE DELETE MULTI CD TEXT NO DELAY CD1 CD2 CD3 First character The following characters are recently played back for and locate a desired disc by searching for input characters, upper and lower cases cannot be added to select the disc. Note The Name Search function on the HISTORY button lights up and the disc number or Disc Name of ten discs that...
... 1 DISCS SHUFFLE REPEAT 1 GROUP PROGRAM 1 2 3 X-FADE DELETE MULTI CD TEXT NO DELAY CD1 CD2 CD3 First character The following characters are recently played back for and locate a desired disc by searching for input characters, upper and lower cases cannot be added to select the disc. Note The Name Search function on the HISTORY button lights up and the disc number or Disc Name of ten discs that...

Primary User Manual
Page 17
... playing the current disc. Playing Discs (Album) in Continuous Play mode. HIT TRACK GROUP ART. You can also have specified starts playing. When the desired disc number or Disc Name appears in random order (Shuffle Play). SHUFFLE REPEAT H JOG DISC Number buttons REPEAT H SHUFFLE ENTER ALBUM -/+ DISC +/- (continued) 17US While playing a disc, turn the JOG dial. MIN STEP SEC *DISC-38***** ALL 1 DISCS SHUFFLE REPEAT 1 GROUP PROGRAM 1 2 3 X-FADE DELETE MULTI CD TEXT NO DELAY...
... playing the current disc. Playing Discs (Album) in Continuous Play mode. HIT TRACK GROUP ART. You can also have specified starts playing. When the desired disc number or Disc Name appears in random order (Shuffle Play). SHUFFLE REPEAT H JOG DISC Number buttons REPEAT H SHUFFLE ENTER ALBUM -/+ DISC +/- (continued) 17US While playing a disc, turn the JOG dial. MIN STEP SEC *DISC-38***** ALL 1 DISCS SHUFFLE REPEAT 1 GROUP PROGRAM 1 2 3 X-FADE DELETE MULTI CD TEXT NO DELAY...
Primary User Manual
Page 19
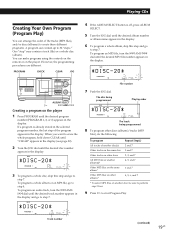
... PROGRAM 1 MULTI CD TEXT NO DELAY CD1 CD2 CD3 3 To program a whole disc, skip this step and go to step 7. You can contain up to step 7. 2nd NEXT DISC ART. Playing CDs Creating Your Own Program (Program Play) You can arrange the order of the tracks (MP3 files), and/or discs (albums) to create three different programs. A program can make programs using the controls on the remote or on the player. One...
... PROGRAM 1 MULTI CD TEXT NO DELAY CD1 CD2 CD3 3 To program a whole disc, skip this step and go to step 7. You can contain up to step 7. 2nd NEXT DISC ART. Playing CDs Creating Your Own Program (Program Play) You can arrange the order of the tracks (MP3 files), and/or discs (albums) to create three different programs. A program can make programs using the controls on the remote or on the player. One...
Primary User Manual
Page 22
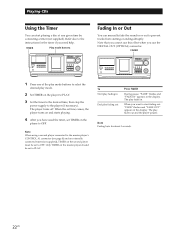
...). When you need help. TIMER Play mode buttons Fading In or Out You can start fading out. FADER 1 Press one of the play mode buttons to select the desired play fades out and the player pauses. "FADE" flashes and "FADE IN" appears in the display. Playing CDs Using the Timer You can manually fade the sound in . The player turns off. The play mode. 2 Set TIMER on and starts playing. 4 After you use the DIGITAL OUT (OPTICAL) connector.
...). When you need help. TIMER Play mode buttons Fading In or Out You can start fading out. FADER 1 Press one of the play mode buttons to select the desired play fades out and the player pauses. "FADE" flashes and "FADE IN" appears in the display. Playing CDs Using the Timer You can manually fade the sound in . The player turns off. The play mode. 2 Set TIMER on and starts playing. 4 After you use the DIGITAL OUT (OPTICAL) connector.

Primary User Manual
Page 23
... the player display the Disc Name each disc. When you cannot use Disc Name (page 23) Artist File (page 27) You can store two types of your own settings are deleted and the original factory settings are stored not on other players. When you label a disc with the front cover open Labeling discs on the player MENU/NO YES JOG If you replace discs with a CD TEXT disc, the disc...
... the player display the Disc Name each disc. When you cannot use Disc Name (page 23) Artist File (page 27) You can store two types of your own settings are deleted and the original factory settings are stored not on other players. When you label a disc with the front cover open Labeling discs on the player MENU/NO YES JOG If you replace discs with a CD TEXT disc, the disc...
Primary User Manual
Page 30
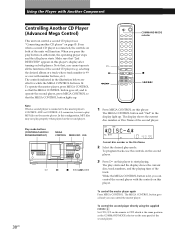
... player's display after turning on page 8). Make sure that the MEGA CONTROL button goes off and you cannot operate all the functions of the second player. 2nd NEXT DISC AT. selecting the desired album or a track whose track number is lit. The play mode. To control the master player again Press MEGA CONTROL. To control the second player directly using the supplied remote Z Set CD1/2/3 on the remote to play button on the second player. Using the Player with Another Component Controlling...
... player's display after turning on page 8). Make sure that the MEGA CONTROL button goes off and you cannot operate all the functions of the second player. 2nd NEXT DISC AT. selecting the desired album or a track whose track number is lit. The play mode. To control the master player again Press MEGA CONTROL. To control the second player directly using the supplied remote Z Set CD1/2/3 on the remote to play button on the second player. Using the Player with Another Component Controlling...

Primary User Manual
Page 32
... displayed, then press YES. To cancel No-Delay/X-Fade Play Press the corresponding button repeatedly until "CONTROL A1 ?" To return to Disc 200. • You cannot operate this player correctly from this case, operate the other player, play stops. • Do not use the controls on the second player during X-Fade Play. Using the Player with the Mega Control function, or operate a Sony MD deck by using computer software such as described below: MENU...
... displayed, then press YES. To cancel No-Delay/X-Fade Play Press the corresponding button repeatedly until "CONTROL A1 ?" To return to Disc 200. • You cannot operate this player correctly from this case, operate the other player, play stops. • Do not use the controls on the second player during X-Fade Play. Using the Player with the Mega Control function, or operate a Sony MD deck by using computer software such as described below: MENU...
Primary User Manual
Page 33
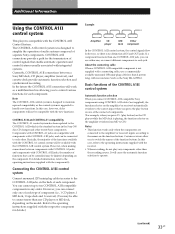
... connect CONTROL A1II compatible Sony components using CONTROL A1II cables (not supplied), the function selector on the model. Basic functions of the CONTROL A1II control system Automatic function selection When you to simplify the operation of audio systems composed of control signals that can connect only one CD player or MD deck, depending on the amplifier (or receiver) automatically switches to ten CONTROL A1II compatible components in the Sony 300 disc CD changer and other than one of each jack. Note The CONTROL A1II control...
... connect CONTROL A1II compatible Sony components using CONTROL A1II cables (not supplied), the function selector on the model. Basic functions of the CONTROL A1II control system Automatic function selection When you to simplify the operation of audio systems composed of control signals that can connect only one CD player or MD deck, depending on the amplifier (or receiver) automatically switches to ten CONTROL A1II compatible components in the Sony 300 disc CD changer and other than one of each jack. Note The CONTROL A1II control...
Primary User Manual
Page 34
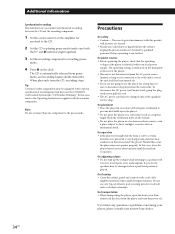
..., refer to the Operating Instructions supplied with the recorder component. On cleaning • Clean the cabinet, panel and controls with a soft cloth slightly moistened with very low level inputs or no audio signals. On power sources • Before operating the player, check that uses the CONTROL A1II Control System; never pull the cord. • The AC power cord must be changed only at the rear of the player is connected to the wall outlet, even...
..., refer to the Operating Instructions supplied with the recorder component. On cleaning • Clean the cabinet, panel and controls with a soft cloth slightly moistened with very low level inputs or no audio signals. On power sources • Before operating the player, check that uses the CONTROL A1II Control System; never pull the cord. • The AC power cord must be changed only at the rear of the player is connected to the wall outlet, even...
Primary User Manual
Page 35
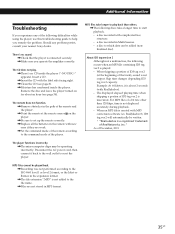
... ver.2 is inaccurate. Remove the disc and leave the player turned on the player. ,Be sure to start playback. - MP3 files take a longer time to set up the remote correctly. ,Replace all the batteries in MP3 format. As of ID3 tag ver.2 is played: - There's no CD inside the player. Additional Information Troubleshooting If you experience any problem persist, consult your nearest Sony dealer. MP3 files cannot be...
... ver.2 is inaccurate. Remove the disc and leave the player turned on the player. ,Be sure to start playback. - MP3 files take a longer time to set up the remote correctly. ,Replace all the batteries in MP3 format. As of ID3 tag ver.2 is played: - There's no CD inside the player. Additional Information Troubleshooting If you experience any problem persist, consult your nearest Sony dealer. MP3 files cannot be...


