
Limited Warranty (US Only)
Page 1
... IS LIMITED IN DURATION TO THE DURATION OF THIS WARRANTY. 4-557-172-02 General Stereo/Hifi Components/Tape Decks ® CD Players/Mini Disc Players/Audio Systems Hifi Audio LIMITED WARRANTY Sony Electronics Inc. ("Sony") warrants this Product is determined to be presented to obtain warranty service. In addition, if you may not apply to service...
... IS LIMITED IN DURATION TO THE DURATION OF THIS WARRANTY. 4-557-172-02 General Stereo/Hifi Components/Tape Decks ® CD Players/Mini Disc Players/Audio Systems Hifi Audio LIMITED WARRANTY Sony Electronics Inc. ("Sony") warrants this Product is determined to be presented to obtain warranty service. In addition, if you may not apply to service...
Operating Instructions
Page 3
......4 Hooking Up the System ...4 Connecting Another CD Player 6 Inserting CDs ...7 Playing CDs Playing a CD ...10 Using the Display ...11 Locating a Specific Disc ...12 Specifying the Next Disc to Play 14 Playing the Disc Just Inserted (Easy Play 14 Playing Discs in Various Modes (Repeat/Shuffle Play 15 ...Storing Specific Tracks (Delete Bank 24 Grouping Discs (Group File 24 Classifying Discs According to Artist Name (Artist File 26 Storing Your Favorite Tracks (Hit List 29 Using the Player with Another Component Controlling Another CD Player (Advanced Mega Control 31 Playing Alternately ...
......4 Hooking Up the System ...4 Connecting Another CD Player 6 Inserting CDs ...7 Playing CDs Playing a CD ...10 Using the Display ...11 Locating a Specific Disc ...12 Specifying the Next Disc to Play 14 Playing the Disc Just Inserted (Easy Play 14 Playing Discs in Various Modes (Repeat/Shuffle Play 15 ...Storing Specific Tracks (Delete Bank 24 Grouping Discs (Group File 24 Classifying Discs According to Artist Name (Artist File 26 Storing Your Favorite Tracks (Hit List 29 Using the Player with Another Component Controlling Another CD Player (Advanced Mega Control 31 Playing Alternately ...
Operating Instructions
Page 4
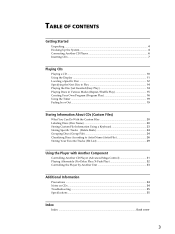
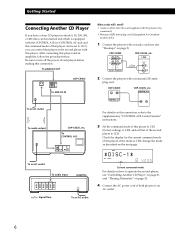
Getting Started Unpacking Check that you do not use , the batteries should last for about six months. CONTROL A1 DIGITAL OUT (OPTICAL) CD player To an AC outlet To line output (L) To line output (R) z When to replace batteries With normal use the remote for Canadian models only) &#...Insert two size AA (LR6) batteries (supplied) by matching the + and - Hooking Up the System Overview This section describes how to hook up the CD player to direct sunlight or leave too near an extremely hot or humid place. • Do not drop any foreign object into the remote casing, particularly...
Getting Started Unpacking Check that you do not use , the batteries should last for about six months. CONTROL A1 DIGITAL OUT (OPTICAL) CD player To an AC outlet To line output (L) To line output (R) z When to replace batteries With normal use the remote for Canadian models only) &#...Insert two size AA (LR6) batteries (supplied) by matching the + and - Hooking Up the System Overview This section describes how to hook up the CD player to direct sunlight or leave too near an extremely hot or humid place. • Do not drop any foreign object into the remote casing, particularly...
Operating Instructions
Page 5
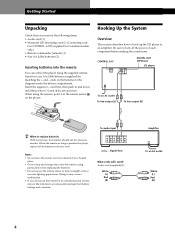
Be sure to connect firmly to a wall outlet. CD player L L R R IN 2ND CD OUT ANALOG Amplifier INPUT CD L R • If you cannot use fading in a flat, horizontal place. Note that you have a Sony component with the CONTROL A1 (or CONTROL A1) jack Connect the component via the CONTROL A1 (or ... an audio cord, be sure to match the color-coded cord to the appropriate jacks on placement of separate Sony components. Optical cable (not supplied) CD player OPTICAL OUT DIGITAL Digital component DIGITAL INPUT OPTICAL Note When you connect via the DIGITAL OUT (OPTICAL) connector using...
Be sure to connect firmly to a wall outlet. CD player L L R R IN 2ND CD OUT ANALOG Amplifier INPUT CD L R • If you cannot use fading in a flat, horizontal place. Note that you have a Sony component with the CONTROL A1 (or CONTROL A1) jack Connect the component via the CONTROL A1 (or ... an audio cord, be sure to match the color-coded cord to the appropriate jacks on placement of separate Sony components. Optical cable (not supplied) CD player OPTICAL OUT DIGITAL Digital component DIGITAL INPUT OPTICAL Note When you connect via the DIGITAL OUT (OPTICAL) connector using...
Operating Instructions
Page 6
...) mini- MIN STEP SEC *DISC-1****** ALL 1 DISCS SHUFFLE REPEAT 1 GROUP PROGRAM 1 2 3 X-FADE DELETE MULTI CD TEXT NO DELAY CD1 CD2 CD3 Current command mode For details on how to turn off the power of this player and an amplifier, follow the procedure below. CDP-CX400 L L R R IN 2ND CD OUT ANALOG CDP-CX235, etc. CDP-CX400 CDP-CX235, etc. HIT TRACK GROUP...
...) mini- MIN STEP SEC *DISC-1****** ALL 1 DISCS SHUFFLE REPEAT 1 GROUP PROGRAM 1 2 3 X-FADE DELETE MULTI CD TEXT NO DELAY CD1 CD2 CD3 Current command mode For details on how to turn off the power of this player and an amplifier, follow the procedure below. CDP-CX400 L L R R IN 2ND CD OUT ANALOG CDP-CX235, etc. CDP-CX400 CDP-CX235, etc. HIT TRACK GROUP...
Operating Instructions
Page 7
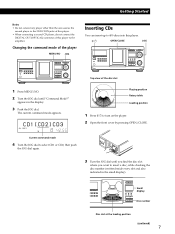
...also indicated in the display. 3 Push the JOG dial. Changing the command mode of the player MENU/NO JOG Inserting CDs You can insert up to 400 discs into this player. ?/1 OPEN/CLOSE JOG I / 1 I / 1 Disc number Disc slot at the loading position (continued) 7 appears in the small display). Small display I ...Getting Started Notes • Do not connect any player other than the one used as the second player to the 2ND CD IN jacks of this player. • When connecting a second CD player, do not connect the DIGITAL OUT (OPTICAL) connector of the disc slot 1 Press MENU/NO. 2 Turn the...
...also indicated in the display. 3 Push the JOG dial. Changing the command mode of the player MENU/NO JOG Inserting CDs You can insert up to 400 discs into this player. ?/1 OPEN/CLOSE JOG I / 1 I / 1 Disc number Disc slot at the loading position (continued) 7 appears in the small display). Small display I ...Getting Started Notes • Do not connect any player other than the one used as the second player to the 2ND CD IN jacks of this player. • When connecting a second CD player, do not connect the DIGITAL OUT (OPTICAL) connector of the disc slot 1 Press MENU/NO. 2 Turn the...
Operating Instructions
Page 8
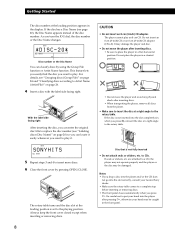
... 8 cm CD. If the disc has a Disc Name (see "Grouping discs (Group File)" on page 26. 4 Insert a disc with the label side facing right. For details, see page 20), the Disc Name appears instead of the disc number. It may be caught in a slanted position. • Do not move the player after pressing H, otherwise your nearest Sony dealer. •...
... 8 cm CD. If the disc has a Disc Name (see "Grouping discs (Group File)" on page 26. 4 Insert a disc with the label side facing right. For details, see page 20), the Disc Name appears instead of the disc number. It may be caught in a slanted position. • Do not move the player after pressing H, otherwise your nearest Sony dealer. •...

Operating Instructions
Page 9
When you can remove the disc easily. Getting Started 9 The disc in the selected slot moves up and you press A again, the disc returns to the loaded position. If the disc does not return to the loaded position, reinsert the disc. z To remove discs easily After following steps 1 to 3 of "Inserting CDs" on page 7, remove the discs. Removing CDs After following steps 1 to 3 of "Inserting CDs" on page 7, press A (DISC EJECT). Then close the front cover.
When you can remove the disc easily. Getting Started 9 The disc in the selected slot moves up and you press A again, the disc returns to the loaded position. If the disc does not return to the loaded position, reinsert the disc. z To remove discs easily After following steps 1 to 3 of "Inserting CDs" on page 7, remove the discs. Removing CDs After following steps 1 to 3 of "Inserting CDs" on page 7, press A (DISC EJECT). Then close the front cover.
Operating Instructions
Page 10
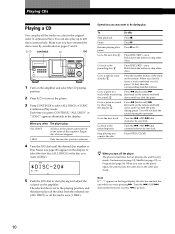
...to start playing and adjust the volume on the player. 3 Press CONTINUE to the playing position, and the player plays all the discs from the selected one click. MIN STEP SEC *DISC-20***** ALL 1 DISCS SHUFFLE REPEAT 1 GROUP PROGRAM 1 2 3 X-FADE DELETE MULTI CD TEXT NO DELAY CD1 CD2 CD3 5 Push ...the JOG dial to go back. 10 Hold down until you select The player plays ALL DISCS All discs in the player consecutively in the display. You...
...to start playing and adjust the volume on the player. 3 Press CONTINUE to the playing position, and the player plays all the discs from the selected one click. MIN STEP SEC *DISC-20***** ALL 1 DISCS SHUFFLE REPEAT 1 GROUP PROGRAM 1 2 3 X-FADE DELETE MULTI CD TEXT NO DELAY CD1 CD2 CD3 5 Push ...the JOG dial to go back. 10 Hold down until you select The player plays ALL DISCS All discs in the player consecutively in the display. You...
Operating Instructions
Page 11
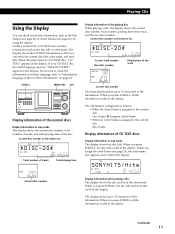
... Total number of tracks Total playing time NEXT DISC 2nd PLAYER DISC Current disc number Display information of the playing disc While playing a disc, the display shows the current disc number, track number, playing time of the information. MIN STEP SEC *DISC-20***** ALL 1 DISCS SHUFFLE REPEAT 1 GROUP PROGRAM 1 2 3 X-FADE DELETE MULTI CD TEXT NO DELAY CD1 CD2 CD3 Current...
... Total number of tracks Total playing time NEXT DISC 2nd PLAYER DISC Current disc number Display information of the playing disc While playing a disc, the display shows the current disc number, track number, playing time of the information. MIN STEP SEC *DISC-20***** ALL 1 DISCS SHUFFLE REPEAT 1 GROUP PROGRAM 1 2 3 X-FADE DELETE MULTI CD TEXT NO DELAY CD1 CD2 CD3 Current...
Operating Instructions
Page 12
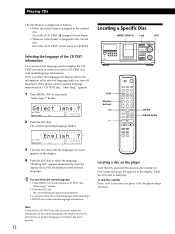
... JOG dial until the language you select a CD TEXT disc with multi-language information. flashes. 2 Push the JOG dial. Each time you turn off the player. "Select lang.?" ALL 1 DISCS SHUFFLE REPEAT 1 GROUP PROGRAM 1 2 3 X-FADE DELETE MULTI CD TEXT NO DELAY CD1 CD2 CD3 2 Push the...check the current language while selecting a CD TEXT disc without multi-language information. I / 1 DISC Number buttons >10 H ENTER NAME SCAN Locating a disc on the player Turn the JOG dial until you press +100, the player skips 100 discs. HIT TRACK GROUP ART. To skip discs quickly Press +100. Once you ...
... JOG dial until the language you select a CD TEXT disc with multi-language information. flashes. 2 Push the JOG dial. Each time you turn off the player. "Select lang.?" ALL 1 DISCS SHUFFLE REPEAT 1 GROUP PROGRAM 1 2 3 X-FADE DELETE MULTI CD TEXT NO DELAY CD1 CD2 CD3 2 Push the...check the current language while selecting a CD TEXT disc without multi-language information. I / 1 DISC Number buttons >10 H ENTER NAME SCAN Locating a disc on the player Turn the JOG dial until you press +100, the player skips 100 discs. HIT TRACK GROUP ART. To skip discs quickly Press +100. Once you ...
Operating Instructions
Page 13
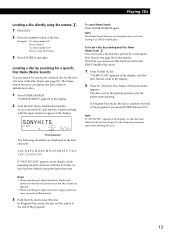
...CD TEXT NO DELAY CD1 CD2 CD3 First character The following characters are ignored. • When searching for input characters, blanks and symbols before the first character in the Disc Name are displayed as the first character. To cancel Name Search Press NAME SEARCH again. Note The Name Search function on the player... does not work during ALL DISCS shuffle play . The disc is added to the end of the program. Note If "NO ENTRY" appears in the display. 2 Turn the...
...CD TEXT NO DELAY CD1 CD2 CD3 First character The following characters are ignored. • When searching for input characters, blanks and symbols before the first character in the Disc Name are displayed as the first character. To cancel Name Search Press NAME SEARCH again. Note The Name Search function on the player... does not work during ALL DISCS shuffle play . The disc is added to the end of the program. Note If "NO ENTRY" appears in the display. 2 Turn the...
Operating Instructions
Page 14
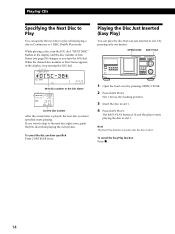
...ART. MIN STEP SEC *DISC-38***** ALL 1 DISCS SHUFFLE REPEAT 1 GROUP PROGRAM 1 2 3 X-FADE DELETE MULTI CD TEXT NO DELAY CD1 CD2 CD3 Next disc number or the Disc Name NEXT DISC 2nd PLAYER DISC Current disc number After the current disc is lit and the player starts playing the disc in the display, stop ...turning the JOG dial. 2nd NEXT DISC ART. Note The Easy Play ...
...ART. MIN STEP SEC *DISC-38***** ALL 1 DISCS SHUFFLE REPEAT 1 GROUP PROGRAM 1 2 3 X-FADE DELETE MULTI CD TEXT NO DELAY CD1 CD2 CD3 Next disc number or the Disc Name NEXT DISC 2nd PLAYER DISC Current disc number After the current disc is lit and the player starts playing the disc in the display, stop ...turning the JOG dial. 2nd NEXT DISC ART. Note The Easy Play ...
Operating Instructions
Page 15
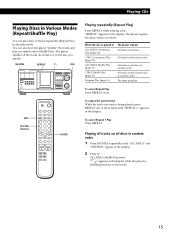
... Play starts. To cancel Repeat 1 Play Press REPEAT. Playing CDs Playing Discs in Various Modes (Repeat/Shuffle Play) You can also have the player "shuffle" the tracks and play in any play discs or tracks repeatedly (Repeat Play) in random order (Shuffle Play). "REPEAT" appears in the display. 2 Press H. Playing all tracks on all...
... Play starts. To cancel Repeat 1 Play Press REPEAT. Playing CDs Playing Discs in Various Modes (Repeat/Shuffle Play) You can also have the player "shuffle" the tracks and play in any play discs or tracks repeatedly (Repeat Play) in random order (Shuffle Play). "REPEAT" appears in the display. 2 Press H. Playing all tracks on all...
Operating Instructions
Page 16
... in the display while the player is already stored in the selected program number, the last step of the disc. 3 Press H. 1 DISC Shuffle Play starts. Notes • You cannot specify the next disc to specify the next disc. MIN STEP SEC *DISC-20***** ALL 1 DISCS SHUFFLE REPEAT 1 GROUP PROGRAM 1 2 3 X-FADE DELETE MULTI CD TEXT NO DELAY CD1 CD2...
... in the display while the player is already stored in the selected program number, the last step of the disc. 3 Press H. 1 DISC Shuffle Play starts. Notes • You cannot specify the next disc to specify the next disc. MIN STEP SEC *DISC-20***** ALL 1 DISCS SHUFFLE REPEAT 1 GROUP PROGRAM 1 2 3 X-FADE DELETE MULTI CD TEXT NO DELAY CD1 CD2...
Operating Instructions
Page 17
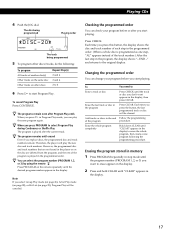
...to erase the whole program, then create a new program following : To program All tracks of another disc(s) Other tracks on the same disc Other tracks on the disc are not found in the player or on other discs Repeat Step(s) 2 and 4 3 and 4 2 to 4 6 Press H to start playing. Erase... Therefore, the player will play the same program again. Changing the programmed order You can play the new disc and track numbers. Erase the last track or disc in the display. Press CHECK. Each time you replace discs, the programmed disc and track numbers remain. Playing CDs 4 Push the ...
...to erase the whole program, then create a new program following : To program All tracks of another disc(s) Other tracks on the same disc Other tracks on the disc are not found in the player or on other discs Repeat Step(s) 2 and 4 3 and 4 2 to 4 6 Press H to start playing. Erase... Therefore, the player will play the same program again. Changing the programmed order You can play the new disc and track numbers. Erase the last track or disc in the display. Press CHECK. Each time you replace discs, the programmed disc and track numbers remain. Playing CDs 4 Push the ...

Operating Instructions
Page 18
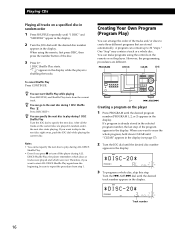
...NO DELAY CD1 CD2 CD3 5 First press >10 then press the number button of the disc. 2nd NEXT DISC ART. MIN STEP SEC **DISC-[**_]* ALL 1 DISCS SHUFFLE REPEAT 1 GROUP PROGRAM 1 2 3 X-FADE DELETE MULTI CD TEXT NO DELAY CD1 CD2 CD3 3 Press the number button of the track. When you...17. 18 MIN STEP SEC **DISC-[*20]* ALL 1 DISCS SHUFFLE REPEAT 1 GROUP PROGRAM 1 2 3 X-FADE DELETE MULTI CD TEXT NO DELAY CD1 CD2 CD3 4 To program a whole disc, press ENTER and go to step 6. 2nd NEXT DISC ART. Playing CDs Creating a program using the remote Z DISC >10 CHECK H PROGRAM Number ...
...NO DELAY CD1 CD2 CD3 5 First press >10 then press the number button of the disc. 2nd NEXT DISC ART. MIN STEP SEC **DISC-[**_]* ALL 1 DISCS SHUFFLE REPEAT 1 GROUP PROGRAM 1 2 3 X-FADE DELETE MULTI CD TEXT NO DELAY CD1 CD2 CD3 3 Press the number button of the track. When you...17. 18 MIN STEP SEC **DISC-[*20]* ALL 1 DISCS SHUFFLE REPEAT 1 GROUP PROGRAM 1 2 3 X-FADE DELETE MULTI CD TEXT NO DELAY CD1 CD2 CD3 4 To program a whole disc, press ENTER and go to step 6. 2nd NEXT DISC ART. Playing CDs Creating a program using the remote Z DISC >10 CHECK H PROGRAM Number ...
Operating Instructions
Page 19
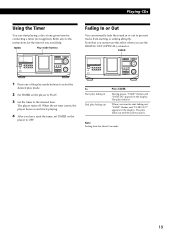
When the set TIMER on the player to the instructions for about 5 seconds. 19 "FADE" flashes and "FADE IN" appears in ... Fading In or Out You can start fading out. To Start play fading in End play fades out and the player pauses. Note Fading lasts for the timer if you use this effect when you need help. The play mode. ...you have used the timer, set time comes, the player turns on the player to PLAY. 3 Set the timer to start playing a disc at any given time by connecting a timer (not supplied). Playing CDs Using the Timer You can manually fade the sound in...
When the set TIMER on the player to the instructions for about 5 seconds. 19 "FADE" flashes and "FADE IN" appears in ... Fading In or Out You can start fading out. To Start play fading in End play fades out and the player pauses. Note Fading lasts for the timer if you use this effect when you need help. The play mode. ...you have used the timer, set time comes, the player turns on the player to PLAY. 3 Set the timer to start playing a disc at any given time by connecting a timer (not supplied). Playing CDs Using the Timer You can manually fade the sound in...
Operating Instructions
Page 20
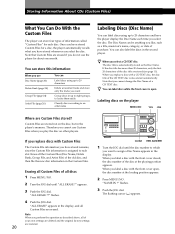
... you like, such as described above, all of the disc title are erased if you do not use the player for a disc, the player automatically recalls what you label a disc with a CD TEXT disc, the disc title of the disc at the loading position appears. 2 Press MENU/NO. Erasing all discs 1 Press MENU/NO. 2 Turn the JOG dial until the...
... you like, such as described above, all of the disc title are erased if you do not use the player for a disc, the player automatically recalls what you label a disc with a CD TEXT disc, the disc title of the disc at the loading position appears. 2 Press MENU/NO. Erasing all discs 1 Press MENU/NO. 2 Turn the JOG dial until the...

Operating Instructions
Page 21
...3 in "Labeling discs on the player" on page 20 to select the Disc Name you want to change. 2 Turn the . To erase characters Press CLEAR. AMS > dial to move the cursor to store the Disc Name. MIN STEP SEC S************ ALL 1 DISCS SHUFFLE REPEAT 1 GROUP PROGRAM 1 2 3 X-FADE DELETE MULTI CD TEXT NO DELAY CD1... the display. HIT TRACK GROUP ART. To add characters Push the JOG dial. Erasing the Disc Name 1 Follow steps 1 to 3 in "Labeling discs on the player" on page 20 to select the Disc Name you want to the selected character, then turn the JOG dial clockwise, the characters appear...
...3 in "Labeling discs on the player" on page 20 to select the Disc Name you want to change. 2 Turn the . To erase characters Press CLEAR. AMS > dial to move the cursor to store the Disc Name. MIN STEP SEC S************ ALL 1 DISCS SHUFFLE REPEAT 1 GROUP PROGRAM 1 2 3 X-FADE DELETE MULTI CD TEXT NO DELAY CD1... the display. HIT TRACK GROUP ART. To add characters Push the JOG dial. Erasing the Disc Name 1 Follow steps 1 to 3 in "Labeling discs on the player" on page 20 to select the Disc Name you want to the selected character, then turn the JOG dial clockwise, the characters appear...


