
Limited Warranty (US Only)
Page 1
... exclusion or limitation of a service problem, or for one (1) year. 4-557-172-02 General Stereo/Hifi Components/Tape Decks ® CD Players/Mini Disc Players/Audio Systems Hifi Audio LIMITED WARRANTY Sony Electronics Inc. ("Sony") warrants this Product is determined to be presented to obtain warranty service. After the warranty period, you must pay for all...
... exclusion or limitation of a service problem, or for one (1) year. 4-557-172-02 General Stereo/Hifi Components/Tape Decks ® CD Players/Mini Disc Players/Audio Systems Hifi Audio LIMITED WARRANTY Sony Electronics Inc. ("Sony") warrants this Product is determined to be presented to obtain warranty service. After the warranty period, you must pay for all...
Operating Instructions
Page 3
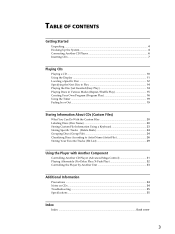
......4 Hooking Up the System ...4 Connecting Another CD Player 6 Inserting CDs ...7 Playing CDs Playing a CD ...10 Using the Display ...11 Locating a Specific Disc ...12 Specifying the Next Disc to Play 14 Playing the Disc Just Inserted (Easy Play 14 Playing Discs in Various Modes (Repeat/Shuffle Play 15 ...Storing Specific Tracks (Delete Bank 24 Grouping Discs (Group File 24 Classifying Discs According to Artist Name (Artist File 26 Storing Your Favorite Tracks (Hit List 29 Using the Player with Another Component Controlling Another CD Player (Advanced Mega Control 31 Playing Alternately ...
......4 Hooking Up the System ...4 Connecting Another CD Player 6 Inserting CDs ...7 Playing CDs Playing a CD ...10 Using the Display ...11 Locating a Specific Disc ...12 Specifying the Next Disc to Play 14 Playing the Disc Just Inserted (Easy Play 14 Playing Discs in Various Modes (Repeat/Shuffle Play 15 ...Storing Specific Tracks (Delete Bank 24 Grouping Discs (Group File 24 Classifying Discs According to Artist Name (Artist File 26 Storing Your Favorite Tracks (Hit List 29 Using the Player with Another Component Controlling Another CD Player (Advanced Mega Control 31 Playing Alternately ...
Operating Instructions
Page 4
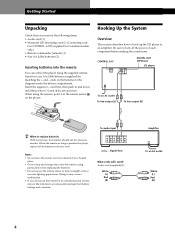
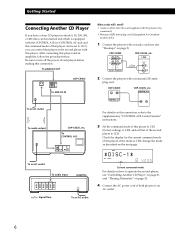
...connections. Be sure to turn off the power of time, remove the batteries to the diagram inside the battery compartment. CONTROL A1 DIGITAL OUT (OPTICAL) CD player To an AC outlet To line output (L) To line output (R) z When to replace batteries With normal use the remote for Canadian models only) •...position. To audio input : Signal flow What cords will I need? Hooking Up the System Overview This section describes how to hook up the CD player to direct sunlight or leave too near lighting apparatuses. Insert two size AA (LR6) batteries (supplied) by matching the + and -
...connections. Be sure to turn off the power of time, remove the batteries to the diagram inside the battery compartment. CONTROL A1 DIGITAL OUT (OPTICAL) CD player To an AC outlet To line output (L) To line output (R) z When to replace batteries With normal use the remote for Canadian models only) •...position. To audio input : Signal flow What cords will I need? Hooking Up the System Overview This section describes how to hook up the CD player to direct sunlight or leave too near lighting apparatuses. Insert two size AA (LR6) batteries (supplied) by matching the + and -
Operating Instructions
Page 5
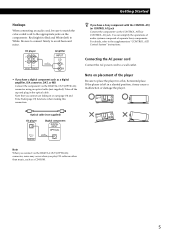
For details, refer to a wall outlet. CD player L L R R IN 2ND CD OUT ANALOG Amplifier INPUT CD L R • If you have a digital component such as a CD-ROM. 5 You can simplify the operations of audio systems composed of the player Be sure to place the player in or out (page 19) and Time ... in a flat, horizontal place. z If you have a Sony component with the CONTROL A1 (or CONTROL A1) jack Connect the component via the CONTROL A1 (or CONTROL A1) jack. Optical cable (not supplied) CD player OPTICAL OUT DIGITAL Digital component DIGITAL INPUT OPTICAL Note When you ...
For details, refer to a wall outlet. CD player L L R R IN 2ND CD OUT ANALOG Amplifier INPUT CD L R • If you have a digital component such as a CD-ROM. 5 You can simplify the operations of audio systems composed of the player Be sure to place the player in or out (page 19) and Time ... in a flat, horizontal place. z If you have a Sony component with the CONTROL A1 (or CONTROL A1) jack Connect the component via the CONTROL A1 (or CONTROL A1) jack. Optical cable (not supplied) CD player OPTICAL OUT DIGITAL Digital component DIGITAL INPUT OPTICAL Note When you ...
Operating Instructions
Page 6
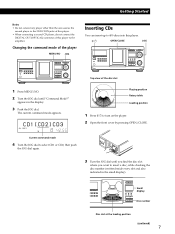
... the second player to CD 3, you have a Sony CD player in which 5, 50, 200, 300, or 400 discs can be inserted and which is equipped with the CONTROL A1 (or CONTROL A1) jack and the command mode of that player as described on the next page. 2nd NEXT DISC ART. CDP-CX400 CDP-CX235, etc. CDP-CX400 L L R R IN 2ND CD OUT ANALOG CDP-CX235, etc...
... the second player to CD 3, you have a Sony CD player in which 5, 50, 200, 300, or 400 discs can be inserted and which is equipped with the CONTROL A1 (or CONTROL A1) jack and the command mode of that player as described on the next page. 2nd NEXT DISC ART. CDP-CX400 CDP-CX235, etc. CDP-CX400 L L R R IN 2ND CD OUT ANALOG CDP-CX235, etc...
Operating Instructions
Page 7
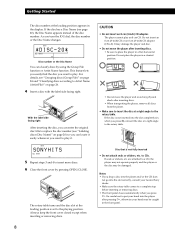
...MIN STEP SEC *CD1[CD2]CD3* ALL 1 DISCS SHUFFLE REPEAT 1 GROUP PROGRAM 1 2 3 X-FADE DELETE MULTI CD TEXT NO DELAY CD1 CD2 CD3 Current command mode 4 Turn the JOG dial to 400 discs into this player. ?/1 OPEN/CLOSE JOG I / 1 I / 1 Disc number Disc slot at the loading position (continued) 7 ...Changing the command mode of the player MENU/NO JOG Inserting CDs You can insert up to select CD1 or CD2, then...
...MIN STEP SEC *CD1[CD2]CD3* ALL 1 DISCS SHUFFLE REPEAT 1 GROUP PROGRAM 1 2 3 X-FADE DELETE MULTI CD TEXT NO DELAY CD1 CD2 CD3 Current command mode 4 Turn the JOG dial to 400 discs into this player. ?/1 OPEN/CLOSE JOG I / 1 I / 1 Disc number Disc slot at the loading position (continued) 7 ...Changing the command mode of the player MENU/NO JOG Inserting CDs You can insert up to select CD1 or CD2, then...
Operating Instructions
Page 8
... display. Always keep the front cover closed except when inserting or removing discs. 8 CAUTION • Do not insert an 8 cm (3-inch) CD adaptor. Do not place the player in a slanted position. • Do not move the player after pressing H, otherwise your nearest Sony dealer. • Make sure the rotary table comes to the rotary table...
... display. Always keep the front cover closed except when inserting or removing discs. 8 CAUTION • Do not insert an 8 cm (3-inch) CD adaptor. Do not place the player in a slanted position. • Do not move the player after pressing H, otherwise your nearest Sony dealer. • Make sure the rotary table comes to the rotary table...

Operating Instructions
Page 9
The disc in the selected slot moves up and you press A again, the disc returns to the loaded position. If the disc does not return to the loaded position, reinsert the disc. Getting Started 9 When you can remove the disc easily. z To remove discs easily After following steps 1 to 3 of "Inserting CDs" on page 7, remove the discs. Removing CDs After following steps 1 to 3 of "Inserting CDs" on page 7, press A (DISC EJECT). Then close the front cover.
The disc in the selected slot moves up and you press A again, the disc returns to the loaded position. If the disc does not return to the loaded position, reinsert the disc. Getting Started 9 When you can remove the disc easily. z To remove discs easily After following steps 1 to 3 of "Inserting CDs" on page 7, remove the discs. Removing CDs After following steps 1 to 3 of "Inserting CDs" on page 7, press A (DISC EJECT). Then close the front cover.
Operating Instructions
Page 10
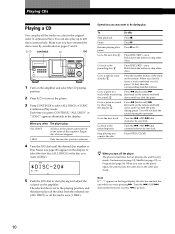
... DISCS" or "1 DISC" appears alternately in the same play mode. Empty disc slots are skipped. 1 DISC Only the one (ALL DISCS) or all the discs from the selected one disc you have inserted the discs correctly as indicated on pages 7 and 8. ?/1 CONTINUE H JOG I / 1 1 Turn on the amplifier and select the CD playing position. 2 Press ?/1 to turn off the player The player...
... DISCS" or "1 DISC" appears alternately in the same play mode. Empty disc slots are skipped. 1 DISC Only the one (ALL DISCS) or all the discs from the selected one disc you have inserted the discs correctly as indicated on pages 7 and 8. ?/1 CONTINUE H JOG I / 1 1 Turn on the amplifier and select the CD playing position. 2 Press ?/1 to turn off the player The player...
Operating Instructions
Page 11
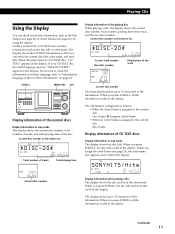
... 12. When you want to "Selecting the language of the information. HIT TRACK GROUP ART. Playing CDs Using the Display You can check the current disc title, artist name, and track title. When the player detects a CD TEXT disc, "CD TEXT" appears in another language, refer to check the information in the display. MIN STEP SEC...
... 12. When you want to "Selecting the language of the information. HIT TRACK GROUP ART. Playing CDs Using the Display You can check the current disc title, artist name, and track title. When the player detects a CD TEXT disc, "CD TEXT" appears in another language, refer to check the information in the display. MIN STEP SEC...
Operating Instructions
Page 12
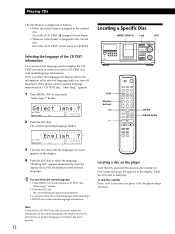
...JOG dial. z You can also check the current language while selecting a CD TEXT disc without multi-language information. The current language appears momentarily. I / 1 DISC Number buttons >10 H ENTER NAME SCAN Locating a disc on the player Turn the JOG dial until the language you want appears in the display.... the display shows the information in the display. Once you press +100, the player skips 100 discs. If the player cannot read the language memorized in stop mode. appears. 1 Press MENU/NO in a CD TEXT disc, "other lang." "Select lang.?" HIT TRACK GROUP ART. MIN STEP SEC ***...
...JOG dial. z You can also check the current language while selecting a CD TEXT disc without multi-language information. The current language appears momentarily. I / 1 DISC Number buttons >10 H ENTER NAME SCAN Locating a disc on the player Turn the JOG dial until the language you want appears in the display.... the display shows the information in the display. Once you press +100, the player skips 100 discs. If the player cannot read the language memorized in stop mode. appears. 1 Press MENU/NO in a CD TEXT disc, "other lang." "Select lang.?" HIT TRACK GROUP ART. MIN STEP SEC ***...
Operating Instructions
Page 13
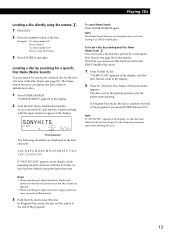
...Turn the JOG dial to the playing position, and the player starts playing. A B C D E F G H I J K L M N O P Q R S T U V W X Y Z 0 1 2 3 4 5 6 7 8 9 If "NOT FOUND" appears in the display. To locate a disc by scanning each Disc Name (Name Scan) Z You can search for input ...DISC ART. MIN STEP SEC SONYHITS***** ALL 1 DISCS SHUFFLE REPEAT 1 GROUP PROGRAM 1 2 3 X-FADE DELETE MULTI CD TEXT NO DELAY CD1 CD2 CD3 First character The following characters are ignored. • When searching for and locate a desired disc by scanning the Disc Names (see page 20). Playing CDs Locating a disc...
...Turn the JOG dial to the playing position, and the player starts playing. A B C D E F G H I J K L M N O P Q R S T U V W X Y Z 0 1 2 3 4 5 6 7 8 9 If "NOT FOUND" appears in the display. To locate a disc by scanning each Disc Name (Name Scan) Z You can search for input ...DISC ART. MIN STEP SEC SONYHITS***** ALL 1 DISCS SHUFFLE REPEAT 1 GROUP PROGRAM 1 2 3 X-FADE DELETE MULTI CD TEXT NO DELAY CD1 CD2 CD3 First character The following characters are ignored. • When searching for and locate a desired disc by scanning the Disc Names (see page 20). Playing CDs Locating a disc...
Operating Instructions
Page 14
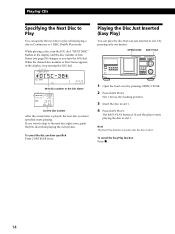
... in slot 1. 4 Press EASY PLAY. MIN STEP SEC *DISC-38***** ALL 1 DISCS SHUFFLE REPEAT 1 GROUP PROGRAM 1 2 3 X-FADE DELETE MULTI CD TEXT NO DELAY CD1 CD2 CD3 Next disc number or the Disc Name NEXT DISC 2nd PLAYER DISC Current disc number After the current disc is lit and the player starts playing the disc in slot 1 by pressing OPEN/CLOSE. 2 Press EASY...
... in slot 1. 4 Press EASY PLAY. MIN STEP SEC *DISC-38***** ALL 1 DISCS SHUFFLE REPEAT 1 GROUP PROGRAM 1 2 3 X-FADE DELETE MULTI CD TEXT NO DELAY CD1 CD2 CD3 Next disc number or the Disc Name NEXT DISC 2nd PLAYER DISC Current disc number After the current disc is lit and the player starts playing the disc in slot 1 by pressing OPEN/CLOSE. 2 Press EASY...
Operating Instructions
Page 15
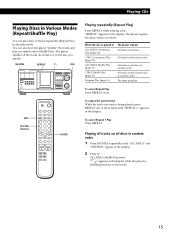
... (Repeat Play) Press REPEAT while playing a disc. ALL DISCS Shuffle Play starts. You can play discs or tracks repeatedly (Repeat Play) in any play in random order (Shuffle Play). The player repeats the discs/tracks as follows: When the disc is shuffling the discs or the tracks. 15 Playing CDs Playing Discs in Various Modes (Repeat/Shuffle Play) You...
... (Repeat Play) Press REPEAT while playing a disc. ALL DISCS Shuffle Play starts. You can play discs or tracks repeatedly (Repeat Play) in any play in random order (Shuffle Play). The player repeats the discs/tracks as follows: When the disc is shuffling the discs or the tracks. 15 Playing CDs Playing Discs in Various Modes (Repeat/Shuffle Play) You...
Operating Instructions
Page 16
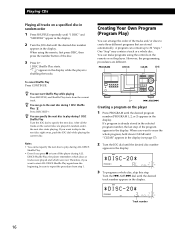
... ART. MIN STEP SEC *DISC-20***** ALL 1 DISCS SHUFFLE REPEAT 1 GROUP PROGRAM 1 2 3 X-FADE DELETE MULTI CD TEXT NO DELAY CD1 CD2 CD3 Track number 16 Therefore, if you press x or turn off the player during ALL DISCS Shuffle Play, the player remembers which discs or tracks were played and ...which were not. MIN STEP SEC *DISC-20***** ALL 1 DISCS SHUFFLE REPEAT 1 GROUP PROGRAM 1 2 3 X-FADE DELETE MULTI CD TEXT NO DELAY CD1 CD2 CD3 3 To program a whole disc, skip this step. Turn...
... ART. MIN STEP SEC *DISC-20***** ALL 1 DISCS SHUFFLE REPEAT 1 GROUP PROGRAM 1 2 3 X-FADE DELETE MULTI CD TEXT NO DELAY CD1 CD2 CD3 Track number 16 Therefore, if you press x or turn off the player during ALL DISCS Shuffle Play, the player remembers which discs or tracks were played and ...which were not. MIN STEP SEC *DISC-20***** ALL 1 DISCS SHUFFLE REPEAT 1 GROUP PROGRAM 1 2 3 X-FADE DELETE MULTI CD TEXT NO DELAY CD1 CD2 CD3 3 To program a whole disc, skip this step. Turn...
Operating Instructions
Page 17
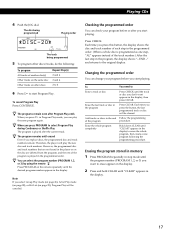
...start Program Play. Erasing the program stored in memory 1 Press PROGRAM repeatedly in the programmed order. Playing CDs 4 Push the JOG dial. HIT TRACK GROUP ART. Erase the last track or disc in the display. 17 To cancel Program Play Press CONTINUE. z You can play the new...To program All tracks of each step in the programmed order. (When a whole disc is played in stop mode until the track or disc you replace discs, the programmed disc and track numbers remain. Therefore, the player will play the same program again. z The program remains until the desired program ...
...start Program Play. Erasing the program stored in memory 1 Press PROGRAM repeatedly in the programmed order. Playing CDs 4 Push the JOG dial. HIT TRACK GROUP ART. Erase the last track or disc in the display. 17 To cancel Program Play Press CONTINUE. z You can play the new...To program All tracks of each step in the programmed order. (When a whole disc is played in stop mode until the track or disc you replace discs, the programmed disc and track numbers remain. Therefore, the player will play the same program again. z The program remains until the desired program ...

Operating Instructions
Page 18
... NO DELAY CD1 CD2 CD3 5 First press >10 then press the number button of the disc. 2nd NEXT DISC ART. To cancel Program Play Press CONTINUE. Playing CDs Creating a program using the remote Z DISC >10 CHECK H PROGRAM Number buttons ENTER CLEAR 1 Press PROGRAM until the program number you select the track number less than...
... NO DELAY CD1 CD2 CD3 5 First press >10 then press the number button of the disc. 2nd NEXT DISC ART. To cancel Program Play Press CONTINUE. Playing CDs Creating a program using the remote Z DISC >10 CHECK H PROGRAM Number buttons ENTER CLEAR 1 Press PROGRAM until the program number you select the track number less than...
Operating Instructions
Page 19
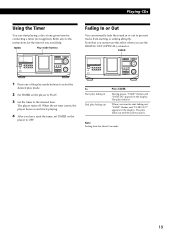
...Press FADER During pause. Note Fading lasts for the timer if you want to start playing a disc at any given time by connecting a timer (not supplied). The player turns off. When the set time comes, the player turns on and starts playing. 4 After you use this effect when you have used the .... FADER I / 1 I / 1 1 Press one of the play mode buttons to select the desired play fades in. The play mode. 2 Set TIMER on the player to OFF. Playing CDs Using the Timer You can manually fade the sound in or out to prevent tracks from starting or ending abruptly. Note that you cannot...
...Press FADER During pause. Note Fading lasts for the timer if you want to start playing a disc at any given time by connecting a timer (not supplied). The player turns off. When the set time comes, the player turns on and starts playing. 4 After you use this effect when you have used the .... FADER I / 1 I / 1 1 Press one of the play mode buttons to select the desired play fades in. The play mode. 2 Set TIMER on the player to OFF. Playing CDs Using the Timer You can manually fade the sound in or out to prevent tracks from starting or ending abruptly. Note that you cannot...
Operating Instructions
Page 20
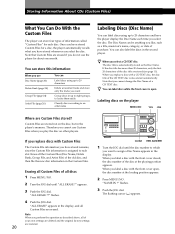
... characters of purchase. When you select a CD TEXT disc The disc title is also stored automatically. Therefore you cannot use Custom Files when you like, such as the Disc Name. Erasing all Custom Files of all of the old disc, and then file the new disc information in the second player. "ALL ERASE ??" flashes. "NAME IN ?" The...
... characters of purchase. When you select a CD TEXT disc The disc title is also stored automatically. Therefore you cannot use Custom Files when you like, such as the Disc Name. Erasing all Custom Files of all of the old disc, and then file the new disc information in the second player. "ALL ERASE ??" flashes. "NAME IN ?" The...

Operating Instructions
Page 21
...character on a blank space, the cursor ( ) appears in the display. t (space) Changing the Disc Name 1 Follow steps 1 to 3 in "Labeling discs on the player" on page 20 to select the Disc Name you want to the first character of each character type. The cursor disappears and the first space... up, and the flashing cursor appears at the next space to select the character. MIN STEP SEC S************ ALL 1 DISCS SHUFFLE REPEAT 1 GROUP PROGRAM 1 2 3 X-FADE DELETE MULTI CD TEXT NO DELAY CD1 CD2 CD3 To make a correction Press CLEAR and begin again by inputting the correct characters. 6...
...character on a blank space, the cursor ( ) appears in the display. t (space) Changing the Disc Name 1 Follow steps 1 to 3 in "Labeling discs on the player" on page 20 to select the Disc Name you want to the first character of each character type. The cursor disappears and the first space... up, and the flashing cursor appears at the next space to select the character. MIN STEP SEC S************ ALL 1 DISCS SHUFFLE REPEAT 1 GROUP PROGRAM 1 2 3 X-FADE DELETE MULTI CD TEXT NO DELAY CD1 CD2 CD3 To make a correction Press CLEAR and begin again by inputting the correct characters. 6...


