
Operating Instructions (primary manual)
Page 4
...To zoom greater than 20×, select the digital zoom power in D ZOOM in the menu settings. ) D ZOOM [MENU] (p. 52) •Focusing manually Manual focus (p. 42) •Shooting distant subjects Landscape mode (p. 39) •Recording fast-moving subjects Sports lesson mode (p. 39) Functions to... back the picture on a TV without connecting a cord •Recording with the date/time SUPER LASER LINK (p. 33) (CCD-TRV98 only) Date and time (p. 27) •Enhancing old tapes ORC [MENU] (p. 54) Functions to use after recording (in the playback mode) •Correcting jitter TBC [MENU] ...
...To zoom greater than 20×, select the digital zoom power in D ZOOM in the menu settings. ) D ZOOM [MENU] (p. 52) •Focusing manually Manual focus (p. 42) •Shooting distant subjects Landscape mode (p. 39) •Recording fast-moving subjects Sports lesson mode (p. 39) Functions to... back the picture on a TV without connecting a cord •Recording with the date/time SUPER LASER LINK (p. 33) (CCD-TRV98 only) Date and time (p. 27) •Enhancing old tapes ORC [MENU] (p. 54) Functions to use after recording (in the playback mode) •Correcting jitter TBC [MENU] ...

Operating Instructions (primary manual)
Page 5
... started Using this manual 8 Checking supplied accessories 10 Step 1 Preparing the power supply ... 11 Installing the battery pack 11 Charging the battery pack 12 Connecting to a wall outlet 16 Step 2 Setting the date and time ........ 17 Step 3 Inserting a cassette 19 Recording - Picture effect 38 Using the PROGRAM AE function .... 39 Adjusting the...
... started Using this manual 8 Checking supplied accessories 10 Step 1 Preparing the power supply ... 11 Installing the battery pack 11 Charging the battery pack 12 Connecting to a wall outlet 16 Step 2 Setting the date and time ........ 17 Step 3 Inserting a cassette 19 Recording - Picture effect 38 Using the PROGRAM AE function .... 39 Adjusting the...

Operating Instructions (primary manual)
Page 6
... outdoors (p. 11). EJECT 2 Insert a cassette into the cassette compartment with its window facing out and the write-protect tab on the cassette compartment. Connecting the power cord (p. 16) Use the battery pack when using your camcorder. AC power adaptor (supplied) Inserting a cassette (p. 19) 1 Open the lid of the cassette compartment.
... outdoors (p. 11). EJECT 2 Insert a cassette into the cassette compartment with its window facing out and the write-protect tab on the cassette compartment. Connecting the power cord (p. 16) Use the battery pack when using your camcorder. AC power adaptor (supplied) Inserting a cassette (p. 19) 1 Open the lid of the cassette compartment.
Operating Instructions (primary manual)
Page 7
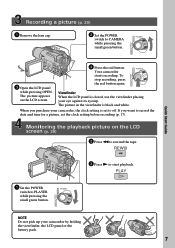
...When you want to start playback. Monitoring the playback picture on the LCD screen. 4 Press the red button. OFF (CHARGE) PLAYER POWER CAMERA Viewfinder When the LCD panel is closed, use the viewfinder placing your camcorder by holding the viewfinder, the LCD panel or the battery ...stop recording, press the red button again. REW 3 Press N to record the date and time for a picture, set to rewind the tape. Recording a picture (p. 20) 1 Remove the lens cap. 2 Set the POWER switch to PLAYER while pressing the small green button. PLAY 1 Set the POWER switch to CAMERA while ...
...When you want to start playback. Monitoring the playback picture on the LCD screen. 4 Press the red button. OFF (CHARGE) PLAYER POWER CAMERA Viewfinder When the LCD panel is closed, use the viewfinder placing your camcorder by holding the viewfinder, the LCD panel or the battery ...stop recording, press the red button again. REW 3 Press N to record the date and time for a picture, set to rewind the tape. Recording a picture (p. 20) 1 Remove the lens cap. 2 Set the POWER switch to PLAYER while pressing the small green button. PLAY 1 Set the POWER switch to CAMERA while ...

Operating Instructions (primary manual)
Page 8
...color systems TV color systems differ from country to CAMERA. To view your recordings on your camcorder are shown in the text, for example, "CCD-TRV98 only." Any differences in operation are for ...illustration purposes. As you read through this manual, buttons and settings on a TV, you need an NTSC system-based TV. 8 TRV68 - 460× - Otherwise, the model name is being carried out. Set the POWER... indicate that the operation is indicated in the table below. The CCD-TRV98 is the model used for the six models listed in the...
...color systems TV color systems differ from country to CAMERA. To view your recordings on your camcorder are shown in the text, for example, "CCD-TRV98 only." Any differences in operation are for ...illustration purposes. As you read through this manual, buttons and settings on a TV, you need an NTSC system-based TV. 8 TRV68 - 460× - Otherwise, the model name is being carried out. Set the POWER... indicate that the operation is indicated in the table below. The CCD-TRV98 is the model used for the six models listed in the...

Operating Instructions (primary manual)
Page 10
...your camcorder. 1 2 3 4 5 6 7 1 Wireless Remote Commander (1) (p. 78) CCD-TRV49/TRV78/TRV98 only 4 Size AA (R6) battery for Remote Commander (2) (p. 78) CCD-TRV49/TRV78/TRV98 only 2 AC-L10A/L10B/L10C AC power adaptor (1), Power cord (1) (p. 12) 3 NP-F330 battery pack (1) (p. 11, 12) 5 A/V connecting... cable (1) (p. 32) 6 Shoulder strap (1) (p. 75) 7 Lens cap (1) (p. 20, 74) Contents of the recording cannot be compensated if recording or...
...your camcorder. 1 2 3 4 5 6 7 1 Wireless Remote Commander (1) (p. 78) CCD-TRV49/TRV78/TRV98 only 4 Size AA (R6) battery for Remote Commander (2) (p. 78) CCD-TRV49/TRV78/TRV98 only 2 AC-L10A/L10B/L10C AC power adaptor (1), Power cord (1) (p. 12) 3 NP-F330 battery pack (1) (p. 11, 12) 5 A/V connecting... cable (1) (p. 32) 6 Shoulder strap (1) (p. 75) 7 Lens cap (1) (p. 20, 74) Contents of the recording cannot be compensated if recording or...

Operating Instructions (primary manual)
Page 11
To remove the battery pack Slide the battery pack out in the direction of the arrow while pressing BATT RELEASE down until it clicks. Slide the battery pack down . BATT RELEASE 11 Getting started Step 1 Preparing the power supply Installing the battery pack Install the battery pack to use your camcorder outdoors.
To remove the battery pack Slide the battery pack out in the direction of the arrow while pressing BATT RELEASE down until it clicks. Slide the battery pack down . BATT RELEASE 11 Getting started Step 1 Preparing the power supply Installing the battery pack Install the battery pack to use your camcorder outdoors.

Operating Instructions (primary manual)
Page 12
...). Charging begins, and the CHG lamp lights up . (2) Connect the power cord to the AC power adaptor. (3) Connect the power cord to a wall outlet. (4) Set the POWER switch to OFF (CHARGE). When the CHG lamp goes out, the charging is completed. 4 POWER PLAYER OFF (CHARGE) CAMERA CHG lamp 1 2 After charging the battery pack Disconnect the AC...
...). Charging begins, and the CHG lamp lights up . (2) Connect the power cord to the AC power adaptor. (3) Connect the power cord to a wall outlet. (4) Set the POWER switch to OFF (CHARGE). When the CHG lamp goes out, the charging is completed. 4 POWER PLAYER OFF (CHARGE) CAMERA CHG lamp 1 2 After charging the battery pack Disconnect the AC...

Operating Instructions (primary manual)
Page 13
.... - Do this once a year. Something is correct. This may go off although the battery remaining indicator indicates that the battery pack has enough power to operate Charge the battery pack fully again so that the indication on the battery remaining indicator is wrong with the metal parts of the... NP-F730/F730H/F750 NP-F930/F950 NP-F960 Full charge 150 210 300 390 420 Approximate number of the AC power adaptor. Getting started Step 1 Preparing the power supply Notes •Prevent metallic objects from coming into contact with the battery pack. Keep the battery pack in the ...
.... - Do this once a year. Something is correct. This may go off although the battery remaining indicator indicates that the battery pack has enough power to operate Charge the battery pack fully again so that the indication on the battery remaining indicator is wrong with the metal parts of the... NP-F730/F730H/F750 NP-F930/F950 NP-F960 Full charge 150 210 300 390 420 Approximate number of the AC power adaptor. Getting started Step 1 Preparing the power supply Notes •Prevent metallic objects from coming into contact with the battery pack. Keep the battery pack in the ...

Operating Instructions (primary manual)
Page 14
... battery life may be shorter if you use a fully charged battery pack * Approximate continuous recording time at 25°C (77°F). Step 1 Preparing the power supply Recording time CCD-TRV49/TRV58/TRV68/TRV78 Battery pack Recording with the viewfinder Continuous* Typical** NP-F330 (supplied) 140 75 NP-F530 245 135 ...205 110 240 130 410 225 490 270 650 355 750 410 880 485 CCD-TRV88 Battery pack NP-F330 (supplied) NP-F530 NP-F550 NP-F730 NP-F730H/F750 NP-F930 NP-F950 NP-F960 Recording with the viewfinder Continuous* Typical** 140 75 245 135 280 155 500 ...
... battery life may be shorter if you use a fully charged battery pack * Approximate continuous recording time at 25°C (77°F). Step 1 Preparing the power supply Recording time CCD-TRV49/TRV58/TRV68/TRV78 Battery pack Recording with the viewfinder Continuous* Typical** NP-F330 (supplied) 140 75 NP-F530 245 135 ...205 110 240 130 410 225 490 270 650 355 750 410 880 485 CCD-TRV88 Battery pack NP-F330 (supplied) NP-F530 NP-F550 NP-F730 NP-F730H/F750 NP-F930 NP-F950 NP-F960 Recording with the viewfinder Continuous* Typical** 140 75 245 135 280 155 500 ...

Operating Instructions (primary manual)
Page 15
...such as battery consumption with LCD closed 145 260 295 525 610 825 930 1090 Approximate number of Sony Corporation. 15 This unit is a trademark of minutes when you use a fully charged battery pack The...be shorter if you use your camcorder in a cold environment. Getting started Step 1 Preparing the power supply Playing time CCD-TRV49/TRV58/TRV68/TRV78 Battery pack NP-F330 (supplied) NP-F530 NP-F550 NP-F730 NP-... 490 650 750 880 Playing time with LCD closed 145 260 295 525 610 825 930 1090 CCD-TRV88 Battery pack NP-F330 (supplied) NP-F530 NP-F550 NP-F730 NP-F730H/F750 NP-F930 ...
...such as battery consumption with LCD closed 145 260 295 525 610 825 930 1090 Approximate number of Sony Corporation. 15 This unit is a trademark of minutes when you use a fully charged battery pack The...be shorter if you use your camcorder in a cold environment. Getting started Step 1 Preparing the power supply Playing time CCD-TRV49/TRV58/TRV68/TRV78 Battery pack NP-F330 (supplied) NP-F530 NP-F550 NP-F730 NP-... 490 650 750 880 Playing time with LCD closed 145 260 295 525 610 825 930 1090 CCD-TRV88 Battery pack NP-F330 (supplied) NP-F530 NP-F550 NP-F730 NP-F730H/F750 NP-F930 ...

Operating Instructions (primary manual)
Page 16
..., we recommend that the battery pack cannot supply any trouble occurs with the plug's v mark facing up. (2) Connect the power cord to the AC power adaptor. (3) Connect the power cord to the DC IN jack on your camcorder. •The DC IN jack has "source priority". Notes •The .... 1 2, 3 PRECAUTION The set itself has been turned off the power. This means that you power it is connected to the wall outlet, even if the set is not plugged into a wall outlet. •Place the AC power adaptor near a wall outlet. Using a car battery Use Sony DC Adaptor/Charger (optional). 16
..., we recommend that the battery pack cannot supply any trouble occurs with the plug's v mark facing up. (2) Connect the power cord to the AC power adaptor. (3) Connect the power cord to the DC IN jack on your camcorder. •The DC IN jack has "source priority". Notes •The .... 1 2, 3 PRECAUTION The set itself has been turned off the power. This means that you power it is connected to the wall outlet, even if the set is not plugged into a wall outlet. •Place the AC power adaptor near a wall outlet. Using a car battery Use Sony DC Adaptor/Charger (optional). 16
Operating Instructions (primary manual)
Page 19
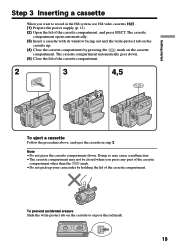
... When you press any part of the cassette compartment. 2 3 EJECT 4,5 To eject a cassette Follow the procedure above, and eject the cassette in the Hi8 system, use Hi8 video cassettes . (1) Prepare the power supply (p. 11). (2) Open the lid of the cassette compartment. Note • Do not press the cassette compartment down . (5) Close the lid of... a cassette with its window facing out and the write-protect tab on the cassette up your camcorder by pressing the mark on the cassette to record in step 3.
... When you press any part of the cassette compartment. 2 3 EJECT 4,5 To eject a cassette Follow the procedure above, and eject the cassette in the Hi8 system, use Hi8 video cassettes . (1) Prepare the power supply (p. 11). (2) Open the lid of the cassette compartment. Note • Do not press the cassette compartment down . (5) Close the lid of... a cassette with its window facing out and the write-protect tab on the cassette up your camcorder by pressing the mark on the cassette to record in step 3.
Operating Instructions (primary manual)
Page 20
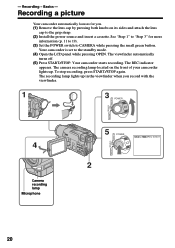
...POWER switch to "Step 3" for you record with the viewfinder. 1 3 POWER PLAYER OFF (CHARGE) CAMERA 4 Camera recording lamp Microphone PLAYER 5 POWER 40min REC 0:00:01 OFF (CHARGE) CAMERA 2 20 Your camcorder starts recording. To stop recording, press START/STOP again. See "Step 1" to CAMERA while pressing the small green button. The recording.... (5) Press START/STOP. Your camcorder is set to the grip strap. (2) Install the power source and insert a cassette. The camera recording lamp located on the front of your camcorder lights up in the viewfinder when you . (1)...
...POWER switch to "Step 3" for you record with the viewfinder. 1 3 POWER PLAYER OFF (CHARGE) CAMERA 4 Camera recording lamp Microphone PLAYER 5 POWER 40min REC 0:00:01 OFF (CHARGE) CAMERA 2 20 Your camcorder starts recording. To stop recording, press START/STOP again. See "Step 1" to CAMERA while pressing the small green button. The recording.... (5) Press START/STOP. Your camcorder is set to the grip strap. (2) Install the power source and insert a cassette. The camera recording lamp located on the front of your camcorder lights up in the viewfinder when you . (1)...
Operating Instructions (primary manual)
Page 21
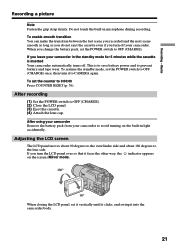
... pack from your camcorder in the standby mode for 5 minutes while the cassette is to save battery power and to OFF (CHARGE). Do not touch the built-in light accidentally. After recording (1) Set the POWER switch to the lens side. When you leave your camcorder to avoid turning on the screen (Mirror... degrees to the viewfinder side and about 180 degrees to OFF (CHARGE). (2) Close the LCD panel. (3) Eject the cassette. (4) Attach the lens cap. Basics Recording a picture Note Fasten the grip strap firmly. To resume the standby mode, set the POWER switch to CAMERA again.
... pack from your camcorder in the standby mode for 5 minutes while the cassette is to save battery power and to OFF (CHARGE). Do not touch the built-in light accidentally. After recording (1) Set the POWER switch to the lens side. When you leave your camcorder to avoid turning on the screen (Mirror... degrees to the viewfinder side and about 180 degrees to OFF (CHARGE). (2) Close the LCD panel. (3) Eject the cassette. (4) Attach the lens cap. Basics Recording a picture Note Fasten the grip strap firmly. To resume the standby mode, set the POWER switch to CAMERA again.

Operating Instructions (primary manual)
Page 23
... can shoot a subject that is sharp. To activate digital zoom, select the digital zoom power in D ZOOM in better-looking recordings. Recording a picture Using the zoom feature Move the power zoom lever a little for wide-angle (subject appears farther away) W T WT W T Recording - Basics Zoom greater than 20× is processed digitally. Notes on digital zoom...
... can shoot a subject that is sharp. To activate digital zoom, select the digital zoom power in D ZOOM in better-looking recordings. Recording a picture Using the zoom feature Move the power zoom lever a little for wide-angle (subject appears farther away) W T WT W T Recording - Basics Zoom greater than 20× is processed digitally. Notes on digital zoom...

Operating Instructions (primary manual)
Page 29
... monitor the playback picture on the screen. You can control playback using the Remote Commander supplied with your camcorder (CCD-TRV49/TRV78/TRV98 only). (1) Install the power source and insert the recorded tape. (2) Set the POWER switch to PLAYER while pressing the small green button. (3) Open the LCD panel while pressing OPEN. (4) Press m to... start playback. (6) To adjust the volume, press either of the two buttons on your camcorder is silent when the LCD panel is closed. 4 REW 5 PLAY 2 POWER PLAYER OFF (CHARGE) CAMERA 3 To stop playback Press x. 6 VOLUME 29 Playback -
... monitor the playback picture on the screen. You can control playback using the Remote Commander supplied with your camcorder (CCD-TRV49/TRV78/TRV98 only). (1) Install the power source and insert the recorded tape. (2) Set the POWER switch to PLAYER while pressing the small green button. (3) Open the LCD panel while pressing OPEN. (4) Press m to... start playback. (6) To adjust the volume, press either of the two buttons on your camcorder is silent when the LCD panel is closed. 4 REW 5 PLAY 2 POWER PLAYER OFF (CHARGE) CAMERA 3 To stop playback Press x. 6 VOLUME 29 Playback -

Operating Instructions (primary manual)
Page 31
... back a tape Various playback modes To operate video control buttons, set the POWER switch to normal speed. To resume rewinding or advancing, release the button. To view the picture at slow speed (slow playback) - When you play back a tape recorded in the stop mode. To locate a scene...Commander during playback. To advance the tape Press M in the stop mode. When the playback pause mode lasts for about 1 minute (CCD-TRV49/TRV78/TRV98 only) Your camcorder automatically returns to PLAYER. To resume normal playback, release the button. In the various playback modes Sound...
... back a tape Various playback modes To operate video control buttons, set the POWER switch to normal speed. To resume rewinding or advancing, release the button. To view the picture at slow speed (slow playback) - When you play back a tape recorded in the stop mode. To locate a scene...Commander during playback. To advance the tape Press M in the stop mode. When the playback pause mode lasts for about 1 minute (CCD-TRV49/TRV78/TRV98 only) Your camcorder automatically returns to PLAYER. To resume normal playback, release the button. In the various playback modes Sound...

Operating Instructions (primary manual)
Page 32
You can operate the playback control buttons in the same way as when you monitor playback pictures on the VCR to LINE. Viewing the recording on TV Connect your camcorder to your TV with the A/V connecting cable supplied with your camcorder. Refer to the operating instructions of ...watch the playback picture on the VCR by using the A/V connecting cable. With this connection, you power your TV has an S video jack Connect using the AC power adaptor (p. 16). Refer to a TV without Video/Audio input jacks Use an NTSC system RFU adaptor (optional). Connect your TV. Set the input ...
You can operate the playback control buttons in the same way as when you monitor playback pictures on the VCR to LINE. Viewing the recording on TV Connect your camcorder to your TV with the A/V connecting cable supplied with your camcorder. Refer to the operating instructions of ...watch the playback picture on the VCR by using the A/V connecting cable. With this connection, you power your TV has an S video jack Connect using the AC power adaptor (p. 16). Refer to a TV without Video/Audio input jacks Use an NTSC system RFU adaptor (optional). Connect your TV. Set the input ...

Operating Instructions (primary manual)
Page 33
The lamp of your camcorder to your camcorder consumes power. CCD-TRV98 only Once you connect the AV cordless IR receiver (optional) to start playback. (6) Point the super laser link emitter at the AV cordless IR ... LASER LINK. For details, refer to your camcorder, and insert the recorded tape. (1) After connecting your TV. SUPER LASER LINK Super laser link emitter Before operation Attach the power supply such as the AC power adaptor to the operating instructions of Sony Corporation. 33 To cancel the super laser link function Press SUPER LASER...
The lamp of your camcorder to your camcorder consumes power. CCD-TRV98 only Once you connect the AV cordless IR receiver (optional) to start playback. (6) Point the super laser link emitter at the AV cordless IR ... LASER LINK. For details, refer to your camcorder, and insert the recorded tape. (1) After connecting your TV. SUPER LASER LINK Super laser link emitter Before operation Attach the power supply such as the AC power adaptor to the operating instructions of Sony Corporation. 33 To cancel the super laser link function Press SUPER LASER...

