
Operating Instructions
Page 6
... plug with its v mark facing up . 3 Close the cassette compartment by pressing the mark on the cassette up . Connecting the power cord (p. 16) Use the battery pack when using your camcorder. AC power adaptor (supplied) Inserting a cassette (p. 19) 1 Open the lid of the cassette compartment. Close the lid of the cassette compartment, and press...
... plug with its v mark facing up . 3 Close the cassette compartment by pressing the mark on the cassette up . Connecting the power cord (p. 16) Use the battery pack when using your camcorder. AC power adaptor (supplied) Inserting a cassette (p. 19) 1 Open the lid of the cassette compartment. Close the lid of the cassette compartment, and press...

Operating Instructions
Page 10
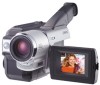
Checking supplied accessories Make sure that the following accessories are supplied with your camcorder. 1 2 3 4 5 6 7 1 Wireless Remote Commander (1) (p. 78) CCD-TRV49/TRV78/TRV98 only 4 Size AA (R6) battery for Remote Commander (2) (p. 78) CCD-TRV49/TRV78/TRV98 only 2 AC-L10A/L10B/L10C AC power adaptor (1), Power cord (1) (p. 12) 3 NP-F330 battery pack (1) (p. 11, 12) 5 A/V connecting cable (1) (p. 32) 6 Shoulder strap...
Checking supplied accessories Make sure that the following accessories are supplied with your camcorder. 1 2 3 4 5 6 7 1 Wireless Remote Commander (1) (p. 78) CCD-TRV49/TRV78/TRV98 only 4 Size AA (R6) battery for Remote Commander (2) (p. 78) CCD-TRV49/TRV78/TRV98 only 2 AC-L10A/L10B/L10C AC power adaptor (1), Power cord (1) (p. 12) 3 NP-F330 battery pack (1) (p. 11, 12) 5 A/V connecting cable (1) (p. 32) 6 Shoulder strap...
Operating Instructions
Page 12
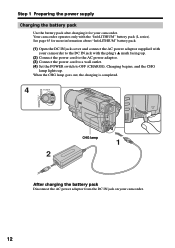
... series). When the CHG lamp goes out, the charging is completed. 4 POWER PLAYER OFF (CHARGE) CAMERA CHG lamp 1 2 After charging the battery pack Disconnect the AC power adaptor from the DC IN jack on your camcorder. Your camcorder operates only with the plug's v mark facing up . Step 1 Preparing... the power supply Charging the battery pack Use the battery pack after charging it for ...
... series). When the CHG lamp goes out, the charging is completed. 4 POWER PLAYER OFF (CHARGE) CAMERA CHG lamp 1 2 After charging the battery pack Disconnect the AC power adaptor from the DC IN jack on your camcorder. Your camcorder operates only with the plug's v mark facing up . Step 1 Preparing... the power supply Charging the battery pack Use the battery pack after charging it for ...

Operating Instructions
Page 13
...NP-F930/F950 NP-F960 Full charge 150 210 300 390 420 Approximate number of the AC power adaptor. This may go off although the battery remaining indicator indicates that the battery pack has enough power to charge an empty battery pack 13 While charging the battery pack, the CHG lamp does... Notes •Prevent metallic objects from coming into contact with the battery pack. The battery pack is correct. If the power may cause a short-circuit, damaging the AC power adaptor. •Keep the battery pack dry. •When the battery pack is wrong with the metal parts of the DC plug of...
...NP-F930/F950 NP-F960 Full charge 150 210 300 390 420 Approximate number of the AC power adaptor. This may go off although the battery remaining indicator indicates that the battery pack has enough power to charge an empty battery pack 13 While charging the battery pack, the CHG lamp does... Notes •Prevent metallic objects from coming into contact with the battery pack. The battery pack is correct. If the power may cause a short-circuit, damaging the AC power adaptor. •Keep the battery pack dry. •When the battery pack is wrong with the metal parts of the DC plug of...

Operating Instructions
Page 16
... AC power adaptor near a wall outlet. Using a car battery Use Sony DC Adaptor/Charger (optional). 16 Step 1 Preparing the power supply Connecting to a wall outlet When you power it from a wall outlet using the AC power adaptor, if any power if the power cord is connected to the DC IN jack, even when the power cord is attached to your camcorder with...
... AC power adaptor near a wall outlet. Using a car battery Use Sony DC Adaptor/Charger (optional). 16 Step 1 Preparing the power supply Connecting to a wall outlet When you power it from a wall outlet using the AC power adaptor, if any power if the power cord is connected to the DC IN jack, even when the power cord is attached to your camcorder with...

Operating Instructions
Page 32
...of your TV. To connect to LINE. Connect the S video cable (optional) to the S video jacks on both your camcorder from a wall outlet using the AC power adaptor (p. 16). With this connection, you monitor playback pictures on the LCD screen. When monitoring the playback picture on the TV... screen, we recommend that you power your camcorder and the TV. 32 Viewing the recording on TV Connect your camcorder to your TV with ...
...of your TV. To connect to LINE. Connect the S video cable (optional) to the S video jacks on both your camcorder from a wall outlet using the AC power adaptor (p. 16). With this connection, you monitor playback pictures on the LCD screen. When monitoring the playback picture on the TV... screen, we recommend that you power your camcorder and the TV. 32 Viewing the recording on TV Connect your camcorder to your TV with ...

Operating Instructions
Page 33
CCD-TRV98 only Once you connect the AV cordless IR receiver (optional) to turn the power off The super laser link function turns off the super...automatically. Playback - SUPER LASER LINK Super laser link emitter Before operation Attach the power supply such as the AC power adaptor to your camcorder, and insert the recorded tape. (1) After connecting your TV and AV cordless IR receiver... receiver to ON. (2) Set the POWER switch to PLAYER. (3) Turn the TV on and set the TV/VCR selector on your camcorder to VCR. (4) Press SUPER LASER LINK. The lamp of Sony Corporation. 33 If you can easily ...
CCD-TRV98 only Once you connect the AV cordless IR receiver (optional) to turn the power off The super laser link function turns off the super...automatically. Playback - SUPER LASER LINK Super laser link emitter Before operation Attach the power supply such as the AC power adaptor to your camcorder, and insert the recorded tape. (1) After connecting your TV and AV cordless IR receiver... receiver to ON. (2) Set the POWER switch to PLAYER. (3) Turn the TV on and set the TV/VCR selector on your camcorder to VCR. (4) Press SUPER LASER LINK. The lamp of Sony Corporation. 33 If you can easily ...

Operating Instructions
Page 59
...time. • The battery pack is not fully charged. c Install a charged battery pack. (p. 11, 12) • The AC power adaptor is dead or nearly dead. c Connect the AC power adaptor to a wall outlet. c Charge the battery pack fully again. (p. 11, 12) • The battery pack is not fully charged... the battery pack fully again. (p. 11, 12) • A deviation has occured in the remaining battery time. c Remove the cassette and leave your camcorder for cassette ejection work . c Charge the battery pack fully again. (p. 11, 12) • A deviation has occured in the remaining battery time. ...
...time. • The battery pack is not fully charged. c Install a charged battery pack. (p. 11, 12) • The AC power adaptor is dead or nearly dead. c Connect the AC power adaptor to a wall outlet. c Charge the battery pack fully again. (p. 11, 12) • The battery pack is not fully charged... the battery pack fully again. (p. 11, 12) • A deviation has occured in the remaining battery time. c Remove the cassette and leave your camcorder for cassette ejection work . c Charge the battery pack fully again. (p. 11, 12) • A deviation has occured in the remaining battery time. ...

Operating Instructions
Page 60
...the functions still do not work . (CCD-TRV49/TRV78/TRV98 only) • COMMANDER is set to OFF (CHARGE) c Set it to your camcorder. c Remove the obstacle. • The batteries inserted in your comcorder. • The POWER switch is disconnected. marks. Turn the power on . • Disconnect the Connecting ...camcorder does not work , press the RESET button using a sharp-pointed object. (If you press the RESET button, all the settings including the date and time return to the default.) (p. 75) While charging the battery pack, the CHG lamp does not light up. • The AC power adaptor...
...the functions still do not work . (CCD-TRV49/TRV78/TRV98 only) • COMMANDER is set to OFF (CHARGE) c Set it to your camcorder. c Remove the obstacle. • The batteries inserted in your comcorder. • The POWER switch is disconnected. marks. Turn the power on . • Disconnect the Connecting ...camcorder does not work , press the RESET button using a sharp-pointed object. (If you press the RESET button, all the settings including the date and time return to the default.) (p. 75) While charging the battery pack, the CHG lamp does not light up. • The AC power adaptor...

Operating Instructions
Page 61
... if you try corrective actions a few times, contact your camcorder. • A malfunction that is displayed, check the following code chart. c Remove the cassette and insert it again, then operate your Sony dealer or local authorized Sony service facility and inform them of the AC power adaptor or remove the battery pack. Five-digit display C:04...
... if you try corrective actions a few times, contact your camcorder. • A malfunction that is displayed, check the following code chart. c Remove the cassette and insert it again, then operate your Sony dealer or local authorized Sony service facility and inform them of the AC power adaptor or remove the battery pack. Five-digit display C:04...

Operating Instructions
Page 65
... fully charged. Charging the battery • Be sure to OFF (CHARGE) when not taking shots or playing back on your camcorder, leave your camcorder and an AC power adaptor. We recommend the following to warm it up on your body to ensure care-free, longer use of its life. When ...take test shots before you may not be used . Effective use : - Put the battery in a pocket close to your camcorder. Remaining battery time indicator • If the power goes off although the remaining battery time indicator indicates that has functions for a long time, store it in minutes. How to...
... fully charged. Charging the battery • Be sure to OFF (CHARGE) when not taking shots or playing back on your camcorder, leave your camcorder and an AC power adaptor. We recommend the following to warm it up on your body to ensure care-free, longer use of its life. When ...take test shots before you may not be used . Effective use : - Put the battery in a pocket close to your camcorder. Remaining battery time indicator • If the power goes off although the remaining battery time indicator indicates that has functions for a long time, store it in minutes. How to...

Operating Instructions
Page 66
... Guyana, Hungary, Iran, Iraq, Monaco, Poland, Russia, Ukraine, etc. Select WORLD TIME in any country or area with the AC power adaptor supplied with VIDEO/AUDIO input jack. See page 56 for more information. 66 The following shows TV color systems used overseas. If you want.... AC-L10A/L10B/L10C [a] [b] Your camcorder is an NTSC system based camcorder. When charging the battery pack, use your camcorder within 100 V to 240 V AC, 50/60 Hz. Using your camcorder abroad Using your camcorder abroad You can use a commercially available AC plug adaptor [a], if necessary, depending on a TV,...
... Guyana, Hungary, Iran, Iraq, Monaco, Poland, Russia, Ukraine, etc. Select WORLD TIME in any country or area with the AC power adaptor supplied with VIDEO/AUDIO input jack. See page 56 for more information. 66 The following shows TV color systems used overseas. If you want.... AC-L10A/L10B/L10C [a] [b] Your camcorder is an NTSC system based camcorder. When charging the battery pack, use your camcorder within 100 V to 240 V AC, 50/60 Hz. Using your camcorder abroad Using your camcorder abroad You can use a commercially available AC plug adaptor [a], if necessary, depending on a TV,...

Operating Instructions
Page 69
...while holding the RELEASE knob up . Charging the built-in rechargeable lithium cell Your camcorder is supplied with a built-in a cold place, a residual image may appear on 7.2 V (battery pack) or 8.4 V (AC power adaptor). •For DC or AC operation, use the accessories recommended in about 4 months...screen with your fingers or a sharp-pointed object. •If your camcorder is not a malfunction. •While using the AC power adaptor supplied with your camcorder, and leave your camcorder and have it checked by a Sony dealer before operating it . The cell, however, will be completely ...
...while holding the RELEASE knob up . Charging the built-in rechargeable lithium cell Your camcorder is supplied with a built-in a cold place, a residual image may appear on 7.2 V (battery pack) or 8.4 V (AC power adaptor). •For DC or AC operation, use the accessories recommended in about 4 months...screen with your fingers or a sharp-pointed object. •If your camcorder is not a malfunction. •While using the AC power adaptor supplied with your camcorder, and leave your camcorder and have it checked by a Sony dealer before operating it . The cell, however, will be completely ...

Operating Instructions
Page 70
...or dirty - If there are not using the unit for a long time. Never pull the power cord itself. •Do not operate the unit with a mild detergent solution. If this malfunction cannot be repaired. Camcorder care •Remove the tape, and periodically turn on it. Sand or dust may cause ...in or out. it out by the plug. AC power adaptor •Unplug the unit from AM receivers and video equipment. When you use your camcorder on a sandy beach or in a dusty place, protect it from coming into your camcorder. To disconnect the power cord, pull it may cause a fire or damage ...
...or dirty - If there are not using the unit for a long time. Never pull the power cord itself. •Do not operate the unit with a mild detergent solution. If this malfunction cannot be repaired. Camcorder care •Remove the tape, and periodically turn on it. Sand or dust may cause ...in or out. it out by the plug. AC power adaptor •Unplug the unit from AM receivers and video equipment. When you use your camcorder on a sandy beach or in a dusty place, protect it from coming into your camcorder. To disconnect the power cord, pull it may cause a fire or damage ...

Operating Instructions
Page 72
... negative 327 mV, (at output impedance more than 47 kΩ (kilohms)) Output impedance with General Power requirements 7.2 V (battery pack) 8.4 V (AC power adaptor) Average power consumption (when using the battery pack) During camera recording using LCD CCD-TRV49/TRV58/TRV68/ TRV78: 2.7 W CCD-TRV88: 3.3 W CCD-TRV98: 3.4 W Viewfinder 2.3W Operating temperature 0 °C to 40 °C (32 °F... FM system Audio recording system Rotary heads, FM system Video signal NTSC color, EIA standards Usable cassette 8mm video format cassette Hi8 or standard 8 Recording/playback time (using 120 min.
... negative 327 mV, (at output impedance more than 47 kΩ (kilohms)) Output impedance with General Power requirements 7.2 V (battery pack) 8.4 V (AC power adaptor) Average power consumption (when using the battery pack) During camera recording using LCD CCD-TRV49/TRV58/TRV68/ TRV78: 2.7 W CCD-TRV88: 3.3 W CCD-TRV98: 3.4 W Viewfinder 2.3W Operating temperature 0 °C to 40 °C (32 °F... FM system Audio recording system Rotary heads, FM system Video signal NTSC color, EIA standards Usable cassette 8mm video format cassette Hi8 or standard 8 Recording/playback time (using 120 min.

Operating Instructions
Page 80
Index A, B AC power adaptor 12 Adjusting viewfinder 24 A/V connecting cable 32, 50 BACK LIGHT 25 Battery pack 11 Beep 56 BOUNCE 36 C, D...jack 73 EDIT 53 END SEARCH 28, 31 Exposure 41 F, G, H Fade in/out 37 FADER 36 FOCUS 42 Grip strap 77 Heads 68 Hi8 system 64 M, N Manual focus 42 Menu settings 51 Mirror mode 21 Moisture condensation .......... 67 MONOTONE 36 Mosaic fader 36 NIGHTSHOT 26 NTSC system 66... 19 Zoom 23 I, J, K, L "InfoLITHIUM" battery ........ 65 Infrared rays emitter ........ 26, 33 LCD screen 21 LP mode 54 Sony Corporation Printed in Japan 306564811
Index A, B AC power adaptor 12 Adjusting viewfinder 24 A/V connecting cable 32, 50 BACK LIGHT 25 Battery pack 11 Beep 56 BOUNCE 36 C, D...jack 73 EDIT 53 END SEARCH 28, 31 Exposure 41 F, G, H Fade in/out 37 FADER 36 FOCUS 42 Grip strap 77 Heads 68 Hi8 system 64 M, N Manual focus 42 Menu settings 51 Mirror mode 21 Moisture condensation .......... 67 MONOTONE 36 Mosaic fader 36 NIGHTSHOT 26 NTSC system 66... 19 Zoom 23 I, J, K, L "InfoLITHIUM" battery ........ 65 Infrared rays emitter ........ 26, 33 LCD screen 21 LP mode 54 Sony Corporation Printed in Japan 306564811


