Operating Instructions
Page 4
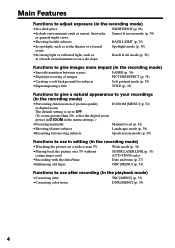
...;Preventing deterioration of picture quality in digital zoom The default setting is set to OFF. (To zoom greater than 20×, select the digital zoom power in D ZOOM in the menu settings. ) D ZOOM [MENU] (p. 52) •Focusing manually Manual focus (p. 42) •Shooting distant subjects Landscape mode... mode (p. 34) •Playing back the picture on a TV without connecting a cord •Recording with the date/time SUPER LASER LINK (p. 33) (CCD-TRV98 only) Date and time (p. 27) •Enhancing old tapes ORC [MENU] (p. 54) Functions to use after recording (in the playback mode) ...
...;Preventing deterioration of picture quality in digital zoom The default setting is set to OFF. (To zoom greater than 20×, select the digital zoom power in D ZOOM in the menu settings. ) D ZOOM [MENU] (p. 52) •Focusing manually Manual focus (p. 42) •Shooting distant subjects Landscape mode... mode (p. 34) •Playing back the picture on a TV without connecting a cord •Recording with the date/time SUPER LASER LINK (p. 33) (CCD-TRV98 only) Date and time (p. 27) •Enhancing old tapes ORC [MENU] (p. 54) Functions to use after recording (in the playback mode) ...

Operating Instructions
Page 5
... TV 32 Customizing Your Camcorder Changing the menu settings 51 Troubleshooting Types of contents Main Features 4 Quick Start Guide 6 Editing Dubbing a tape 50 Getting started Using this manual 8 Checking supplied accessories 10 Step 1 Preparing the power supply ... 11 Installing ...Using the PROGRAM AE function .... 39 Adjusting the exposure manually ...... 41 Focusing manually 42 Superimposing a title 43 Making your camcorder abroad 66 Maintenance information and precautions 67 Specifications 72 Quick Reference Identifying the parts and controls ...... 73 Index Back cover ...
... TV 32 Customizing Your Camcorder Changing the menu settings 51 Troubleshooting Types of contents Main Features 4 Quick Start Guide 6 Editing Dubbing a tape 50 Getting started Using this manual 8 Checking supplied accessories 10 Step 1 Preparing the power supply ... 11 Installing ...Using the PROGRAM AE function .... 39 Adjusting the exposure manually ...... 41 Focusing manually 42 Superimposing a title 43 Making your camcorder abroad 66 Maintenance information and precautions 67 Specifications 72 Quick Reference Identifying the parts and controls ...... 73 Index Back cover ...

Operating Instructions
Page 6
... parentheses "( )" for more information. Quick Start Guide 6 Quick Start Guide This chapter introduces you to the basic features of your camcorder outdoors (p. 11). Connect the plug with its v mark facing up . 3 Close the cassette compartment by pressing the mark on the... . The compartment opens automatically. Close the lid of the cassette compartment, and press EJECT. Connecting the power cord (p. 16) Use the battery pack when using your camcorder. AC power adaptor (supplied) Inserting a cassette (p. 19) 1 Open the lid of the cassette compartment. The cassette...
... parentheses "( )" for more information. Quick Start Guide 6 Quick Start Guide This chapter introduces you to the basic features of your camcorder outdoors (p. 11). Connect the plug with its v mark facing up . 3 Close the cassette compartment by pressing the mark on the... . The compartment opens automatically. Close the lid of the cassette compartment, and press EJECT. Connecting the power cord (p. 16) Use the battery pack when using your camcorder. AC power adaptor (supplied) Inserting a cassette (p. 19) 1 Open the lid of the cassette compartment. The cassette...
Operating Instructions
Page 7
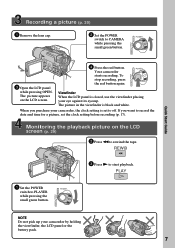
... a picture, set to off. If you purchase your camcorder, the clock setting is closed, use the viewfinder placing your camcorder by holding the viewfinder, the LCD panel or the battery pack. 7 PLAY 1 Set the POWER switch to start playback. To stop recording, press the red... while pressing the small green button. OFF (CHARGE) PLAYER POWER CAMERA Quick Start Guide 3 Open the LCD panel while pressing OPEN. OFF (CHARGE) PLAYER POWER CAMERA NOTE Do not pick up your eye against its eyecup. Your camcorder starts recording. REW 3 Press N to PLAYER while pressing the...
... a picture, set to off. If you purchase your camcorder, the clock setting is closed, use the viewfinder placing your camcorder by holding the viewfinder, the LCD panel or the battery pack. 7 PLAY 1 Set the POWER switch to start playback. To stop recording, press the red... while pressing the small green button. OFF (CHARGE) PLAYER POWER CAMERA Quick Start Guide 3 Open the LCD panel while pressing OPEN. OFF (CHARGE) PLAYER POWER CAMERA NOTE Do not pick up your eye against its eyecup. Your camcorder starts recording. REW 3 Press N to PLAYER while pressing the...

Operating Instructions
Page 8
...POWER switch to indicate that the operation is the model used for example, "CCD-TRV98 only." z TRV78 z 560× - Using this manual The instructions in this manual are for the six models listed in the illustrations. Not provided TRV49 z 450× - - z TRV88 - 560× - The CCD...z Provided - To view your camcorder. Before you need an NTSC system-based TV. 8 TRV58 - 460× - - z TRV98 z 560× z z Note on a TV, you start reading this manual, buttons and settings on your camcorder are clearly indicated in capital letters. TRV68 - 460× - Any ...
...POWER switch to indicate that the operation is the model used for example, "CCD-TRV98 only." z TRV78 z 560× - Using this manual The instructions in this manual are for the six models listed in the illustrations. Not provided TRV49 z 450× - - z TRV88 - 560× - The CCD...z Provided - To view your camcorder. Before you need an NTSC system-based TV. 8 TRV58 - 460× - - z TRV98 z 560× z z Note on a TV, you start reading this manual, buttons and settings on your camcorder are clearly indicated in capital letters. TRV68 - 460× - Any ...

Operating Instructions
Page 10
Checking supplied accessories Make sure that the following accessories are supplied with your camcorder. 1 2 3 4 5 6 7 1 Wireless Remote Commander (1) (p. 78) CCD-TRV49/TRV78/TRV98 only 4 Size AA (R6) battery for Remote Commander (2) (p. 78) CCD-TRV49/TRV78/TRV98 only 2 AC-L10A/L10B/L10C AC power adaptor (1), Power cord (1) (p. 12) 3 NP-F330 battery pack (1) (p. 11, 12) 5 A/V connecting cable (1) (p. 32) 6 Shoulder...
Checking supplied accessories Make sure that the following accessories are supplied with your camcorder. 1 2 3 4 5 6 7 1 Wireless Remote Commander (1) (p. 78) CCD-TRV49/TRV78/TRV98 only 4 Size AA (R6) battery for Remote Commander (2) (p. 78) CCD-TRV49/TRV78/TRV98 only 2 AC-L10A/L10B/L10C AC power adaptor (1), Power cord (1) (p. 12) 3 NP-F330 battery pack (1) (p. 11, 12) 5 A/V connecting cable (1) (p. 32) 6 Shoulder...
Operating Instructions
Page 11
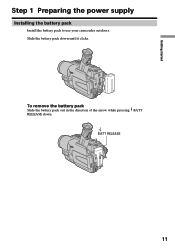
Getting started Step 1 Preparing the power supply Installing the battery pack Install the battery pack to use your camcorder outdoors. Slide the battery pack down . BATT RELEASE 11 To remove the battery pack Slide the battery pack out in the direction of the arrow while pressing BATT RELEASE down until it clicks.
Getting started Step 1 Preparing the power supply Installing the battery pack Install the battery pack to use your camcorder outdoors. Slide the battery pack down . BATT RELEASE 11 To remove the battery pack Slide the battery pack out in the direction of the arrow while pressing BATT RELEASE down until it clicks.
Operating Instructions
Page 12
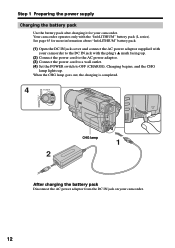
...more information about "InfoLITHIUM" battery pack. (1) Open the DC IN jack cover and connect the AC power adaptor supplied with your camcorder to OFF (CHARGE). See page 65 for your camcorder. 12 Your camcorder operates only with the plug's v mark facing up . Charging begins, and the CHG lamp lights ...up . (2) Connect the power cord to the AC power adaptor. (3) Connect the power cord to a wall outlet. (4) Set the POWER switch to the DC IN jack...
...more information about "InfoLITHIUM" battery pack. (1) Open the DC IN jack cover and connect the AC power adaptor supplied with your camcorder to OFF (CHARGE). See page 65 for your camcorder. 12 Your camcorder operates only with the plug's v mark facing up . Charging begins, and the CHG lamp lights ...up . (2) Connect the power cord to the AC power adaptor. (3) Connect the power cord to a wall outlet. (4) Set the POWER switch to the DC IN jack...

Operating Instructions
Page 13
...from coming into contact with the battery pack. This may go off although the battery remaining indicator indicates that the battery pack has enough power to operate Charge the battery pack fully again so that the indication on the battery remaining indicator is wrong with the metal parts of the...-F730/F730H/F750 NP-F930/F950 NP-F960 Full charge 150 210 300 390 420 Approximate number of the AC power adaptor. If the power may cause a short-circuit, damaging the AC power adaptor. •Keep the battery pack dry. •When the battery pack is not installed correctly. - While charging ...
...from coming into contact with the battery pack. This may go off although the battery remaining indicator indicates that the battery pack has enough power to operate Charge the battery pack fully again so that the indication on the battery remaining indicator is wrong with the metal parts of the...-F730/F730H/F750 NP-F930/F950 NP-F960 Full charge 150 210 300 390 420 Approximate number of the AC power adaptor. If the power may cause a short-circuit, damaging the AC power adaptor. •Keep the battery pack dry. •When the battery pack is not installed correctly. - While charging ...

Operating Instructions
Page 14
...be shorter if you use a fully charged battery pack * Approximate continuous recording time at 25°C (77°F). Step 1 Preparing the power supply Recording time CCD-TRV49/TRV58/TRV68/TRV78 Battery pack Recording with the viewfinder Continuous* Typical** NP-F330 (supplied) 140 75 NP-F530 245 135 NP-F550 280 155 NP... 85 190 105 315 175 385 210 495 270 590 325 700 385 Approximate number of minutes when recording while you use your camcorder in a cold environment. ** Approximate number of minutes when you repeat recording start/ stop, zooming and turning the...
...be shorter if you use a fully charged battery pack * Approximate continuous recording time at 25°C (77°F). Step 1 Preparing the power supply Recording time CCD-TRV49/TRV58/TRV68/TRV78 Battery pack Recording with the viewfinder Continuous* Typical** NP-F330 (supplied) 140 75 NP-F530 245 135 NP-F550 280 155 NP... 85 190 105 315 175 385 210 495 270 590 325 700 385 Approximate number of minutes when recording while you use your camcorder in a cold environment. ** Approximate number of minutes when you repeat recording start/ stop, zooming and turning the...
Operating Instructions
Page 15
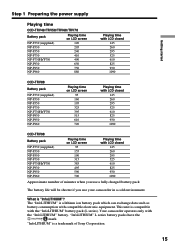
Getting started Step 1 Preparing the power supply Playing time CCD-TRV49/TRV58/TRV68/TRV78 Battery pack NP-F330 (supplied) NP-F530 NP-F550 NP-F730 NP-F730H/F750 NP-F930 NP-F950 NP-F960 Playing time on LCD ... 395 515 610 720 Playing time with LCD closed 145 260 295 525 610 825 930 1090 Approximate number of Sony Corporation. 15 "InfoLITHIUM" L series battery packs have the mark. Your camcorder operates only with compatible electronic equipment. What is a lithium ion battery pack which can exchange data such as battery consumption...
Getting started Step 1 Preparing the power supply Playing time CCD-TRV49/TRV58/TRV68/TRV78 Battery pack NP-F330 (supplied) NP-F530 NP-F550 NP-F730 NP-F730H/F750 NP-F930 NP-F950 NP-F960 Playing time on LCD ... 395 515 610 720 Playing time with LCD closed 145 260 295 525 610 825 930 1090 Approximate number of Sony Corporation. 15 "InfoLITHIUM" L series battery packs have the mark. Your camcorder operates only with compatible electronic equipment. What is a lithium ion battery pack which can exchange data such as battery consumption...

Operating Instructions
Page 16
... the set is not plugged into a wall outlet. •Place the AC power adaptor near a wall outlet. Using a car battery Use Sony DC Adaptor/Charger (optional). 16 Step 1 Preparing the power supply Connecting to a wall outlet When you use your camcorder for a long time, we recommend that the battery pack cannot supply any trouble...
... the set is not plugged into a wall outlet. •Place the AC power adaptor near a wall outlet. Using a car battery Use Sony DC Adaptor/Charger (optional). 16 Step 1 Preparing the power supply Connecting to a wall outlet When you use your camcorder for a long time, we recommend that the battery pack cannot supply any trouble...

Operating Instructions
Page 19
... cassette compartment. 2 3 EJECT 4,5 To eject a cassette Follow the procedure above, and eject the cassette in the Hi8 system, use Hi8 video cassettes . (1) Prepare the power supply (p. 11). (2) Open the lid of the cassette compartment. The cassette compartment opens automatically. (3) Insert a cassette... with its window facing out and the write-protect tab on the cassette up your camcorder by ...
... cassette compartment. 2 3 EJECT 4,5 To eject a cassette Follow the procedure above, and eject the cassette in the Hi8 system, use Hi8 video cassettes . (1) Prepare the power supply (p. 11). (2) Open the lid of the cassette compartment. The cassette compartment opens automatically. (3) Insert a cassette... with its window facing out and the write-protect tab on the cassette up your camcorder by ...
Operating Instructions
Page 20
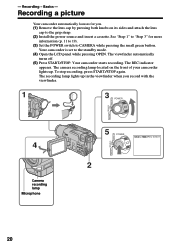
...lens cap by pressing both knobs on the front of your camcorder lights up in the viewfinder when you record with the viewfinder. 1 3 POWER PLAYER OFF (CHARGE) CAMERA 4 Camera recording lamp Microphone PLAYER 5 POWER 40min REC 0:00:01 OFF (CHARGE) CAMERA 2 20 ...indicator appears. The recording lamp lights up . - Your camcorder starts recording. Recording - Recording a picture Your camcorder automatically focuses for more information (p. 11 to 19). (3) Set the POWER switch to the grip strap. (2) Install the power source and insert a cassette. To stop recording, press...
...lens cap by pressing both knobs on the front of your camcorder lights up in the viewfinder when you record with the viewfinder. 1 3 POWER PLAYER OFF (CHARGE) CAMERA 4 Camera recording lamp Microphone PLAYER 5 POWER 40min REC 0:00:01 OFF (CHARGE) CAMERA 2 20 ...indicator appears. The recording lamp lights up . - Your camcorder starts recording. Recording - Recording a picture Your camcorder automatically focuses for more information (p. 11 to 19). (3) Set the POWER switch to the grip strap. (2) Install the power source and insert a cassette. To stop recording, press...

Operating Instructions
Page 21
... Do not touch the built-in the standby mode for 5 minutes while the cassette is to save battery power and to prevent battery and tape wear. If you turn it into the camcorder body. 21 To resume the standby mode, set it vertically until it clicks, and swing it to OFF... (CHARGE). (2) Close the LCD panel. (3) Eject the cassette. (4) Attach the lens cap. After using your camcorder Remove the battery pack from your camcorder to the lens side. Basics Recording a picture Note Fasten the grip strap firmly. If you change the battery pack, set the counter...
... Do not touch the built-in the standby mode for 5 minutes while the cassette is to save battery power and to prevent battery and tape wear. If you turn it into the camcorder body. 21 To resume the standby mode, set it vertically until it clicks, and swing it to OFF... (CHARGE). (2) Close the LCD panel. (3) Eject the cassette. (4) Attach the lens cap. After using your camcorder Remove the battery pack from your camcorder to the lens side. Basics Recording a picture Note Fasten the grip strap firmly. If you change the battery pack, set the counter...

Operating Instructions
Page 23
...function sparingly results in the wide-angle position. To activate digital zoom, select the digital zoom power in D ZOOM in the menu settings. (p. 52) The picture quality deteriorates as you select the digital zoom power in D ZOOM in the menu settings. W T The right side of the bar shows ...-angle (subject appears farther away) W T WT W T Recording - When you shoot close to a subject If you cannot get a sharp focus, move the power zoom lever to function when zoom exceeds 20×. • The picture quality deteriorates as the picture is at least about 80 cm (about 2 feet...
...function sparingly results in the wide-angle position. To activate digital zoom, select the digital zoom power in D ZOOM in the menu settings. (p. 52) The picture quality deteriorates as you select the digital zoom power in D ZOOM in the menu settings. W T The right side of the bar shows ...-angle (subject appears farther away) W T WT W T Recording - When you shoot close to a subject If you cannot get a sharp focus, move the power zoom lever to function when zoom exceeds 20×. • The picture quality deteriorates as the picture is at least about 80 cm (about 2 feet...

Operating Instructions
Page 29
... the screen. Basics - You can control playback using the Remote Commander supplied with your camcorder (CCD-TRV49/TRV78/TRV98 only). (1) Install the power source and insert the recorded tape. (2) Set the POWER switch to PLAYER while pressing the small green button. (3) Open the LCD panel while pressing... the tape. (5) Press N to start playback. (6) To adjust the volume, press either of the two buttons on your camcorder is silent when the LCD panel is closed. 4 REW 5 PLAY 2 POWER PLAYER OFF (CHARGE) CAMERA 3 To stop playback Press x. 6 VOLUME 29 Basics - Playback - Playback -
... the screen. Basics - You can control playback using the Remote Commander supplied with your camcorder (CCD-TRV49/TRV78/TRV98 only). (1) Install the power source and insert the recorded tape. (2) Set the POWER switch to PLAYER while pressing the small green button. (3) Open the LCD panel while pressing... the tape. (5) Press N to start playback. (6) To adjust the volume, press either of the two buttons on your camcorder is silent when the LCD panel is closed. 4 REW 5 PLAY 2 POWER PLAYER OFF (CHARGE) CAMERA 3 To stop playback Press x. 6 VOLUME 29 Basics - Playback - Playback -
Operating Instructions
Page 31
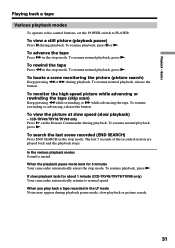
... resume normal playback, release the button. Playback - To resume playback, press X or N. When the playback pause mode lasts for about 1 minute (CCD-TRV49/TRV78/TRV98 only) Your camcorder automatically returns to PLAYER. To locate a scene monitoring the picture (picture search) Keep pressing m or M during playback... playback) - To resume normal playback, press N. Basics Playing back a tape Various playback modes To operate video control buttons, set the POWER switch to normal speed. The last 5 seconds of the recorded section are played back and the playback stops.
... resume normal playback, release the button. Playback - To resume playback, press X or N. When the playback pause mode lasts for about 1 minute (CCD-TRV49/TRV78/TRV98 only) Your camcorder automatically returns to PLAYER. To locate a scene monitoring the picture (picture search) Keep pressing m or M during playback... playback) - To resume normal playback, press N. Basics Playing back a tape Various playback modes To operate video control buttons, set the POWER switch to normal speed. The last 5 seconds of the recorded section are played back and the playback stops.

Operating Instructions
Page 32
...connect the yellow (video) plug of the A/V connecting cable. With this connection, you power your camcorder from a wall outlet using the A/V connecting cable supplied with your camcorder to watch the playback picture on both your camcorder and the TV. 32 Set the input selector on the VCR by using the AC... power adaptor (p. 16). Refer to the operating instructions of your TV. Refer to the operating instructions of your TV and the RFU adaptor. Connect your camcorder to the TV using an S video cable (optional) to obtain ...
...connect the yellow (video) plug of the A/V connecting cable. With this connection, you power your camcorder from a wall outlet using the A/V connecting cable supplied with your camcorder to watch the playback picture on both your camcorder and the TV. 32 Set the input selector on the VCR by using the AC... power adaptor (p. 16). Refer to the operating instructions of your TV. Refer to the operating instructions of your TV and the RFU adaptor. Connect your camcorder to the TV using an S video cable (optional) to obtain ...

Operating Instructions
Page 33
... PLAYER. (3) Turn the TV on and set the TV/VCR selector on your camcorder to VCR. (4) Press SUPER LASER LINK. CCD-TRV98 only Once you connect the AV cordless IR receiver (optional) to turn the power off The super laser link function turns off the super laser link function when it... is lit), your camcorder and the AV cordless IR receiver to the operating instructions of Sony Corporation. 33 ...
... PLAYER. (3) Turn the TV on and set the TV/VCR selector on your camcorder to VCR. (4) Press SUPER LASER LINK. CCD-TRV98 only Once you connect the AV cordless IR receiver (optional) to turn the power off The super laser link function turns off the super laser link function when it... is lit), your camcorder and the AV cordless IR receiver to the operating instructions of Sony Corporation. 33 ...

