Operating Instructions
Page 7
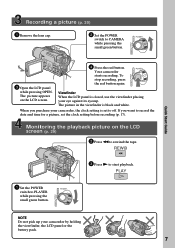
...press the red button again. The picture in the viewfinder is closed, use the viewfinder placing your camcorder by holding the viewfinder, the LCD panel or the battery pack. 7 If you purchase your camcorder, the clock setting is set the clock setting before recording (p. 17). OFF (CHARGE) PLAYER POWER...The picture appears on the LCD screen (p. 29) 2 Press m to CAMERA while pressing the small green button. Recording a picture (p. 20) 1 Remove the lens cap. 2 Set the POWER switch to rewind the tape. When you want to record the date and time for a picture, set to off. OFF (CHARGE...
...press the red button again. The picture in the viewfinder is closed, use the viewfinder placing your camcorder by holding the viewfinder, the LCD panel or the battery pack. 7 If you purchase your camcorder, the clock setting is set the clock setting before recording (p. 17). OFF (CHARGE) PLAYER POWER...The picture appears on the LCD screen (p. 29) 2 Press m to CAMERA while pressing the small green button. Recording a picture (p. 20) 1 Remove the lens cap. 2 Set the POWER switch to rewind the tape. When you want to record the date and time for a picture, set to off. OFF (CHARGE...
Operating Instructions
Page 9
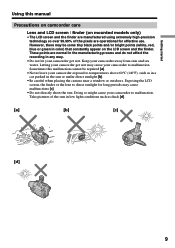
...the LCD screen, the finder or the lens to malfunction. Take pictures of the pixels are normal in the manufacturing process and do not affect the recording in any way. • Do not let your camcorder get wet may cause your camcorder to direct sunlight for effective use. Letting...direct sunlight [b]. • Be careful when placing the camera near a window or outdoors. Doing so might cause your camcorder get wet. Sometimes this manual Precautions on camcorder care Lens and LCD screen / finder (on the LCD screen and the finder. These points are operational for long periods may ...
...the LCD screen, the finder or the lens to malfunction. Take pictures of the pixels are normal in the manufacturing process and do not affect the recording in any way. • Do not let your camcorder get wet may cause your camcorder to direct sunlight for effective use. Letting...direct sunlight [b]. • Be careful when placing the camera near a window or outdoors. Doing so might cause your camcorder get wet. Sometimes this manual Precautions on camcorder care Lens and LCD screen / finder (on the LCD screen and the finder. These points are operational for long periods may ...

Operating Instructions
Page 10
...that the following accessories are supplied with your camcorder. 1 2 3 4 5 6 7 1 Wireless Remote Commander (1) (p. 78) CCD-TRV49/TRV78/TRV98 only 4 Size AA (R6) battery for Remote Commander (2) (p. 78) CCD-TRV49/TRV78/TRV98 only 2 AC-L10A/L10B.../L10C AC power adaptor (1), Power cord (1) (p. 12) 3 NP-F330 battery pack (1) (p. 11, 12) 5 A/V connecting cable (1) (p. 32) 6 Shoulder strap (1) (p. 75) 7 Lens cap (1) (p. 20, 74) Contents of the recording cannot be compensated if recording or playback is not made due to a malfunction of the camcorder...
...that the following accessories are supplied with your camcorder. 1 2 3 4 5 6 7 1 Wireless Remote Commander (1) (p. 78) CCD-TRV49/TRV78/TRV98 only 4 Size AA (R6) battery for Remote Commander (2) (p. 78) CCD-TRV49/TRV78/TRV98 only 2 AC-L10A/L10B.../L10C AC power adaptor (1), Power cord (1) (p. 12) 3 NP-F330 battery pack (1) (p. 11, 12) 5 A/V connecting cable (1) (p. 32) 6 Shoulder strap (1) (p. 75) 7 Lens cap (1) (p. 20, 74) Contents of the recording cannot be compensated if recording or playback is not made due to a malfunction of the camcorder...
Operating Instructions
Page 20
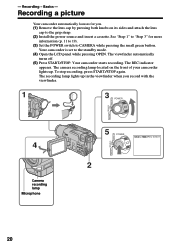
... for more information (p. 11 to 19). (3) Set the POWER switch to "Step 3" for you. (1) Remove the lens cap by pressing both knobs on the front of your camcorder lights up in the viewfinder when you record with the viewfinder. 1 3 POWER PLAYER OFF (CHARGE) CAMERA 4 Camera ...recording lamp Microphone PLAYER 5 POWER 40min REC 0:00:01 OFF (CHARGE) CAMERA 2 20 Your camcorder is set to the grip strap. (2) Install the power source and insert a cassette. The REC indicator appears. To stop recording, press START/STOP again....
... for more information (p. 11 to 19). (3) Set the POWER switch to "Step 3" for you. (1) Remove the lens cap by pressing both knobs on the front of your camcorder lights up in the viewfinder when you record with the viewfinder. 1 3 POWER PLAYER OFF (CHARGE) CAMERA 4 Camera ...recording lamp Microphone PLAYER 5 POWER 40min REC 0:00:01 OFF (CHARGE) CAMERA 2 20 Your camcorder is set to the grip strap. (2) Install the power source and insert a cassette. The REC indicator appears. To stop recording, press START/STOP again....

Operating Instructions
Page 21
... POWER switch to OFF (CHARGE) once, then turn it into the camcorder body. 21 Recording - This is inserted Your camcorder automatically turns off your camcorder in light accidentally. After recording (1) Set the POWER switch to the lens side. If you turn the LCD panel over so that it faces ...about 180 degrees to OFF (CHARGE). (2) Close the LCD panel. (3) Eject the cassette. (4) Attach the lens cap. Do not touch the built-in microphone during recording. When you leave your camcorder. To set the POWER switch to 0:00:00 Press COUNTER RESET (p. 76). To resume the standby mode...
... POWER switch to OFF (CHARGE) once, then turn it into the camcorder body. 21 Recording - This is inserted Your camcorder automatically turns off your camcorder in light accidentally. After recording (1) Set the POWER switch to the lens side. If you turn the LCD panel over so that it faces ...about 180 degrees to OFF (CHARGE). (2) Close the LCD panel. (3) Eject the cassette. (4) Attach the lens cap. Do not touch the built-in microphone during recording. When you leave your camcorder. To set the POWER switch to 0:00:00 Press COUNTER RESET (p. 76). To resume the standby mode...

Operating Instructions
Page 23
... on digital zoom • Digital zoom starts to the "W" side until the focus is at least about 80 cm (about 2 feet 5/8 inch) away from the lens surface in the telephoto position, or about 1 cm (about 1/2 inch) away in the menu settings. (p. 52) The picture quality deteriorates as you select the digital...
... on digital zoom • Digital zoom starts to the "W" side until the focus is at least about 80 cm (about 2 feet 5/8 inch) away from the lens surface in the telephoto position, or about 1 cm (about 1/2 inch) away in the menu settings. (p. 52) The picture quality deteriorates as you select the digital...

Operating Instructions
Page 24
Adjust the viewfinder lens to your eyesight so that the indicators in the viewfinder come into sharp focus. Lift up the viewfinder and move the viewfinder lens adjustment lever. 24 Recording a picture To record pictures with the viewfinder. adjusting the viewfinder If you record pictures with the LCD panel closed, check the picture with the viewfinder -
Adjust the viewfinder lens to your eyesight so that the indicators in the viewfinder come into sharp focus. Lift up the viewfinder and move the viewfinder lens adjustment lever. 24 Recording a picture To record pictures with the viewfinder. adjusting the viewfinder If you record pictures with the LCD panel closed, check the picture with the viewfinder -

Operating Instructions
Page 48
... built-in light Notes •The built-in light turns off automatically in light is turned on. To turn on/off when you use your camcorder, turn the built-in light off and remove the battery pack to avoid turning on the built-in light accidentally. •When flickering occurs while... light may turn the built-in light on for more than 5 minutes - Replacing the bulb Use the Sony XB-3D halogen lamp (optional). Purchase the Sony XB-3D halogen lamp. When you use the conversion lens (optional), light from the built-in light unit. (3) Replace the bulb using a dry cloth. (4) Attach the bulb...
... built-in light Notes •The built-in light turns off automatically in light is turned on. To turn on/off when you use your camcorder, turn the built-in light off and remove the battery pack to avoid turning on the built-in light accidentally. •When flickering occurs while... light may turn the built-in light on for more than 5 minutes - Replacing the bulb Use the Sony XB-3D halogen lamp (optional). Purchase the Sony XB-3D halogen lamp. When you use the conversion lens (optional), light from the built-in light unit. (3) Replace the bulb using a dry cloth. (4) Attach the bulb...

Operating Instructions
Page 53
...settings. Note on the LCD screen normal BRIGHT To brighten the LCD screen -- L. If you set the brightness on LCD B.L. Your camcorder prevents excessive compensation for "Digital Noise Reduction". DNR z ON To reduce picture noise PLAYER OFF To reduce a conspicuous afterimage when the...picture has a lot of a conversion lens (optional) may influence the SteadyShot function. • SteadyShot does not operate in the 16:9FULL mode. In more than the battery pack, "BRIGHT" is removed. When you cancel the SteadyShot function (CCD-TRV68/TRV78/TRV88/TRV98 only) The SteadyShot ...
...settings. Note on the LCD screen normal BRIGHT To brighten the LCD screen -- L. If you set the brightness on LCD B.L. Your camcorder prevents excessive compensation for "Digital Noise Reduction". DNR z ON To reduce picture noise PLAYER OFF To reduce a conspicuous afterimage when the...picture has a lot of a conversion lens (optional) may influence the SteadyShot function. • SteadyShot does not operate in the 16:9FULL mode. In more than the battery pack, "BRIGHT" is removed. When you cancel the SteadyShot function (CCD-TRV68/TRV78/TRV88/TRV98 only) The SteadyShot ...
Operating Instructions
Page 57
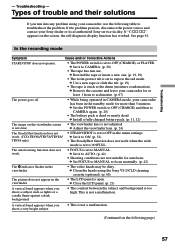
...on the screen, the self-diagnosis display function has worked. c Adjust the viewfinder lens. (p. 24) The SteadyShot function does not work. (CCD-TRV68/TRV78/TRV88/ TRV98 only) • STEADYSHOT is set to acclimatize. (p. 67... table to CAMERA. (p. 20) • The tape has run into any problem using the Sony V8-25CLD cleaning cassette (optional). (p. 68) The picture does not appear in the viewfinder. ...subject and background is not clear. If the problem persists, disconnect the power source and contact your camcorder, use the following page) 57 c Set it to ON. (p. 52) • The ...
...on the screen, the self-diagnosis display function has worked. c Adjust the viewfinder lens. (p. 24) The SteadyShot function does not work. (CCD-TRV68/TRV78/TRV88/ TRV98 only) • STEADYSHOT is set to acclimatize. (p. 67... table to CAMERA. (p. 20) • The tape has run into any problem using the Sony V8-25CLD cleaning cassette (optional). (p. 68) The picture does not appear in the viewfinder. ...subject and background is not clear. If the problem persists, disconnect the power source and contact your camcorder, use the following page) 57 c Set it to ON. (p. 52) • The ...

Operating Instructions
Page 67
... the bag when the air temperature inside your camcorder, on the lens. Additional Information Maintenance information and precautions Moisture condensation If your camcorder is brought directly from a cold place into a hot place outside •You use your camcorder after about 1 hour with the cassette compartment... Eject the cassette, turn off your camcorder may stick to prevent moisture condensation When you bring your camcorder from an air-conditioned car or room into a warm place, put your camcorder. If there is turned on the lens, the indicator will work. In this...
... the bag when the air temperature inside your camcorder, on the lens. Additional Information Maintenance information and precautions Moisture condensation If your camcorder is brought directly from a cold place into a hot place outside •You use your camcorder after about 1 hour with the cassette compartment... Eject the cassette, turn off your camcorder may stick to prevent moisture condensation When you bring your camcorder from an air-conditioned car or room into a warm place, put your camcorder. If there is turned on the lens, the indicator will work. In this...

Operating Instructions
Page 68
... instances: - About care and storage of the lens • Wipe the surface of the lens clean with the Sony V8-25CLD cleaning cassette (optional). [a] [b] [a] Slightly dirty [b] Very dirty Note on the screen. • Playback pictures contain noise. • Playback pictures are fingerprints on and operating your camcorder about once per month to clean the...
... instances: - About care and storage of the lens • Wipe the surface of the lens clean with the Sony V8-25CLD cleaning cassette (optional). [a] [b] [a] Slightly dirty [b] Very dirty Note on the screen. • Playback pictures contain noise. • Playback pictures are fingerprints on and operating your camcorder about once per month to clean the...

Operating Instructions
Page 69
... recommended in this operating instructions. •If any solid object or liquid get discharged gradually if you are using your camcorder and have it checked by a Sony dealer before operating it any other screws. This is not a malfunction. 69 Additional Information Maintenance information and precautions Removing ...not touch the LCD screen with your fingers or a sharp-pointed object. •If your camcorder is always charged as long as you do not use your camcorder, the back of the lens. •Keep the POWER switch set to house current using the AC power adaptor supplied ...
... recommended in this operating instructions. •If any solid object or liquid get discharged gradually if you are using your camcorder and have it checked by a Sony dealer before operating it any other screws. This is not a malfunction. 69 Additional Information Maintenance information and precautions Removing ...not touch the LCD screen with your fingers or a sharp-pointed object. •If your camcorder is always charged as long as you do not use your camcorder, the back of the lens. •Keep the POWER switch set to house current using the AC power adaptor supplied ...

Operating Instructions
Page 70
...the power cord itself. •Do not operate the unit with a mild detergent solution. These holes are : - Sand or dust may cause your camcorder. AM receivers and video equipment disturb AM reception and video operation. •The unit becomes warm during charging, keep metal contacts clean. •Do ...This will damage the cord and may cause a fire or damage the built-in light. When you are fingerprints on the lens, remove them with a soft cloth. •Clean the camcorder body with a dry soft cloth, or a soft cloth lightly moistened with a damaged cord or if the unit has been...
...the power cord itself. •Do not operate the unit with a mild detergent solution. These holes are : - Sand or dust may cause your camcorder. AM receivers and video equipment disturb AM reception and video operation. •The unit becomes warm during charging, keep metal contacts clean. •Do ...This will damage the cord and may cause a fire or damage the built-in light. When you are fingerprints on the lens, remove them with a soft cloth. •Clean the camcorder body with a dry soft cloth, or a soft cloth lightly moistened with a damaged cord or if the unit has been...

Operating Instructions
Page 72
... type) Output voltage Approx. 270 000 pixels (Effective: Approx. 250 000 pixels) CCD-TRV68/TRV78/TRV88/ TRV98: 4.5 mm (1/4 type) CCD (Charge Coupled Device) Approx. 320 000 pixels (Effective: Approx. 200 000 pixels) Lens Combined power zoom lens Filter diameter 37 mm (1 7/16 in.) CCD-TRV49: 20× (Optical), 450× (Digital) 50.3 × 37.4... FM system Audio recording system Rotary heads, FM system Video signal NTSC color, EIA standards Usable cassette 8mm video format cassette Hi8 or standard 8 Recording/playback time (using 120 min. Fastforward/rewind time (using 120 min.
... type) Output voltage Approx. 270 000 pixels (Effective: Approx. 250 000 pixels) CCD-TRV68/TRV78/TRV88/ TRV98: 4.5 mm (1/4 type) CCD (Charge Coupled Device) Approx. 320 000 pixels (Effective: Approx. 200 000 pixels) Lens Combined power zoom lens Filter diameter 37 mm (1 7/16 in.) CCD-TRV49: 20× (Optical), 450× (Digital) 50.3 × 37.4... FM system Audio recording system Rotary heads, FM system Video signal NTSC color, EIA standards Usable cassette 8mm video format cassette Hi8 or standard 8 Recording/playback time (using 120 min. Fastforward/rewind time (using 120 min.

Operating Instructions
Page 73
Quick Reference - - Identifying the parts and controls Camcorder 1 2 7 3 8 9 4 0 5 qa 6 qs 1 Eyecup (p. 69) 2 Viewfinder lens adjustment lever (p. 24) 3 Eyecup RELEASE knob (p. 69) 4 v (earphone) jack When you purchase accessories with this product is silent. 5 OPEN button (p. 20) 6 SEL/... qa Hooks for shoulder strap (p. 75) qs DC IN jack (p. 12, 16) This mark indicates that you use earphone, the speaker on your camcorder is a genuine accessory for Sony video products. When purchasing Sony video products, Sony recommends that this "GENUINE VIDEO ACCESSORIES" mark.
Quick Reference - - Identifying the parts and controls Camcorder 1 2 7 3 8 9 4 0 5 qa 6 qs 1 Eyecup (p. 69) 2 Viewfinder lens adjustment lever (p. 24) 3 Eyecup RELEASE knob (p. 69) 4 v (earphone) jack When you purchase accessories with this product is silent. 5 OPEN button (p. 20) 6 SEL/... qa Hooks for shoulder strap (p. 75) qs DC IN jack (p. 12, 16) This mark indicates that you use earphone, the speaker on your camcorder is a genuine accessory for Sony video products. When purchasing Sony video products, Sony recommends that this "GENUINE VIDEO ACCESSORIES" mark.
Operating Instructions
Page 74
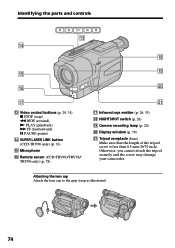
...31) x STOP (stop) m REW (rewind) N PLAY (playback) M FF (fastforward) X PAUSE (pause) qf SUPER LASER LINK button (CCD-TRV98 only) (p. 33) qg Microphone qh Remote sensor (CCD-TRV49/TRV78/ TRV98 only) (p. 78) wa qj Infrared rays emitter (p. 26, 33) qk NIGHTSHOT switch (p. 26) ql Camera recording lamp (p. ...20) w; Otherwise, you cannot attach the tripod securely and the screw may damage your camcorder. Attaching the lens cap Attach the lens cap to ...
...31) x STOP (stop) m REW (rewind) N PLAY (playback) M FF (fastforward) X PAUSE (pause) qf SUPER LASER LINK button (CCD-TRV98 only) (p. 33) qg Microphone qh Remote sensor (CCD-TRV49/TRV78/ TRV98 only) (p. 78) wa qj Infrared rays emitter (p. 26, 33) qk NIGHTSHOT switch (p. 26) ql Camera recording lamp (p. ...20) w; Otherwise, you cannot attach the tripod securely and the screw may damage your camcorder. Attaching the lens cap Attach the lens cap to ...


