Operating Instructions
Page 9
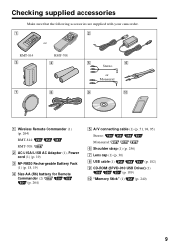
...) 3 NP-FM30 Rechargeable Battery Pack (1) (p. 18, 19) 4 Size AA (R6) battery for Remote Commander (2) (p. 264) 5 A/V connecting cable (1) (p. 51, 94, 95) Stereo: Monaural: 6 Shoulder strap (1) (p. 256) 7 Lens cap (1) (p. 30) 8 USB cable (1) (p. 182) 9 CD-ROM (SPVD-010 USB Driver) (1) (p. 189) 0 "Memory Stick" (1) (p. 240) 9
...) 3 NP-FM30 Rechargeable Battery Pack (1) (p. 18, 19) 4 Size AA (R6) battery for Remote Commander (2) (p. 264) 5 A/V connecting cable (1) (p. 51, 94, 95) Stereo: Monaural: 6 Shoulder strap (1) (p. 256) 7 Lens cap (1) (p. 30) 8 USB cable (1) (p. 182) 9 CD-ROM (SPVD-010 USB Driver) (1) (p. 189) 0 "Memory Stick" (1) (p. 240) 9

Operating Instructions
Page 11
REW 3 Press N to record the date and time for a picture, set up your camcorder by the ...you want to start playback. The cap is not attached when you purchase your eyesight (p. 35). Adjust the viewfinder lens to VCR/PLAYER while pressing the small green button.* V POWER OFF(CHG) CAM ME Note Do not pick up...screen. 2 Set the POWER switch to rewind the tape. Your camcorder starts recording. ERMAORY ERMAORY Quick Start Guide Recording a picture (p. 30) 1 Remove the lens cap. To stop recording, press START/ STOP again. When you purchase your eye against this part ...
REW 3 Press N to record the date and time for a picture, set up your camcorder by the ...you want to start playback. The cap is not attached when you purchase your eyesight (p. 35). Adjust the viewfinder lens to VCR/PLAYER while pressing the small green button.* V POWER OFF(CHG) CAM ME Note Do not pick up...screen. 2 Set the POWER switch to rewind the tape. Your camcorder starts recording. ERMAORY ERMAORY Quick Start Guide Recording a picture (p. 30) 1 Remove the lens cap. To stop recording, press START/ STOP again. When you purchase your eye against this part ...
Operating Instructions
Page 13
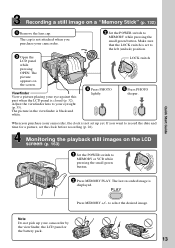
... by the viewfinder, the LCD panel or the battery pack. 13 Quick Start Guide ERMAORY ERMAORY Recording a still image on the screen. The picture appears on a "Memory Stick" (p. 132) 1 Remove the lens cap. Make sure that the LOCK switch is closed (p. 32). Note Do not pick up ...yet. When you purchase your camcorder. 3 Open the LCD panel while pressing OPEN. PHOTO PHOTO 2 Set the POWER switch to the left (unlock) position. The last recorded image is black and...
... by the viewfinder, the LCD panel or the battery pack. 13 Quick Start Guide ERMAORY ERMAORY Recording a still image on the screen. The picture appears on a "Memory Stick" (p. 132) 1 Remove the lens cap. Make sure that the LOCK switch is closed (p. 32). Note Do not pick up ...yet. When you purchase your camcorder. 3 Open the LCD panel while pressing OPEN. PHOTO PHOTO 2 Set the POWER switch to the left (unlock) position. The last recorded image is black and...
Operating Instructions
Page 17
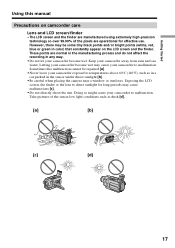
.../or bright points (white, red, blue or green in color) that constantly appear on camcorder care Lens and LCD screen/finder • The LCD screen and the finder are manufactured using extremely high-precision ... pictures of the pixels are normal in the manufacturing process and do not affect the recording in low light conditions such as in a car parked in the sun or under direct sunlight [b]. ...•Be careful when placing the camera near a window or outdoors. These points are operational for long periods may cause your camcorder become...
.../or bright points (white, red, blue or green in color) that constantly appear on camcorder care Lens and LCD screen/finder • The LCD screen and the finder are manufactured using extremely high-precision ... pictures of the pixels are normal in the manufacturing process and do not affect the recording in low light conditions such as in a car parked in the sun or under direct sunlight [b]. ...•Be careful when placing the camera near a window or outdoors. These points are operational for long periods may cause your camcorder become...

Operating Instructions
Page 30
...press DATA CODE on the screen. Recording - The recording lamp lights up . Your camcorder starts recording. - This sets your camcorder lights up in microphone during recording. The camera recording lamp located on the front of ...your camcorder to the standby mode. (4) Open the LCD panel while pressing OPEN. To stop recording, press START/STOP again. However, they are not displayed during recording. 30 Recording a picture Your camcorder automatically focuses. (1) Remove the lens cap and attach the lens cap to CAMERA...
...press DATA CODE on the screen. Recording - The recording lamp lights up . Your camcorder starts recording. - This sets your camcorder lights up in microphone during recording. The camera recording lamp located on the front of ...your camcorder to the standby mode. (4) Open the LCD panel while pressing OPEN. To stop recording, press START/STOP again. However, they are not displayed during recording. 30 Recording a picture Your camcorder automatically focuses. (1) Remove the lens cap and attach the lens cap to CAMERA...
Operating Instructions
Page 32
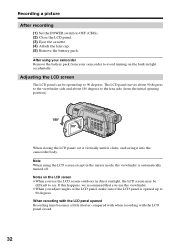
...Note When using your camcorder to see. The LCD panel moves about 90 degrees to the viewfinder side and about 180 degrees to the lens side (from your camcorder Remove the battery pack from the initial opening position). 180° 90° When closing the LCD panel, ...LCD screen except in light accidentally. Notes on the built-in the mirror mode, the viewfinder is opened Recording time becomes a little shorter compared with when recording with the LCD panel closed. 32 When recording with the LCD panel opened up to OFF (CHG). (2) Close the LCD panel. (3) Eject the cassette...
...Note When using your camcorder to see. The LCD panel moves about 90 degrees to the viewfinder side and about 180 degrees to the lens side (from your camcorder Remove the battery pack from the initial opening position). 180° 90° When closing the LCD panel, ...LCD screen except in light accidentally. Notes on the built-in the mirror mode, the viewfinder is opened Recording time becomes a little shorter compared with when recording with the LCD panel closed. 32 When recording with the LCD panel opened up to OFF (CHG). (2) Close the LCD panel. (3) Eject the cassette...
Operating Instructions
Page 34
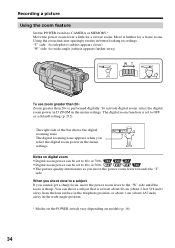
...activate digital zoom, select the digital zoom power in D ZOOM in better-looking recordings. The digital zoom function is sharp. W T The digital zooming zone appears...× Zoom greater than 20× is at least about 80 cm (about 2 feet 5/8 inch) away from the lens surface in the telephoto position, or about 1 cm (about 1/2 inch) away in the menu settings. When you shoot close... Digital zoom power can shoot a subject that is performed digitally. Recording a picture Using the zoom feature Set the POWER switch to CAMERA or MEMORY.* Move the power zoom lever a little for a faster zoom.
...activate digital zoom, select the digital zoom power in D ZOOM in better-looking recordings. The digital zoom function is sharp. W T The digital zooming zone appears...× Zoom greater than 20× is at least about 80 cm (about 2 feet 5/8 inch) away from the lens surface in the telephoto position, or about 1 cm (about 1/2 inch) away in the menu settings. When you shoot close... Digital zoom power can shoot a subject that is performed digitally. Recording a picture Using the zoom feature Set the POWER switch to CAMERA or MEMORY.* Move the power zoom lever a little for a faster zoom.
Operating Instructions
Page 35
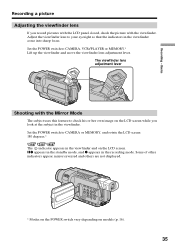
...on the POWER switch vary depending on the LCD screen. Set the POWER switch to CAMERA or MEMORY, and rotate the LCD screen 180 degrees.* The indicator appears in the recording mode. The viewfinder lens adjustment lever Shooting with the Mirror Mode The subject uses this feature to your eyesight ..., and z appears in the viewfinder and on models (p. 16). 35 Basics Recording a picture Adjusting the viewfinder lens If you look at the subject in the viewfinder come into sharp focus. Set the POWER switch to CAMERA, VCR/PLAYER or MEMORY.* Lift up the viewfinder and move the viewfinder...
...on the POWER switch vary depending on the LCD screen. Set the POWER switch to CAMERA or MEMORY, and rotate the LCD screen 180 degrees.* The indicator appears in the recording mode. The viewfinder lens adjustment lever Shooting with the Mirror Mode The subject uses this feature to your eyesight ..., and z appears in the viewfinder and on models (p. 16). 35 Basics Recording a picture Adjusting the viewfinder lens If you look at the subject in the viewfinder come into sharp focus. Set the POWER switch to CAMERA, VCR/PLAYER or MEMORY.* Lift up the viewfinder and move the viewfinder...

Operating Instructions
Page 80
... AUTO mode ( ) for more than five minutes with no cassette inserted or after the tape has run out. Interval time of Interval recording •When you use the conversion lens (optional), light from the built-in light is blocked and may turn off when inserting or ejecting a cassette. •The built-in...
... AUTO mode ( ) for more than five minutes with no cassette inserted or after the tape has run out. Interval time of Interval recording •When you use the conversion lens (optional), light from the built-in light is blocked and may turn off when inserting or ejecting a cassette. •The built-in...

Operating Instructions
Page 213
... you cancel the SteadyShot function *7) The SteadyShot off indicator appears on the SteadyShot function *7) •The SteadyShot function will not correct excessive camera-shake. •Attachment of a conversion lens (optional) may influence the SteadyShot function. To cancel the SteadyShot function. To cancel the NightShot Light function. To use the NightShot Light function...
... you cancel the SteadyShot function *7) The SteadyShot off indicator appears on the SteadyShot function *7) •The SteadyShot function will not correct excessive camera-shake. •Attachment of a conversion lens (optional) may influence the SteadyShot function. To cancel the SteadyShot function. To cancel the NightShot Light function. To use the NightShot Light function...
Operating Instructions
Page 224
...; The tape is set to focus manually (p. 71). • The video heads may be dirty. c Adjust the viewfinder lens (p. 35). • STEADYSHOT is dead or nearly dead. c Adjust to OFF in CAMERA mode, your Sony dealer or local authorized Sony service facility. Cause and/or Corrective Action • The POWER switch is...switch to OFF (CHG) and then to CAMERA. c Set the autofocus mode (p. 71). • Shooting conditions are not suitable for at least one (p. 28, 45). • The write-protect tab is stuck to expose the red mark. In the recording mode Symptom START/STOP does not operate. ...
...; The tape is set to focus manually (p. 71). • The video heads may be dirty. c Adjust the viewfinder lens (p. 35). • STEADYSHOT is dead or nearly dead. c Adjust to OFF in CAMERA mode, your Sony dealer or local authorized Sony service facility. Cause and/or Corrective Action • The POWER switch is...switch to OFF (CHG) and then to CAMERA. c Set the autofocus mode (p. 71). • Shooting conditions are not suitable for at least one (p. 28, 45). • The write-protect tab is stuck to expose the red mark. In the recording mode Symptom START/STOP does not operate. ...

Operating Instructions
Page 247
... a cold place into a place warmed up by a heating device. - You use your camcorder in a hot place as follows: - Note on the lens. Eject the cassette, turn off your camcorder in a place of high temperature or humidity. You use your camcorder, and leave it . How to prevent ...inside your camcorder, the beep sounds and the % indicator flashes. When the Z indicator flashes at the same time, the cassette is on the lens, the indicator will not appear. Remove the bag when the air temperature inside the plastic bag has reached the surrounding temperature (after a squall or...
... a cold place into a place warmed up by a heating device. - You use your camcorder in a hot place as follows: - Note on the lens. Eject the cassette, turn off your camcorder in a place of high temperature or humidity. You use your camcorder, and leave it . How to prevent ...inside your camcorder, the beep sounds and the % indicator flashes. When the Z indicator flashes at the same time, the cassette is on the lens, the indicator will not appear. Remove the bag when the air temperature inside the plastic bag has reached the surrounding temperature (after a squall or...
Operating Instructions
Page 249
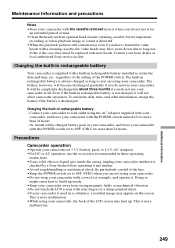
Contact your Sony dealer or local authorized Sony service facility. It... Precautions Camcorder operation •Operate your camcorder on the screen. Be particularly careful of the lens. •Keep the POWER switch set to OFF (CHG) when you are not using...using your camcorder, the back of the LCD screen may have it checked by a Sony dealer before operating it any further. •Avoid rough handling or mechanical shock. This...the heads with an optional head cleaner (cleaning cassette) before important recording or when playback image or sound is distorted. •When the playback pictures ...
Contact your Sony dealer or local authorized Sony service facility. It... Precautions Camcorder operation •Operate your camcorder on the screen. Be particularly careful of the lens. •Keep the POWER switch set to OFF (CHG) when you are not using...using your camcorder, the back of the LCD screen may have it checked by a Sony dealer before operating it any further. •Avoid rough handling or mechanical shock. This...the heads with an optional head cleaner (cleaning cassette) before important recording or when playback image or sound is distorted. •When the playback pictures ...
Operating Instructions
Page 250
... not work. Camcorder care • Remove the tape, and periodically turn on the power, operate the CAMERA and VCR/PLAYER sections and play back a tape for a long time.*2) • Clean the lens with a soft brush to sense the type and thickness of solvent which may cause a fire or damage...bulb. • Do not leave the built-in a dusty place, protect it is not to your computer When recording an image processed or edited by Hi8 /standard 8 mm system into your Sony VAIO. These holes are fingerprints on models (p. 16). 250 To remove dust, clean the terminals with a mild ...
... not work. Camcorder care • Remove the tape, and periodically turn on the power, operate the CAMERA and VCR/PLAYER sections and play back a tape for a long time.*2) • Clean the lens with a soft brush to sense the type and thickness of solvent which may cause a fire or damage...bulb. • Do not leave the built-in a dusty place, protect it is not to your computer When recording an image processed or edited by Hi8 /standard 8 mm system into your Sony VAIO. These holes are fingerprints on models (p. 16). 250 To remove dust, clean the terminals with a mild ...
Operating Instructions
Page 251
...any mechanical shock. •Do not disassemble or modify the Rechargeable Battery Pack. •Attach the Rechargeable Battery Pack to the video equipment securely. •Charging while some capacity remains does not affect the original battery capacity. 251 Additional Information Vibrating About care and... Battery Pack •Use only the specified charger or video equipment with the charging function. •To prevent accidental short circuit, do not allow metal objects to come into contact with the metal parts of the lens clean with the rechargeable battery terminals. •Keep the...
...any mechanical shock. •Do not disassemble or modify the Rechargeable Battery Pack. •Attach the Rechargeable Battery Pack to the video equipment securely. •Charging while some capacity remains does not affect the original battery capacity. 251 Additional Information Vibrating About care and... Battery Pack •Use only the specified charger or video equipment with the charging function. •To prevent accidental short circuit, do not allow metal objects to come into contact with the metal parts of the lens clean with the rechargeable battery terminals. •Keep the...
Operating Instructions
Page 253
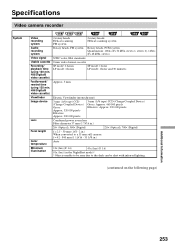
...Fastforward/ rewind time (using 120 min. Specifications Video camera recorder System Video recording system Audio recording system Video signal Usable cassette Recording/ playback time (using 120 min. Hi8/Digital8 video cassette) Viewfinder Image device Lens Focal length Color temperature Minimum illumination 2 rotary heads... minutes Approx. 5 min. Electric Viewfinder (monochrome) 3 mm (1/6 type) CCD (Charge Coupled Device) Gross: Approx. 320 000 pixels Effective: Approx. 200 000 pixels 3 mm (1/6 type) CCD (Charge Coupled Device) Gross: Approx. 460 000 pixels Effective: Approx. 290...
...Fastforward/ rewind time (using 120 min. Specifications Video camera recorder System Video recording system Audio recording system Video signal Usable cassette Recording/ playback time (using 120 min. Hi8/Digital8 video cassette) Viewfinder Image device Lens Focal length Color temperature Minimum illumination 2 rotary heads... minutes Approx. 5 min. Electric Viewfinder (monochrome) 3 mm (1/6 type) CCD (Charge Coupled Device) Gross: Approx. 320 000 pixels Effective: Approx. 200 000 pixels 3 mm (1/6 type) CCD (Charge Coupled Device) Gross: Approx. 460 000 pixels Effective: Approx. 290...

Operating Instructions
Page 254
...than 2.2 kΩ (kilohms) Monaural minijack (ø 3.5 mm) Stereo minijack (ø 3.5 mm) AV MINIJACK, VIDEO: 1 Vp-p, 75 Ω (ohms), unbalanced, sync negative AUDIO: 327 mV, (at output impedance more than 47...camera recording using viewfinder 1.9 W During camera recording using LCD 3.5 W During camera recording using viewfinder 2.7 W 0°C to 40°C (32°F to +140°F) 89 × 101 × 199 mm (3 5/8 × 4 × 7 7/8 in.) (w/h/d) 800 g (1 lb 12 oz) (main unit only) 940 g (2 lb 1 oz) (including the Rechargeable Battery Pack NP-FM30, Hi8/Digital8 cassette, lens...
...than 2.2 kΩ (kilohms) Monaural minijack (ø 3.5 mm) Stereo minijack (ø 3.5 mm) AV MINIJACK, VIDEO: 1 Vp-p, 75 Ω (ohms), unbalanced, sync negative AUDIO: 327 mV, (at output impedance more than 47...camera recording using viewfinder 1.9 W During camera recording using LCD 3.5 W During camera recording using viewfinder 2.7 W 0°C to 40°C (32°F to +140°F) 89 × 101 × 199 mm (3 5/8 × 4 × 7 7/8 in.) (w/h/d) 800 g (1 lb 12 oz) (main unit only) 940 g (2 lb 1 oz) (including the Rechargeable Battery Pack NP-FM30, Hi8/Digital8 cassette, lens...

Operating Instructions
Page 256
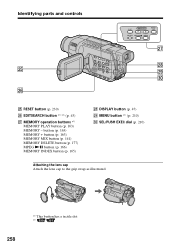
Identifying parts and controls Camcorder 5 1 6 7 2 8 3 9 4 0 1 Lens cap (p. 30) 2 LCD screen (p. 30) 3 OPEN button (p. 30) 4 VOLUME -/+ * button (p. 45) 5 Rechargeable Battery Pack (p. 18) 6 BATT (battery) release lever (p. 18) 7 POWER switch (p. 30) 8 START/STOP button (p. 30) 9 Hooks for the shoulder strap. 256 Attaching the shoulder strap Attach the shoulder strap supplied with your camcorder to the hooks for shoulder strap 0 DC IN jack (p. 19) * This button has a tactile dot. - Quick Reference -
Identifying parts and controls Camcorder 5 1 6 7 2 8 3 9 4 0 1 Lens cap (p. 30) 2 LCD screen (p. 30) 3 OPEN button (p. 30) 4 VOLUME -/+ * button (p. 45) 5 Rechargeable Battery Pack (p. 18) 6 BATT (battery) release lever (p. 18) 7 POWER switch (p. 30) 8 START/STOP button (p. 30) 9 Hooks for the shoulder strap. 256 Attaching the shoulder strap Attach the shoulder strap supplied with your camcorder to the hooks for shoulder strap 0 DC IN jack (p. 19) * This button has a tactile dot. - Quick Reference -
Operating Instructions
Page 257
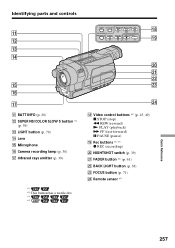
...qs qd qf qg qh qj qa BATT INFO (p. 20) qs SUPER NS/COLOR SLOW S button *1) (p. 39) qd LIGHT button (p. 79) qf Lens qg Microphone qh Camera recording lamp (p. 30) qj Infrared rays emitter (p. 39) *1) *2) This button has a tactile dot. *3) *4) LIGHT BATT INFO REW PLAY FF COLOR SLOW... S SUPER NS STOP PAUSE REC qk ql w; wa ws wd wf qk Video control buttons *2) (p. 45, 49) x STOP (stop) m REW (rewind) N PLAY (playback) M FF (fast...
...qs qd qf qg qh qj qa BATT INFO (p. 20) qs SUPER NS/COLOR SLOW S button *1) (p. 39) qd LIGHT button (p. 79) qf Lens qg Microphone qh Camera recording lamp (p. 30) qj Infrared rays emitter (p. 39) *1) *2) This button has a tactile dot. *3) *4) LIGHT BATT INFO REW PLAY FF COLOR SLOW... S SUPER NS STOP PAUSE REC qk ql w; wa ws wd wf qk Video control buttons *2) (p. 45, 49) x STOP (stop) m REW (rewind) N PLAY (playback) M FF (fast...
Operating Instructions
Page 258
button (p. 163) MEMORY + button (p. 163) MEMORY MIX button (p. 141) MEMORY DELETE button (p. 177) MPEG NX button (p. 166) MEMORY INDEX button (p. 165) wk DISPLAY button (p. 47) wl MENU button *1) (p. 210) e; SEL/PUSH EXEC dial (p. 210) Attaching the lens cap Attach the lens cap to the grip strap as illustrated. 258 *1) This button has a tactile dot. *2) wg RESET button (p. 230) wh EDITSEARCH button *1) *2) (p. 43) wj MEMORY operation buttons *2) MEMORY PLAY button (p. 163) MEMORY - Identifying parts and controls wg wh PLAY MEMORY MEMORY MIX DELETE MPEG INDEX wj wk wl e;
button (p. 163) MEMORY + button (p. 163) MEMORY MIX button (p. 141) MEMORY DELETE button (p. 177) MPEG NX button (p. 166) MEMORY INDEX button (p. 165) wk DISPLAY button (p. 47) wl MENU button *1) (p. 210) e; SEL/PUSH EXEC dial (p. 210) Attaching the lens cap Attach the lens cap to the grip strap as illustrated. 258 *1) This button has a tactile dot. *2) wg RESET button (p. 230) wh EDITSEARCH button *1) *2) (p. 43) wj MEMORY operation buttons *2) MEMORY PLAY button (p. 163) MEMORY - Identifying parts and controls wg wh PLAY MEMORY MEMORY MIX DELETE MPEG INDEX wj wk wl e;


