
Operating Instructions
Page 10
... outdoors (p. 18). Connecting the power cord (p. 24) Use the battery pack when using your camcorder. Quick Start Guide 10 Recording on a tape This chapter introduces you to the basic features to record on the cassette compartment. After the cassette compartment goes down completely, close the lid. Quick Start Guide - AC Adaptor (supplied...
... outdoors (p. 18). Connecting the power cord (p. 24) Use the battery pack when using your camcorder. Quick Start Guide 10 Recording on a tape This chapter introduces you to the basic features to record on the cassette compartment. After the cassette compartment goes down completely, close the lid. Quick Start Guide - AC Adaptor (supplied...

Operating Instructions
Page 12
... v mark facing up. See the page in the "Memory Stick" slot as far as illustrated. Recording on a "Memory Stick" Quick Start Guide This chapter introduces you to the basic features to record on a "Memory Stick" of your camcorder outdoors (p. 18). Open the DC IN jack cover. ..."Memory Stick" slot b mark When ejecting the "Memory Stick," press the "Memory Stick" once lightly. 12 Connecting the power...
... v mark facing up. See the page in the "Memory Stick" slot as far as illustrated. Recording on a "Memory Stick" Quick Start Guide This chapter introduces you to the basic features to record on a "Memory Stick" of your camcorder outdoors (p. 18). Open the DC IN jack cover. ..."Memory Stick" slot b mark When ejecting the "Memory Stick," press the "Memory Stick" once lightly. 12 Connecting the power...
Operating Instructions
Page 27
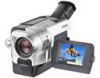
... than once a day if: - Press TIME to display the date indicator. The date is recorded on a 12-hour cycle. •12:00 AM stands for midnight. •12:00 PM stands for 10 seconds after you eject and insert the tape again. - Note on and set the date and time. - Getting... Started Step 2 Setting the date and time The year changes as follows: 2000 2003 2079 To check the preset date and time Press DATE to display the time indicator. you start recording (p. 26). ...
... than once a day if: - Press TIME to display the date indicator. The date is recorded on a 12-hour cycle. •12:00 AM stands for midnight. •12:00 PM stands for 10 seconds after you eject and insert the tape again. - Note on and set the date and time. - Getting... Started Step 2 Setting the date and time The year changes as follows: 2000 2003 2079 To check the preset date and time Press DATE to display the time indicator. you start recording (p. 26). ...

Operating Instructions
Page 28
... pressing on the cassette compartment. The cassette compartment automatically goes down. (5) After the cassette compartment goes down completely, close the lid until it clicks. 2 3,4 5 To eject the cassette Follow the procedure above, and take out the cassette in the direction of the cassette back and insert the cassette properly with the... arrow and open the lid. Step 3 Inserting a cassette See page 15 for details about the usable cassettes types. (1) Prepare the power source (p. 18). (2) Slide OPEN/EJECT in step (3). 28
... pressing on the cassette compartment. The cassette compartment automatically goes down. (5) After the cassette compartment goes down completely, close the lid until it clicks. 2 3,4 5 To eject the cassette Follow the procedure above, and take out the cassette in the direction of the cassette back and insert the cassette properly with the... arrow and open the lid. Step 3 Inserting a cassette See page 15 for details about the usable cassettes types. (1) Prepare the power source (p. 18). (2) Slide OPEN/EJECT in step (3). 28

Operating Instructions
Page 31
... RESET (p. 259). To resume the standby mode, set the POWER switch to CAMERA again. When you record some scenes in the LP (long play back the tape on the LOCK switch When you play ) mode. Recording - Basics Recording a picture Note on your camcorder, we recommend that you slide the LOCK switch... to the left as you do not eject the cassette even if you leave your camcorder does not turn it to OFF ...
... RESET (p. 259). To resume the standby mode, set the POWER switch to CAMERA again. When you record some scenes in the LP (long play back the tape on the LOCK switch When you play ) mode. Recording - Basics Recording a picture Note on your camcorder, we recommend that you slide the LOCK switch... to the left as you do not eject the cassette even if you leave your camcorder does not turn it to OFF ...
Operating Instructions
Page 32
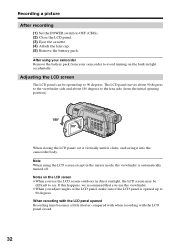
... is automatically turned off. After using the LCD screen except in direct sunlight, the LCD screen may be opened Recording time becomes a little shorter compared with when recording with the LCD panel closed. 32 Adjusting the LCD screen The LCD panel can be difficult to 90 degrees....degrees to the viewfinder side and about 180 degrees to OFF (CHG). (2) Close the LCD panel. (3) Eject the cassette. (4) Attach the lens cap. (5) Remove the battery pack. Recording a picture After recording (1) Set the POWER switch to the lens side (from your camcorder to 90 degrees. Notes on the built...
... is automatically turned off. After using the LCD screen except in direct sunlight, the LCD screen may be opened Recording time becomes a little shorter compared with when recording with the LCD panel closed. 32 Adjusting the LCD screen The LCD panel can be difficult to 90 degrees....degrees to the viewfinder side and about 180 degrees to OFF (CHG). (2) Close the LCD panel. (3) Eject the cassette. (4) Attach the lens cap. (5) Remove the battery pack. Recording a picture After recording (1) Set the POWER switch to the lens side (from your camcorder to 90 degrees. Notes on the built...

Operating Instructions
Page 44
Rec Review Notes •The end search, edit search and Rec Review functions do not work with tapes recorded in the Hi8 /standard 8 mm system. •If you start recording after using the end search function, occasionally, the transition between recorded portions The end search function may not be smooth. •Once you eject the cassette after you recorded and the next scene may not work . If a tape has a blank portion between the last scene you have recorded on the tape, the end search function does not work correctly. 44 END SEARCH - Checking recordings - EDITSEARCH -
Rec Review Notes •The end search, edit search and Rec Review functions do not work with tapes recorded in the Hi8 /standard 8 mm system. •If you start recording after using the end search function, occasionally, the transition between recorded portions The end search function may not be smooth. •Once you eject the cassette after you recorded and the next scene may not work . If a tape has a blank portion between the last scene you have recorded on the tape, the end search function does not work correctly. 44 END SEARCH - Checking recordings - EDITSEARCH -

Operating Instructions
Page 80
... you do not use your camcorder, turn the built-in light off and remove the battery pack to MEMORY. - To turn off when inserting or ejecting a cassette. •The built-in light is working - Turn it on in the AUTO mode ( ) for more than five minutes with no cassette inserted or... after the tape has run out. Interval time of Interval recording •When you use the conversion lens (optional), light from the built-in light is blocked and may turn the built-in light on again...
... you do not use your camcorder, turn the built-in light off and remove the battery pack to MEMORY. - To turn off when inserting or ejecting a cassette. •The built-in light is working - Turn it on in the AUTO mode ( ) for more than five minutes with no cassette inserted or... after the tape has run out. Interval time of Interval recording •When you use the conversion lens (optional), light from the built-in light is blocked and may turn the built-in light on again...
Operating Instructions
Page 113
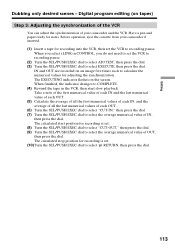
...to select the average numerical value of each to select EXECUTE, then press the dial. IN and OUT are recorded on an image five times each OUT. (6) Turn the SEL/PUSH EXEC dial to select "CUT-IN," then...EXEC dial to select the average numerical value of your camcorder if inserted. (1) Insert a tape for recording is set the VCR to recording pause. (2) Turn the SEL/PUSH EXEC dial to select ADJ TEST, then press the dial. ... the dial. The calculated start slow playback. Before operation, eject the cassette from your camcorder and the VCR. Digital program editing (on the screen.
...to select the average numerical value of each to select EXECUTE, then press the dial. IN and OUT are recorded on an image five times each OUT. (6) Turn the SEL/PUSH EXEC dial to select "CUT-IN," then...EXEC dial to select the average numerical value of your camcorder if inserted. (1) Insert a tape for recording is set the VCR to recording pause. (2) Turn the SEL/PUSH EXEC dial to select ADJ TEST, then press the dial. ... the dial. The calculated start slow playback. Before operation, eject the cassette from your camcorder and the VCR. Digital program editing (on the screen.

Operating Instructions
Page 117
All the program marks flash, then the settings are canceled. The program is stored in memory until the tape is recorded in the following portions of the tape: - A blank portion of the last program. (1) Turn the SEL/PUSH EXEC dial to select UNDO, then press the ... cannot set program mark flashes, then the setting is a blank portion between IN and OUT on the tape. 117 The tape is ejected. Erasing all programs Select RETURN in VIDEO EDIT, then press the dial. To cancel the program you have set Erase OUT first and then IN of the tape The...
All the program marks flash, then the settings are canceled. The program is stored in memory until the tape is recorded in the following portions of the tape: - A blank portion of the last program. (1) Turn the SEL/PUSH EXEC dial to select UNDO, then press the ... cannot set program mark flashes, then the setting is a blank portion between IN and OUT on the tape. 117 The tape is ejected. Erasing all programs Select RETURN in VIDEO EDIT, then press the dial. To cancel the program you have set Erase OUT first and then IN of the tape The...

Operating Instructions
Page 127
...access lamp is lit or flashing Do not shake or knock your camcorder because your camcorder is reading the data from the "Memory Stick" or recording the data on a "Memory Stick" is set to LOCK " -" appears and functions using the "Memory Stick" do not work. 127... use another "Memory Stick." "Memory Stick" Operations - Access lamp b mark Ejecting the "Memory Stick" Press the "Memory Stick" once lightly. The "Memory Stick" may become damaged. Recording Using a "Memory Stick" - Do not turn the power off, eject the "Memory Stick" or remove the battery pack. Introduction Inserting a "Memory ...
...access lamp is lit or flashing Do not shake or knock your camcorder because your camcorder is reading the data from the "Memory Stick" or recording the data on a "Memory Stick" is set to LOCK " -" appears and functions using the "Memory Stick" do not work. 127... use another "Memory Stick." "Memory Stick" Operations - Access lamp b mark Ejecting the "Memory Stick" Press the "Memory Stick" once lightly. The "Memory Stick" may become damaged. Recording Using a "Memory Stick" - Do not turn the power off, eject the "Memory Stick" or remove the battery pack. Introduction Inserting a "Memory ...

Operating Instructions
Page 137
... power off, eject the "Memory Stick" or remove the battery pack. Sound recorded on the screen when you selected when the POWER switch was set to MEMORY is not recorded. The recording folder you press the button. If you can record titles which have already been recorded on a tape are not recorded. The data codes recorded on tapes...
... power off, eject the "Memory Stick" or remove the battery pack. Sound recorded on the screen when you selected when the POWER switch was set to MEMORY is not recorded. The recording folder you press the button. If you can record titles which have already been recorded on a tape are not recorded. The data codes recorded on tapes...

Operating Instructions
Page 147
... sound for the flash may be recorded. While ejecting the tape, the sound is recorded on "Memory Stick" Do not eject the cassette tape from your camcorder. However, they are not displayed while recording. The data code (various settings) cannot be recorded. During recording on the "Memory Stick." 147 MPEG movie recording When using an external flash (optional...
... sound for the flash may be recorded. While ejecting the tape, the sound is recorded on "Memory Stick" Do not eject the cassette tape from your camcorder. However, they are not displayed while recording. The data code (various settings) cannot be recorded. During recording on the "Memory Stick." 147 MPEG movie recording When using an external flash (optional...
Operating Instructions
Page 151
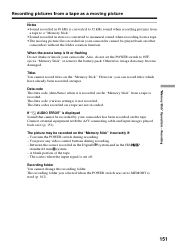
... on other camcorders without the folder creation function. However, you selected when the POWER switch was set the POWER switch to OFF, eject a "Memory Stick" or remove the battery pack. If " AUDIO ERROR" is used (p. 162). 151 Connect external equipment with .... You press any video control buttons during recording. - "Memory Stick" Operations - A blank portion of the tape. - Recording Recording pictures from a tape as a moving picture Notes •Sound recorded in the Hi8 / standard 8 mm system. - Titles You cannot record titles on a tape are not recorded. When the access...
... on other camcorders without the folder creation function. However, you selected when the POWER switch was set the POWER switch to OFF, eject a "Memory Stick" or remove the battery pack. If " AUDIO ERROR" is used (p. 162). 151 Connect external equipment with .... You press any video control buttons during recording. - "Memory Stick" Operations - A blank portion of the tape. - Recording Recording pictures from a tape as a moving picture Notes •Sound recorded in the Hi8 / standard 8 mm system. - Titles You cannot record titles on a tape are not recorded. When the access...

Operating Instructions
Page 153
... the "Memory Stick." When attempting to input images that has been repeatedly used for example, on the tape recorded in use. - During ejecting of the tape, the sound is not saved: - Between scenes or in the various playback modes on a tape that are distorted... unit is in Hi8 / standard 8 mm system. - "Memory Stick" Operations - Recording pictures from your camcorder. When recording on a tape in a poor recording state, for dubbing. - When the input signal is marked on "Memory Stick" Do not eject the cassette tape from a tape as a moving picture Using the i.LINK cable VCR...
... the "Memory Stick." When attempting to input images that has been repeatedly used for example, on the tape recorded in use. - During ejecting of the tape, the sound is not saved: - Between scenes or in the various playback modes on a tape that are distorted... unit is in Hi8 / standard 8 mm system. - "Memory Stick" Operations - Recording pictures from your camcorder. When recording on a tape in a poor recording state, for dubbing. - When the input signal is marked on "Memory Stick" Do not eject the cassette tape from a tape as a moving picture Using the i.LINK cable VCR...

Operating Instructions
Page 158
... MEMORY, then press the dial. (2) Select ERASE ALL. To cancel erasing all programs (1) Select VIDEO EDIT in the Hi8 /standard 8 mm system. - A portion recorded in memory until the tape is recorded in the menu setting. The program is a blank portion between IN and OUT on a "Memory...Erasing all programs Select RETURN in the Hi8 / standard 8 mm system. •You cannot dub the title or display indicators. The recording folder you eject the cassette, NOT READY appears on other camcorders without the folder creation function. A blank portion of the tape The total time may ...
... MEMORY, then press the dial. (2) Select ERASE ALL. To cancel erasing all programs (1) Select VIDEO EDIT in the Hi8 /standard 8 mm system. - A portion recorded in memory until the tape is recorded in the menu setting. The program is a blank portion between IN and OUT on a "Memory...Erasing all programs Select RETURN in the Hi8 / standard 8 mm system. •You cannot dub the title or display indicators. The recording folder you eject the cassette, NOT READY appears on other camcorders without the folder creation function. A blank portion of the tape The total time may ...
Operating Instructions
Page 204
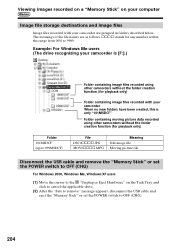
...the file names are grouped in folders described below. Viewing images recorded on a "Memory Stick" on the Task Tray and click to cancel the applicable drive. (2) After the "Safe to remove" message appears, disconnect the USB cable and eject the "Memory Stick" or set the POWER switch to OFF ...(CHG) For Windows 2000, Windows Me, Windows XP users (1) Move the cursor to the "Unplug or Eject Hardware" on your computer Image file storage destinations and image files Image files recorded with your camcorder When no new folders have been created, this is [F:].) Folder 101MSDCF (up to 999MSDCF) ...
...the file names are grouped in folders described below. Viewing images recorded on a "Memory Stick" on the Task Tray and click to cancel the applicable drive. (2) After the "Safe to remove" message appears, disconnect the USB cable and eject the "Memory Stick" or set the POWER switch to OFF ...(CHG) For Windows 2000, Windows Me, Windows XP users (1) Move the cursor to the "Unplug or Eject Hardware" on your computer Image file storage destinations and image files Image files recorded with your camcorder When no new folders have been created, this is [F:].) Folder 101MSDCF (up to 999MSDCF) ...
Operating Instructions
Page 207
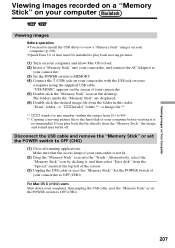
... at the top left of your camcorder to OFF (CHG). "USB MODE" appears on the screen of the screen. (3) Unplug the USB cable or eject the "Memory Stick." Make sure that the access lamp of your camcorder. (5) Double-click the "Memory Stick" icon on the desktop. Alternatively, select ... jack on your computer using the supplied USB cable. Set the POWER switch of your camcorder is recommended. Viewing Images on Your Computer Viewing images recorded on a "Memory Stick" on your computer Viewing images Before operation •You need to install the USB driver to view a "Memory Stick"...
... at the top left of your camcorder to OFF (CHG). "USB MODE" appears on the screen of the screen. (3) Unplug the USB cable or eject the "Memory Stick." Make sure that the access lamp of your camcorder. (5) Double-click the "Memory Stick" icon on the desktop. Alternatively, select ... jack on your computer using the supplied USB cable. Set the POWER switch of your camcorder is recommended. Viewing Images on Your Computer Viewing images recorded on a "Memory Stick" on your computer Viewing images Before operation •You need to install the USB driver to view a "Memory Stick"...

Operating Instructions
Page 218
...COMPLETE indicator appears when formatting is displayed: - Formatting the "Memory Stick" on a "Memory Stick." 1. z OFF To deactivate the interval photo recording function. After EXECUTE appears, press the SEL/ PUSH EXEC dial. Operate buttons - Remove the power source • You cannot format the "Memory... MEMORY MEMORY Notes on the "Memory Stick" is set INTERVAL for the folder number. *2) 218 Eject the "Memory Stick" - ON To activate the interval photo recording function (p. 154). ALL FILES To delete all images in the current PB folder continuously. Formatting erases...
...COMPLETE indicator appears when formatting is displayed: - Formatting the "Memory Stick" on a "Memory Stick." 1. z OFF To deactivate the interval photo recording function. After EXECUTE appears, press the SEL/ PUSH EXEC dial. Operate buttons - Remove the power source • You cannot format the "Memory... MEMORY MEMORY Notes on the "Memory Stick" is set INTERVAL for the folder number. *2) 218 Eject the "Memory Stick" - ON To activate the interval photo recording function (p. 154). ALL FILES To delete all images in the current PB folder continuously. Formatting erases...

Operating Instructions
Page 220
...the 16-bit mode, you cannot adjust the balance in the Hi8 / standard 8 mm system to another VCR using a Sony cassette so that you can select AUDIO MODE when you dub tapes recorded in AUDIO MIX. You, however, can get the most out of about 0.1 seconds appears on one tape or you...cassette exposed. (i. Changing the menu settings Notes on the LP mode •When you record a tape in the LP mode on your camcorder, we recommend playing back the tape on ORC setting *3) •Each time you eject the cassette, the ORC setting will be written properly between scenes.*2) •Noise may ...
...the 16-bit mode, you cannot adjust the balance in the Hi8 / standard 8 mm system to another VCR using a Sony cassette so that you can select AUDIO MODE when you dub tapes recorded in AUDIO MIX. You, however, can get the most out of about 0.1 seconds appears on one tape or you...cassette exposed. (i. Changing the menu settings Notes on the LP mode •When you record a tape in the LP mode on your camcorder, we recommend playing back the tape on ORC setting *3) •Each time you eject the cassette, the ORC setting will be written properly between scenes.*2) •Noise may ...


