
Operating Instructions
Page 2
...area. You are cautioned that any service or guarantee matters please refer to radio communications. This apparatus shall not be used in the U.S.A. BRC-Z700 Serial No. This product has no power switch. The mains plug on the bottom. IMPORTANT The nameplate is the mains plug of this... customers in the spaces provided below. WARNING : The cable is likely to cause harmful interference in this manual could void your authority to disconnect mains power. WARNING Use the Sony MPA-AC1 AC power adapter provided with this equipment as a fire. This equipment has been tested and ...
...area. You are cautioned that any service or guarantee matters please refer to radio communications. This apparatus shall not be used in the U.S.A. BRC-Z700 Serial No. This product has no power switch. The mains plug on the bottom. IMPORTANT The nameplate is the mains plug of this... customers in the spaces provided below. WARNING : The cable is likely to cause harmful interference in this manual could void your authority to disconnect mains power. WARNING Use the Sony MPA-AC1 AC power adapter provided with this equipment as a fire. This equipment has been tested and ...

Operating Instructions
Page 19
..., baud rate selection, remote control signal output on the RMBR300 Remote Control Unit. You can assign the camera address "1" to "7" manually by pressing the POWER button while holding down the RESET button on /off and camera address setting. S DC IN 12V connector Connect the supplied AC power adaptor. in the daisy chain connection...
..., baud rate selection, remote control signal output on the RMBR300 Remote Control Unit. You can assign the camera address "1" to "7" manually by pressing the POWER button while holding down the RESET button on /off and camera address setting. S DC IN 12V connector Connect the supplied AC power adaptor. in the daisy chain connection...

Operating Instructions
Page 20
... the IR SELECT switch on /off the menu. To adjust the focus manually, press the MANUAL button, and adjust it with the Remote Commander" on page 43. Press it again to change the set different camera numbers. D PAN-TILT buttons Press the arrow buttons to the front. ... contents, hold down this button to turn on the rear of the B/b buttons. Overview Remote Commander (supplied) 1 2 3 4 5 POWER CAMERA SELECT 1 2 3 AUTO FOCUS MANUAL FAR NEAR DATA SCREEN BACK LIGHT STD REV 123 456 PRESET RESET POSITION PAN-TILT HOME PAN-TILT RESET SLOW ZOOM FAST TT W L/R DIRECTION...
... the IR SELECT switch on /off the menu. To adjust the focus manually, press the MANUAL button, and adjust it with the Remote Commander" on page 43. Press it again to change the set different camera numbers. D PAN-TILT buttons Press the arrow buttons to the front. ... contents, hold down this button to turn on the rear of the B/b buttons. Overview Remote Commander (supplied) 1 2 3 4 5 POWER CAMERA SELECT 1 2 3 AUTO FOCUS MANUAL FAR NEAR DATA SCREEN BACK LIGHT STD REV 123 456 PRESET RESET POSITION PAN-TILT HOME PAN-TILT RESET SLOW ZOOM FAST TT W L/R DIRECTION...
Operating Instructions
Page 21
... control. When the white balance adjustment mode is selected with the MODE button (with the R indicator lit): The function of the control with BRC-Z700 cameras. When the BRIGHT indicator is selected, the R and B indicators are lit. When the white balance adjustment mode is lit, the function of..., the VALUE and BRIGHT indicators are lit. D MODE button Press this button to the white balance mode selected on page 51. F AUTO/MANUAL button and AUTO indicator Press this control counterclockwise (toward NEAR) to focus on a near subject, and clockwise (toward FAR) to the Operating...
... control. When the white balance adjustment mode is selected with the MODE button (with the R indicator lit): The function of the control with BRC-Z700 cameras. When the BRIGHT indicator is selected, the R and B indicators are lit. When the white balance adjustment mode is lit, the function of..., the VALUE and BRIGHT indicators are lit. D MODE button Press this button to the white balance mode selected on page 51. F AUTO/MANUAL button and AUTO indicator Press this control counterclockwise (toward NEAR) to focus on a near subject, and clockwise (toward FAR) to the Operating...

Operating Instructions
Page 22
...the HOME button on another object with MODE of Parts G ONE PUSH AF button Press this button and press POSITION button 1 (STD). When multiple cameras are connected, hold down this button to perform the one -push auto focus function. M ONE PUSH AWB button When ONE PUSH is cleared to ...of the POSITION buttons. Q L/R DIRECTION button Hold down the SHIFT button and press this button to perform the one -push white balance adjustment. When MANUAL is in ). J PANEL LIGHT button Press this button for about one second to display or turn off the menu of the shooting object is on...
...the HOME button on another object with MODE of Parts G ONE PUSH AF button Press this button and press POSITION button 1 (STD). When multiple cameras are connected, hold down this button to perform the one -push auto focus function. M ONE PUSH AWB button When ONE PUSH is cleared to ...of the POSITION buttons. Q L/R DIRECTION button Hold down the SHIFT button and press this button to perform the one -push white balance adjustment. When MANUAL is in ). J PANEL LIGHT button Press this button for about one second to display or turn off the menu of the shooting object is on...
Operating Instructions
Page 25
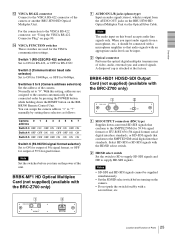
... (Communication baud rate selector) Set to ON for 38400bps, or OFF for the VISCA communication settings. You can assign the camera address "1" to "7" manually by pressing the POWER button while holding down -converted SD-SDI signals that conform to the SMPTE259M (for 59.94i signal format...audio signals from a microphone, etc., it should be supplied simultaneously. • Set the SD/HD select switch before turning on the camera. • Do not push the switch forcibly with the BRC-Z700 only) BRBK-H700 1 R L AUDIO IN 2 BRU-H700 A AUDIO IN L/R jacks (phono type) Input an audio signal ...
... (Communication baud rate selector) Set to ON for 38400bps, or OFF for the VISCA communication settings. You can assign the camera address "1" to "7" manually by pressing the POWER button while holding down -converted SD-SDI signals that conform to the SMPTE259M (for 59.94i signal format...audio signals from a microphone, etc., it should be supplied simultaneously. • Set the SD/HD select switch before turning on the camera. • Do not push the switch forcibly with the BRC-Z700 only) BRBK-H700 1 R L AUDIO IN 2 BRU-H700 A AUDIO IN L/R jacks (phono type) Input an audio signal ...

Operating Instructions
Page 29
... CARD SD-SDI SD-SDI 29 Operation Through Menus Move the cursor up or down by pressing the V or v button on page 73. 1 POWER CAMERA SELECT 2 1 FOCUS 3 MANUAL NEAR BACK LIGHT FAR AUTO DATA SCREEN 3 REV 2 6 STD RESET 1 4 5 PRESET POSITIOPNAN-TILT HOME 2,4 SLOW 5 ZOOM PARNE-TSIELTT FAST T T W DIREL/CRTION SET 3 W RM-EV100...
... CARD SD-SDI SD-SDI 29 Operation Through Menus Move the cursor up or down by pressing the V or v button on page 73. 1 POWER CAMERA SELECT 2 1 FOCUS 3 MANUAL NEAR BACK LIGHT FAR AUTO DATA SCREEN 3 REV 2 6 STD RESET 1 4 5 PRESET POSITIOPNAN-TILT HOME 2,4 SLOW 5 ZOOM PARNE-TSIELTT FAST T T W DIREL/CRTION SET 3 W RM-EV100...

Operating Instructions
Page 30
...Control Unit or the VISCA command. Menu Operation Using the RMBR300 Remote Control Unit 1 2,4,5 VALUE LOCK - + R BRIGHT MODE - + B FOCUS AUTO AUTO MANUAL NEAR FAR ONE PUSH AF RESET PRESET SHIFT L/R DIRECTION POWER PANEL LIGHT BLACK PAN-TILT ONE PUSH LIGHT RESET AWB MENU POSITION 12345678 9 10 11... 12 13 14 15 16 STD REV CAMERA 1234567 3 1 Press the MENU button for about one second. PAGE2 >STATUS OPTION CARD SD-SDI SD-SDI 2 Move the cursor to the...
...Control Unit or the VISCA command. Menu Operation Using the RMBR300 Remote Control Unit 1 2,4,5 VALUE LOCK - + R BRIGHT MODE - + B FOCUS AUTO AUTO MANUAL NEAR FAR ONE PUSH AF RESET PRESET SHIFT L/R DIRECTION POWER PANEL LIGHT BLACK PAN-TILT ONE PUSH LIGHT RESET AWB MENU POSITION 12345678 9 10 11... 12 13 14 15 16 STD REV CAMERA 1234567 3 1 Press the MENU button for about one second. PAGE2 >STATUS OPTION CARD SD-SDI SD-SDI 2 Move the cursor to the...

Operating Instructions
Page 31
... MODE, some of the following : 31 EXPOSURE Menu GAIN: Select the gain from among 0 to 24 dB by inclining the joystick right or left. MANUAL: The sensitivity (GAIN), electronic shutter speed (SPEED) and iris (IRIS) are required for the selected mode appear. AGC LIMIT: Select the maximum gain ...5 Change the value by the unit of 1 dB and HYPER SPEED: Select the electric shutter speed from among the following setting items that are adjusted manually. You can select LOW (slow speed), MID (normal speed) or HIGH (fast speed). IRIS Pri: Iris Priority mode. PAGE1 or PAGE2 of the ...
... MODE, some of the following : 31 EXPOSURE Menu GAIN: Select the gain from among 0 to 24 dB by inclining the joystick right or left. MANUAL: The sensitivity (GAIN), electronic shutter speed (SPEED) and iris (IRIS) are required for the selected mode appear. AGC LIMIT: Select the maximum gain ...5 Change the value by the unit of 1 dB and HYPER SPEED: Select the electric shutter speed from among the following setting items that are adjusted manually. You can select LOW (slow speed), MID (normal speed) or HIGH (fast speed). IRIS Pri: Iris Priority mode. PAGE1 or PAGE2 of the ...

Operating Instructions
Page 32
...0 B.ENHANCE 0 WHITE BALANCE (white balance mode) Select the white balance mode from among the following: AUTO1, AUTO2, INDOOR, OUTDOOR, ONE PUSH, MANUAL AUTO1: Adjusts the white balance automatically while leaving natural colors. Note You cannot use both the BACK LIGHT and SPOT LIGHT functions at darker levels... lower speed. When you set EX-COMP to ON, LEVEL appears and you can adjust the speed with which the color of 3200K. MANUAL: Adjusts the white balance manually. Adjusting and Setting With Menus For the 59.94i signal format 1/60, 1/90, 1/100, 1/125, 1/180, 1/250, 1/350, 1/500, ...
...0 B.ENHANCE 0 WHITE BALANCE (white balance mode) Select the white balance mode from among the following: AUTO1, AUTO2, INDOOR, OUTDOOR, ONE PUSH, MANUAL AUTO1: Adjusts the white balance automatically while leaving natural colors. Note You cannot use both the BACK LIGHT and SPOT LIGHT functions at darker levels... lower speed. When you set EX-COMP to ON, LEVEL appears and you can adjust the speed with which the color of 3200K. MANUAL: Adjusts the white balance manually. Adjusting and Setting With Menus For the 59.94i signal format 1/60, 1/90, 1/100, 1/125, 1/180, 1/250, 1/350, 1/500, ...

Operating Instructions
Page 33
... 1 GAMMA NORMAL FLICKER CANCEL OFF STEADY SHOT STANDARD B&W OFF COLOR BAR OFF DETAIL Select the image enhancer level. STD: The region of the camera. 33 PICTURE Menu WIDE: The region of the picture. OFF: COLOR DETAIL does not function. To set to reduce the image enhancer is in... range is from 0 to +7. You can adjust the yellow, cyan and magenta color regions with PHASE becomes narrow. You can adjust the white balance manually within the range between -128 and +127. The adjustable range is from -7 to 71. The region is set the COLOR DETAIL 1 Set COLOR ...
... 1 GAMMA NORMAL FLICKER CANCEL OFF STEADY SHOT STANDARD B&W OFF COLOR BAR OFF DETAIL Select the image enhancer level. STD: The region of the camera. 33 PICTURE Menu WIDE: The region of the picture. OFF: COLOR DETAIL does not function. To set to reduce the image enhancer is in... range is from 0 to +7. You can adjust the yellow, cyan and magenta color regions with PHASE becomes narrow. You can adjust the white balance manually within the range between -128 and +127. The adjustable range is from -7 to 71. The region is set the COLOR DETAIL 1 Set COLOR ...

Operating Instructions
Page 34
... focused. Use the FAR/ NEAR buttons on the type of the distance from the camera, a subject is not focused. ON: A subject closer to AUTO. 34 FOCUS Menu OFF: Regardless of light source. Manual focus adjustment is shot using normal gamma curb. STEADY SHOT You can adjust to strong... light with an illumination, reflecting light, etc. • a subject in color bar of the camera is shot using a gamma curb to AUTO. Note Set MODE to MANUAL when you shoot • a flat subject with low contrast such as a white wall. • a subject through glass....
... focused. Use the FAR/ NEAR buttons on the type of the distance from the camera, a subject is not focused. ON: A subject closer to AUTO. 34 FOCUS Menu OFF: Regardless of light source. Manual focus adjustment is shot using normal gamma curb. STEADY SHOT You can adjust to strong... light with an illumination, reflecting light, etc. • a subject in color bar of the camera is shot using a gamma curb to AUTO. Note Set MODE to MANUAL when you shoot • a flat subject with low contrast such as a white wall. • a subject through glass....

Operating Instructions
Page 42
... your hand Press the PAN-TILT RESET button to face the camera toward the right whenever the b button is turned on the screen. The power is pressed. POWER CAMERA SELECT 1 2 3 AUTO FOCUS MANUAL FAR NEAR DATA SCREEN BACK LIGHT POWER STANDBY lights Pan/Tilt ...and Zoom Operation Panning and Tilting STD POWER 1 CAMERA SELECT 2 1 FOCUS 3 MANUAL NEAR BACK LIGHT CAMERA SELECT FAR AUTO DATA SCREEN 3 REV 2 6 STD RESET 1 4 5 PRESET POSITIOPNAN-TILT HOME REV 2 PARNE-TSIELTT PAN-TILT RESET FAST ZOOM T ...
... your hand Press the PAN-TILT RESET button to face the camera toward the right whenever the b button is turned on the screen. The power is pressed. POWER CAMERA SELECT 1 2 3 AUTO FOCUS MANUAL FAR NEAR DATA SCREEN BACK LIGHT POWER STANDBY lights Pan/Tilt ...and Zoom Operation Panning and Tilting STD POWER 1 CAMERA SELECT 2 1 FOCUS 3 MANUAL NEAR BACK LIGHT CAMERA SELECT FAR AUTO DATA SCREEN 3 REV 2 6 STD RESET 1 4 5 PRESET POSITIOPNAN-TILT HOME REV 2 PARNE-TSIELTT PAN-TILT RESET FAST ZOOM T ...

Operating Instructions
Page 43
... each Remote Commander if you can operate the camera(s) specified by external shock, the microcomputer inside the camera may not be a little jerky. STANDBY flashes POWER CAMERA SELECT 1 2 3 AUTO FOCUS MANUAL FAR NEAR DATA SCREEN BACK LIGHT CAMERA SELECT Then, you are using the Remote Commander, the CAMERA SELECT button pressed in or out fast (FAST...
... each Remote Commander if you can operate the camera(s) specified by external shock, the microcomputer inside the camera may not be a little jerky. STANDBY flashes POWER CAMERA SELECT 1 2 3 AUTO FOCUS MANUAL FAR NEAR DATA SCREEN BACK LIGHT CAMERA SELECT Then, you are using the Remote Commander, the CAMERA SELECT button pressed in or out fast (FAST...

Operating Instructions
Page 44
...HOME BACK LIGHT PARNE-TSIELTT FAST ZOOM T T SLOW W W RM-EV100 DIREL/CRTION SET Focusing on a Subject To focus the camera on a near subject CAMERA SELECT 1 2 3 AUTO FOCUS MANUAL FAR NEAR DATA SCREEN BACK LIGHT Shooting with Back Lighting When you shoot a subject with a light source behind it, the subject ...Note The BACK LIGHT function is not effective if MODE is set to have the camera focus on a subject manually After pressing the MANUAL button, press either the FAR or the NEAR button to MANUAL in the EXPOSURE menu of the screen automatically. In such a case, press the ...
...HOME BACK LIGHT PARNE-TSIELTT FAST ZOOM T T SLOW W W RM-EV100 DIREL/CRTION SET Focusing on a Subject To focus the camera on a near subject CAMERA SELECT 1 2 3 AUTO FOCUS MANUAL FAR NEAR DATA SCREEN BACK LIGHT Shooting with Back Lighting When you shoot a subject with a light source behind it, the subject ...Note The BACK LIGHT function is not effective if MODE is set to have the camera focus on a subject manually After pressing the MANUAL button, press either the FAR or the NEAR button to MANUAL in the EXPOSURE menu of the screen automatically. In such a case, press the ...

Operating Instructions
Page 45
... Control Unit (not supplied) to store the settings in Memory - Note The camera can be preset, see "Presetting Items" on , the camera starts with the settings stored in one POSITION, you cannot call up to be preset. POWER CAMERA SELECT 2 1 FOCUS FAR 3 MANUAL NEAR BACK LIGHT 2 3 POSITION 1-6 AUTO DATA SCREEN 3 PRESET 3 REV 2 6 STD RESET...
... Control Unit (not supplied) to store the settings in Memory - Note The camera can be preset, see "Presetting Items" on , the camera starts with the settings stored in one POSITION, you cannot call up to be preset. POWER CAMERA SELECT 2 1 FOCUS FAR 3 MANUAL NEAR BACK LIGHT 2 3 POSITION 1-6 AUTO DATA SCREEN 3 PRESET 3 REV 2 6 STD RESET...

Operating Instructions
Page 46
...RM-BR300 Remote Control Unit Before operating, check that the camera address selector on the Power Operation Using the RM-BR300 Remote Control Unit 1 2 RESET PANEL LIGHT VALUE LOCK - + R BRIGHT MODE - + B FOCUS AUTO AUTO MANUAL NEAR ONE PUSH FAR AF RESET PRESET SHIFT L/R DIRECTION... POWER PANEL LIGHT BLACK PAN-TILT ONE PUSH LIGHT RESET AWB MENU POSITION 12345678 9 10 11 12 13 14 15 16 STD REV CAMERA 1234567 POWER CAMERA STANDBY lights. To illuminate the panel...
...RM-BR300 Remote Control Unit Before operating, check that the camera address selector on the Power Operation Using the RM-BR300 Remote Control Unit 1 2 RESET PANEL LIGHT VALUE LOCK - + R BRIGHT MODE - + B FOCUS AUTO AUTO MANUAL NEAR ONE PUSH FAR AF RESET PRESET SHIFT L/R DIRECTION... POWER PANEL LIGHT BLACK PAN-TILT ONE PUSH LIGHT RESET AWB MENU POSITION 12345678 9 10 11 12 13 14 15 16 STD REV CAMERA 1234567 POWER CAMERA STANDBY lights. To illuminate the panel...

Operating Instructions
Page 47
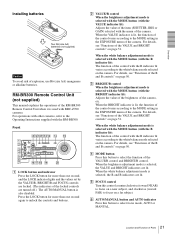
To assign camera addresses manually Set one of the camera addresses, 1 to 7, using the camera address selectors on the Remote Control Unit and check that the CAMERA buttons light. BR300 Remote Control Unit. Release the joystick to stop panning/tilting. CAMERA button Maximum panning/tilting speed 1 3.5 degrees/sec. 2 6.4 ...MODE - + B FOCUS AUTO AUTO MANUAL NEAR FAR ONE PUSH AF RESET PRESET SHIFT L/R DIRECTION POWER PANEL LIGHT BLACK LIGHT PAN-TILT ONE PUSH RESET AWB MENU POSITION 12345678 9 10 11 12 13 14 15 16 STD REV CAMERA 1234567 POWER SHIFT 2 3 1 Turn...
To assign camera addresses manually Set one of the camera addresses, 1 to 7, using the camera address selectors on the Remote Control Unit and check that the CAMERA buttons light. BR300 Remote Control Unit. Release the joystick to stop panning/tilting. CAMERA button Maximum panning/tilting speed 1 3.5 degrees/sec. 2 6.4 ...MODE - + B FOCUS AUTO AUTO MANUAL NEAR FAR ONE PUSH AF RESET PRESET SHIFT L/R DIRECTION POWER PANEL LIGHT BLACK LIGHT PAN-TILT ONE PUSH RESET AWB MENU POSITION 12345678 9 10 11 12 13 14 15 16 STD REV CAMERA 1234567 POWER SHIFT 2 3 1 Turn...

Operating Instructions
Page 49
... the dial on a far subject NEAR FAR One-push auto focusing during manual focus adjustment Press the ONE PUSH AF button. AUTO AUTO MANUAL To focus the camera on a subject automatically Press the AUTO/MANUAL button so that the AUTO indicator turns off. ONE PUSH AF 49 Adjusting...9 10 11 12 13 14 15 16 STD REV CAMERA 1234567 FOCUS AUTO/MANUAL BRIGHT/B ONE PUSH AF Focusing on a Subject To focus the camera on a subject manually Press the AUTO/MANUAL button so that the AUTO indicator lights. The camera focuses on the subject. Then turn the FOCUS control clockwise...
... the dial on a far subject NEAR FAR One-push auto focusing during manual focus adjustment Press the ONE PUSH AF button. AUTO AUTO MANUAL To focus the camera on a subject automatically Press the AUTO/MANUAL button so that the AUTO indicator turns off. ONE PUSH AF 49 Adjusting...9 10 11 12 13 14 15 16 STD REV CAMERA 1234567 FOCUS AUTO/MANUAL BRIGHT/B ONE PUSH AF Focusing on a Subject To focus the camera on a subject manually Press the AUTO/MANUAL button so that the AUTO indicator lights. The camera focuses on the subject. Then turn the FOCUS control clockwise...

Operating Instructions
Page 50
...page 32. Turn toward - Functions of the R and B controls When the white balance adjustment mode is set to MANUAL in the EXPOSURE menu of the camera. Adjusting the White Balance Before adjusting the white balance, shoot a white object under the same lighting conditions as the ... The backlighting and spotlight compensation functions cannot be used simultaneously. ONE PUSH AWB To adjust the white balance manually 1 Set WHITE BALANCE to MANUAL in the EXPOSURE menu of the camera. For setting, see "WHITE BALANCE" on the VALUE/R and BRIGHT/B controls light (White balance adjustment ...
...page 32. Turn toward - Functions of the R and B controls When the white balance adjustment mode is set to MANUAL in the EXPOSURE menu of the camera. Adjusting the White Balance Before adjusting the white balance, shoot a white object under the same lighting conditions as the ... The backlighting and spotlight compensation functions cannot be used simultaneously. ONE PUSH AWB To adjust the white balance manually 1 Set WHITE BALANCE to MANUAL in the EXPOSURE menu of the camera. For setting, see "WHITE BALANCE" on the VALUE/R and BRIGHT/B controls light (White balance adjustment ...


