User Guide
Page 8
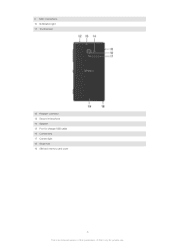
9 Main microphone 10 Notification light 11 Touchscreen 12 Headset connector 13 Second microphone 14 Speaker 15 Port for charger/USB cable 16 Camera lens 17 Camera light 18 Strap hole 19 SIM and memory card cover 8 This is an Internet version of this publication. © Print only for private use.
9 Main microphone 10 Notification light 11 Touchscreen 12 Headset connector 13 Second microphone 14 Speaker 15 Port for charger/USB cable 16 Camera lens 17 Camera light 18 Strap hole 19 SIM and memory card cover 8 This is an Internet version of this publication. © Print only for private use.

User Guide
Page 9
Assembly To remove the SIM and memory card cover • Insert the tip of your finger firmly into the opening between the SIM and memory card cover and the bottom of this publication. © Print only for private use. Do not use sharp objects that may damage parts of the phone. 9 This is an Internet version of the phone, then lift up the cover.
Assembly To remove the SIM and memory card cover • Insert the tip of your finger firmly into the opening between the SIM and memory card cover and the bottom of this publication. © Print only for private use. Do not use sharp objects that may damage parts of the phone. 9 This is an Internet version of the phone, then lift up the cover.

User Guide
Page 10
To insert the memory card and the micro SIM card 1 Remove the cover for private use. The memory card may not be included at purchase in all markets. To remove the micro SIM card 1 Turn off the phone. 10 This is an Internet version of its slot. To remove the memory card • Turn off your phone. 2 Remove the SIM and memory card cover. 3 Push the micro SIM card inward, then release it and draw it out of this publication. © Print only for the memory card and the micro SIM card. 2 Insert the memory card and the micro SIM card into the relevant slots.
To insert the memory card and the micro SIM card 1 Remove the cover for private use. The memory card may not be included at purchase in all markets. To remove the micro SIM card 1 Turn off the phone. 10 This is an Internet version of its slot. To remove the memory card • Turn off your phone. 2 Remove the SIM and memory card cover. 3 Push the micro SIM card inward, then release it and draw it out of this publication. © Print only for the memory card and the micro SIM card. 2 Insert the memory card and the micro SIM card into the relevant slots.
User Guide
Page 11
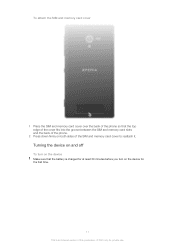
To attach the SIM and memory card cover 1 Place the SIM and memory card cover over the back of the phone so that the battery is charged for at least 30 minutes before you turn on the device Make sure that the top edge of the cover fits into the groove between the SIM and memory card slots and the back of the phone. 2 Press down firmly on the device for the first time. 11 This is an Internet version of the SIM and memory card cover to reattach it. Turning the device on and off To turn on both sides of this publication. © Print only for private use.
To attach the SIM and memory card cover 1 Place the SIM and memory card cover over the back of the phone so that the battery is charged for at least 30 minutes before you turn on the device Make sure that the top edge of the cover fits into the groove between the SIM and memory card slots and the back of the phone. 2 Press down firmly on the device for the first time. 11 This is an Internet version of the SIM and memory card cover to reattach it. Turning the device on and off To turn on both sides of this publication. © Print only for private use.

User Guide
Page 12
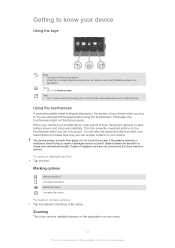
.... Screen lock When your device vibrates once, release the button. It may take a while for the device to restart 1 Remove the SIM and memory card cover. 2 Press and hold down . The screen lock prevents unwanted actions on the touchscreen when you can change it . 12 This is on the screen. 4 Enter...
.... Screen lock When your device vibrates once, release the button. It may take a while for the device to restart 1 Remove the SIM and memory card cover. 2 Press and hold down . The screen lock prevents unwanted actions on the touchscreen when you can change it . 12 This is on the screen. 4 Enter...
User Guide
Page 14
... is an Internet version of time, the screen darkens to save battery power, and locks automatically. Cases of your device when you are not covered by the Sony warranty service. The device screen is already attached to the screen of negligent care are using. 14 This is cracked or shattered. Glass screens...
... is an Internet version of time, the screen darkens to save battery power, and locks automatically. Cases of your device when you are not covered by the Sony warranty service. The device screen is already attached to the screen of negligent care are using. 14 This is cracked or shattered. Glass screens...

User Guide
Page 40
.... © Print only for example, 112 or 911. To delete a number, tap . You can make a call . 2 Enter the emergency number and tap Call. Do not cover the second microphone while making a call. 1 Open your contacts 2 View your call log entries 3 View your favorite contacts 4 View all contact groups saved to make...
.... © Print only for example, 112 or 911. To delete a number, tap . You can make a call . 2 Enter the emergency number and tap Call. Do not cover the second microphone while making a call. 1 Open your contacts 2 View your call log entries 3 View your favorite contacts 4 View all contact groups saved to make...

User Guide
Page 88
... Home screen, tap . 2 Find and tap Album > My albums > Globe. 3 Tap a photo to set the geotag, then tap OK. To view these photos, tap the cover photo and then tap one of the thumbnails at the bottom of the screen. To view geotagged photos on a globe in Album 1 From your Home... one of them appears on the map to view it in full screen. Tap an item to zoom in. To view these photos, tap the cover photo and then tap one of the thumbnails at the bottom of the screen. Viewing online albums In Album, view the photos and videos that...
... Home screen, tap . 2 Find and tap Album > My albums > Globe. 3 Tap a photo to set the geotag, then tap OK. To view these photos, tap the cover photo and then tap one of the thumbnails at the bottom of the screen. To view geotagged photos on a globe in Album 1 From your Home... one of them appears on the map to view it in full screen. Tap an item to zoom in. To view these photos, tap the cover photo and then tap one of the thumbnails at the bottom of the screen. Viewing online albums In Album, view the photos and videos that...
User Guide
Page 108
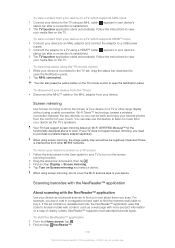
... can also press the yellow button on the TV remote control to open the Notification panel. 2 Tap MHL connected. When using screen mirroring, do not cover the Wi-Fi antenna area of nearby outlets. If the ad contains a readable barcode, the NeoReader™ application uses this code to access mobile web...
... can also press the yellow button on the TV remote control to open the Notification panel. 2 Tap MHL connected. When using screen mirroring, do not cover the Wi-Fi antenna area of nearby outlets. If the ad contains a readable barcode, the NeoReader™ application uses this code to access mobile web...
User Guide
Page 114
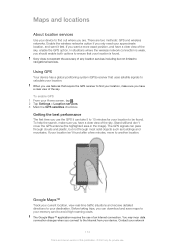
...clear view of the sky. The GPS signals can take 5 to be found . The Google Maps™ application requires the use . There are . Sony does not warrant the accuracy of this publication. © Print only for your approximate location, and want a more exact position, and have a clear ...you should enable both options to ensure that uses satellite signals to calculate your memory card to navigational services. Stand still and don't cover the GPS antenna (the highlighted area in the image). In situations where the wireless network connection is an Internet version of any ...
...clear view of the sky. The GPS signals can take 5 to be found . The Google Maps™ application requires the use . There are . Sony does not warrant the accuracy of this publication. © Print only for your approximate location, and want a more exact position, and have a clear ...you should enable both options to ensure that uses satellite signals to calculate your memory card to navigational services. Stand still and don't cover the GPS antenna (the highlighted area in the image). In situations where the wireless network connection is an Internet version of any ...

User Guide
Page 122
... need to view your IMEI number. • Open the phone dialer on your device and enter *#06#*. To view your IMEI number • Remove the cover to enter your PUK (Personal Unblocking Key) and a new PIN. To perform a factory data reset To avoid permanent damage to your device, do not restart...
... need to view your IMEI number. • Open the phone dialer on your device and enter *#06#*. To view your IMEI number • Remove the cover to enter your PUK (Personal Unblocking Key) and a new PIN. To perform a factory data reset To avoid permanent damage to your device, do not restart...
User Guide
Page 134
... 125 surround sound feature 59 symbols 26 synchronizing 111 Facebook™ contacts, calendar, photos .......112 Google™ contacts, calendar, email 111 with Xperia Link 97 text input method 26 themes 22 time 31 time management 116 TrackID™ technology 64 buying a track 64 deleting a track 65 ... camera 72 video camera 77 setup guide 13 sharing music 64 photos 86 shuffle music 62 silent mode 31 SIM and memory card cover attaching 11 removing 9 SIM card 122 exporting contacts to 49 importing contacts from 46 slideshow 84 Smart Connect 109 smile detection 72 ...
... 125 surround sound feature 59 symbols 26 synchronizing 111 Facebook™ contacts, calendar, photos .......112 Google™ contacts, calendar, email 111 with Xperia Link 97 text input method 26 themes 22 time 31 time management 116 TrackID™ technology 64 buying a track 64 deleting a track 65 ... camera 72 video camera 77 setup guide 13 sharing music 64 photos 86 shuffle music 62 silent mode 31 SIM and memory card cover attaching 11 removing 9 SIM card 122 exporting contacts to 49 importing contacts from 46 slideshow 84 Smart Connect 109 smile detection 72 ...


