
Instruction Manual and Troubleshooting Guide
Page 4
...singer.com. The SINGER® brand has stood for over 160 years. We have the easiest and most successful sewing experience. Happy Sewing! I .. I1• •%. .0I ..1 SETTING UP THE MACHINE Sewing Preparation 13 Main Parts 6 Touch Panel LCD 13 Accessories... 7 Home Screen Home Button 13 13 Removable Storage Compartment 8 Sewing Mode 13 To Open the Accessory Tray 8 Stitch Information 13 To Remove/Attach the Removable Storage Compartment 8 Selecting a ...
...singer.com. The SINGER® brand has stood for over 160 years. We have the easiest and most successful sewing experience. Happy Sewing! I .. I1• •%. .0I ..1 SETTING UP THE MACHINE Sewing Preparation 13 Main Parts 6 Touch Panel LCD 13 Accessories... 7 Home Screen Home Button 13 13 Removable Storage Compartment 8 Sewing Mode 13 To Open the Accessory Tray 8 Stitch Information 13 To Remove/Attach the Removable Storage Compartment 8 Selecting a ...
Instruction Manual and Troubleshooting Guide
Page 7
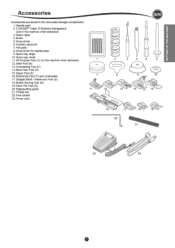
... when delivered) 12. Open Toe Foot (N) 20. Overcasting Foot (C) 14. Blind Hem Foot (D) 15. Needle pack 2.5 SINGER® Class 15 Bobbins (transparent) (one in the removable storage compartment. 1. Foot control 23. SETTING UP THE MACHINE Accessories Accessories are stored in the machine when delivered) 3. Seam ripper 4. Felt pads 8. Screwdriver for needle plate 9. Spool...
... when delivered) 12. Open Toe Foot (N) 20. Overcasting Foot (C) 14. Blind Hem Foot (D) 15. Needle pack 2.5 SINGER® Class 15 Bobbins (transparent) (one in the removable storage compartment. 1. Foot control 23. SETTING UP THE MACHINE Accessories Accessories are stored in the machine when delivered) 3. Seam ripper 4. Felt pads 8. Screwdriver for needle plate 9. Spool...
Instruction Manual and Troubleshooting Guide
Page 8
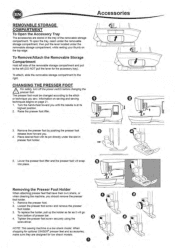
... of presser bar. 4. Loosen the presser foot screw and remove the presser foot holder. 3. Accessories REMOVABLE STORAGE COMPARTMENT To Open the Accessory Tray The accessories are designed for the accessory tray). Removing the Presser Foot Holder When attaching presser feet that have their own shank, or... when cleaning the machine, you until the needle is a low shank model. When shopping for optional SINGER° presser feet and accessories, make sure they are stored in presser foot holder. 0 5. NOTE: This sewing machine is at its pin directly ...
... of presser bar. 4. Loosen the presser foot screw and remove the presser foot holder. 3. Accessories REMOVABLE STORAGE COMPARTMENT To Open the Accessory Tray The accessories are designed for the accessory tray). Removing the Presser Foot Holder When attaching presser feet that have their own shank, or... when cleaning the machine, you until the needle is a low shank model. When shopping for optional SINGER° presser feet and accessories, make sure they are stored in presser foot holder. 0 5. NOTE: This sewing machine is at its pin directly ...

Instruction Manual and Troubleshooting Guide
Page 11
... machine will be lit until tack stitch has completed. The LED lights will stop automatically at the same time. Place the foot control in the accessory tray. NOTE: When the foot control is released. /1 /A EIJI 3 0 PACK AWAY AFTER SEWING 1. When released, machine will sew a tack and stop when...the threads after sewing to cut before the needle moves to the machine around the foot control for easy storage. 4. e Place all accessories in the space above the free arm. To cut the upper and bobbin threads. SETTING UP THE MACHINE _ Setting Up the Machine 5.
... machine will be lit until tack stitch has completed. The LED lights will stop automatically at the same time. Place the foot control in the accessory tray. NOTE: When the foot control is released. /1 /A EIJI 3 0 PACK AWAY AFTER SEWING 1. When released, machine will sew a tack and stop when...the threads after sewing to cut before the needle moves to the machine around the foot control for easy storage. 4. e Place all accessories in the space above the free arm. To cut the upper and bobbin threads. SETTING UP THE MACHINE _ Setting Up the Machine 5.


