Singer Patchwork 7285Q Support and Manuals
Get Help and Manuals for this Singer item
View All Support Options Below
Free Singer Patchwork 7285Q manuals!
Problems with Singer Patchwork 7285Q?
Ask a Question
Free Singer Patchwork 7285Q manuals!
Problems with Singer Patchwork 7285Q?
Ask a Question
Most Recent Singer Patchwork 7285Q Questions

Thread Guide
need to know how to replace the thread guide on my patchwork 7285Q
need to know how to replace the thread guide on my patchwork 7285Q
(Posted by jvt522 1 year ago)
Singer Patchwork 7285Q Videos

Bobbin Tension Adjustment - Loose Thread Bounce Problem - Singer Sewing Machine Patchwork 7285Q
Duration: 27:13
Total Views: 38,010
Duration: 27:13
Total Views: 38,010
Unboxing: Máquina de coser, singer Patchwork 7285Q (Código descuento en electro365: BOSQUE)
Duration: 8:18
Total Views: 4,202
Duration: 8:18
Total Views: 4,202
Unboxing mesin jahit singer patchwork 7285q
Duration: 10:06
Total Views: 135
Duration: 10:06
Total Views: 135
SINGER Patchwork 7285Q ????? ?????
Duration: 2:13
Total Views: 24,788
Duration: 2:13
Total Views: 24,788
Popular Singer Patchwork 7285Q Manual Pages
Instruction Manual - Page 2
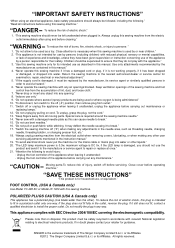
... & Canada only)
Use Model YC-485 EC or Model JF-1000 with any maintenance." "IMPORTANT SAFETY INSTRUCTIONS"
"When using this product must be followed, including the following to be supervised to repair or replace at once." 21.
Always unplug this can cause needle to electrical/ electronic products. "Use this sewing machine only for examination, repair, electrical or mechanical...
Instruction Manual - Page 5
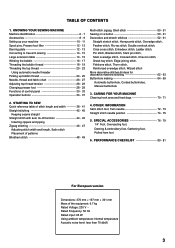
... SEWING MACHINE 0DFKLQHLGHQWL¿FDWLRQ 6 - 7 Accessories 8 - 9 Setting up your machine 10 - 11 Spool pins, Presser foot lifter 12 - 13 Darning plate 12 - 13 Converting to free-arm sewing 14 - 15 Large extension table 14 - 15 Winding the bobbin 16 - 17 Threading the bobbin thread 18 - 19 Threading the top thread 20 - 23
Using automatic needle threader Picking up bobbin...
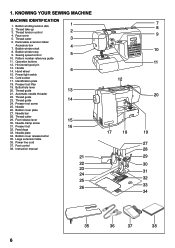
Instruction Manual - Page 8
... extension table/
Accessory box
4
7. Buttonhole lever 20. Needle plate
34. Hand wheel
6
15. Thread cutter
3
6. Thread cutter
29. Foot release lever
15
30. Bobbin cover release button
35. Thread take-up 3. Sewing speed control
5
10. Bobbin winding tension disk
1
2. Power/light switch
16. KNOWING YOUR SEWING MACHINE
MACHINE IDENTIFICATION
1.
Instruction Manual - Page 16
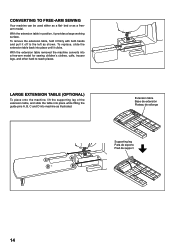
CONVERTING TO FREE-ARM SEWING
Instruction Manual - Page 24

... recommended you . Guide thread into thread guide as illustrated.
2.
Hook thread into hooked end and pull the thread upward.
5. Rotate the lever to its highest position by rotating the hand wheel towards you (counter-clockwise).
1. Release the lever and pull thread away from you set the machine for straight stitch when using the needle threader.
1
2
3
4
5
6
22...
Instruction Manual - Page 30
...' in the up position. Place the desired foot on the needle plate aligning the
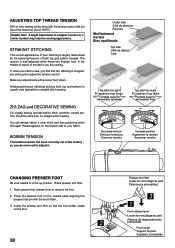
presser foot pin with the tension control dial (on top of the machine) set at "AUTO" . ADJUSTING TOP THREAD TENSION
90% of your sewing will be less than for straight stitch sewing.
Push presser foot release lever to adjust it.
You will...
Instruction Manual - Page 32
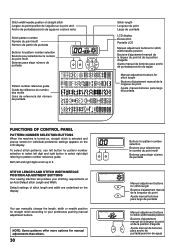
... patterns, use left button for individual preference settings appears on the display. STITCH LENGTH AND STITCH WIDTH/NEEDLE POSITION ADJUSTMENT BUTTONS
Your sewing machine will produce your preference pushing manual adjustment buttons. You can manually change the length, width or needle position for stitch width/needle position Boutons d'ajustement manuel de la largeur du point et de la...
Instruction Manual - Page 34
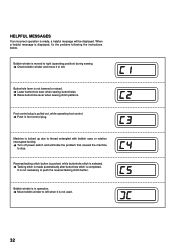
.... ÎTurn off power switch and eliminate the problem that caused the machine
to push the reverse/tacking stitch button. When a helpful message is moved to right (operating position) during sewing. ÎCheck bobbin winder and move it to left. Bobbin winder is displayed, fix the problem following the instructions below. Buttonhole lever is made , a helpful message will...
Instruction Manual - Page 36
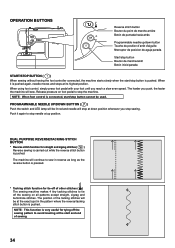
... is connected, start and end of other stitches ( ) The sewing machine makes 4 tiny tacking stitches to tie off the sewing pattern to avoid raveling at its highest position.
OPERATION BUTTONS
Reverse stitch button Bouton du point de marche arrière Botón de puntada hacia atrás
Programmable needle up position. Release pressure on foot pedal...
Instruction Manual - Page 44
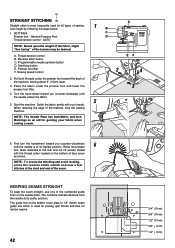
... one of the material, stop button E. The numbers indicate distance from the needle at its highest position. Start/stop the sewing machine.
Programmable needle up/down button D. The guide line on the needle plate. Thread tension control B. STRAIGHT STITCHING
A
Straight stitch is most frequently used for piecing quilt blocks and also for narrow seams.
42
3/4" (19 mm) 5/8" (16 mm...
Instruction Manual - Page 56
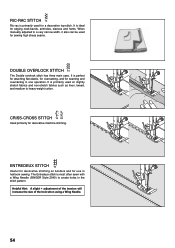
... and for decorative machine stitching. ENTREDEUX STITCH
Useful for decorative stitching on slightly stretch fabrics and non-stretch fabrics such as linen, tweed, and medium to create holes in one operation. It is primarily used for a decorative top-stitch. RIC-RAC STITCH
Ric-rac is primarily used for sewing high stress seams.
DOUBLE OVERLOCK STITCH
The Double overlock stitch has three...
Instruction Manual - Page 70
....
3
4. Spur Saliente Tige
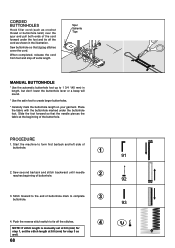
MANUAL BUTTONHOLE
* Use the automatic buttonhole foot up to 1 3/4 "(45 mm) in the illustration. Stitch forward to tie off extra length. Push the reverse stitch switch to the end of buttonhole.
2
3. Sew buttonhole so that the needle pierces the fabric at 0.8 (mm) for step 3 as well.
68 Start the machine to create larger...
Instruction Manual - Page 72

... as it is necessary to avoid electrical shock.
70
(3) (4) Replace the needle plate.
5
Cleaning the sewing machine and footcontroller
After using, keep the essential parts clean at all purpose" oil as
indicated by removing the plug from the sewing machine and footcontroller. Remove the needle plate (1).
(1)
2
3. Replace the bobbin case with the lint brush.
4
Put one drop of...
Instruction Manual - Page 76

STRAIGHT STITCH NEEDLE POSITION
The position of the needle when sewing straight stitch may be adjusted to anyone of 13 different positions with the Stitch Width Control as illustrated:
Toward left Vers la gauche Hacia izquierda
0XOWLIXQFWLRQEXWWRQ Touche multifonctions Botón de múltiples funciones
Toward right Vers la droite Hacia derecha
74
Instruction Manual - Page 78

..., right sides together, under presser foot. 3. Sewing Instructions 1. Do not forget to guide fabric when overcasting. Place two pieces of your fabric. 2.
Insert fabric under
the 1/4-Inch Foot. 2. OVERCASTING FOOT
This foot is used to lower your stitch. When the fabric reaches the foot's 1/4-turn mark, leave
the needle in doll clothes or baby garments. 5.
Singer Patchwork 7285Q Reviews
We have not received any reviews for Singer yet.