
Instruction Manual 2
Page 17
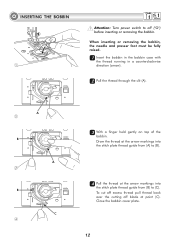
... plate. 12 A 2 B A 3 B C 4 33 With a finger held gently on top of the bobbin. When inserting or removing the bobbin, the needle and presser foot must be fully raised. 11 Insert the bobbin in the bobbin case with the thread running in a counterclockwise direction (arrow). 22 Pull the thread through the slit (A). Draw the thread at the...
... plate. 12 A 2 B A 3 B C 4 33 With a finger held gently on top of the bobbin. When inserting or removing the bobbin, the needle and presser foot must be fully raised. 11 Insert the bobbin in the bobbin case with the thread running in a counterclockwise direction (arrow). 22 Pull the thread through the slit (A). Draw the thread at the...
Instruction Manual 2
Page 79
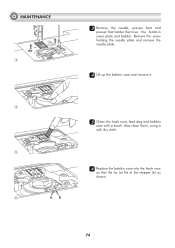
Also clean them, using a soft, dry cloth. 66 Replace the bobbin case into the hook race so that the tip (a) fits to the stopper (b) as shown. 74 Remove the bobbin cover plate and bobbin. Remove the screw holding the needle plate and remove the needle plate. 44 Lift up the bobbin case and remove it. 55 Clean the hook race, feed dog and bobbin case with a brush. MAINTENANCE 3 4 5 6 ab 33 Remove the needle, presser foot and presser foot holder.
Also clean them, using a soft, dry cloth. 66 Replace the bobbin case into the hook race so that the tip (a) fits to the stopper (b) as shown. 74 Remove the bobbin cover plate and bobbin. Remove the screw holding the needle plate and remove the needle plate. 44 Lift up the bobbin case and remove it. 55 Clean the hook race, feed dog and bobbin case with a brush. MAINTENANCE 3 4 5 6 ab 33 Remove the needle, presser foot and presser foot holder.
Instruction Manual 2
Page 80
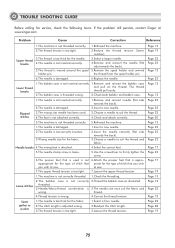
... threaded correctly. 1.Rethread the machine. TROUBLE SHOOTING GUIDE Before calling for service, check the following items. If the problem still persists, contact Singer at www.singer.com Problem Cause Correction Reference 1.The machine is not correctly inserted. 2.Insert the needle correctly (flat side towards the back). 3.Wrong needle... of stitch that priate for the fabric. 2.The stitch length is adjusted wrong. 3.The thread tension is threaded wrong. 2.Check both bobbin and bobbin case. Page 23 Page 23 Page 22 Page 20 Page 13 Page 23 Page 23 Page 22 Page 77 Page 23 Page 77 Page 19...
... threaded correctly. 1.Rethread the machine. TROUBLE SHOOTING GUIDE Before calling for service, check the following items. If the problem still persists, contact Singer at www.singer.com Problem Cause Correction Reference 1.The machine is not correctly inserted. 2.Insert the needle correctly (flat side towards the back). 3.Wrong needle... of stitch that priate for the fabric. 2.The stitch length is adjusted wrong. 3.The thread tension is threaded wrong. 2.Check both bobbin and bobbin case. Page 23 Page 23 Page 22 Page 20 Page 13 Page 23 Page 23 Page 22 Page 77 Page 23 Page 77 Page 19...
Instruction Manual 2
Page 81
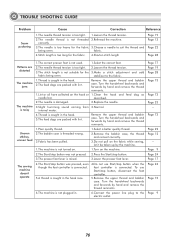
... the handwheel backwards and forwards by hand and remove the thread remnants. 1.Poor quality thread. 1.Select a better quality thread. 2.The bobbin case is threaded wrong. 2.Remove the bobbin case, the thread and reinsert correctly. 3.Fabric has been pulled. 1.The machine is not turned on. 3.Do not pull on the fabric... is too tight. 2.Loosen the thread tension. 3.The stitch length is caught in the hook race. 5.Remove the upper thread and bobbin case. fabric. 4.Stitch length is too long for the 3.Make a stitch adjustment and add fabric being sewn. Remove the upper thread and...
... the handwheel backwards and forwards by hand and remove the thread remnants. 1.Poor quality thread. 1.Select a better quality thread. 2.The bobbin case is threaded wrong. 2.Remove the bobbin case, the thread and reinsert correctly. 3.Fabric has been pulled. 1.The machine is not turned on. 3.Do not pull on the fabric... is too tight. 2.Loosen the thread tension. 3.The stitch length is caught in the hook race. 5.Remove the upper thread and bobbin case. fabric. 4.Stitch length is too long for the 3.Make a stitch adjustment and add fabric being sewn. Remove the upper thread and...


