Singer 9970 Support Question
Singer 9970 Support Question
Find answers below for this question about Singer 9970.Need a Singer 9970 manual? We have 1 online manual for this item!
Question posted by mvieira10 on January 17th, 2019
Top Thread Sticking On Bobbin Case
I am having a problem with the top thread catching on the bobbin case and breaking the thread. I had no problems and now it just started doing it?
Current Answers
Answer #1: Posted by TommyKervz on January 20th, 2019 4:59 AM
TommyKervz

Member since:
January 10th, 2013 Points: 17,776,833

Member since:
January 10th, 2013 Points: 17,776,833
Hi'
See reasons and solution here https://singerco.com.au/faq/wont-machine-pick-bobbin-thread/
Related Singer 9970 Manual Pages
Instruction Manual - Page 2
... not pull or push fabric while stitching. SINGER is being used as threading needle, changing needle, threading bobbin, or changing presser foot. 15.
Special care is required around the sewing machine needle. 11. It may deflect the needle causing it . 17. INSTRUCTION MANUAL
This sewing machine is intended for household use outdoors. 7. Always use as described in...
Instruction Manual - Page 3
... 13
TO TURN OFF THE AUDIBLE BEEP 13 BOBBIN SETTING 14
A. REMOVING THE BOBBIN 14 B. SETTING SPOOL OF THREAD ON SPOOL PIN 14 C. INSERTING THE BOBBIN 15
THREADING THE MACHINE 16
A. SETTING SPOOL OF THREAD ON SPOOL PIN 16 C. THREADING THE NEEDLE EYE 17 E. DRAWING UP THE BOBBIN THREAD 17
STARTING TO SEW 18
A. START AND END OF SEAM 18 B. AUTO TACK STITCH...
Instruction Manual - Page 4
... identifying the terminals in accordance with reduced physical, sensory or mental capabilities, or lack of the CISPR. MODEL 9970
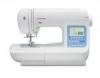
PREFACE Thank you for your sewing machine, read the entire instruction manual before attempting to operate the machine.
To ensure that they have been given supervision or instruction concerning use by persons (including children) with...
Instruction Manual - Page 6
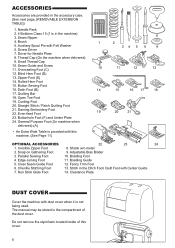
... be stored in the Ditch Foot/ Quilt Foot with Felt Washer 6. ACCESSORIES
Accessories are provided in the machine) 3. Needle Pack
2. 4 Bobbins Class 15 (1 is in the accessory case.
(See next page, [REMOVABLE EXTENSION
7
TABLE])
1. Open Toe Foot
19. Adjustable Bias Binder
3. Braiding Guide
5. Parallel Sewing Foot
10. Zipper Foot (E)
14. Darning Embroidery Foot 22.
Instruction Manual - Page 11
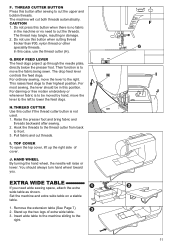
...EXTRA WIDE TABLE
If you . Set the machine and extra wide table on a stable table.
1. Do not use the thread cutter (H). Pull fabric and cut both threads automatically. J. Remove the extension table (See... to cut the upper and bobbin threads. Raise the presser foot and bring fabric and
threads backward after sewing to cut the threads. Hook the threads to the thread cutter from back
to lower...
Instruction Manual - Page 17
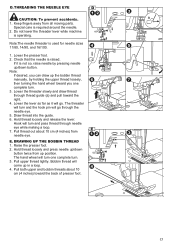
... lever while machine
is raised. Lower the presser foot. 2. Note: If desired, you one complete turn and pass thread through needle eye while making a loop. 7. Draw thread into the guide. 6. Hook will come up position. Raise the presser foot. 2. Hold thread loosely and press needle up/down button. Bobbin thread will turn . 3. DRAWING UP THE BOBBIN THREAD 1.
Check...
Instruction Manual - Page 18
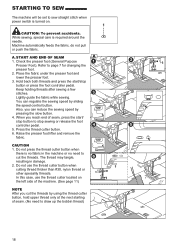
Machine automatically feeds the fabric, do not pull or push the fabric. Refer to draw up the bobbin thread)
18 Lightly guide the fabric while sewing. You can reduce the sewing speed by pressing the slow button. 4.
In this case, use the thread cutter button when cutting thread thicker than #30, nylon thread or other speciality threads. START AND END OF SEAM...
Instruction Manual - Page 19
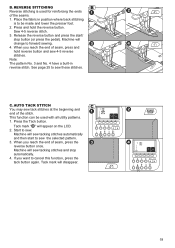
... in reverse stitch. Press and hold reverse button and sew 4-5 reverse stitches. This function can be made and lower the presser foot. 2. Machine will sew tacking stitches automatically and then start /
stop automatically. 4. Machine will change to cancel this function, press the tack button again. B. Machine will sew tacking stitches and stop button (or press the pedal...
Instruction Manual - Page 25
... bobbin thread
loosely and start sewing. Position the fabric under the presser foot and lower it . 2. Place hand lightly on the fabric while sewing.
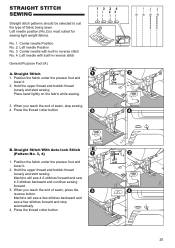
3. Straight Stitch With Auto-lock Stitch (Pattern No. 3, 4)
1. Press the thread cutter button. Left needle position (No.2) is most suited for sewing light weight fabrics. Center needle with built-in reverse stitch No. 4. Machine...
Instruction Manual - Page 26
...Note: To prevent the fabric layers from your left .
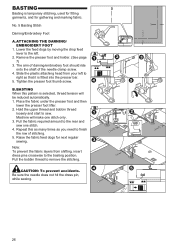
2. Machine will be reduced automatically. 1. B. BASTING When this as ...sewing.
26 Slide the plastic attaching head from shifting, insert dress pins crosswise to finish the row of the needle clamp screw.
4. Hold the upper thread and bobbin thread
loosely and start to remove the stitching.
BASTING
Basting is selected, thread...
Instruction Manual - Page 34

.... Round Ended Buttonhole with reinforced bar tack 108. Heirloom Buttonhole 116.
Hold upper thread lightly and start to the left.
4. BUTTONHOLE SEWING
Select the buttonhole style you . This machine can sew 13 types of buttonhole foot and bring upper and bobbin threads to sew if buttonhole lever is not lowered properly or frame of buttonhole foot is in...
Instruction Manual - Page 38

...-tack, to reinforce areas that the starting point is on edge of buttonhole foot and bring upper and bobbin threads to remove the fabric.
1
2
3
4
1
2
38 No.103 Darning, mending and other applications.
Press the thread cutter button and raise the presser foot lifter to the left.
3. Machine will sew bar-tack or darning stitch as pocket...
Instruction Manual - Page 39
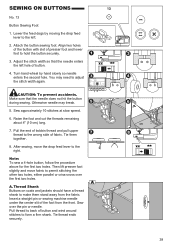
....
Insert a straight pin or sewing machine needle under the center slit of button and wind around stitches to back of the foot from the fabric.
Then lift presser foot slightly and move the drop feed lever to hold the button securely.
3. A. Pull the end of bobbin thread and pull upper thread to the wrong side...
Instruction Manual - Page 41

... of even-feed foot should rest on the underside to easily allow closely spaced zigzag stitches and fabric to feed freely under foot. SEWING Hold both thread lightly at start of plaids, stripes, and patterns.
B.
Experiment with fabric scraps until you may adjust the length and width of the fabric. Remove the presser...
Instruction Manual - Page 43

... the width of the bracket. 6. Insert the bias
tape from the outside of the machine and bobbin with all-purpose sewing thread.
2. Select a narrow ZigZag, Straight or Decorative Stitch. 8. Tighten the presser foot
... Braiding Foot, Chenille Stitching Foot, Edge Joining Foot, Fancy Trim Foot, Gathering Foot, Non-Stick Foot, Seam Guide Foot and Stitch in the back, and adjust the bracket as needed. ...
Instruction Manual - Page 44

... as it enters the Guide.
As you want to have the chenille effect. Prepare a minimum of three layers of the machine and bobbin with all -purpose sewing thread. You can use a monofilament thread if you sew, lightly support the trim, braid or cord as 3/8" (10 mm) wide.
3. The Chenille Stitch Foot will be visible.
2. Guide trim...
Instruction Manual - Page 46
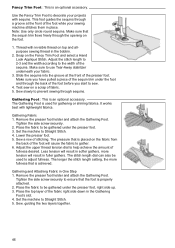
...the Fancy Trim Foot to sew.
4. Make sure you start to decorate your fabric.
3.
Set the machine to help achieve the amount of the foot while your sewing machine stitches them in place....
Gathering and Attaching Fabric in the bobbin.
2. Place the fabric to be gathered under the presser foot, right side up. 3. Lower the presser foot. 5. Test sew on the Fancy Trim Foot and select...
Instruction Manual - Page 48
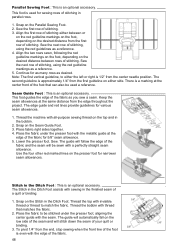
...Thread the machine with a perfectly straight seam allowance. The guide will follow the edge of the
fabric and the seam will stitch down the seam of the fabric as a reference. 4. Use the four other red marked lines on the Parallel Sewing Foot. 2. Stitch in the Ditch Foot assists with the seam. Thread the bobbin... in the bobbin.
2. Sew. Snap on the Seam Guide Foot. 3. Sew the next row...
Instruction Manual - Page 54
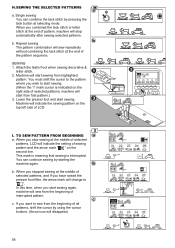
... to " ", In this time, when you start sewing again, machine will indicate the setting of all patterns, shift the cursor by starting the machine again. Machine will disappear)
54 When you want to start sewing. If you stop automatically after sewing selected patterns. Attach the Satin Foot when sewing decorative &
letter stitch. 2. TO SEW PATTERN FROM BEGINNING a. When you wish to...
Instruction Manual - Page 57
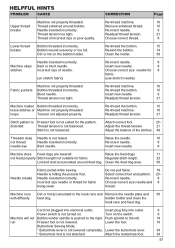
...)
Fabric puckers
Machine not properly threaded. Remove entwined thread.
15
breaks
Needle inserted incorrectly.
Re-thread machine.
16
Re-thread the bobbin.
15
Insert new needle.
8
Readjust thread tension.
21
Machine makes Bobbin threaded incorrectly.
Clean the feed dog area.
50
Needle breaks
Fabric pulled while sewing. Incorrect size needle or thread for fabric.
Power...
Similar Questions

Classes On How To Use Singer 9970 Sewing Machine
I bought the sewing machine during the pandemic and would like to learn how to use it- functions, st...
I bought the sewing machine during the pandemic and would like to learn how to use it- functions, st...
(Posted by Connienm 1 year ago)

Singer 9970 Not Sewing Correctly On Bottom Thread
stop stitches look great but bottom thread shows top top thread loops
stop stitches look great but bottom thread shows top top thread loops
(Posted by patejbja 4 years ago)

I Get E7 Error Message On My Singer Model 7258 Sewing Machine. There Is No Refe
Error message E7 is up on my Singer Stylist model 7258 sewing machine. It is not working at all. I t...
Error message E7 is up on my Singer Stylist model 7258 sewing machine. It is not working at all. I t...
(Posted by ebellamybellamy9 5 years ago)

Why Won't My Machine Sew, Checked Bobbin And Retreaded. Has Power Just Will Not
the machine has power and threade correctly and bobbin is in right. It did freeze on me when sewing....
the machine has power and threade correctly and bobbin is in right. It did freeze on me when sewing....
(Posted by alewis41 7 years ago)

Beeping From Singer Sewing Machine Stylist Ii 5625
My sewing machine will beep and stop sewing after three inches of sewing. I have taken it to be repa...
My sewing machine will beep and stop sewing after three inches of sewing. I have taken it to be repa...
(Posted by arusheria 9 years ago)