

Instruction Manual
Page 5
..., Attaching embroidery unit 62 - 63 Removing embroidery unit 62 - 63 Securing fabric in embroidery hoop 64 - 65 Using fabric and stabilizer 66 - 69 Preparing the machine before installing the hoop -------- 70 - 71 Attaching and removing embroidery hoop 70 - 71 Installation of patterns Blind stitch 38 - 39 Multi-stitch zigzag 40 - 41...Decorative Stitching 48 - 49 Continuous patterns 50 - 51 Sewing on a button 50 - 51 Buttonholes 52 - 57 Using buttonhole foot, Procedure, Corded buttonholes Buttonholing with Futura Multi hoop 88 - 95 Helpful messages when embroidering 96 - 97 4.
..., Attaching embroidery unit 62 - 63 Removing embroidery unit 62 - 63 Securing fabric in embroidery hoop 64 - 65 Using fabric and stabilizer 66 - 69 Preparing the machine before installing the hoop -------- 70 - 71 Attaching and removing embroidery hoop 70 - 71 Installation of patterns Blind stitch 38 - 39 Multi-stitch zigzag 40 - 41...Decorative Stitching 48 - 49 Continuous patterns 50 - 51 Sewing on a button 50 - 51 Buttonholes 52 - 57 Using buttonhole foot, Procedure, Corded buttonholes Buttonholing with Futura Multi hoop 88 - 95 Helpful messages when embroidering 96 - 97 4.
Instruction Manual
Page 8
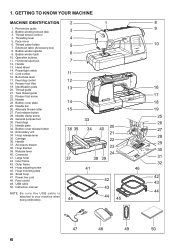
... 10 8. Bobbin winder latch 6 10. Identification plate 20. Bobbin cover plate 14 18 25. Release lever 40. Inner frame 43. Small hoop 47. Thread tension control 4. Bobbin winder spindle 9. Operation buttons 11. Power/light switch 15. Cord socket 11 16. Alternate thread cutter 15 ...19 27. Embroidery unit 34 Hoop release lever 35. Handle 37. Connector 41. Hoop adjusting screw 45. Foot control 49. Threading lever 4 5. Hand wheel 14. Presser foot screw 17 23....
... 10 8. Bobbin winder latch 6 10. Identification plate 20. Bobbin cover plate 14 18 25. Release lever 40. Inner frame 43. Small hoop 47. Thread tension control 4. Bobbin winder spindle 9. Operation buttons 11. Power/light switch 15. Cord socket 11 16. Alternate thread cutter 15 ...19 27. Embroidery unit 34 Hoop release lever 35. Handle 37. Connector 41. Hoop adjusting screw 45. Foot control 49. Threading lever 4 5. Hand wheel 14. Presser foot screw 17 23....
Instruction Manual
Page 64
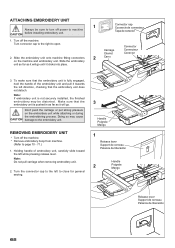
... to turn off the machine. Turn the connector cap to the left while pressing release lever. REMOVING EMBROIDERY UNIT * Turn off the machine. * Remove embroidery hoop from machine. (Refer to open. Turn off power to machine CAUTION before installing embroidery unit. To make sure that the embroidery unit is pushed in...
... to turn off the machine. Turn the connector cap to the left while pressing release lever. REMOVING EMBROIDERY UNIT * Turn off the machine. * Remove embroidery hoop from machine. (Refer to open. Turn off power to machine CAUTION before installing embroidery unit. To make sure that the embroidery unit is pushed in...

Instruction Manual
Page 66
... sound like a drum when the tightened surface is properly positioned in embroidery frame with no slack, securely tighten the screw. Slightly tighten the hoop adjusting screw and pull fabric 2 edges to match. 64 Hoop adjusting screw Vis de réglage de cerceau Tornillo de ajuste de aro c. Check inner and outer... screw and place fabric between inner and outer frame. Fit the two frames together by pressing down on inner hoop will come to remove slack. b. Once fabric is tapped with no slack, securely tighten the screw. Once fabric is properly positioned in embroidery frame...
... sound like a drum when the tightened surface is properly positioned in embroidery frame with no slack, securely tighten the screw. Slightly tighten the hoop adjusting screw and pull fabric 2 edges to match. 64 Hoop adjusting screw Vis de réglage de cerceau Tornillo de ajuste de aro c. Check inner and outer... screw and place fabric between inner and outer frame. Fit the two frames together by pressing down on inner hoop will come to remove slack. b. Once fabric is tapped with no slack, securely tighten the screw. Once fabric is properly positioned in embroidery frame...

Instruction Manual
Page 68
... stabilizer correctly. Stabilizer (Adhesive surface facing down) Entoilage (surface adhésive orientée vers le bas) Entretela (superficie adhesiva hacia abajo) Hoop position Position du cerceau Posición del aro Material (Under side) Tissu (Côté de dessous) Material (Reverso) Embroidering surface (Top side...such as shrinkage and puckering of the fabric around the embroidery area. Stretchy fabrics The fabric may stretch when tightening the hoop, the result may be larger in problems such as towels, use a water soluble stabilizer both on the underside and on the ...
... stabilizer correctly. Stabilizer (Adhesive surface facing down) Entoilage (surface adhésive orientée vers le bas) Entretela (superficie adhesiva hacia abajo) Hoop position Position du cerceau Posición del aro Material (Under side) Tissu (Côté de dessous) Material (Reverso) Embroidering surface (Top side...such as shrinkage and puckering of the fabric around the embroidery area. Stretchy fabrics The fabric may stretch when tightening the hoop, the result may be larger in problems such as towels, use a water soluble stabilizer both on the underside and on the ...

Instruction Manual
Page 70
... to that the weight of the stabilizer be obtained from thin to thick. When embroidering onto fabric which is bigger than the hoop size, or when embroidering close to the edge of the fabric, attach the stabilizer as illustrated. WHEN EMBROIDERING ALONG THE EDGE ...borde del material Stabilizer (Adhesive surface facing) Entoilage (face à la surface adhésive) Estabilizador (cara de la superficie adhesiva) Hoop inner frame Cadre intérieur du cerceau Interior del marco del aro Stabilizer Entoilage Estabilizador Ribbon tape Ruban Cinta Stabilizer Entoilage Estabilizador ...
... to that the weight of the stabilizer be obtained from thin to thick. When embroidering onto fabric which is bigger than the hoop size, or when embroidering close to the edge of the fabric, attach the stabilizer as illustrated. WHEN EMBROIDERING ALONG THE EDGE ...borde del material Stabilizer (Adhesive surface facing) Entoilage (face à la surface adhésive) Estabilizador (cara de la superficie adhesiva) Hoop inner frame Cadre intérieur du cerceau Interior del marco del aro Stabilizer Entoilage Estabilizador Ribbon tape Ruban Cinta Stabilizer Entoilage Estabilizador ...
Instruction Manual
Page 72
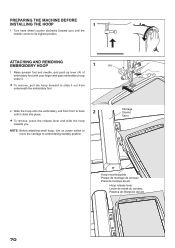
... presser foot and needle, and push up lever (A) of embroidery foot with your finger and pass embroidery hoop under it. To remove, pull the hoop forward to embroidering standby position. Turn hand wheel counter clockwise (toward you) until it out from front to back until the needle comes ...to its highest position. NOTE: Before attaching small hoop, turn on power switch to move the carriage to slide it clicks into place. 2 To remove, press the release lever and slide the...
... presser foot and needle, and push up lever (A) of embroidery foot with your finger and pass embroidery hoop under it. To remove, pull the hoop forward to embroidering standby position. Turn hand wheel counter clockwise (toward you) until it out from front to back until the needle comes ...to its highest position. NOTE: Before attaching small hoop, turn on power switch to move the carriage to slide it clicks into place. 2 To remove, press the release lever and slide the...

Instruction Manual
Page 76
Simply click on "Cancel". If the installation utility identifies a lack of the FUTURA software files to the given directory on the hard disk. Turn on your large hoop. IMPORTANT: If you have embroidered using the small hoop, and you are now ready to use your sewing machine. It will finally start -up protocol. Boot... procedure by turning the Hand wheel towards you plan to 100%. CORRECT START-UP PROCEDURE WHEN EMBROIDERING The following steps must be stored. Attach the hoop that you . 2. Double click on the Futura Icon on your computer, but do not open up the...
Simply click on "Cancel". If the installation utility identifies a lack of the FUTURA software files to the given directory on the hard disk. Turn on your large hoop. IMPORTANT: If you have embroidered using the small hoop, and you are now ready to use your sewing machine. It will finally start -up protocol. Boot... procedure by turning the Hand wheel towards you plan to 100%. CORRECT START-UP PROCEDURE WHEN EMBROIDERING The following steps must be stored. Attach the hoop that you . 2. Double click on the Futura Icon on your computer, but do not open up the...
Instruction Manual
Page 78
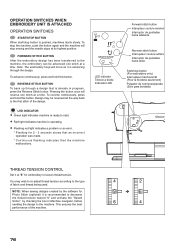
... design has been transferred to start /stop the machine, push the button again and the machine will move as it at a time. Note: The embroidery hoop will stop button (For embroidery only) Interrupteur marche/arrêt (Pour la broderie seulement) Pulsador de comienzo/parada (Sólo para bordado) THREAD TENSION CONTROL...
... design has been transferred to start /stop the machine, push the button again and the machine will move as it at a time. Note: The embroidery hoop will stop button (For embroidery only) Interrupteur marche/arrêt (Pour la broderie seulement) Pulsador de comienzo/parada (Sólo para bordado) THREAD TENSION CONTROL...

Instruction Manual
Page 82
.... This can cause fabric to page 20 - 21. Refer to pucker and result in the frames so that when the fabric is too tight. Embroidery hoop is tangled somewhere along the thread path, this will increase the upper thread tension and cause the fabric to page 16 - 19. 80... Hoop is tangled. Check the thread. Upper thread tension is tapped with the hoop mounting screws. Refer to hang up and not advance through the machine. If the thread is tangled on the...
.... This can cause fabric to page 20 - 21. Refer to pucker and result in the frames so that when the fabric is too tight. Embroidery hoop is tangled somewhere along the thread path, this will increase the upper thread tension and cause the fabric to page 16 - 19. 80... Hoop is tangled. Check the thread. Upper thread tension is tapped with the hoop mounting screws. Refer to hang up and not advance through the machine. If the thread is tangled on the...

Instruction Manual
Page 84
... says thread is broken, machine lights are missing If the embroidery machine detects that the thread is supplied with the accessories over . 2. The hoop will move back one stitch at a time. Restart the embroidery machine and continue embroidering. Rethread upper thread, (see page 16 - 17 "... de hilo 2. Reverse stitch button Interrupteur couture arrière interruptor de puntadas hacia atrás 82 HELPFUL INFORMATION FOR EMBROIDERING WITH FUTURA 1. In such cases, use the following procedure to step back through the embroidery data. Upper thread is not broken. Press the reverse...
... says thread is broken, machine lights are missing If the embroidery machine detects that the thread is supplied with the accessories over . 2. The hoop will move back one stitch at a time. Restart the embroidery machine and continue embroidering. Rethread upper thread, (see page 16 - 17 "... de hilo 2. Reverse stitch button Interrupteur couture arrière interruptor de puntadas hacia atrás 82 HELPFUL INFORMATION FOR EMBROIDERING WITH FUTURA 1. In such cases, use the following procedure to step back through the embroidery data. Upper thread is not broken. Press the reverse...
Instruction Manual
Page 86
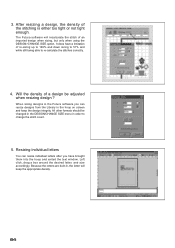
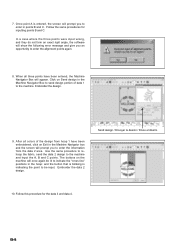
... the design integrity. When sizing designs in the hoop on screen and keep the appropriate density. 84 All other formats should be adjusted when resizing design ? Resizing individual letters You can resize individual letters after you can resize designs from the Library in the Futura software you have a limitation of re-sizing... in , the letter will recalculate the stitch of the stitching is either too tight or not tight enough. It does have brought them into the hoop and exited the text window. 3.
... the design integrity. When sizing designs in the hoop on screen and keep the appropriate density. 84 All other formats should be adjusted when resizing design ? Resizing individual letters You can resize individual letters after you can resize designs from the Library in the Futura software you have a limitation of re-sizing... in , the letter will recalculate the stitch of the stitching is either too tight or not tight enough. It does have brought them into the hoop and exited the text window. 3.

Instruction Manual
Page 90
...;. Using a very fine-lined water soluble marker, mark a line vertically down the center of the fabric. Multi-Hoop Multi-Hooping is a special feature in the Futura software that will allow embroidery data which is larger than a single embroidery hoop to be sent to the machine to stitch out, while making it easy to re...
...;. Using a very fine-lined water soluble marker, mark a line vertically down the center of the fabric. Multi-Hoop Multi-Hooping is a special feature in the Futura software that will allow embroidery data which is larger than a single embroidery hoop to be sent to the machine to stitch out, while making it easy to re...

Instruction Manual
Page 92
... and vertical cross lines on the screen. The design data is sent to the machine for sewing. Guide lines are to the machine for Multiple Hooping. On each corner of markings on the tool bar. 5. 3. Fig. 3 Fig. 3 Fig. 3 Fig. 4 Fig. 4 Fig. 4 Guide line Ligne Guide Línea gu&#...parts flow out of the first hoop section). 4. In each side of the hoop there is built into the hoop, aligning cross lines of data 1 within the guide line markings of the hoop. The grey area (#1 Hoop) is the first of the embroidery data that is a Center Hoop line which together define the ...
... and vertical cross lines on the screen. The design data is sent to the machine for sewing. Guide lines are to the machine for Multiple Hooping. On each corner of markings on the tool bar. 5. 3. Fig. 3 Fig. 3 Fig. 3 Fig. 4 Fig. 4 Fig. 4 Guide line Ligne Guide Línea gu&#...parts flow out of the first hoop section). 4. In each side of the hoop there is built into the hoop, aligning cross lines of data 1 within the guide line markings of the hoop. The grey area (#1 Hoop) is the first of the embroidery data that is a Center Hoop line which together define the ...

Instruction Manual
Page 94
...when entering the points, press the clear button, (twin needle/clear button) to point A on the machine are positioned in the hoop. and then re-enter point(s). 92 Upward Vers le haut Hacia arriba Downward Vers le bas Leftward Hacia abajo Vers la gauche ...de changement Interruptor de cambio OK switch Commutateur d'acceptation Interruptor OK Clear switch Commutateur de suppression Interruptor de borrado A B C MULTIPLE HOOP SHIFT BUTTONS AND "CROSS LINE" INDICATOR LIGHTS FOR INPUTTING POINTS A, B, AND C Please Note: The buttons on the cross line, and push the ...
...when entering the points, press the clear button, (twin needle/clear button) to point A on the machine are positioned in the hoop. and then re-enter point(s). 92 Upward Vers le haut Hacia arriba Downward Vers le bas Leftward Hacia abajo Vers la gauche ...de changement Interruptor de cambio OK switch Commutateur d'acceptation Interruptor OK Clear switch Commutateur de suppression Interruptor de borrado A B C MULTIPLE HOOP SHIFT BUTTONS AND "CROSS LINE" INDICATOR LIGHTS FOR INPUTTING POINTS A, B, AND C Please Note: The buttons on the cross line, and push the ...
Instruction Manual
Page 96
... wrong, and they do not form an exact right angle, the software will show the following error message and give you to enter in the hoop: and the button that is blinking is entered, the screen will once again be lit to enter the information from... hoop 1 have been entered, the Machine Navigator Box will prompt you to indicate the "cross line" positions in points B and C. Click on the machine will prompt ...
... wrong, and they do not form an exact right angle, the software will show the following error message and give you to enter in the hoop: and the button that is blinking is entered, the screen will once again be lit to enter the information from... hoop 1 have been entered, the Machine Navigator Box will prompt you to indicate the "cross line" positions in points B and C. Click on the machine will prompt ...


