Get support for Singer Futura XL-400

Singer Futura XL-400 Support Question

Singer Futura XL-400 Support Question

Find answers below for this question about Singer Futura XL-400.
Need a Singer Futura XL-400 manual? We have 1 online manual for this item!
Question posted by Nanallamas on December 30th, 2012

Hoop Issues

Software indicates hoop is too small for design. What am I doing wrong?

Current Answers

Answer #1: Posted by ritacdavis on January 15th, 2013 9:37 PM
This answer was accepted by the poster of the original question.
ritacdavis

Member since:
January 15th, 2013

Points: 1,040
1,040
points
Singer support at the link before has steps towards correcting this problem

http://www.singersewingsolutions.com/faq_1.html#158662

Related Singer Futura XL-400 Manual Pages

Instruction Manual - Page 2

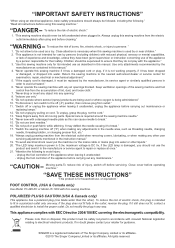
... injury: - All rights reserved. "Switch off ("0") when making any way. "Never sew with this sewing machine if it has a damaged cord or plug, if it is intended to fit in ..., unplug the appliance before carrying out any air openings blocked. Return the sewing machine to persons: " 1. "Switch the sewing machine off or unplug the appliance when leaving it unattended: - Unplug the foot...
Instruction Manual - Page 5

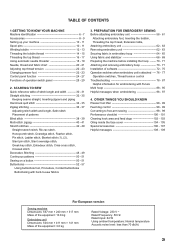
...51 Sewing on a button 50 - 51 Buttonholes 52 - 57 Using buttonhole foot, Procedure, Corded buttonholes Buttonholing with Futura Multi hoop 88 - 95 Helpful messages when embroidering 96 - 97 4. STARTING TO SEW Quick... 104 - 105 Special accessories 106 - 107 Helpful messages 108 - 109 For European version Sewing machine Dimensions: 567 mm × 240 mm × 317 mm Mass of the equipment: ...
Instruction Manual - Page 8

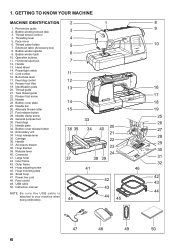
... 7 12. Presser foot lifter 19. Thread cutter/holder 7. Needle 24. Needle bar 26. Foot release button 28. Needle plate 32. Small hoop 47. Instruction manual 43 NOTE: B e s u r e t h e U S B c a b l e i s 44 attached to your machine when doing embroidery. 45 44 45 47 48 49 50 6 Bobbin cover plate 14 18 25. Outer frame 32 44. Bobbin...
Instruction Manual - Page 10

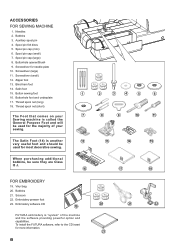
... and should be used for most decorative sewing. Screwdriver (small) 12. Thread spool net (short) The Foot that comes on your 7 Sewing machine is "system" of your sewing. Scissors 22. Auxiliary spool pin 4. Satin foot 15. Embroidery presser foot 23. Button sewing foot 1 16. Vinyl bag 20. To install the FUTURA software, refer to the CD insert for...
Instruction Manual - Page 12

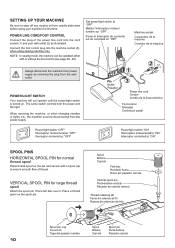
... the machine, or when changing needles or lights, etc., the machine must be operated either with a spool cap to wipe off any surplus oil from needle plate area before using sewing machine only.... Connecteur de la machine Conector de la máquina 2 1 Pin Butée Pasador 3 Power line cord Cordon Cordón de la linea eléctrica Foot control Rhéostat XL-550-P04-1.Ceonptrsol...
Instruction Manual - Page 24

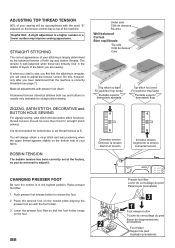
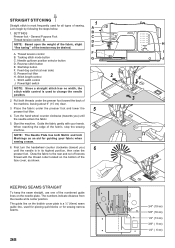
... STITCHING The correct appearance of the fabric you have determined that the machine is well balanced when these two threads 'lock' in the highest position. The tension is correctly threaded (see page 7). Do this, however, only after you are sewing. Lower the presser foot lifter so that the stitching is in the...
Instruction Manual - Page 28

... / Needle Position Control Knob. Stitch length and width/needle position controls *Auto/Default settings Your sewing machine will produce most of your preference. The LED Indicator next to the Control will light in green and a beep will sound indicating you can be activated if it is available for a selected pattern. Starting at an Auto...
Instruction Manual - Page 30

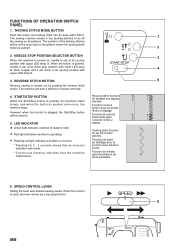
... be done with 4 upper LED lamp lit. 3. The sewing machine makes 4 tiny tacking stitches to tie off of the tacking stitches will return to start.  Red light indicates machine is operating.  Flashing red light indicates a problem or an error. * Flashing for tie-off 1 the sewing on , needle is set at its up -stop position...
Instruction Manual - Page 34

... cover, as shown. The numbers indicate distance from the needle at rear side) G. First turn the handwheel counter clockwise (toward the back of the tension may be desired. 1 A B C D E A. Draw the fabric to change the needle position. 2. SETTINGS Presser foot - Tacking stitch mode button C. Start/stop the sewing machine. The guide line on the...
Instruction Manual - Page 56

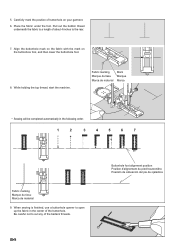
Place the fabric under the foot. When sewing is finished, use a buttonhole opener to cut any of the buttonhole. Be careful not to open up ... mark on your garment. 6. While holding the top thread, start the machine. Fabric marking Marque du tissu Marca de material mark Marque Marca * Sewing will be completed automatically in the center of the bartack threads. 54 Buttonhole...
Instruction Manual - Page 60

PREPARATION FOR EMBROIDERY SEWING BEFORE ATTACHING EMBROIDERY UNIT ATTACHING EMBROIDERY FOOT Foot holder Support du pied Sujetador prensatelas Always be sure to machine CAUTION before changing presser foot. * Raise presser foot lifter. Remove presser foot screw, presser foot and foot holder. 2. Needle clamp Serre-aiguille Abrazadera de aguja ...
Instruction Manual - Page 64

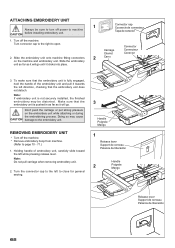
...machine. * Remove embroidery hoop from machine. (Refer to page 70 - 71.) 1. To make sure that the embroidery unit is fully engaged, hold the handle of embroidery unit, carefully slide toward the left while pressing release lever. Don't push the carriage or put strong pressure on the machine... may cause CAUTION damage to close for general sewing. 3 Handle Poignée Mango 1 Release ...
Instruction Manual - Page 76

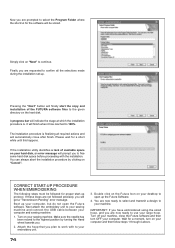
...FUTURA software files to use your sewing machine. IMPORTANT: If you have embroidered using the small hoop...Futura software and then turn on your computer and then follow steps 1 through 4 above. 74 CORRECT START-UP PROCEDURE WHEN EMBROIDERING The following steps must be stored. Turn on your machine. Attach the hoop that you . 2. Pressing the "Next" button will indicate... a design to ...
Instruction Manual - Page 78

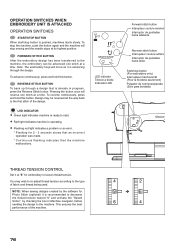
... a time. To stop the machine, push the button again and the machine will move as it at its highest position. Note: The embroidery hoop will stop sewing and the needle stops at "E" for 2 - 3 seconds shows that an incorrect operation was made. * Continuous flashing indicates that is advancing through a design that the machine malfunctions. To reverse continuously, press...
Instruction Manual - Page 84

...small net that is unwinding properly. Reverse stitch button Interrupteur couture arrière interruptor de puntadas hacia atrás 82 HELPFUL INFORMATION FOR EMBROIDERING WITH FUTURA 1. Step back through the embroidery data. Computer screen says thread is broken, machine...du fil Puntadas en blanco resultantes de ruptura de hilo 2. The hoop will move back one stitch at a time.
Instruction Manual - Page 86

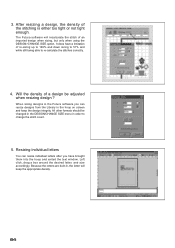
... stitch of a design be changed in the DESIGN/CHANGE SIZE menu in the hoop on screen and keep the appropriate density. 84 3. It does have brought them into the hoop and exited the... still being able to change the stitch count. 5. The Futura software will keep the design integrity. When sizing designs in the Futura software you can resize individual letters after you have a limitation of...
Instruction Manual - Page 90

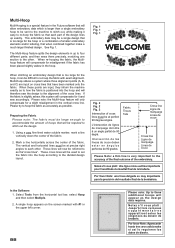
... supplémentaires apparaîtront selon les exigences du dessin de broderie. Multi-Hoop Multi-Hooping is a special feature in the Futura software that will allow embroidery data which is positioned into the hoop according to the divided design layout. When re-hooping the fabric, the Multihoop feature will only compensate for misalignment if the fabric...
Instruction Manual - Page 92

... which indicates the exact center of the first hoop section). 4. The design data is sent to Machine" tool on the "Transmit to the machine for sewing one ...designs from the Design Library that is sent to the machine for sewing. 3. The grey area (#1 Hoop) is the first of the hoop. (See figures 2 and 3). Set fabric and stabilizer into the software. (Additional numbered hoops...
Instruction Manual - Page 104

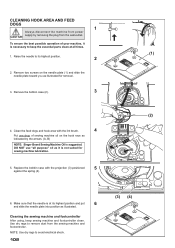
... projection (3) positioned 5 against the spring (4). (2) (A) (B) 6. Replace the bobbin case with the lint brush. 4 Put one drop of your machine, it is at all purpose" oil as indicated by removing the plug from the sewing machine and footcontroller. Remove the bobbin case (2). 3 4. Make sure that the needle is not suited for removal. 3. CLEANING HOOK AREA...
Instruction Manual - Page 106

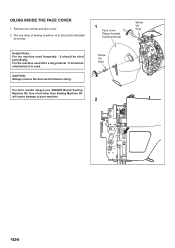
... Vis Guia 104 Remove two screws and face cover. 2. Use of sewing machine oil to your machine. Put one drop of oil other than Sewing Machine Oil will cause damage to the points indicated by arrows. 1 Face cover Plaque frontale Cubierta frontal Helpful Hints : For the machine used after a long interval : It should be oiled before oiling...

Similar Questions

Where Can I Get The Installation Software
I need future xl 400 software
(Posted by pathollis 3 years ago)
Replacement Part For Singer Futura Xl 400
I am looking for the embroidery arm unit for a Singer Futura Xl 400. Can you assist me in locating t...
(Posted by sjh4ba 3 years ago)
Singer Futura Xl-400
I am in need of a Singer Futura XL-400 Startup disc. Any idea where I can get one
(Posted by fayevb 4 years ago)
I Get E7 Error Message On My Singer Model 7258 Sewing Machine. There Is No Refe
Error message E7 is up on my Singer Stylist model 7258 sewing machine. It is not working at all. I t...
(Posted by ebellamybellamy9 5 years ago)
Beeping From Singer Sewing Machine Stylist Ii 5625
My sewing machine will beep and stop sewing after three inches of sewing. I have taken it to be repa...
(Posted by arusheria 9 years ago)
Ask a New Question
Use the box below to post a new question about this Singer product .
Points & Prizes
  • You can earn points for nearly everything you do on HelpOwl.com
  • You can trade in those points for gift cards at leading retailers such as Amazon.com and Walmart
  • It's that simple!
See How it Works
Create a Free Account

Singer Manuals

Find free Singer Futura XL-400 manuals and user guides available at ManualOwl.com. Try out our unique manual viewer allowing you to interact with manuals from directly within your browser!

Singer Reviews

View thousands of Singer user reviews and customer ratings available at ReviewOwl.com.

Contact Information

Complete Singer customer service contact information including steps to reach representatives, hours of operation, customer support links and more from ContactHelp.com.

Scoreboard Ratings

See detailed Singer customer service rankings, employee comments and much more from our sister site.