

Instruction Manual
Page 5
... 28 - 29 2. PREPARATION FOR EMBROIDERY SEWING Before attaching embroidery unit 58 - 61 Attaching embroidery foot, Inserting the bobbin, Threading the top thread, Extension table, Attaching embroidery unit 62 - 63 Removing embroidery unit 62 - 63 Securing fabric in embroidery hoop 64 - 65 Using fabric ..., Criss-cross stitch, Crossed stitch Decorative Stitching 48 - 49 Continuous patterns 50 - 51 Sewing on a button 50 - 51 Buttonholes 52 - 57 Using buttonhole foot, Procedure, Corded buttonholes Buttonholing with Futura Multi hoop 88 - 95 Helpful messages when embroidering 96 - 97 4.
... 28 - 29 2. PREPARATION FOR EMBROIDERY SEWING Before attaching embroidery unit 58 - 61 Attaching embroidery foot, Inserting the bobbin, Threading the top thread, Extension table, Attaching embroidery unit 62 - 63 Removing embroidery unit 62 - 63 Securing fabric in embroidery hoop 64 - 65 Using fabric ..., Criss-cross stitch, Crossed stitch Decorative Stitching 48 - 49 Continuous patterns 50 - 51 Sewing on a button 50 - 51 Buttonholes 52 - 57 Using buttonhole foot, Procedure, Corded buttonholes Buttonholing with Futura Multi hoop 88 - 95 Helpful messages when embroidering 96 - 97 4.

Instruction Manual
Page 10
...be used for most decorative sewing. Bobbins 3. Auxiliary spool pin 4. Scissors 22. Embroidery presser foot 23. Spool pin felt discs 5. Screwdriver (large) 11. Bobbins 21. Spool pin cap (large) 8. Embroidery software CD 19 FUTURA embroidery is "system" of your 7 Sewing machine is another 12 ...very useful foot and should be sure they are Class I5 J. 16 FOR EMBROIDERY 19. Thread spool net (short) The Foot that comes...
...be used for most decorative sewing. Bobbins 3. Auxiliary spool pin 4. Scissors 22. Embroidery presser foot 23. Spool pin felt discs 5. Screwdriver (large) 11. Bobbins 21. Spool pin cap (large) 8. Embroidery software CD 19 FUTURA embroidery is "system" of your 7 Sewing machine is another 12 ...very useful foot and should be sure they are Class I5 J. 16 FOR EMBROIDERY 19. Thread spool net (short) The Foot that comes...

Instruction Manual
Page 60
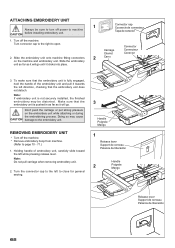
... foot behind presser bar so that the embroidery presser foot moves up and down together with the needle. INSERTING THE BOBBIN Refer to page 14 - 15. * A large amount of thread is required for ... the needle clamp. Secure it by tightening presser foot screw. 3. Needle clamp Serre-aiguille Abrazadera de aguja Embroidery presser foot Pied presseur de broderie Prensatelas de bordado 58 PREPARATION FOR EMBROIDERY SEWING BEFORE ATTACHING EMBROIDERY UNIT ATTACHING EMBROIDERY FOOT Foot holder Support du pied Sujetador prensatelas Always be sure to machine CAUTION before changing presser...
... foot behind presser bar so that the embroidery presser foot moves up and down together with the needle. INSERTING THE BOBBIN Refer to page 14 - 15. * A large amount of thread is required for ... the needle clamp. Secure it by tightening presser foot screw. 3. Needle clamp Serre-aiguille Abrazadera de aguja Embroidery presser foot Pied presseur de broderie Prensatelas de bordado 58 PREPARATION FOR EMBROIDERY SEWING BEFORE ATTACHING EMBROIDERY UNIT ATTACHING EMBROIDERY FOOT Foot holder Support du pied Sujetador prensatelas Always be sure to machine CAUTION before changing presser...
Instruction Manual
Page 64
... is not securely installed, the finished embroidery may cause CAUTION damage to open. Slide the embroidery unit onto machine fitting connectors 2 Carro on the embroidery unit while attaching or during the embroidering process. Doing so may be sure to turn off power to close for general sewing. 3 Handle Poignée Mango 1 Release lever Support...
... is not securely installed, the finished embroidery may cause CAUTION damage to open. Slide the embroidery unit onto machine fitting connectors 2 Carro on the embroidery unit while attaching or during the embroidering process. Doing so may be sure to turn off power to close for general sewing. 3 Handle Poignée Mango 1 Release lever Support...

Instruction Manual
Page 76
...Pressing the "Next" button will be followed for proper start the copy and installation of available space on your desktop to open the Futura software. Now you are prompted to select the Program Folder where the shortcut for the software will finally start -up protocol. Turn on your... the highest position by clicking on your hard disk, an error message will finish when it has reached to your sewing machine and connect the USB cable between your computer. Next attach the embroidery unit to 100%. Make sure the needle has been moved to continue. Double click on the...
...Pressing the "Next" button will be followed for proper start the copy and installation of available space on your desktop to open the Futura software. Now you are prompted to select the Program Folder where the shortcut for the software will finally start -up protocol. Turn on your... the highest position by clicking on your hard disk, an error message will finish when it has reached to your sewing machine and connect the USB cable between your computer. Next attach the embroidery unit to 100%. Make sure the needle has been moved to continue. Double click on the...
Instruction Manual
Page 78
To stop the machine, push the button again and the machine will stop sewing and the needle stops at a time. FORWARD STITCH BUTTON After the embroidery design has been transferred to the first stitch of the design. Pressing the button once will move as it is ready to ...tension toward "0" and activate the "Speed limiter", by checking the box in progress, press the Reverse Stitch button. NOTE: When sewing designs created by the software for embroidery to start /stop button is already in Machine navigator, before sending the design to the type of the machine. 76 You ...
To stop the machine, push the button again and the machine will stop sewing and the needle stops at a time. FORWARD STITCH BUTTON After the embroidery design has been transferred to the first stitch of the design. Pressing the button once will move as it is ready to ...tension toward "0" and activate the "Speed limiter", by checking the box in progress, press the Reverse Stitch button. NOTE: When sewing designs created by the software for embroidery to start /stop button is already in Machine navigator, before sending the design to the type of the machine. 76 You ...

Instruction Manual
Page 90
... marquage Línea de cruce Cross line Ligne de marquage. Select Tools from the horizontal tool bar, select Hoop and then select Multiple. 2. and then sews them precisely, matching one section to the other . Please note: the Multi-Hoop feature will compensate for it and... and/or lettering, that each other . Multi-Hoop Multi-Hooping is a special feature in the Futura software that will allow embroidery data which is larger than a single embroidery hoop to be sent to the machine to stitch out, while making it easy to re-hoop the fabric so that when combined together make...
... marquage Línea de cruce Cross line Ligne de marquage. Select Tools from the horizontal tool bar, select Hoop and then select Multiple. 2. and then sews them precisely, matching one section to the other . Please note: the Multi-Hoop feature will compensate for it and... and/or lettering, that each other . Multi-Hoop Multi-Hooping is a special feature in the Futura software that will allow embroidery data which is larger than a single embroidery hoop to be sent to the machine to stitch out, while making it easy to re-hoop the fabric so that when combined together make...

Instruction Manual
Page 92
... inner hoop. The example shown uses lettering and designs from the Design Library that is a Center Hoop line which together define the maximum sewing area for sewing one section at a time. Click on the "Transmit to the machine for Multiple Hooping. There are markings which indicates the exact center... hoop section). 4. On each corner of the hoop there are two sets of markings on the fabric as the design parts flow out of the embroidery data that is sent to Machine" tool on the screen. Fig. 3 Fig. 3 Fig. 3 Fig. 4 Fig. 4 Fig. 4 Guide line Ligne Guide Línea ...
... inner hoop. The example shown uses lettering and designs from the Design Library that is a Center Hoop line which together define the maximum sewing area for sewing one section at a time. Click on the "Transmit to the machine for Multiple Hooping. There are markings which indicates the exact center... hoop section). 4. On each corner of the hoop there are two sets of markings on the fabric as the design parts flow out of the embroidery data that is sent to Machine" tool on the screen. Fig. 3 Fig. 3 Fig. 3 Fig. 4 Fig. 4 Fig. 4 Guide line Ligne Guide Línea ...

Instruction Manual
Page 100
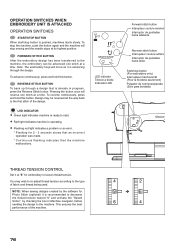
... KNOW PRESSER FOOT LIFTER There are three positions for darning, freehand embroidery and monogramming so that is being sewn. Lower the presser foot to insert or remove fabric. 3. Raise the lifter to the middle position to sew. 2. bed or as a standard flat-bed model. FEED DOG...thick fabric. Down Haut Abajo Feed dog control Abaisse-griffe d'entraînement Control de dientes CONVERTING TO FREE-ARM SEWING Your machine can be raised for all general sewing purposes and lowered for your presser foot. 1. Lift it provides a large working surface as a freearm model. ...
... KNOW PRESSER FOOT LIFTER There are three positions for darning, freehand embroidery and monogramming so that is being sewn. Lower the presser foot to insert or remove fabric. 3. Raise the lifter to the middle position to sew. 2. bed or as a standard flat-bed model. FEED DOG...thick fabric. Down Haut Abajo Feed dog control Abaisse-griffe d'entraînement Control de dientes CONVERTING TO FREE-ARM SEWING Your machine can be raised for all general sewing purposes and lowered for your presser foot. 1. Lift it provides a large working surface as a freearm model. ...


