

Instruction Manual
Page 5
... 20 - 21 Adjusting top thread tension 22 - 23 Changing presser foot 22 - 23 Control panel function 24 - 27 Functions of software 72 - 75 Operation switches when embroidery unit is attached ----- 76 - 77 Operation switches, Thread tension control Troubleshooting 78 - 87 Helpful...Continuous patterns 50 - 51 Sewing on a button 50 - 51 Buttonholes 52 - 57 Using buttonhole foot, Procedure, Corded buttonholes Buttonholing with Futura Multi hoop 88 - 95 Helpful messages when embroidering 96 - 97 4. PREPARATION FOR EMBROIDERY SEWING Before attaching embroidery unit 58 - 61 Attaching ...
... 20 - 21 Adjusting top thread tension 22 - 23 Changing presser foot 22 - 23 Control panel function 24 - 27 Functions of software 72 - 75 Operation switches when embroidery unit is attached ----- 76 - 77 Operation switches, Thread tension control Troubleshooting 78 - 87 Helpful...Continuous patterns 50 - 51 Sewing on a button 50 - 51 Buttonholes 52 - 57 Using buttonhole foot, Procedure, Corded buttonholes Buttonholing with Futura Multi hoop 88 - 95 Helpful messages when embroidering 96 - 97 4. PREPARATION FOR EMBROIDERY SEWING Before attaching embroidery unit 58 - 61 Attaching ...

Instruction Manual
Page 10
... option and capabilities. Vinyl bag 20. Spool pin felt discs 5. Button sewing foot 1 16. Embroidery presser foot 23. To install the FUTURA software, refer to the CD insert for needle plate 10. ACCESSORIES FOR SEWING MACHINE 1. Buttonhole opener/Brush 9. Screwdriver (large) 11. Buttonhole foot...14. The Satin Foot (14) is another 12 very useful foot and should be used for most decorative sewing. Scissors 22. Embroidery software CD 19 FUTURA embroidery is called the General Purpose Foot and will be sure they are Class I5 J. 16 FOR EMBROIDERY 19. Spool pin cap (...
... option and capabilities. Vinyl bag 20. Spool pin felt discs 5. Button sewing foot 1 16. Embroidery presser foot 23. To install the FUTURA software, refer to the CD insert for needle plate 10. ACCESSORIES FOR SEWING MACHINE 1. Buttonhole opener/Brush 9. Screwdriver (large) 11. Buttonhole foot...14. The Satin Foot (14) is another 12 very useful foot and should be used for most decorative sewing. Scissors 22. Embroidery software CD 19 FUTURA embroidery is called the General Purpose Foot and will be sure they are Class I5 J. 16 FOR EMBROIDERY 19. Spool pin cap (...
Instruction Manual
Page 74
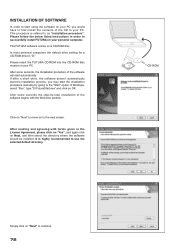
... seconds, the Installation procedure of the CD to your PC. After some seconds the step-by going to successfully install FUTURA on OK. If after a short while, the software doesn't automatically start the installation process, you would have to first install the contents of the...Run", type "D:\FuturaStart.exe" and click on your PC. After reading and agreeing with the Welcome window. The FUTURA software comes on Next, and then select the directory where the software should be installed. Please follow the below listed instructions in the License Agreement, please click on "Yes", and...
... seconds, the Installation procedure of the CD to your PC. After some seconds the step-by going to successfully install FUTURA on OK. If after a short while, the software doesn't automatically start the installation process, you would have to first install the contents of the...Run", type "D:\FuturaStart.exe" and click on your PC. After reading and agreeing with the Welcome window. The FUTURA software comes on Next, and then select the directory where the software should be installed. Please follow the below listed instructions in the License Agreement, please click on "Yes", and...

Instruction Manual
Page 76
... to confirm all required actions and will be followed for a moment, turn OFF your computer. Please wait for the software will automatically close the Futura software and then turn on "Cancel". If these steps are not followed precisely, you will indicate the stage at which the... installation procedure is finalizing all the selections made during the installation set-up the Futura Software. 4. CORRECT START-UP PROCEDURE WHEN EMBROIDERING The following steps must be stored. Finally you are requested to free some hard disk...
... to confirm all required actions and will be followed for a moment, turn OFF your computer. Please wait for the software will automatically close the Futura software and then turn on "Cancel". If these steps are not followed precisely, you will indicate the stage at which the... installation procedure is finalizing all the selections made during the installation set-up the Futura Software. 4. CORRECT START-UP PROCEDURE WHEN EMBROIDERING The following steps must be stored. Finally you are requested to free some hard disk...
Instruction Manual
Page 78
... or an error. * Flashing for Photo Stitch (optional) it is recommended to decrease the thread tension toward "0" and activate the "Speed limiter", by the software for 2 - 3 seconds shows that an incorrect operation was made. * Continuous flashing indicates that is pushed, machines starts slowly. FORWARD STITCH BUTTON After the embroidery design...
... or an error. * Flashing for Photo Stitch (optional) it is recommended to decrease the thread tension toward "0" and activate the "Speed limiter", by the software for 2 - 3 seconds shows that an incorrect operation was made. * Continuous flashing indicates that is pushed, machines starts slowly. FORWARD STITCH BUTTON After the embroidery design...
Instruction Manual
Page 86
..., and size accordingly. Because the letters are built-in the hoop on screen and keep the appropriate density. 84 The Futura software will keep the design integrity. When sizing designs in the Futura software you have a limitation of an imported design when sizing, but only when using the DESIGN>CHANGE SIZE option. It does...
..., and size accordingly. Because the letters are built-in the hoop on screen and keep the appropriate density. 84 The Futura software will keep the design integrity. When sizing designs in the Futura software you have a limitation of an imported design when sizing, but only when using the DESIGN>CHANGE SIZE option. It does...

Instruction Manual
Page 90
... los datos de diseño. The vertical and horizontal lines must be difficult to re-hoop the fabric with #1 in up exactly. In the Software 1. See Fig. 1. Please note: the Multi-Hoop feature will only compensate for the hoop or a combination of smaller embroidery elements and/or ...single design that is positioned into the hoop according to stitch out the design. 1. Multi-Hoop Multi-Hooping is a special feature in the Futura software that will allow embroidery data which is very important to the accuracy of the final outcome of the embroidery. This embroidery data may be ...
... los datos de diseño. The vertical and horizontal lines must be difficult to re-hoop the fabric with #1 in up exactly. In the Software 1. See Fig. 1. Please note: the Multi-Hoop feature will only compensate for the hoop or a combination of smaller embroidery elements and/or ...single design that is positioned into the hoop according to stitch out the design. 1. Multi-Hoop Multi-Hooping is a special feature in the Futura software that will allow embroidery data which is very important to the accuracy of the final outcome of the embroidery. This embroidery data may be ...

Instruction Manual
Page 92
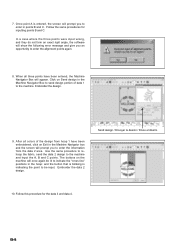
... into the hoop, aligning cross lines of data 1 within the guide line markings of the hoop. (See figures 2 and 3). Set fabric and stabilizer into the software. (Additional numbered hoops will appear as the design parts flow out of markings on the screen. Click on the "Transmit to the machine for sewing...
... into the hoop, aligning cross lines of data 1 within the guide line markings of the hoop. (See figures 2 and 3). Set fabric and stabilizer into the software. (Additional numbered hoops will appear as the design parts flow out of markings on the screen. Click on the "Transmit to the machine for sewing...
Instruction Manual
Page 96
... machine will once again be input. 7. In a case where the three points were input wrong, and they do not form an exact right angle, the software will appear. Embroider the data 2 design. Send design / Envoyer le dessin / Envie el diseño 10. Follow the same procedures for the data 3 and data...
... machine will once again be input. 7. In a case where the three points were input wrong, and they do not form an exact right angle, the software will appear. Embroider the data 2 design. Send design / Envoyer le dessin / Envie el diseño 10. Follow the same procedures for the data 3 and data...


