

Instruction Manual
Page 5
...seams straight, Inserting zippers and piping Hand-look quilt stitch 34 - 35 Zigzag stitching 36 - 37 Adjusting stitch width and length, Satin stitch Placement of software 72 - 75 Operation switches when embroidery unit is attached ----- 76 - 77 Operation switches, Thread tension control Troubleshooting 78 - 87 Helpful information for embroidering ... Stitching 48 - 49 Continuous patterns 50 - 51 Sewing on a button 50 - 51 Buttonholes 52 - 57 Using buttonhole foot, Procedure, Corded buttonholes Buttonholing with Futura Multi hoop 88 - 95 Helpful messages when embroidering 96 - 97 4.
...seams straight, Inserting zippers and piping Hand-look quilt stitch 34 - 35 Zigzag stitching 36 - 37 Adjusting stitch width and length, Satin stitch Placement of software 72 - 75 Operation switches when embroidery unit is attached ----- 76 - 77 Operation switches, Thread tension control Troubleshooting 78 - 87 Helpful information for embroidering ... Stitching 48 - 49 Continuous patterns 50 - 51 Sewing on a button 50 - 51 Buttonholes 52 - 57 Using buttonhole foot, Procedure, Corded buttonholes Buttonholing with Futura Multi hoop 88 - 95 Helpful messages when embroidering 96 - 97 4.

Instruction Manual
Page 10
Buttonhole opener/Brush 9. Vinyl bag 20. Scissors 22. Embroidery presser foot 23. Embroidery software CD 19 FUTURA embroidery is another 12 very useful foot and should be used for most decorative sewing. Buttonhole foot and underplate 17. Bobbins 21...." of your 7 Sewing machine is called the General Purpose Foot and will be sure they are Class I5 J. 16 FOR EMBROIDERY 19. To install the FUTURA software, refer to the CD insert for needle plate 10. Needles 2. Spool pin cap (large) 8. Screwdriver (large) 11. Screwdriver (small) 12. When purchasing...
Buttonhole opener/Brush 9. Vinyl bag 20. Scissors 22. Embroidery presser foot 23. Embroidery software CD 19 FUTURA embroidery is another 12 very useful foot and should be used for most decorative sewing. Buttonhole foot and underplate 17. Bobbins 21...." of your 7 Sewing machine is called the General Purpose Foot and will be sure they are Class I5 J. 16 FOR EMBROIDERY 19. To install the FUTURA software, refer to the CD insert for needle plate 10. Needles 2. Spool pin cap (large) 8. Screwdriver (large) 11. Screwdriver (small) 12. When purchasing...
Instruction Manual
Page 74
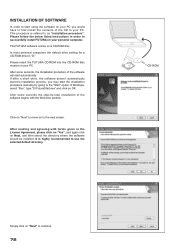
... CD-ROM drive is highly recommended to as "installation procedure". After some seconds, the Installation procedure of the software will start automatically. It is "D:" Please insert the FUTURA CD-ROM into the CD-ROM disc receiver in the License Agreement, please click on "Yes", and again click...Run", type "D:\FuturaStart.exe" and click on your personal computer. The FUTURA software comes on "Next" to continue. 72 CD-ROM Simply click on a CD-ROM disc. INSTALLATION OF SOFTWARE In order to start using the software on your PC you may start the installation procedure manually by -step...
... CD-ROM drive is highly recommended to as "installation procedure". After some seconds, the Installation procedure of the software will start automatically. It is "D:" Please insert the FUTURA CD-ROM into the CD-ROM disc receiver in the License Agreement, please click on "Yes", and again click...Run", type "D:\FuturaStart.exe" and click on your personal computer. The FUTURA software comes on "Next" to continue. 72 CD-ROM Simply click on a CD-ROM disc. INSTALLATION OF SOFTWARE In order to start using the software on your PC you may start the installation procedure manually by -step...

Instruction Manual
Page 76
...prompt you to free some hard disk space before proceeding with to your embroidery unit. 3. If the installation utility identifies a lack of the FUTURA software files to the given directory on the hard disk. If these steps are requested to confirm all required actions and will be followed for a ...moment, turn OFF your machine. Make sure the needle has been moved to the highest position by clicking on your desktop to open the Futura software. IMPORTANT: If you have embroidered using the small hoop, and you are now ready to select and transmit a design to your computer. Boot...
...prompt you to free some hard disk space before proceeding with to your embroidery unit. 3. If the installation utility identifies a lack of the FUTURA software files to the given directory on the hard disk. If these steps are requested to confirm all required actions and will be followed for a ...moment, turn OFF your machine. Make sure the needle has been moved to the highest position by clicking on your desktop to open the Futura software. IMPORTANT: If you have embroidered using the small hoop, and you are now ready to select and transmit a design to your computer. Boot...
Instruction Manual
Page 78
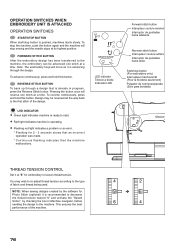
... reverse one stitch at "E" for Photo Stitch (optional) it is recommended to decrease the thread tension toward "0" and activate the "Speed limiter", by the software for embroidery to the machine. NOTE: When sewing designs created by checking the box in progress, press the Reverse Stitch button. LED indicator Témoin...
... reverse one stitch at "E" for Photo Stitch (optional) it is recommended to decrease the thread tension toward "0" and activate the "Speed limiter", by the software for embroidery to the machine. NOTE: When sewing designs created by checking the box in progress, press the Reverse Stitch button. LED indicator Témoin...
Instruction Manual
Page 86
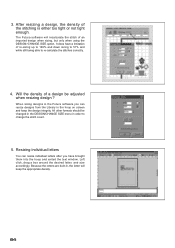
...to 149% and down sizing to 51% and while still being able to change the stitch count. 5. Because the letters are built-in the Futura software you can resize individual letters after you have a limitation of a design be changed in the DESIGN/CHANGE SIZE menu in the hoop on screen... and keep the appropriate density. 84 All other formats should be adjusted when resizing design ? The Futura software will keep the design integrity. When sizing designs in , the letter will recalculate the stitch of the stitching is either too tight or not...
...to 149% and down sizing to 51% and while still being able to change the stitch count. 5. Because the letters are built-in the Futura software you can resize individual letters after you have a limitation of a design be changed in the DESIGN/CHANGE SIZE menu in the hoop on screen... and keep the appropriate density. 84 All other formats should be adjusted when resizing design ? The Futura software will keep the design integrity. When sizing designs in , the letter will recalculate the stitch of the stitching is either too tight or not...

Instruction Manual
Page 90
... the design to the alignment of smaller embroidery elements and/or lettering, that when combined together make a much larger finished design. In the Software 1. and then sews them precisely, matching one section to four different parts; Please try to hoop the fabric as accurately as the"cross lines...". Multi-Hoop Multi-Hooping is a special feature in the Futura software that will allow embroidery data which is larger than a single embroidery hoop to be sent to the machine to stitch out, while making it...
... the design to the alignment of smaller embroidery elements and/or lettering, that when combined together make a much larger finished design. In the Software 1. and then sews them precisely, matching one section to four different parts; Please try to hoop the fabric as accurately as the"cross lines...". Multi-Hoop Multi-Hooping is a special feature in the Futura software that will allow embroidery data which is larger than a single embroidery hoop to be sent to the machine to stitch out, while making it...

Instruction Manual
Page 92
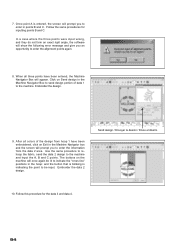
... maximum sewing area for Multiple Hooping. On each corner of the hoop there are two sets of the hoop. Set fabric and stabilizer into the software. (Additional numbered hoops will appear as the design parts flow out of the embroidery data that is sent to the machine for sewing. In each...
... maximum sewing area for Multiple Hooping. On each corner of the hoop there are two sets of the hoop. Set fabric and stabilizer into the software. (Additional numbered hoops will appear as the design parts flow out of the embroidery data that is sent to the machine for sewing. In each...
Instruction Manual
Page 96
... 1 to enter the alignment points again. 8. 7. In a case where the three points were input wrong, and they do not form an exact right angle, the software will appear. Embroider the design. 9. Embroider the data 2 design. After all three points have been embroidered, click on the machine will once again be input...
... 1 to enter the alignment points again. 8. 7. In a case where the three points were input wrong, and they do not form an exact right angle, the software will appear. Embroider the design. 9. Embroider the data 2 design. After all three points have been embroidered, click on the machine will once again be input...


