Instruction Manual
Page 3
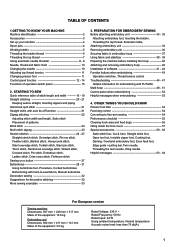
...stitch, Fishbone stitch Sewing on a button 27 Buttonholes 28 - 31 Using buttonhole foot, Procedure, Corded buttonholes Buttonholing with FUTURA Multi hoop 48 - 51 Control panel when embroidering 52 Helpful messages when embroidering 53 4. STARTING TO SEW Quick reference ... FOR EMBROIDERY SEWING Before attaching embroidery unit 34 - 35 Attaching embroidery foot, Inserting the bobbin, Threading the top thread, Extension table, Attaching embroidery unit 36 Removing embroidery unit 36 Securing fabric in embroidery hoop 37 Using fabric and stabilizer 38 - 39 Preparing the machine before...
...stitch, Fishbone stitch Sewing on a button 27 Buttonholes 28 - 31 Using buttonhole foot, Procedure, Corded buttonholes Buttonholing with FUTURA Multi hoop 48 - 51 Control panel when embroidering 52 Helpful messages when embroidering 53 4. STARTING TO SEW Quick reference ... FOR EMBROIDERY SEWING Before attaching embroidery unit 34 - 35 Attaching embroidery foot, Inserting the bobbin, Threading the top thread, Extension table, Attaching embroidery unit 36 Removing embroidery unit 36 Securing fabric in embroidery hoop 37 Using fabric and stabilizer 38 - 39 Preparing the machine before...
Instruction Manual
Page 4
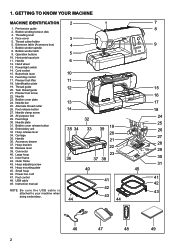
...44. Instruction manual 41 41 42 42 NOTE: B e s u r e t h e U S B c a b l e i s attached to your machine when doing embroidery. 43 43 44 44 46 47 48 49 2 Cord socket 15. Presser foot lifter 11 19. Thread guide 12 15 20. Needle plate 25 31. ... 32 24 30. Accessory drawer 37. Buttonhole lever 10 16. All purpose foot 29. Hoop mounting plate 45. Handle 6 12. GETTING TO KNOW YOUR MACHINE MACHINE IDENTIFICATION 2 1 7 1. Threading lever 4. Pre-tension guide 8 2. Extension table (Accessory box) 4 9 7. Needle 16 23. Connector 40. Handle ...
...44. Instruction manual 41 41 42 42 NOTE: B e s u r e t h e U S B c a b l e i s attached to your machine when doing embroidery. 43 43 44 44 46 47 48 49 2 Cord socket 15. Presser foot lifter 11 19. Thread guide 12 15 20. Needle plate 25 31. ... 32 24 30. Accessory drawer 37. Buttonhole lever 10 16. All purpose foot 29. Hoop mounting plate 45. Handle 6 12. GETTING TO KNOW YOUR MACHINE MACHINE IDENTIFICATION 2 1 7 1. Threading lever 4. Pre-tension guide 8 2. Extension table (Accessory box) 4 9 7. Needle 16 23. Connector 40. Handle ...

Instruction Manual
Page 5
...storage compartments of your sewing machine is another very useful foot and should be used for most decorative sewing. Spool pin felt disc 5. Thread spool net (long) 7 18. Needles 2. Spool pin cap (small) 7. Vinyl bag 20. Scissors 19 22. Embroidery presser foot 23. Spool... additional bobbins, be sure they are class 15 J. 16 FOR EMBROIDERY Embroidery accessories are located in the vinyl bag, packaged with the embroidery unit. 19. Buttonhole opener/Brush 9. Blind hem foot 14. Embroidery software CD To install the software, refer to the CD insert ...
...storage compartments of your sewing machine is another very useful foot and should be used for most decorative sewing. Spool pin felt disc 5. Thread spool net (long) 7 18. Needles 2. Spool pin cap (small) 7. Vinyl bag 20. Scissors 19 22. Embroidery presser foot 23. Spool... additional bobbins, be sure they are class 15 J. 16 FOR EMBROIDERY Embroidery accessories are located in the vinyl bag, packaged with the embroidery unit. 19. Buttonhole opener/Brush 9. Blind hem foot 14. Embroidery software CD To install the software, refer to the CD insert ...

Instruction Manual
Page 14
... when creating a stitch program, and page 52 for regular sewing, programming and embroidering. Read more about the display when embroidering. 2. The information on the machine without the embroidery unit attached, straight stitch number 00, is selected. DIRECT SELECTION BUTTONS Frequently used stitches are available by the direct selection buttons. Simply press a button...
... when creating a stitch program, and page 52 for regular sewing, programming and embroidering. Read more about the display when embroidering. 2. The information on the machine without the embroidery unit attached, straight stitch number 00, is selected. DIRECT SELECTION BUTTONS Frequently used stitches are available by the direct selection buttons. Simply press a button...

Instruction Manual
Page 17
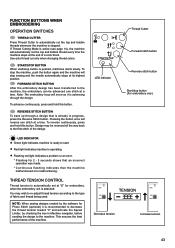
...Tacking stitch function for straight and zigzag stitches 5. FUNCTIONS OF OPERATION SWITCH PANEL 1. TACKING STITCH MODE BUTTON Press Tacking Stitch Button and the sewing machine makes 1 2 START/STOP to the button is set at its up -stop . 6 Reverse stitch function for tie-off of the tacking ...3 stitches will sew 4 stitches in both the sewing mode and the embroidery mode. 7 15 NEEDLE STOP POSITION SELECTOR BUTTON When the machine is turned on, needle is lit red. 4 2. START/STOP BUTTON When the Start/Stop button is pushed, ...
...Tacking stitch function for straight and zigzag stitches 5. FUNCTIONS OF OPERATION SWITCH PANEL 1. TACKING STITCH MODE BUTTON Press Tacking Stitch Button and the sewing machine makes 1 2 START/STOP to the button is set at its up -stop . 6 Reverse stitch function for tie-off of the tacking ...3 stitches will sew 4 stitches in both the sewing mode and the embroidery mode. 7 15 NEEDLE STOP POSITION SELECTOR BUTTON When the machine is turned on, needle is lit red. 4 2. START/STOP BUTTON When the Start/Stop button is pushed, ...
Instruction Manual
Page 36
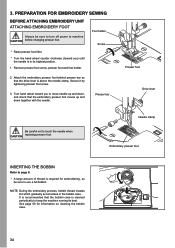
... for embroidering, so be sure to turn off power to page 6. * A large amount of thread is above the needle clamp. Needle clamp Embroidery presser foot INSERTING THE BOBBIN Refer to machine CAUTION before changing presser foot. Foot holder Screw * Raise presser foot lifter. * Turn the hand wheel counter clockwise (toward you ) until...
... for embroidering, so be sure to turn off power to page 6. * A large amount of thread is above the needle clamp. Needle clamp Embroidery presser foot INSERTING THE BOBBIN Refer to machine CAUTION before changing presser foot. Foot holder Screw * Raise presser foot lifter. * Turn the hand wheel counter clockwise (toward you ) until...

Instruction Manual
Page 37
Turn off power to the machine for embroidery. NOTE: It is recommended to thread the upper thread before transmitting a design to machine. 2. Slide the extension table to left to remove it from machine. (Refer to page 7 - 9. THREADING THE TOP THREAD Refer to page 54.) 35 EXTENSION TABLE 1.
Turn off power to the machine for embroidery. NOTE: It is recommended to thread the upper thread before transmitting a design to machine. 2. Slide the extension table to left to remove it from machine. (Refer to page 7 - 9. THREADING THE TOP THREAD Refer to page 54.) 35 EXTENSION TABLE 1.

Instruction Manual
Page 38
... to page 40.) 1. To make sure that the embroidery unit does not detach. Doing so may be sure to turn off power to machine CAUTION before installing embroidery unit. 1. REMOVING EMBROIDERY UNIT * Turn off the machine. Turn the connector cap to the left direction, checking... that the embroidery unit is not securely installed, the finished embroidery may cause CAUTION damage to open. Turn...
... to page 40.) 1. To make sure that the embroidery unit does not detach. Doing so may be sure to turn off power to machine CAUTION before installing embroidery unit. 1. REMOVING EMBROIDERY UNIT * Turn off the machine. Turn the connector cap to the left direction, checking... that the embroidery unit is not securely installed, the finished embroidery may cause CAUTION damage to open. Turn...

Instruction Manual
Page 42
...lever 40 To remove, pull the hoop forward to back 2 until the needle comes to the ready position. Slide the hoop onto the embroidery unit from front to slide it clicks into place. To remove, press the hoop release lever and slide the hoop towards you ) ...until it out from underneath the embroidery foot. 2. ATTACHING AND REMOVING EMBROIDERY HOOP 1 (A) 1. PREPARING THE MACHINE BEFORE INSTALLING THE HOOP 1 1. Raise presser foot and needle, and push up lever (A) of under it. NOTE: Before...
...lever 40 To remove, pull the hoop forward to back 2 until the needle comes to the ready position. Slide the hoop onto the embroidery unit from front to slide it clicks into place. To remove, press the hoop release lever and slide the hoop towards you ) ...until it out from underneath the embroidery foot. 2. ATTACHING AND REMOVING EMBROIDERY HOOP 1 (A) 1. PREPARING THE MACHINE BEFORE INSTALLING THE HOOP 1 1. Raise presser foot and needle, and push up lever (A) of under it. NOTE: Before...
Instruction Manual
Page 43
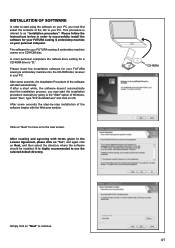
... on to continue. 41 This procedure is refered to as instructions below in order to successfully install the software for your FUTURA sewing & embroidery machine into the CD-ROM disc receiver in the and again click on Next, and then select the directory where the software ...a CD-ROM drive is highly recommended to the next screen. It is "D:" Please insert the installation software for your FUTURA sewing & embroidery machine on your FUTURA sewing & embroidery machine comes on OK. CD-ROM Simply click on to use the selected default directory. After reading and agreeing with the Welcome...
... on to continue. 41 This procedure is refered to as instructions below in order to successfully install the software for your FUTURA sewing & embroidery machine into the CD-ROM disc receiver in the and again click on Next, and then select the directory where the software ...a CD-ROM drive is highly recommended to the next screen. It is "D:" Please insert the installation software for your FUTURA sewing & embroidery machine on your FUTURA sewing & embroidery machine comes on OK. CD-ROM Simply click on to use the selected default directory. After reading and agreeing with the Welcome...

Instruction Manual
Page 44
...-UP PROCEDURE WHEN EMBROIDERING The following steps must be stored. Double click on to your desktop to open the embroidery software. Simply click on the FUTURA icon shortcut your machine. 42 Next attach the embroidery unit to free some hard disk space before proceeding with the installation. If the installation utility identifies a lack of...
...-UP PROCEDURE WHEN EMBROIDERING The following steps must be stored. Double click on to your desktop to open the embroidery software. Simply click on the FUTURA icon shortcut your machine. 42 Next attach the embroidery unit to free some hard disk space before proceeding with the installation. If the installation utility identifies a lack of...
Instruction Manual
Page 45
...Limiter, by the software for embroidery, when the embroidery unit is pushed, machines starts slowly. THREAD TENSION CONTROL Thread tension is automatically set at a time. FORWARD STITCH BUTTON After the embroidery design has been transferred to the machine, the embroidery can be reversed all the way... back LED indicator LED INDICATOR Green light indicates machine is recommended to start /stop button is attached. NOTE...
...Limiter, by the software for embroidery, when the embroidery unit is pushed, machines starts slowly. THREAD TENSION CONTROL Thread tension is automatically set at a time. FORWARD STITCH BUTTON After the embroidery design has been transferred to the machine, the embroidery can be reversed all the way... back LED indicator LED INDICATOR Green light indicates machine is recommended to start /stop button is attached. NOTE...

Instruction Manual
Page 46
...11. Refer to the hoop bracket with a thicker needle. Thread is too tight. This will cause the thread to page 4. EMBROIDERY PATTERN IS MIS-ALIGNED MACHINE SIDE HOOP SIDE Embroidering is continuing when thread is broken. If the thread remains tangled, the fabric may pucker and... embroidery. Refer to pucker. If the thread is it breaks. TROUBLESHOOTING SKIPPED STITCHES AND THREAD BREAKAGES OCCUR Needle tip is tangled. ...
...11. Refer to the hoop bracket with a thicker needle. Thread is too tight. This will cause the thread to page 4. EMBROIDERY PATTERN IS MIS-ALIGNED MACHINE SIDE HOOP SIDE Embroidering is continuing when thread is broken. If the thread remains tangled, the fabric may pucker and... embroidery. Refer to pucker. If the thread is it breaks. TROUBLESHOOTING SKIPPED STITCHES AND THREAD BREAKAGES OCCUR Needle tip is tangled. ...

Instruction Manual
Page 47
.... If stitches are flashing lights and making a beeping sound, but only when using DESIGN>CHANGE SIZE option. Restart the embroidery machine and continue embroidering. Embroidering direction Embroidered section 1 357 2 468 automatically stop Blank stitches resulting from thread breakage Reverse stitch ...to re-calculate the stitches correctly. 45 Step back through the embroidering data to step back through the embroidery data. HELPFUL INFORMATION FOR EMBROIDERING WITH FUTURA 1. Rethread upper thread, (see 7 "Threading the Top Thread".) Placing the small net that the thread...
.... If stitches are flashing lights and making a beeping sound, but only when using DESIGN>CHANGE SIZE option. Restart the embroidery machine and continue embroidering. Embroidering direction Embroidered section 1 357 2 468 automatically stop Blank stitches resulting from thread breakage Reverse stitch ...to re-calculate the stitches correctly. 45 Step back through the embroidering data to step back through the embroidery data. HELPFUL INFORMATION FOR EMBROIDERING WITH FUTURA 1. Rethread upper thread, (see 7 "Threading the Top Thread".) Placing the small net that the thread...
Instruction Manual
Page 50
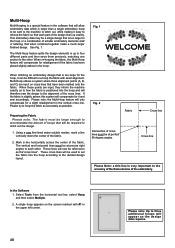
...with #1 in up exactly. Multi-Hoop Multi-Hooping is a special feature in the software that will allow embroidery data which is larger than a single embroidery hoop to be sent to the machine to stitch out, while making it and sew accordingly. Mark a line horizontally across the center of the ...hoop according to stitch out the design. 1. When these points are input, they inform the machine exactly as the"cross lines". Please try to the other . When stitching an embroidery design that have been marked onto the fabric. Preparing the Fabric Please note: The fabric must...
...with #1 in up exactly. Multi-Hoop Multi-Hooping is a special feature in the software that will allow embroidery data which is larger than a single embroidery hoop to be sent to the machine to stitch out, while making it and sew accordingly. Mark a line horizontally across the center of the ...hoop according to stitch out the design. 1. When these points are input, they inform the machine exactly as the"cross lines". Please try to the other . When stitching an embroidery design that have been marked onto the fabric. Preparing the Fabric Please note: The fabric must...

Instruction Manual
Page 51
...from the Design Library that is built into the hoop, aligning cross lines of data 1 within the guide line markings of the embroidery data that is sent to Machine" tool on the fabric as Guide lines. The grey area (#1 Hoop) is the first of the hoop. (See There .... Set fabric and stabilizer into the software. (Additional 4. These marks are markings which indicates the exact center of the hoop there are referred to the machine for sewing. Fig. 3 Fig. 4 Guide line Center point line A Data 1 Guide line Data 2 Guide line C B Guide line Data 4 Data 3 49 3. On...
...from the Design Library that is built into the hoop, aligning cross lines of data 1 within the guide line markings of the embroidery data that is sent to Machine" tool on the fabric as Guide lines. The grey area (#1 Hoop) is the first of the hoop. (See There .... Set fabric and stabilizer into the software. (Additional 4. These marks are markings which indicates the exact center of the hoop there are referred to the machine for sewing. Fig. 3 Fig. 4 Guide line Center point line A Data 1 Guide line Data 2 Guide line C B Guide line Data 4 Data 3 49 3. On...

Instruction Manual
Page 54
After transferring desired design(s) to your FUTURA sewing and embroidery machine, the display shows number of current color block and total number of the lower dial. The current color block number changes. When having reached desired ...
After transferring desired design(s) to your FUTURA sewing and embroidery machine, the display shows number of current color block and total number of the lower dial. The current color block number changes. When having reached desired ...

Instruction Manual
Page 55
... bar indicates how far in progress. The transferred embroidery data is being transferred. B Embroidery in the color block the A machine has embroidered. HELPFUL MESSAGES WHEN EMBROIDERING Display on control panel Situation Embroidery unit is mounted, but embroidery data is not transferred yet. Embroidery data is still available in the machine. The number of the currently stitched out...
... bar indicates how far in progress. The transferred embroidery data is being transferred. B Embroidery in the color block the A machine has embroidered. HELPFUL MESSAGES WHEN EMBROIDERING Display on control panel Situation Embroidery unit is mounted, but embroidery data is not transferred yet. Embroidery data is still available in the machine. The number of the currently stitched out...

Instruction Manual
Page 56
... sewing purposes and lowered for your presser foot. 1. OTHER THINGS YOU SHOULD KNOW PRESSER FOOT LIFTER There are three positions for darning, freehand embroidery and monogramming so that is being sewn. To replace, slide the extension table back into a slim free-arm model for children's clothes, cuffs..., trouser legs, and other hard-to remove thick fabric. With the extension table removed the machine converts into place until it to its highest position to change the presser foot or to -reach places. 54 Raise the lifter to the...
... sewing purposes and lowered for your presser foot. 1. OTHER THINGS YOU SHOULD KNOW PRESSER FOOT LIFTER There are three positions for darning, freehand embroidery and monogramming so that is being sewn. To replace, slide the extension table back into a slim free-arm model for children's clothes, cuffs..., trouser legs, and other hard-to remove thick fabric. With the extension table removed the machine converts into place until it to its highest position to change the presser foot or to -reach places. 54 Raise the lifter to the...
Instruction Manual
Page 65
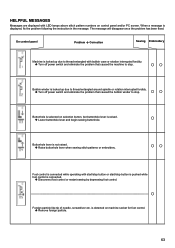
...foot control or restart sewing by depressing foot control. is detected on selection button, but buttonhole lever is selected on machine socket for foot control. Remove foreign particle. 63 Foot control is connected while operating with start/stop button or start/... and begin sewing buttonhole. Buttonhole is raised. Raise buttonhole lever when sewing stitch patterns or embroidery. When a message is On control panel Problem Correction Sewing Embroidery Machine is connected. HELPFUL MESSAGES Messages are displayed with bobbin case or rotation interrupted forcibly. Turn ...
...foot control or restart sewing by depressing foot control. is detected on selection button, but buttonhole lever is selected on machine socket for foot control. Remove foreign particle. 63 Foot control is connected while operating with start/stop button or start/... and begin sewing buttonhole. Buttonhole is raised. Raise buttonhole lever when sewing stitch patterns or embroidery. When a message is On control panel Problem Correction Sewing Embroidery Machine is connected. HELPFUL MESSAGES Messages are displayed with bobbin case or rotation interrupted forcibly. Turn ...


