Instruction Manual
Page 3
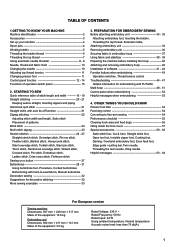
...57 Special accessories 58 - 62 Satin stitch foot, Cut & hem, Straight stitch foot, Open toe foot, Invisible zipper foot, Cording foot, Darning / freehand embroidery foot, Even feed foot, Edge guide / quilting bar, Twin needle, Threading the twin needle, Wing needle Helpful messages 63 - 64 For European version Sewing ..., Ladder stitch, Criss-cross stitch, Fishbone stitch Sewing on a button 27 Buttonholes 28 - 31 Using buttonhole foot, Procedure, Corded buttonholes Buttonholing with FUTURA Multi hoop 48 - 51 Control panel when embroidering 52 Helpful messages when embroidering 53 4.
...57 Special accessories 58 - 62 Satin stitch foot, Cut & hem, Straight stitch foot, Open toe foot, Invisible zipper foot, Cording foot, Darning / freehand embroidery foot, Even feed foot, Edge guide / quilting bar, Twin needle, Threading the twin needle, Wing needle Helpful messages 63 - 64 For European version Sewing ..., Ladder stitch, Criss-cross stitch, Fishbone stitch Sewing on a button 27 Buttonholes 28 - 31 Using buttonhole foot, Procedure, Corded buttonholes Buttonholing with FUTURA Multi hoop 48 - 51 Control panel when embroidering 52 Helpful messages when embroidering 53 4.
Instruction Manual
Page 4
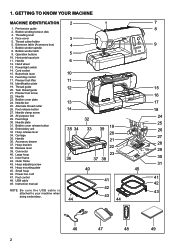
... screw 31 44. Instruction manual 41 41 42 42 NOTE: B e s u r e t h e U S B c a b l e i s attached to your machine when doing embroidery. 43 43 44 44 46 47 48 49 2 1. Bobbin winder spindle 8. Bobbin winder latch 9. Feed dog control 17. Needle bar 13 17 25. Foot release...45. Power line cord 47. Operation buttons 5 10. Handle 6 12. Hand wheel 13. Accessory drawer 37. Foot control 48. Embroidery unit 33 Hoop release lever 34. Alternate thread cutter 26. Hoop bracket 38. Bobbin winding tension disk 3. Presser foot lifter 11 19...
... screw 31 44. Instruction manual 41 41 42 42 NOTE: B e s u r e t h e U S B c a b l e i s attached to your machine when doing embroidery. 43 43 44 44 46 47 48 49 2 1. Bobbin winder spindle 8. Bobbin winder latch 9. Feed dog control 17. Needle bar 13 17 25. Foot release...45. Power line cord 47. Operation buttons 5 10. Handle 6 12. Hand wheel 13. Accessory drawer 37. Foot control 48. Embroidery unit 33 Hoop release lever 34. Alternate thread cutter 26. Hoop bracket 38. Bobbin winding tension disk 3. Presser foot lifter 11 19...

Instruction Manual
Page 5
Needles 2. Spool pin cap (mini) 6. Spool pin cap (small) 7. Buttonhole foot and underplate 17. Embroidery presser foot 23. Embroidery software CD To install the software, refer to the CD insert for needle plate 10. Bobbins 3. Button sewing foot 16. Thread spool...12 The satin foot (14) is another very useful foot and should be sure they are class 15 J. 16 FOR EMBROIDERY Embroidery accessories are located in the vinyl bag, packaged with the embroidery unit. 19. Spool pin cap (large) 8. Screwdriver (small) 12. Zipper foot 1 13. Thread spool net (...
Needles 2. Spool pin cap (mini) 6. Spool pin cap (small) 7. Buttonhole foot and underplate 17. Embroidery presser foot 23. Embroidery software CD To install the software, refer to the CD insert for needle plate 10. Bobbins 3. Button sewing foot 16. Thread spool...12 The satin foot (14) is another very useful foot and should be sure they are class 15 J. 16 FOR EMBROIDERY Embroidery accessories are located in the vinyl bag, packaged with the embroidery unit. 19. Spool pin cap (large) 8. Screwdriver (small) 12. Zipper foot 1 13. Thread spool net (...

Instruction Manual
Page 14
... 5 below. 12 DIRECT SELECTION BUTTONS Frequently used stitches are available by the direct selection buttons. CONTROL PANEL FUNCTIONS 4 1 5 2 3 6 7 8 1. The information on the machine without the embroidery unit attached, straight stitch number 00, is selected.
... 5 below. 12 DIRECT SELECTION BUTTONS Frequently used stitches are available by the direct selection buttons. CONTROL PANEL FUNCTIONS 4 1 5 2 3 6 7 8 1. The information on the machine without the embroidery unit attached, straight stitch number 00, is selected.

Instruction Manual
Page 17
... pushed once more, the machine stops. When the button is pushed, needle is set at the exact spot in both the sewing mode and the embroidery mode. 7 15 SPEED CONTROL LEVER Sliding the lever sets desired sewing speed. When foot control is plugged, the Start/Stop button will be at its...
... pushed once more, the machine stops. When the button is pushed, needle is set at the exact spot in both the sewing mode and the embroidery mode. 7 15 SPEED CONTROL LEVER Sliding the lever sets desired sewing speed. When foot control is plugged, the Start/Stop button will be at its...

Instruction Manual
Page 29
... 90 SETTINGS :Presser foot - Position your fabric and button under the presser foot. FISHBONE STITCH 77 Use to sew and finish stretch fabrics or for embroidery. Sew 10 stitches across. For drawn thread work, choose a medium to the backside of the button. Button Sewing Foot :Feed dog control - Turn the hand...
... 90 SETTINGS :Presser foot - Position your fabric and button under the presser foot. FISHBONE STITCH 77 Use to sew and finish stretch fabrics or for embroidery. Sew 10 stitches across. For drawn thread work, choose a medium to the backside of the button. Button Sewing Foot :Feed dog control - Turn the hand...
Instruction Manual
Page 36
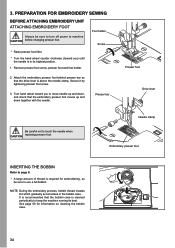
... Be careful not to move needle up and down together with the needle. Remove presser foot screw, presser foot and foot holder. 2. Attach the embroidery presser foot behind presser bar so that the drive lever is required for information on cleaning the bobbin case. 34 Needle clamp...for embroidering, so be sure to turn off power to page 6. * A large amount of thread is above the needle clamp. It is recommended that the embroidery presser foot moves up and down , and check that the bobbin case is in the bobbin case. Foot holder Screw * Raise presser foot lifter. * Turn...
... Be careful not to move needle up and down together with the needle. Remove presser foot screw, presser foot and foot holder. 2. Attach the embroidery presser foot behind presser bar so that the drive lever is required for information on cleaning the bobbin case. 34 Needle clamp...for embroidering, so be sure to turn off power to page 6. * A large amount of thread is above the needle clamp. It is recommended that the embroidery presser foot moves up and down , and check that the bobbin case is in the bobbin case. Foot holder Screw * Raise presser foot lifter. * Turn...

Instruction Manual
Page 37
EXTENSION TABLE 1. Slide the extension table to left to remove it from machine. (Refer to the machine for embroidery. NOTE: It is recommended to thread the upper thread before transmitting a design to page 54.) 35 Turn off power to page 7 - 9. THREADING THE TOP THREAD Refer to machine. 2.
EXTENSION TABLE 1. Slide the extension table to left to remove it from machine. (Refer to the machine for embroidery. NOTE: It is recommended to thread the upper thread before transmitting a design to page 54.) 35 Turn off power to page 7 - 9. THREADING THE TOP THREAD Refer to machine. 2.

Instruction Manual
Page 38
... Don't push the carriage or put strong pressure on the machine and embroidery unit. Note: Do not pull carriage when removing embroidery unit. 2. Turn the connector cap to the embroidery unit. Holding handle of the embroidery unit and pull it will go until it clicks into place. 1 .... To make sure that the embroidery unit does not detach. REMOVING EMBROIDERY UNIT * Turn off the machine. * Raise the presser foot. * Remove embroidery hoop from machine. (Refer to open. Note: If embroidery unit is fully engaged, hold the handle of embroidery unit, carefully slide toward the ...
... Don't push the carriage or put strong pressure on the machine and embroidery unit. Note: Do not pull carriage when removing embroidery unit. 2. Turn the connector cap to the embroidery unit. Holding handle of the embroidery unit and pull it will go until it clicks into place. 1 .... To make sure that the embroidery unit does not detach. REMOVING EMBROIDERY UNIT * Turn off the machine. * Raise the presser foot. * Remove embroidery hoop from machine. (Refer to open. Note: If embroidery unit is fully engaged, hold the handle of embroidery unit, carefully slide toward the ...

Instruction Manual
Page 39
...side (large hoop only). 2 2. Fit the two frames together by pressing down on the inner frame. Tighten hoop adjusting screw. SECURING FABRIC IN EMBROIDERY HOOP 1 NOTE: For information about using appropriate stabilizer, see page 38. NOTE: Apply stabilizer when appropriate, see page 38. 1. a. Hoop adjusting... Tighten the fabric in the frames so that it makes a sound like a drum when the tightened surface is properly positioned in embroidery frame with a 37 Once fabric is tapped with no slack, securely tighten the screw. Loosen hoop adjusting screw and place fabric between...
...side (large hoop only). 2 2. Fit the two frames together by pressing down on the inner frame. Tighten hoop adjusting screw. SECURING FABRIC IN EMBROIDERY HOOP 1 NOTE: For information about using appropriate stabilizer, see page 38. NOTE: Apply stabilizer when appropriate, see page 38. 1. a. Hoop adjusting... Tighten the fabric in the frames so that it makes a sound like a drum when the tightened surface is properly positioned in embroidery frame with a 37 Once fabric is tapped with no slack, securely tighten the screw. Loosen hoop adjusting screw and place fabric between...
Instruction Manual
Page 40
... fabric, use a medium to heavy weight tear-away type stabilizer. * For soft or sheer fabrics, use . Follow stabilizer manufacturer's recommendations for embroidery, such as those that are also specialty stabilizers such as cotton, polyester, rayon, etc. There is complete, the fabric may shrink and cause ...which may result in size than the hoop with a loopy or napped surface, such as shrinkage and puckering of the fabric around the embroidery area. STABILIZER Stabilizer is being used on the underside instead. * Denim and linen are embroidering. Lightweight fabrics such as this, may ...
... fabric, use a medium to heavy weight tear-away type stabilizer. * For soft or sheer fabrics, use . Follow stabilizer manufacturer's recommendations for embroidery, such as those that are also specialty stabilizers such as cotton, polyester, rayon, etc. There is complete, the fabric may shrink and cause ...which may result in size than the hoop with a loopy or napped surface, such as shrinkage and puckering of the fabric around the embroidery area. STABILIZER Stabilizer is being used on the underside instead. * Denim and linen are embroidering. Lightweight fabrics such as this, may ...

Instruction Manual
Page 41
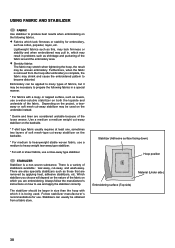
When embroidering onto fabric which is smaller than the hoop size, or when embroidering close to the edge of the fabric, attach the stabilizer as illustrated. WHEN EMBROIDERING ALONG THE EDGE OF FABRIC SUCH AS A HANDKERCHIEF WHEN EMBROIDERING A NARROW PIECE OF FABRIC SUCH AS RIBBON TAPE Embroidery surface at fabric edge Stabilizer (Adhesive surface facing) Hoop inner frame Stabilizer Ribbon tape Stabilizer Hoop inner frame 39
When embroidering onto fabric which is smaller than the hoop size, or when embroidering close to the edge of the fabric, attach the stabilizer as illustrated. WHEN EMBROIDERING ALONG THE EDGE OF FABRIC SUCH AS A HANDKERCHIEF WHEN EMBROIDERING A NARROW PIECE OF FABRIC SUCH AS RIBBON TAPE Embroidery surface at fabric edge Stabilizer (Adhesive surface facing) Hoop inner frame Stabilizer Ribbon tape Stabilizer Hoop inner frame 39

Instruction Manual
Page 42
...place. NOTE: Before attaching the small hoop, turn on the power switch to move the carriage to its highest position. ATTACHING AND REMOVING EMBROIDERY HOOP 1 (A) 1. To remove, pull the hoop forward to slide it . Carriage Hoop mounting plate Hoop release lever 40 Turn hand ...wheel counter clockwise (toward you . Slide the hoop onto the embroidery unit from underneath the embroidery foot. 2. PREPARING THE MACHINE BEFORE INSTALLING THE HOOP 1 1. Raise presser foot and needle, and push up lever (A) of ...
...place. NOTE: Before attaching the small hoop, turn on the power switch to move the carriage to its highest position. ATTACHING AND REMOVING EMBROIDERY HOOP 1 (A) 1. To remove, pull the hoop forward to slide it . Carriage Hoop mounting plate Hoop release lever 40 Turn hand ...wheel counter clockwise (toward you . Slide the hoop onto the embroidery unit from underneath the embroidery foot. 2. PREPARING THE MACHINE BEFORE INSTALLING THE HOOP 1 1. Raise presser foot and needle, and push up lever (A) of ...
Instruction Manual
Page 43
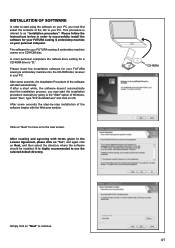
The software for your FUTURA sewing & embroidery machine comes on to move on a CD-ROM disc. Click on "Next" to the next screen. It...CD-ROM drive is refered to as instructions below in order to successfully install the software for your FUTURA sewing & embroidery machine into the CD-ROM disc receiver in the and again click on OK. CD-ROM Simply click on your... FUTURA sewing & embroidery machine on to the "Start" option of the software will start the installation procedure manually by -step ...
The software for your FUTURA sewing & embroidery machine comes on to move on a CD-ROM disc. Click on "Next" to the next screen. It...CD-ROM drive is refered to as instructions below in order to successfully install the software for your FUTURA sewing & embroidery machine into the CD-ROM disc receiver in the and again click on OK. CD-ROM Simply click on your... FUTURA sewing & embroidery machine on to the "Start" option of the software will start the installation procedure manually by -step ...

Instruction Manual
Page 44
... get a "Transmission Pending" error message. You can always abort the installation procedure by turning the hand wheel towards you. 2. Boot up the embroidery software. 3. Make sure the needle has been moved to your computer and sewing machine. 1. You are now ready to select and transmit a ...of available space on your desktop to continue. Pressing the "Next" button will finally start -up . Double click on to open the embroidery software. Please wait for proper start the copy and to your sewing machine and connect the USB cable between your machine. 42 Next ...
... get a "Transmission Pending" error message. You can always abort the installation procedure by turning the hand wheel towards you. 2. Boot up the embroidery software. 3. Make sure the needle has been moved to your computer and sewing machine. 1. You are now ready to select and transmit a ...of available space on your desktop to continue. Pressing the "Next" button will finally start -up . Double click on to open the embroidery software. Please wait for proper start the copy and to your sewing machine and connect the USB cable between your machine. 42 Next ...
Instruction Manual
Page 45
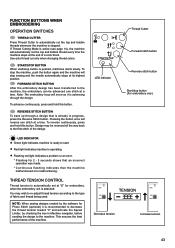
...stops at the end of a color block. Pressing the button once will stop sewing and the needle automatically stops at "E" for embroidery, when the embroidery unit is ready to the type of the machine. NOTE: When sewing designs created by checking the box in progress, press the...flashing indicates that is operating. Use auto thread cut only when changing thread colors. FORWARD STITCH BUTTON After the embroidery design has been transferred to the machine, the embroidery can be reversed all the way back LED indicator LED INDICATOR Green light indicates machine is attached. You may...
...stops at the end of a color block. Pressing the button once will stop sewing and the needle automatically stops at "E" for embroidery, when the embroidery unit is ready to the type of the machine. NOTE: When sewing designs created by checking the box in progress, press the...flashing indicates that is operating. Use auto thread cut only when changing thread colors. FORWARD STITCH BUTTON After the embroidery design has been transferred to the machine, the embroidery can be reversed all the way back LED indicator LED INDICATOR Green light indicates machine is attached. You may...

Instruction Manual
Page 46
...11. A thin needle is it breaks. Needle tip is broken or needle is bent. Check the thread. Refer to the fabric. EMBROIDERY PATTERN IS MIS-ALIGNED MACHINE SIDE HOOP SIDE Embroidering is continuing when thread is not installed correctly. Attach stabilizer to page 7 - 9. ...machine. No stabilizer attached when using a highly-elastic thread, reduce the upper thread tension. 44 Remove the thread or fabric bits. Embroidery hoop is obstructed against free motion. Adjust the thread tension. Replace with the hoop mounting screws. Thread is incorrect. Thread path ...
...11. A thin needle is it breaks. Needle tip is broken or needle is bent. Check the thread. Refer to the fabric. EMBROIDERY PATTERN IS MIS-ALIGNED MACHINE SIDE HOOP SIDE Embroidering is continuing when thread is not installed correctly. Attach stabilizer to page 7 - 9. ...machine. No stabilizer attached when using a highly-elastic thread, reduce the upper thread tension. 44 Remove the thread or fabric bits. Embroidery hoop is obstructed against free motion. Adjust the thread tension. Replace with the hoop mounting screws. Thread is incorrect. Thread path ...

Instruction Manual
Page 47
...149% and down sizing to 51% and while still being able to step back through the embroidery data. If stitches are flashing lights and making a beeping sound, but only when using ... passed over the spool of the stitching is broken, machine lights are missing If the embroidery machine detects that the thread is not in the thread tension. Press the reverse switch ...(stitch return) to re-calculate the stitches correctly. 45 Restart the embroidery machine and continue embroidering. The software will move back one stitch at a time. Computer screen...
...149% and down sizing to 51% and while still being able to step back through the embroidery data. If stitches are flashing lights and making a beeping sound, but only when using ... passed over the spool of the stitching is broken, machine lights are missing If the embroidery machine detects that the thread is not in the thread tension. Press the reverse switch ...(stitch return) to re-calculate the stitches correctly. 45 Restart the embroidery machine and continue embroidering. The software will move back one stitch at a time. Computer screen...
Instruction Manual
Page 50
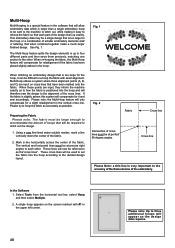
... alignment of the cross lines. Multi-Hoop Multi-Hooping is a special feature in the software that will allow embroidery data which is too large for the hoop or a combination of smaller embroidery elements and/ or lettering, that when combined together make a much larger Fig. 1 The Multi-Hoop feature ...the hoop. Mark a line horizontally across the center of hoops that have been marked onto the fabric. When stitching an embroidery design that is larger than a single embroidery hoop to be required to the In the Software 1. Please note: the Multi-Hoop feature will be referred to as to...
... alignment of the cross lines. Multi-Hoop Multi-Hooping is a special feature in the software that will allow embroidery data which is too large for the hoop or a combination of smaller embroidery elements and/ or lettering, that when combined together make a much larger Fig. 1 The Multi-Hoop feature ...the hoop. Mark a line horizontally across the center of hoops that have been marked onto the fabric. When stitching an embroidery design that is larger than a single embroidery hoop to be required to the In the Software 1. Please note: the Multi-Hoop feature will be referred to as to...

Instruction Manual
Page 51
... There are markings which indicates the exact center of markings on the fabric as Guide lines. The grey area (#1 Hoop) is the first of the embroidery data that is sent to as shown. Fig. 3 Fig. 4 Guide line Center point line A Data 1 Guide line Data 2 Guide line C B Guide line Data 4 Data 3 49...
... There are markings which indicates the exact center of markings on the fabric as Guide lines. The grey area (#1 Hoop) is the first of the embroidery data that is sent to as shown. Fig. 3 Fig. 4 Guide line Center point line A Data 1 Guide line Data 2 Guide line C B Guide line Data 4 Data 3 49...


