User Manual
Page 2
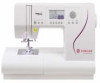
... purchasing your new SINGER® sewing machine! Keep the instructions at a suitable place close to be followed, including the following: Read all instructions before cleaning, removing covers, lubricating or when making any adjustment in the needle area, such as threading needle, changing needle, threading bobbin, or changing presser foot, etc. • Never drop or insert any other objects on the foot control. • Do not use as contained in the instruction manual. Keep ventilation openings of the sewing machine and foot control free from...
... purchasing your new SINGER® sewing machine! Keep the instructions at a suitable place close to be followed, including the following: Read all instructions before cleaning, removing covers, lubricating or when making any adjustment in the needle area, such as threading needle, changing needle, threading bobbin, or changing presser foot, etc. • Never drop or insert any other objects on the foot control. • Do not use as contained in the instruction manual. Keep ventilation openings of the sewing machine and foot control free from...
User Manual
Page 8
...THE EXTENSION TABLE 18 B. CHANGING THE PRESSER FOOT 18 C. TO CHECK SELECTED PATTERNS 88 C. NEEDLE UP-DOWN / SLOW BUTTON 24 D. PRESSER FOOT LIFTER 24 STITCH 52 F. STRAIGHT STITCH 54 H. TOP COVER 26 B. HAND WHEEL 26 STITCH (PATTERN NO. 3, 4 54 BEGINNING 94 CONTROL PANEL 28 ELASTIC STITCH SEWING 56 DECORATIVE AND LETTER A. UTILITY STITCH BUTTON 28 ZIGZAG STITCH SEWING 58 ADJUSTING THE BALANCE D. SETTING SPOOL OF THREAD ON APPLIQUE 64 SPOOL PIN 32 C. THREADING THE NEEDLE EYE 36 BOUND BUTTONHOLE 74 ACCESSORIES 16 E. DROP FEED LEVER 26 STRAIGHT STITCH SEWING...
...THE EXTENSION TABLE 18 B. CHANGING THE PRESSER FOOT 18 C. TO CHECK SELECTED PATTERNS 88 C. NEEDLE UP-DOWN / SLOW BUTTON 24 D. PRESSER FOOT LIFTER 24 STITCH 52 F. STRAIGHT STITCH 54 H. TOP COVER 26 B. HAND WHEEL 26 STITCH (PATTERN NO. 3, 4 54 BEGINNING 94 CONTROL PANEL 28 ELASTIC STITCH SEWING 56 DECORATIVE AND LETTER A. UTILITY STITCH BUTTON 28 ZIGZAG STITCH SEWING 58 ADJUSTING THE BALANCE D. SETTING SPOOL OF THREAD ON APPLIQUE 64 SPOOL PIN 32 C. THREADING THE NEEDLE EYE 36 BOUND BUTTONHOLE 74 ACCESSORIES 16 E. DROP FEED LEVER 26 STRAIGHT STITCH SEWING...

User Manual
Page 14
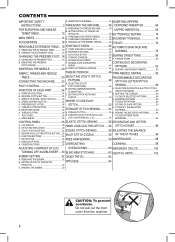
Face Plate 2 2. Buttonhole Lever 7 10. Presser Foot Release Lever 8 17 18 13. Feed Teeth 17. Top Cover 24. Stitch Pattern Chart 23 24 25 26 27 28 29 30 31 25. Spool Pin 27. Needle Up/Down Slow Button 33 36. Decorative & Letter Stitch Button 44. Needle Threader 11. Needle Threader Lever 12. Presser Foot 16. Needle 14 22 20. Bobbin Cover 15 22. Bobbin Winding Tension Disc 28. Thread Cutter Button 41 42 37. Drop Feed Lever 47. Removable Extension Table (Accessories) 4. Needle Clamp Screw 11 12 20 21 18. Thread Guides ...
Face Plate 2 2. Buttonhole Lever 7 10. Presser Foot Release Lever 8 17 18 13. Feed Teeth 17. Top Cover 24. Stitch Pattern Chart 23 24 25 26 27 28 29 30 31 25. Spool Pin 27. Needle Up/Down Slow Button 33 36. Decorative & Letter Stitch Button 44. Needle Threader 11. Needle Threader Lever 12. Presser Foot 16. Needle 14 22 20. Bobbin Cover 15 22. Bobbin Winding Tension Disc 28. Thread Cutter Button 41 42 37. Drop Feed Lever 47. Removable Extension Table (Accessories) 4. Needle Clamp Screw 11 12 20 21 18. Thread Guides ...

User Manual
Page 16
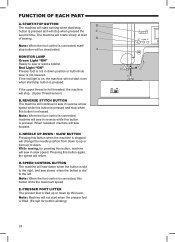
Brush 5. Buttonhole Foot (F) 13. Auxiliary Spool Pin with Felt Washer 6. Blind Hem Foot (D) 10. Zipper Foot (E) 11. ACCESSORIES Accessories are provided in the machine) 3. Seam Ripper 4. Large Thread Spool Cap 8. Satin Stitch Foot (B) 12. Small Thread Spool Cap 9. All-Purpose Foot (On machine when delivered) (A) 1 2 34 5 6 7 8 9 10 11 12 13 16 Screwdriver for Needle Plate 7. Needle Pack 2. 4 SINGER Class 15 bobbins ( 1 is in the storage compartment of the removable extension table. (See next page, [REMOVABLE EXTENSION TABLE]) 1.
Brush 5. Buttonhole Foot (F) 13. Auxiliary Spool Pin with Felt Washer 6. Blind Hem Foot (D) 10. Zipper Foot (E) 11. ACCESSORIES Accessories are provided in the machine) 3. Seam Ripper 4. Large Thread Spool Cap 8. Satin Stitch Foot (B) 12. Small Thread Spool Cap 9. All-Purpose Foot (On machine when delivered) (A) 1 2 34 5 6 7 8 9 10 11 12 13 16 Screwdriver for Needle Plate 7. Needle Pack 2. 4 SINGER Class 15 bobbins ( 1 is in the storage compartment of the removable extension table. (See next page, [REMOVABLE EXTENSION TABLE]) 1.

User Manual
Page 18
... the thumb screw. 18 CHANGING THE PRESSER FOOT 1. B. Remove the presser foot by pushing the presser foot release lever toward you until the needle is at its pin directly under the left side of the accessory drawer cover and pull toward you. Turn the hand wheel toward you sew. To attach, push the table to the stitch or technique you . 4. REMOVING THE EXTENSION TABLE Hook your finger under the slot in presser foot holder. 5. B. OPENING THE ACCESSORY CASE Hook your...
... the thumb screw. 18 CHANGING THE PRESSER FOOT 1. B. Remove the presser foot by pushing the presser foot release lever toward you until the needle is at its pin directly under the left side of the accessory drawer cover and pull toward you. Turn the hand wheel toward you sew. To attach, push the table to the stitch or technique you . 4. REMOVING THE EXTENSION TABLE Hook your finger under the slot in presser foot holder. 5. B. OPENING THE ACCESSORY CASE Hook your...
User Manual
Page 24
... time. REVERSE STITCH BUTTON The machine will rotate slowly at low speed while this button is connected, machine will sew in reverse at start /stop . (Upper thread sensor) B. The machine will continue to sew or wind a bobbin. Note: When the foot control is pressed and will sew in down position or buttonhole lever is lifted. (Except for bobbin winding) 24 Note: When the foot control is connected, start when the presser foot is not lowered. While sewing, by this button is pressed. C. START/STOP BUTTON...
... time. REVERSE STITCH BUTTON The machine will rotate slowly at low speed while this button is connected, machine will sew in reverse at start /stop . (Upper thread sensor) B. The machine will continue to sew or wind a bobbin. Note: When the foot control is pressed and will sew in down position or buttonhole lever is lifted. (Except for bobbin winding) 24 Note: When the foot control is connected, start when the presser foot is not lowered. While sewing, by this button is pressed. C. START/STOP BUTTON...
User Manual
Page 26
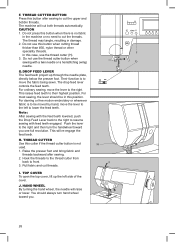
... presser foot. THREAD CUTTER BUTTON Press this cutter if the thread cutter button is to cut the upper and bobbin threads. Note: After sewing with a twin needle or a hemstitching (wing) needle. I. G.DROP FEED LEVER The feed teeth project up the left to cut the threads. This will raise or lower. THREAD CUTTER Use this button after sewing. 2. HAND WHEEL By turning the hand wheel, the needle will re-engage the feed teeth. Do not use this position. For darning or free motion embroidery or whenever fabric...
... presser foot. THREAD CUTTER BUTTON Press this cutter if the thread cutter button is to cut the upper and bobbin threads. Note: After sewing with a twin needle or a hemstitching (wing) needle. I. G.DROP FEED LEVER The feed teeth project up the left to cut the threads. This will raise or lower. THREAD CUTTER Use this button after sewing. 2. HAND WHEEL By turning the hand wheel, the needle will re-engage the feed teeth. Do not use this position. For darning or free motion embroidery or whenever fabric...

User Manual
Page 32
... the size of the thread and start the machine by pressing the start /stop button or pressing the foot control pedal. 6. Use the small spool cap when you use only SINGER Class 15 bobbins in both hands and hook thread to the guide from left to the left end of spool pin and set the spool of thread on spool pin as far as illustrated. C. Cut the thread near hole. 7. Pull the bobbin cover latch to engage bobbin winder. WINDING THE BOBBIN...
... the size of the thread and start the machine by pressing the start /stop button or pressing the foot control pedal. 6. Use the small spool cap when you use only SINGER Class 15 bobbins in both hands and hook thread to the guide from left to the left end of spool pin and set the spool of thread on spool pin as far as illustrated. C. Cut the thread near hole. 7. Pull the bobbin cover latch to engage bobbin winder. WINDING THE BOBBIN...

User Manual
Page 36
... of spool. To thread the take-up lever, draw thread up . 5. Reverse spool cap direction according to the left along the slit. 7. Bring thread to the size of the fabric. Draw thread through needle eye from right to raise the presser foot lifter before you use needle threader. 36 Note: It is very important to left. 3. C. THREADING THE MACHINE A. PREPARING TO THREAD MACHINE 1. Hold thread in poor stitch quality, or excessive thread loops on spool pin...
... of spool. To thread the take-up lever, draw thread up . 5. Reverse spool cap direction according to the left along the slit. 7. Bring thread to the size of the fabric. Draw thread through needle eye from right to raise the presser foot lifter before you use needle threader. 36 Note: It is very important to left. 3. C. THREADING THE MACHINE A. PREPARING TO THREAD MACHINE 1. Hold thread in poor stitch quality, or excessive thread loops on spool pin...
User Manual
Page 40
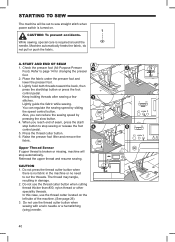
... button to page 14 for changing the presser foot. 2. In this case, use the thread cutter button when sewing with a twin needle or a hemstitching (wing) needle. 40 Do not use the thread cutter button when cutting thread thicker than #30, nylon thread or other speciality threads. Machine automatically feeds the fabric, do not pull or push the fabric. CAUTION: To prevent accidents. START AND END OF SEAM 1. The thread may tangle, resulting in the machine or no need to sew straight stitch when power...
... button to page 14 for changing the presser foot. 2. In this case, use the thread cutter button when sewing with a twin needle or a hemstitching (wing) needle. 40 Do not use the thread cutter button when cutting thread thicker than #30, nylon thread or other speciality threads. Machine automatically feeds the fabric, do not pull or push the fabric. CAUTION: To prevent accidents. START AND END OF SEAM 1. The thread may tangle, resulting in the machine or no need to sew straight stitch when power...

User Manual
Page 42
... fabric in reverse stitch. Release the reverse button and press the start to be used for reinforcing the ends of seam, press and hold the reverse button. This function can be made and lower the presser foot. 2. Machine will sew tacking stitches automatically and then start / stop automatically. 4. If you want to sew these stitches. REVERSE STITCHING Reverse stitching is to sew the selected pattern. Sew 4-5 reverse stitch. 3. F2 3. Tack mark will appear on the LCD. 2. AUTO TACK STITCH You may sew...
... fabric in reverse stitch. Release the reverse button and press the start to be used for reinforcing the ends of seam, press and hold the reverse button. This function can be made and lower the presser foot. 2. Machine will sew tacking stitches automatically and then start / stop automatically. 4. If you want to sew these stitches. REVERSE STITCHING Reverse stitching is to sew the selected pattern. Sew 4-5 reverse stitch. 3. F2 3. Tack mark will appear on the LCD. 2. AUTO TACK STITCH You may sew...

User Manual
Page 50
... straight stitch patterns (No. 1, 2, 3, 4, 5, 7), Stitch width buttons will indicate previous mode. (Stitch information mode) C. When you press the return button (F1), LCD will change the needle position. If the width, length or number icons are not possible, machine will be made while sewing. 50 ii. Elongated F5 3. Adjustments to show the stitch width and length. ELONGATION Some patterns may be changed. After these settings, press the return button (F1). Pre-set the stitch...
... straight stitch patterns (No. 1, 2, 3, 4, 5, 7), Stitch width buttons will indicate previous mode. (Stitch information mode) C. When you press the return button (F1), LCD will change the needle position. If the width, length or number icons are not possible, machine will be made while sewing. 50 ii. Elongated F5 3. Adjustments to show the stitch width and length. ELONGATION Some patterns may be changed. After these settings, press the return button (F1). Pre-set the stitch...
User Manual
Page 54
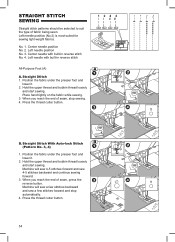
Position the fabric under the presser foot and lower it . 2. Straight Stitch With Auto-lock Stitch (Pattern No. 3, 4) 1. Hold the upper thread and bobbin thread loosely and start sewing. STRAIGHT STITCH SEWING Straight stitch patterns should be selected to suit the type of seam, press the reverse button. No. 1. Left needle with built-in reverse stitch All-Purpose Foot (A) A. When you reach the end of seam, stop automatically. 4. Center needle with built-in reverse stitch No. 4. Press the thread cutter button. Machine will sew 4-5 stitches forward and sew 4-5 ...
Position the fabric under the presser foot and lower it . 2. Straight Stitch With Auto-lock Stitch (Pattern No. 3, 4) 1. Hold the upper thread and bobbin thread loosely and start sewing. STRAIGHT STITCH SEWING Straight stitch patterns should be selected to suit the type of seam, press the reverse button. No. 1. Left needle with built-in reverse stitch All-Purpose Foot (A) A. When you reach the end of seam, stop automatically. 4. Center needle with built-in reverse stitch No. 4. Press the thread cutter button. Machine will sew 4-5 stitches forward and sew 4-5 ...
User Manual
Page 56
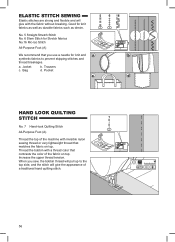
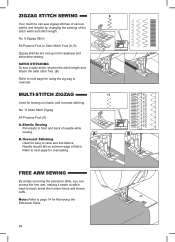
... bobbin with a thread color that contrasts the color of the fabric on top. When you use a needle for knit fabrics as well as durable fabrics such as denim. ELASTIC STITCH SEWING Elastic stitches are strong and flexible and will give with the fabric without breaking. Trousers d. a. Jacket c. Increase the upper thread tension. Pocket HAND LOOK QUILTING STITCH No. 7 Hand-look Quilting Stitch All-Purpose Foot (A) Thread the top of a traditional hand quilting stitch. 56 No. 5 Straight Stretch Stitch...
... bobbin with a thread color that contrasts the color of the fabric on top. When you use a needle for knit fabrics as well as durable fabrics such as denim. ELASTIC STITCH SEWING Elastic stitches are strong and flexible and will give with the fabric without breaking. Trousers d. a. Jacket c. Increase the upper thread tension. Pocket HAND LOOK QUILTING STITCH No. 7 Hand-look Quilting Stitch All-Purpose Foot (A) Thread the top of a traditional hand quilting stitch. 56 No. 5 Straight Stretch Stitch...
User Manual
Page 58
... the free arm, making it easier to stitch hard-to-reach areas like trouser hems and sleeve cuffs. FREE ARM SEWING By simply removing the extension table, you can sew zigzag stitches of various widths and lengths by changing the settings of the stitch width and stitch length. Needle should fall on elastic and overcast stitching. Note: Refer to page 14 for easy to ravel and knit fabrics. SATIN STITCHING To sew a satin stitch, shorten the stitch length and attach the satin stitch foot. (B) Refer...
... the free arm, making it easier to stitch hard-to-reach areas like trouser hems and sleeve cuffs. FREE ARM SEWING By simply removing the extension table, you can sew zigzag stitches of various widths and lengths by changing the settings of the stitch width and stitch length. Needle should fall on elastic and overcast stitching. Note: Refer to page 14 for easy to ravel and knit fabrics. SATIN STITCHING To sew a satin stitch, shorten the stitch length and attach the satin stitch foot. (B) Refer...

User Manual
Page 76
... thread cutter button and raise the presser foot. 3. Remove the basting. EYELET This stitch pattern is not provided with this machine. 76 Place the fabric under the presser foot and lower the presser foot. Note: Eyelet punch is used for making belt holes and other similar applications. 98 Eyelet Satin Stitch Foot (B) You can choose 3 sizes of eyelets by changing the stitch length. 1. Wrong side of the stitching. Machine will sew the eyelet and stop automatically. 2. Make a hole in the center of fabric...
... thread cutter button and raise the presser foot. 3. Remove the basting. EYELET This stitch pattern is not provided with this machine. 76 Place the fabric under the presser foot and lower the presser foot. Note: Eyelet punch is used for making belt holes and other similar applications. 98 Eyelet Satin Stitch Foot (B) You can choose 3 sizes of eyelets by changing the stitch length. 1. Wrong side of the stitching. Machine will sew the eyelet and stop automatically. 2. Make a hole in the center of fabric...
User Manual
Page 80
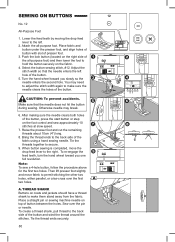
... thread ends to the back side of the button. 5. Place fabric and button under the presser foot, and align holes of button with slot of the fabric using a hand sewing needle. Lower the feed teeth by moving the drop feed lever to make them stand away from the fabric. Attach the all -purpose foot) and then lower the foot to permit stitching the other two holes, either parallel, or criss-cross over the pin or needle. Adjust the stitch...
... thread ends to the back side of the button. 5. Place fabric and button under the presser foot, and align holes of button with slot of the fabric using a hand sewing needle. Lower the feed teeth by moving the drop feed lever to make them stand away from the fabric. Attach the all -purpose foot) and then lower the foot to permit stitching the other two holes, either parallel, or criss-cross over the pin or needle. Adjust the stitch...

User Manual
Page 90
... After you sew with twin needle. Reverse stitch (reverse front and back) i-4. Machine will change settings by pressing the function button (F3) directly under setting icon. 2. Elongation By pressing the function button (F5) directly under mirror/reverse icon, and the stitch will return to the editing mode. 2. LCD will elongate five different sizes. (ii.1-ii.5) If symbol is not indicated, its pattern cannot elongate. iii Twin Needle Press this button (F2...
... After you sew with twin needle. Reverse stitch (reverse front and back) i-4. Machine will change settings by pressing the function button (F3) directly under setting icon. 2. Elongation By pressing the function button (F5) directly under mirror/reverse icon, and the stitch will return to the editing mode. 2. LCD will elongate five different sizes. (ii.1-ii.5) If symbol is not indicated, its pattern cannot elongate. iii Twin Needle Press this button (F2...

User Manual
Page 92
... can make changes by shifting the position of patterns until the machine is highlighted. Pre-set .) To delete all combined patterns. To increase the upper thread tension, press function button F5 (+). Setting the stitch width and length Machine will be indicated as a highlighted number. For shorter length, press function button F4 (-). By pressing the function F3 (AUTO) button, thread tension will indicate the tension mode. G.TO RECALL THE SELECTED PATTERNS If you change the thread tension...
... can make changes by shifting the position of patterns until the machine is highlighted. Pre-set .) To delete all combined patterns. To increase the upper thread tension, press function button F5 (+). Setting the stitch width and length Machine will be indicated as a highlighted number. For shorter length, press function button F4 (-). By pressing the function F3 (AUTO) button, thread tension will indicate the tension mode. G.TO RECALL THE SELECTED PATTERNS If you change the thread tension...
User Manual
Page 102
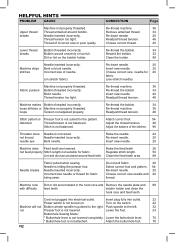
... bobbin. 34 Re-thread machine. 36 Readjust thread tension. 46 Stitch pattern is Presser foot is hitting the presser foot. Raise the feed teeth 26 not feed properly Stitch length not suitable for 20 fabric. (use stretch needle) Fabric puckers Machine not properly threaded. Clean the feed teeth area. 98 Needle breaks Fabric pulled while sewing. Re-insert needle. 20 Choose correct size needle and 20 thread. Incorrect size of needle. (on the switch. 22 Machine will not Bobbin winder spindle is not balanced. Thread tension too tight. loops Tension not adjusted...
... bobbin. 34 Re-thread machine. 36 Readjust thread tension. 46 Stitch pattern is Presser foot is hitting the presser foot. Raise the feed teeth 26 not feed properly Stitch length not suitable for 20 fabric. (use stretch needle) Fabric puckers Machine not properly threaded. Clean the feed teeth area. 98 Needle breaks Fabric pulled while sewing. Re-insert needle. 20 Choose correct size needle and 20 thread. Incorrect size of needle. (on the switch. 22 Machine will not Bobbin winder spindle is not balanced. Thread tension too tight. loops Tension not adjusted...


