Instruction Manual
Page 3
...SETTING 14 A. AFTER DARNING OR FREE-HAND EMBROIDERY 42 OPTIONAL ACCESSORIES 43 TWIN NEEDLE SEWING 49 DECORATIVE & LETTER STITCH SEWING ... 50 A. TOP COVER 11 J. SEWING THE SELECTED PATTERNS 54 I. START/STOP BUTTON 10 B. SEWING HEAVY FABRIC 20 F. ELONGATION 23 E. ...C. CONTENTS IMPORTANT SAFETY INSTRUCTIONS 2 MODEL 9970 4 FOR EUROPEAN AND SIMILAR TERRITORIES: ...... 4 MAIN PARTS 5 ACCESSORIES 6 DUST COVER 6 REMOVABLE EXTENSION TABLE 7 A. REMOVING THE EXTENSION TABLE 7 B. DRAWING UP THE BOBBIN THREAD 17 STARTING TO SEW 18 A. REVERSE STITCHING 19 C. STRAIGHT...
...SETTING 14 A. AFTER DARNING OR FREE-HAND EMBROIDERY 42 OPTIONAL ACCESSORIES 43 TWIN NEEDLE SEWING 49 DECORATIVE & LETTER STITCH SEWING ... 50 A. TOP COVER 11 J. SEWING THE SELECTED PATTERNS 54 I. START/STOP BUTTON 10 B. SEWING HEAVY FABRIC 20 F. ELONGATION 23 E. ...C. CONTENTS IMPORTANT SAFETY INSTRUCTIONS 2 MODEL 9970 4 FOR EUROPEAN AND SIMILAR TERRITORIES: ...... 4 MAIN PARTS 5 ACCESSORIES 6 DUST COVER 6 REMOVABLE EXTENSION TABLE 7 A. REMOVING THE EXTENSION TABLE 7 B. DRAWING UP THE BOBBIN THREAD 17 STARTING TO SEW 18 A. REVERSE STITCHING 19 C. STRAIGHT...
Instruction Manual
Page 6
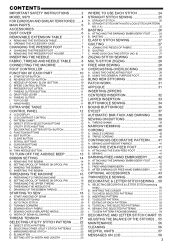
...On machine when delivered) (A) • An Extra Wide Table is not being used. Non Stick Glide Foot 14. Driver for Needle Plate 8. Button Sewing Foot 16. Brush 5. Open Toe Foot 19. Chenille Stitching Foot 13. Needle Pack 2. 4 Bobbins Class 15 (1 is in the accessory case. ...(See next page, [REMOVABLE EXTENSION 7 TABLE]) 1. Seam Ripper 8 4. Braiding Foot 4. Seam Guide and Screw 11. Darning Embroidery Foot 22. Edge Joining Foot 11. Blind Hem Foot (D) 13. Zipper Foot (E) 14. Cording Foot 20. Snap on Gathering Foot 9. Parallel...
...On machine when delivered) (A) • An Extra Wide Table is not being used. Non Stick Glide Foot 14. Driver for Needle Plate 8. Button Sewing Foot 16. Brush 5. Open Toe Foot 19. Chenille Stitching Foot 13. Needle Pack 2. 4 Bobbins Class 15 (1 is in the accessory case. ...(See next page, [REMOVABLE EXTENSION 7 TABLE]) 1. Seam Ripper 8 4. Braiding Foot 4. Seam Guide and Screw 11. Darning Embroidery Foot 22. Edge Joining Foot 11. Blind Hem Foot (D) 13. Zipper Foot (E) 14. Cording Foot 20. Snap on Gathering Foot 9. Parallel...
Instruction Manual
Page 11
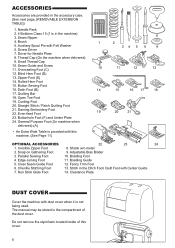
...position. J. The thread may tangle, resulting in this case, use this cutter if the thread cutter button is to be in damage. 2. For most sewing, the lever should always turn hand wheel toward you need to the right. 11 Remove the extension table (See Page 7) 2. Do not use the ...open the top cover, lift up the right side of extra wide table. 3. EXTRA WIDE TABLE If you . CAUTION 1. For darning or free motion embroidery or whenever fabric is not used. 1. F. THREAD CUTTER BUTTON Press this button when there is to the right. Their function is no fabric in the...
...position. J. The thread may tangle, resulting in this case, use this cutter if the thread cutter button is to be in damage. 2. For most sewing, the lever should always turn hand wheel toward you need to the right. 11 Remove the extension table (See Page 7) 2. Do not use the ...open the top cover, lift up the right side of extra wide table. 3. EXTRA WIDE TABLE If you . CAUTION 1. For darning or free motion embroidery or whenever fabric is not used. 1. F. THREAD CUTTER BUTTON Press this button when there is to the right. Their function is no fabric in the...
Instruction Manual
Page 26
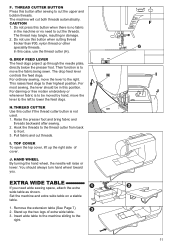
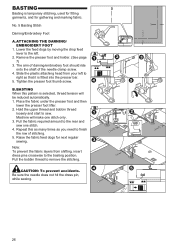
... amount to finish the row of the needle clamp screw. 4. Pull the bobbin thread to sew. CAUTION: To prevent accidents. No. 5 Basting Stitch Darning/Embroidery Foot A. Be sure the needle does not hit the dress pin, while sewing. 26 BASTING When this as many times as you need to the rear and... sew one stitch only. 3. Hold the upper thread and bobbin thread loosely and start to remove ...
... amount to finish the row of the needle clamp screw. 4. Pull the bobbin thread to sew. CAUTION: To prevent accidents. No. 5 Basting Stitch Darning/Embroidery Foot A. Be sure the needle does not hit the dress pin, while sewing. 26 BASTING When this as many times as you need to the rear and... sew one stitch only. 3. Hold the upper thread and bobbin thread loosely and start to remove ...
Instruction Manual
Page 42
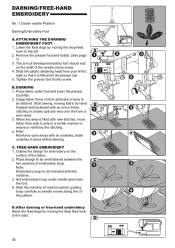
...to be stitched. baste underlay in front and back of area to be embroidered between the two sections of the needle clamp screw. 4. Note: Embroidery hoop is fitted into the presser bar. 5. Lower the feed dogs by hand forward and backward with an underlay; Tighten the presser foot thumb ... so that it is not included with new stitches, move fabric from your left . 2. B. Start sewing, moving the drop feed lever to the left to side in closely spaced rows over the hole or worn area. 3. Set embroidery hoop under foot and lower the presser foot lifter. 2. ATTACHING THE DARNING...
...to be stitched. baste underlay in front and back of area to be embroidered between the two sections of the needle clamp screw. 4. Note: Embroidery hoop is fitted into the presser bar. 5. Lower the feed dogs by hand forward and backward with an underlay; Tighten the presser foot thumb ... so that it is not included with new stitches, move fabric from your left . 2. B. Start sewing, moving the drop feed lever to the left to side in closely spaced rows over the hole or worn area. 3. Set embroidery hoop under foot and lower the presser foot lifter. 2. ATTACHING THE DARNING...


