Instruction Manual
Page 7
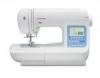
..., insert to the left side of accessory case and pull toward you . 4. Raise the presser foot lifter. 3. REMOVING THE PRESSER FOOT HOLDER When attaching presser feet that have their own shank, or when cleaning the machine, you do. CHANGING THE PRESSER FOOT The presser foot must be changed according to the...
..., insert to the left side of accessory case and pull toward you . 4. Raise the presser foot lifter. 3. REMOVING THE PRESSER FOOT HOLDER When attaching presser feet that have their own shank, or when cleaning the machine, you do. CHANGING THE PRESSER FOOT The presser foot must be changed according to the...
Instruction Manual
Page 9
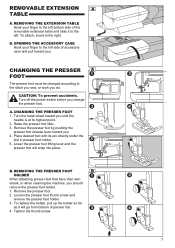
...) 9 Connect the power line cord to the machine by pulling on the floor. Turn on the power switch. 5. Use only foot controller provided with your feet. 4. CONNECTING THE MACHINE DANGER: To reduce the risk of burns, fire, electric shock, or injury to persons. 1. WARNING: To reduce the risk of electric shock...
...) 9 Connect the power line cord to the machine by pulling on the floor. Turn on the power switch. 5. Use only foot controller provided with your feet. 4. CONNECTING THE MACHINE DANGER: To reduce the risk of burns, fire, electric shock, or injury to persons. 1. WARNING: To reduce the risk of electric shock...

Instruction Manual
Page 43
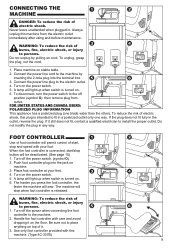
... with all-purpose sewing thread. 2. Snap on the presser foot bar. Sew slowly, keeping the fabric to be used when sewing with the following presser feet. Cut the end of the bracket. 6. Adjustable Bias Binder, Braiding Foot, Chenille Stitching Foot, Edge Joining Foot, Fancy Trim Foot, Gathering Foot, Non-Stick Foot...
... with all-purpose sewing thread. 2. Snap on the presser foot bar. Sew slowly, keeping the fabric to be used when sewing with the following presser feet. Cut the end of the bracket. 6. Adjustable Bias Binder, Braiding Foot, Chenille Stitching Foot, Edge Joining Foot, Fancy Trim Foot, Gathering Foot, Non-Stick Foot...

