Singer Professional 5 Serger 14T968DC Support Question
Singer Professional 5 Serger 14T968DC Support Question
Find answers below for this question about Singer Professional 5 Serger 14T968DC.Need a Singer Professional 5 Serger 14T968DC manual? We have 3 online manuals for this item!
Question posted by superquilter11 on June 5th, 2014
Extra Presser Feet
How do I use the extra presser feet
Current Answers
Related Singer Professional 5 Serger 14T968DC Manual Pages
Instruction Manual - Page 2
... stitch types, which you will have many hours of sewing enjoyment with your conventional sewing machine and adds new creative possiblities to your SINGER PROFESSIONAL 5 Overlock Machine. The overlock works side by side with this easy-to fully understanding your projects.
The SINGER PROFESSIONAL 5 (14T968DC) Overlock Machine is divided into individual chapters, and each chapter focuses...
Instruction Manual - Page 3
... (Cover Stitch) Narrow Chapter 12 Cover Hem (Cover Stitch) Wide Chapter 13 Triple Cover Hem Stitch Chapter 14 Three-Thread Rolled Hem Chapter 15 Additional Presser Feet
Instruction Manual - Page 13
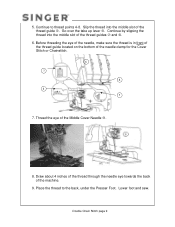
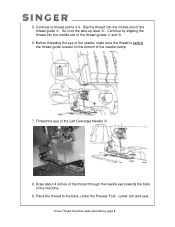
...the thread to thread points 4-8. Continue to the back, under the Presser Foot.
Slip the thread into the middle slot of the machine.
9. Before threading the eye of the needle, make sure the ...thread is in front of the thread guide located on the bottom of the Middle Cover Needle .
8. Lower foot and sew. Go...
Instruction Manual - Page 41
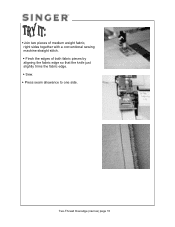
Sew. Press seam allowance to one side.
Two-Thread Overedge (narrow) page 10
Finsh the edges of medium weight fabric, right sides together with a conventional sewing machine straight stitch. Join two pieces of both fabric pieces by aligning the fabric edge so that the knife just slightly trims the fabric edge.
Instruction Manual - Page 46
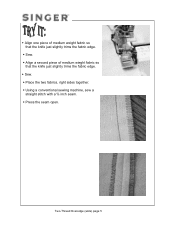
Align one piece of medium wieght fabric so that the knife just slightly trims the fabric edge. Sew. Press the seam open. Using a conventional sewing machine, sew a straight stitch with a ⅝ inch seam. Sew. Place the two fabrics, right sides together.
Align a second piece of medium weight fabric so that the knife just slightly trims the fabric...
Instruction Manual - Page 48
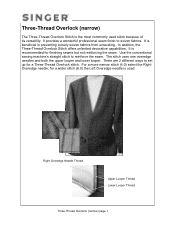
... Thread Lower Looper Thread
Three-Thread Overlock (narrow) page 1 Use the conventional sewing machine's straight stitch to set up for finishing seams but not reinforcing the seam. The stitch uses one overedge needles and both the upper looper and lower looper. It provides a wonderful professional seam finish to woven fabrics. Three-Thread Overlock (narrow)
The...
Instruction Manual - Page 61
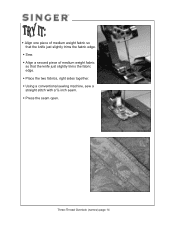
... that the knife just slightly trims the fabric edge. Place the two fabrics, right sides together.
Three-Thread Overlock (narrow) page 14 Using a conventional sewing machine, sew a straight stitch with a ⅝ inch seam. Press the seam open. Sew. Align one piece of medium weight fabric so that the knife just slightly trims the fabric edge.
Instruction Manual - Page 74
... the thread into the middle slot of the thread guides and .
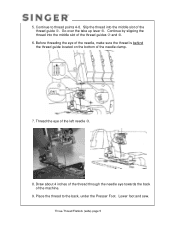
6. Lower foot and sew. Draw about 4 inches of the thread through the needle eye towards the back of the... thread guide located on the bottom of the machine.
9. Thread the eye of the thread guide . Place the thread to thread points 4-8.
Continue to the back, under the Presser Foot. Continue by slipping the thread into the...
Instruction Manual - Page 95
... the thread through the needle eye towards the back of the thread guides and .
6. Lower foot and sew. Continue to the back, under the Presser Foot. Slip the thread into the middle slot of the machine.
9.
Place the thread to thread points 4-8. Three-Thread Flatlock (wide) page 5 5. Go over the take up lever...
Instruction Manual - Page 108

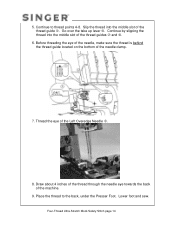
... thread through the needle eye towards the back of the needle clamp.
7.
Continue to the back, under the Presser Foot. Slip the thread into the middle slot of the thread guides and .
6. Place the thread to thread...
8. Three-Thread Ultra-Stretch Mock Safety Stitch page 11 Lower foot and sew. Before threading the eye of the needle, make sure the thread is behind the thread guide located on...
Instruction Manual 2 - Page 15
Continue to the back, under the Presser Foot. Slip the thread into the middle slot of the thread guides and .
6. Thread the eye of... towards the back of the thread guide . Place the thread to thread points 4-8. Lower foot and sew. Continue by slipping the thread into the middle slot of the machine.
9. 5. Go over the take up lever . Four-Thread Ultra-Stretch Mock Safety Stitch page 14...
Instruction Manual 2 - Page 18
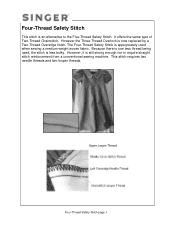
... Four-Thread Safety Stitch is appropriately used , the stitch is less bulky. However, it is still strong enough not to the Five-Thread Safety Stitch. Four-Thread Safety Stitch page 1 Four-Thread Safety Stitch
This stitch is an alternative to require straight stitch reinforcement from a conventional sewing machine. It offers the same type...
Instruction Manual 2 - Page 33
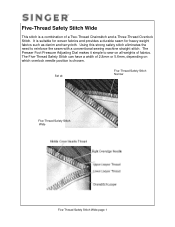
... a width of a Two-Thread Chainstitch and a Three-Thread Overlock Stitch. Using this strong safety stitch eliminates the need to sew on which overlock needle position is chosen. The Presser Foot Pressure Adjusting Dial makes it simple to reinforce the seam with a conventional sewing machine straight stitch. It is suitable for woven fabrics and provides a durable...
Instruction Manual 2 - Page 51
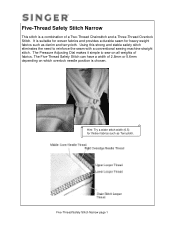
The Pressure Adjusting Dial makes it simple to reinforce the seam with a conventional sewing machine straight stitch. Five-Thread Safety Stitch Narrow page 1 Using this strong and stable safety stitch eliminates the need to sew on all weights of 2.8mm or 5.6mm depending on which overlock needle position is chosen. The Five-Thread Safety Stitch...
Instruction Manual 2 - Page 124

... fabric must always be in one easy operation. It is used for use on stretch or textured fabrics.
1
2
Machine Preparation • Differential Feed: • Needles: • Upper Knife: • Stitch Length: • Foot:
Set to "N" Use the right needle only Engaged Set to sew, keeping the fold of the fabric along guide plate (2)
Additional Presser Feet page 1
Instruction Manual 2 - Page 125

...
inside of the fabric • Line up the edge of the Cording Foot as you sew. Additional Presser Feet page 2
Machine Preparation • Differential Feed: • Needles: • Upper Knife: • Stitch Length: • Foot:
Set to "N" You may use both the right and left needle, or left only Engaged Set to "N" Attach (snap-on...
Instruction Manual 2 - Page 126
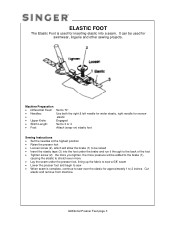
... and other sewing projects. Additional Presser Feet page 3 Cut
elastic and remove from machine. ELASTIC FOOT
The Elastic Foot is complete, continue to sew over the elastic for inserting elastic into the foot under the presser foot, lining up the fabric to sew a 5/8" seam • Lower the presser foot and begin to sew • When seam is used for approximately...
Instruction Manual 2 - Page 127

... are well posi- BEADING FOOT
The Beading Foot is used for smaller beads You may choose to work with or without the upper knife (If engaging the knife, be careful not to cut the beads as you sew) Set to 3 or 4 Attach (snap-on beads, sequins, pearls and thick cord. Additional Presser Feet page 4
Instruction Manual 2 - Page 128
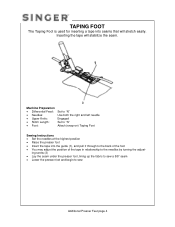
... will stabilize the seam.
3
Machine Preparation • Differential Feed: • Needles: • Upper Knife: • Stitch Length: • Foot:
Set to "N" Use both the right and left needle Engaged Set to "N" Attach (snap-on) Taping Foot
Sewing Instructions • Set the needles at the highest position • Raise the presser foot • Insert the...
Instruction Manual 2 - Page 129
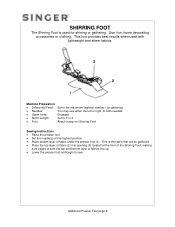
... line up • Lower the presser foot and begin to sew
Additional Presser Feet page 6 This foot provides best results when used for gathering You may use either the left or right, or both the top and bottom layer of fabric under the presser foot (1). This is used with lightweight and sheer fabrics.
Machine Preparation • Differential Feed: •...
Similar Questions

My Serger Got Jame
I have it on and keep sewing for 2h, and it start getting stuck, the motor not moving forward, but i...
I have it on and keep sewing for 2h, and it start getting stuck, the motor not moving forward, but i...
(Posted by solinda4aiya 1 year ago)

I Get E7 Error Message On My Singer Model 7258 Sewing Machine. There Is No Refe
Error message E7 is up on my Singer Stylist model 7258 sewing machine. It is not working at all. I t...
Error message E7 is up on my Singer Stylist model 7258 sewing machine. It is not working at all. I t...
(Posted by ebellamybellamy9 5 years ago)

Step By Step Thread How To Singer Professional Serger
(Posted by asialicaitr 9 years ago)

Beeping From Singer Sewing Machine Stylist Ii 5625
My sewing machine will beep and stop sewing after three inches of sewing. I have taken it to be repa...
My sewing machine will beep and stop sewing after three inches of sewing. I have taken it to be repa...
(Posted by arusheria 9 years ago)

No Power To Machine
Im was sewing a seam and the machine was bouncing quite a bit on the table..not real sturdy. It just...
Im was sewing a seam and the machine was bouncing quite a bit on the table..not real sturdy. It just...
(Posted by lbouska 10 years ago)