Singer 8500Q MODERN QUILTER Support Question
Singer 8500Q MODERN QUILTER Support Question
Find answers below for this question about Singer 8500Q MODERN QUILTER.Need a Singer 8500Q MODERN QUILTER manual? We have 1 online manual for this item!
Question posted by sherricreativeimage on March 15th, 2015
When I Am Quilting It Get Stuck Underneath Not Sure If It S The Bobbin Or Feet?
I've changed the bobbin several times and made sure my feet are down? The thread gets caught underneath?
Current Answers
Related Singer 8500Q MODERN QUILTER Manual Pages
Instruction Manual - Page 2
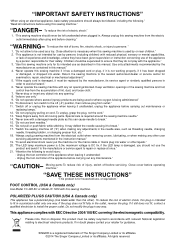
³,03257$176$)(7
Instruction Manual - Page 5
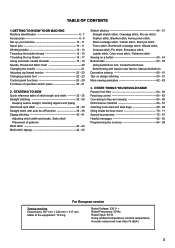
... CONTENTS
1.GETTING TO KNOW YOUR MACHINE 0DFKLQHLGHQWL¿FDWLRQ 6 - 7 Accessories 8 - 9 Set up your machine 10 - 11 Spool pins 10 - 11 Winding bobbin 12 - 13 Threading the bobbin thread 14 - 15 Threading the top thread 16 - 17 Using automatic needle threader 18 - 19 Needle, thread and fabric chart 20 Changing the needle 21 Adjusting top thread tension 22 - 23 Changing presser foot...
Instruction Manual - Page 10
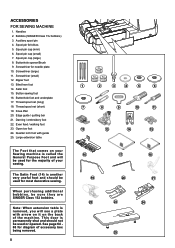
... should not be used for diagram of your sewing. Edge guide / quilting bar 21. The Satin Foot (14) is called the General Purpose Foot and will see a plate with guide 25. Needles 2. Knee lifter 20. When purchasing additional bobbins, be used or opened. ACCESSORIES FOR SEWING MACHINE
1. Auxiliary spool pin 4. Spool pin felt discs 5. Buttonhole...
Instruction Manual - Page 12

NOTE: In sewing mode, the machine can be disconnected from the power supply.
When servicing the machine, or when changing needles or lights, etc., the machine must be operated either
with a spool cap WRHQVXUHVPRRWKÀRZRIWKUHDG
VERTICAL SPOOL PIN for normal thread spool
Place thread spool on the spool pin. Set power/light switch...
Instruction Manual - Page 14
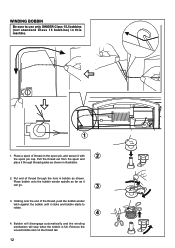
... BOBBIN
Be sure to rotate.
4
4. Remove the wound bobbin and cut the thread tail.
12 Place bobbin onto the bobbin winder spindle as far as shown in illustration.
2. Place a spool of the thread, push the bobbin winder latch against the bobbin until it with
2
the spool pin cap.
Bobbin will disengage automatically and the winding mechanism will stop when the bobbin...
Instruction Manual - Page 16
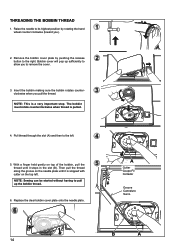
... slot (A) and then to remove the cover.
3. NOTE: Sewing can be started without having to its highest position by pushing the release EXWWRQ WR WKH ULJKW %REELQ FRYHU ZLOO SRS XS VXI¿FLHQWO\ WR allow you pull the thread. THREADING THE BOBBIN THREAD
1. Remove the bobbin cover plate by rotating the hand wheel counter clockwise...
Instruction Manual - Page 22
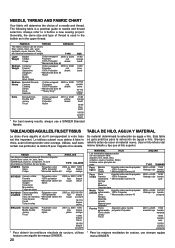
.... Están listados como ejémplos de peso. The following table is used in the bobbin as examples of weight. Generally, the same size and type of thread is a practical guide to it before a new sewing project.
Usar el hilo inferior del mismo tamaño y tipo que el hilo superior. They are...
Instruction Manual - Page 24
... tension
Aumentar tensión
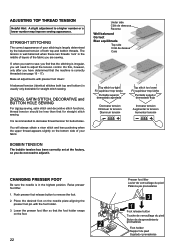
BOBBIN TENSION
The bobbin tension has been correctly set at the factory, so you do not need to decrease thread tension for buttonholes. Make all adjustments with the foot holder. 3.
CHANGING PRESSER FOOT
Be sure the needle is in the middle of layers of the fabric you are sewing.
,IZKHQ\RXVWDUW...
Instruction Manual - Page 30
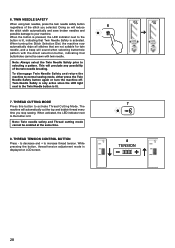
... and save broken needles and possible damage to activate Thread Cutting Mode. This will automatically cut the top and bobbin thread every time you selected. When activated, the LED indicator next to normal sewing mode, either press the Twin Needle Safety button again or turn the machine off.
To disengage Twin Needle Safety and return the...
Instruction Manual - Page 32
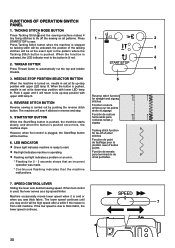
.... When foot control is pushed once more, the machine stops. TACKING STITCH MODE BUTTON
Press Tacking Stitch and the sewing machine makes 4
WLQ\ ¿[LQJ VWLWFKHV WR WLH RII WKH VHZLQJ RQ DOO SDWWHUQV 3UHVV
1
2
START/STOP to automatically cut the top and bobbin
5
threads.
3. The machine will return to the button is carried out by...
Instruction Manual - Page 38
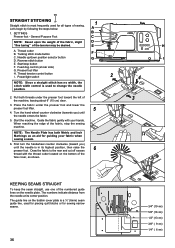
... a ¼" (6mm) seam guide line, used for piecing quilt blocks or for sewing narrow seams.
36
3/4" (19 mm) 5/8" (16 mm) 1/2" (13 mm) 3/8" ( 9 mm) 1/4" ( 6 mm) Draw the fabric to change the needle position. Thread cutter B. Reverse stitch button E. Start/stop the sewing machine. Guide the fabric gently with the thread cutter located on the bottom of the fabric...
Instruction Manual - Page 40
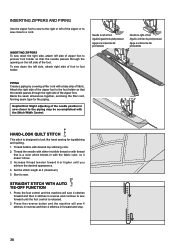
.... Thread bobbin with the fabric color, so it doesn't show.
3. Set the stitich length at 4 (maximum).
5.
Thread the needle with either invisible thread or with thread that is a color which blends in with desired top stitching color.
2. Helpful Hint: Slight adjusting of the needle position to sew closer to sew. Press the foot control and the machine will sew...
Instruction Manual - Page 56
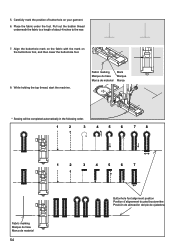
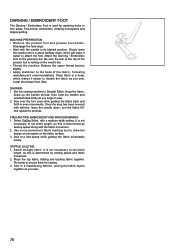
... of buttonhole on the buttonhole foot, and then lower the buttonhole foot.
8. While holding the top thread, start the machine. Fabric marking Marque du tissu Marca de material
Mark Marque Marca
* Sewing will be completed automatically in the following order.
1
2
3
4
5
6
7
8
1
2... fabric under the foot. Pull out the bobbin thread
underneath the fabric to the rear.
7. 5.
Instruction Manual - Page 62

DECORATIVE SEWING
Presser foot: Satin Foot
Different types of how to use other stitches in the same way.
‡ The following are examples of decorative stitches are available. You can use and sew these stitches.
Instruction Manual - Page 68
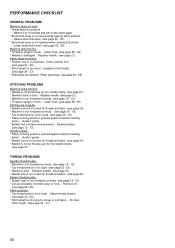
... foot is not raised when sewing stitch patterns.
- Raise feed dogs. (see page 12 - 13). STITCHING PROBLEMS Machine skips stitches. * Needle is not all the way up into the needle clamp.
(see page 22 - 23). * Stitch length is caught in bobbin case or hook. - Rewind bobbin.
(see page 64 - 65). Adjust thread tension.
(see page 21...
Instruction Manual - Page 70
...sewing machine and footcontroller clean. Use dry rags to avoid electrical shock.
68
(3) (4)
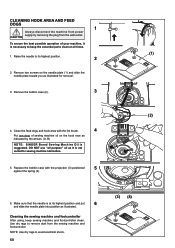
Cleaning the sewing machine and footcontroller
After using, keep the essential parts clean at its highest position.
2
2. Remove the bobbin...toward you as indicated by removing the plug from the sewing machine and footcontroller.
Make sure that the needle is VXJJHVWHG '2 127 XVH ...
Instruction Manual - Page 72
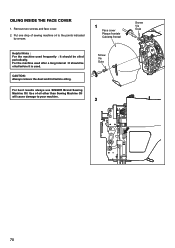
... lint before it is used. Screw Vis Guia
2
Screw Vis Guia
70 For the machine used frequently : It should be oiled periodically.
For best results always use SINGER Brand Sewing Machine Oil. Put one drop of oil other than Sewing Machine Oil will cause damage to the points indicated
by arrows.
1
Face cover Plaque frontale...
Instruction Manual - Page 78
... the fabric 90° and repeat the process.
Sew in a meandering fashion, joining the fabric layers together as you sew.
76
Place fabric in even movements. Set the sewing machine to secure them for repairing holes or torn areas, free-motion embroidery, creating monograms and stipple quilting. Once the area has been covered with stitches...
Instruction Manual - Page 80
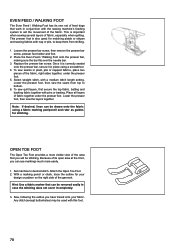
... OD\HUV ¿UVW VHFXUH WKH WRS IDEULF EDWWLQJ DQG backing fabric together with the sewing machine's feeding system to desired stitch. Place all layers of the garment. Attach the Open Toe Foot. 2. With... presser bar, secure it completely.
3. To sew seams in plaid, pile or napped fabrics, place two pieces of fabric, especially when quilting. Because of its own set of feed dogs...
Instruction Manual - Page 82
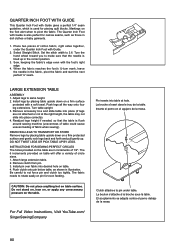
...D ¿UP VXUIDFH
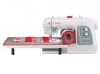
protected with Guide is used for piecing quilt blocks. Remove accessory box and slide table into table at the right height, ... if needed, so that the needle is flush around sewing machine (unevenness of table could cause uneven feeding of 1/2". The 6 ... clutch too tightly. Set the stitch width to make sure that the table is lined up . Push clutch onto...
Similar Questions

I Get E7 Error Message On My Singer Model 7258 Sewing Machine. There Is No Refe
Error message E7 is up on my Singer Stylist model 7258 sewing machine. It is not working at all. I t...
Error message E7 is up on my Singer Stylist model 7258 sewing machine. It is not working at all. I t...
(Posted by ebellamybellamy9 5 years ago)

Error 5.
turning machine off is not getting rid of it. straight stitching is fine, but as soon as I tree to f...
turning machine off is not getting rid of it. straight stitching is fine, but as soon as I tree to f...
(Posted by kazzykrafts 7 years ago)

Having A Power Problem With My Modern Quilter 8500q
I have a Singer Modern Quilter 8500Q sewing machine , it is about 10 months old and tonight it just ...
I have a Singer Modern Quilter 8500Q sewing machine , it is about 10 months old and tonight it just ...
(Posted by Rosbel1227 7 years ago)

8500q Singer Jammed And Bent Needle Stuck
Hi, my 8500Q machine jammed. The error message said C with a picture of the bobbin. I cleaned the ho...
Hi, my 8500Q machine jammed. The error message said C with a picture of the bobbin. I cleaned the ho...
(Posted by cherylwhitepmp 8 years ago)

Beeping From Singer Sewing Machine Stylist Ii 5625
My sewing machine will beep and stop sewing after three inches of sewing. I have taken it to be repa...
My sewing machine will beep and stop sewing after three inches of sewing. I have taken it to be repa...
(Posted by arusheria 9 years ago)