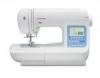
Instruction Manual
Page 3
...29 B. INSERTING PATTERN 51 E. TO DELETE PATTERN 51 F. TO RECALL THE SELECTED PATTERNS 53 H. CONTENTS IMPORTANT SAFETY INSTRUCTIONS 2 MODEL 9970 4 FOR EUROPEAN AND SIMILAR TERRITORIES: ...... 4 MAIN PARTS 5 ACCESSORIES 6 DUST COVER 6 REMOVABLE EXTENSION TABLE 7 A. CHANGING THE ...13 J. MIRROR/REVERSE STITCH 22 D. TRIPLE CORDING 40 CONTINUOUS DECORATIVE PATTERN ........ 41 A. SEWING 41 DARNING/FREE-HAND EMBROIDERY .......... 42 A. FREE-HAND EMBROIDERY 42 D. TO CHECK SELECTED PATTERNS 51 D. OPENING THE ACCESSORY CASE 7 CHANGING THE PRESSER FOOT 7 A. SPEED ...
...29 B. INSERTING PATTERN 51 E. TO DELETE PATTERN 51 F. TO RECALL THE SELECTED PATTERNS 53 H. CONTENTS IMPORTANT SAFETY INSTRUCTIONS 2 MODEL 9970 4 FOR EUROPEAN AND SIMILAR TERRITORIES: ...... 4 MAIN PARTS 5 ACCESSORIES 6 DUST COVER 6 REMOVABLE EXTENSION TABLE 7 A. CHANGING THE ...13 J. MIRROR/REVERSE STITCH 22 D. TRIPLE CORDING 40 CONTINUOUS DECORATIVE PATTERN ........ 41 A. SEWING 41 DARNING/FREE-HAND EMBROIDERY .......... 42 A. FREE-HAND EMBROIDERY 42 D. TO CHECK SELECTED PATTERNS 51 D. OPENING THE ACCESSORY CASE 7 CHANGING THE PRESSER FOOT 7 A. SPEED ...
Instruction Manual
Page 6
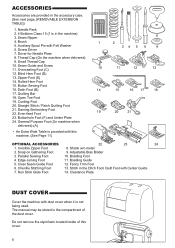
... provided in the machine) 3. Seam Ripper 8 4. Screw Driver 1 2 34 5 6 9 7. Seam Guide and Screw 11. Overcasting Foot (C) 10 11 12 13 12. Quilting Bar 18. Darning Embroidery Foot 22. Shank w/o metal 2. Snap on Gathering Foot 9. Clear Seam Guide Foot 12. Stitch in the compartment of this machine. (See Page 11) OPTIONAL ACCESSORIES...
... provided in the machine) 3. Seam Ripper 8 4. Screw Driver 1 2 34 5 6 9 7. Seam Guide and Screw 11. Overcasting Foot (C) 10 11 12 13 12. Quilting Bar 18. Darning Embroidery Foot 22. Shank w/o metal 2. Snap on Gathering Foot 9. Clear Seam Guide Foot 12. Stitch in the compartment of this machine. (See Page 11) OPTIONAL ACCESSORIES...
Instruction Manual
Page 11
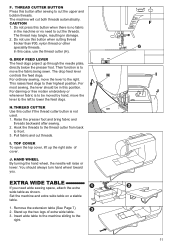
... FEED LEVER The feed dogs project up the two legs of cover. This raises feed dogs to the right. 11 For darning or free motion embroidery or whenever fabric is to move the fabric being sewn. HAND WHEEL By turning the hand wheel, the needle will cut threads. Remove the extension...
... FEED LEVER The feed dogs project up the two legs of cover. This raises feed dogs to the right. 11 For darning or free motion embroidery or whenever fabric is to move the fabric being sewn. HAND WHEEL By turning the hand wheel, the needle will cut threads. Remove the extension...
Instruction Manual
Page 26
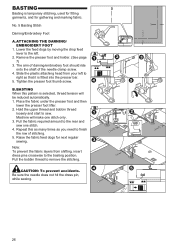
...pattern is fitted into the presser bar. 5. Pull the bobbin thread to the rear and sew one stitch only. 3. No. 5 Basting Stitch Darning/Embroidery Foot A. The arm of darning/embroidery foot should ride onto the shaft of stitching. 5. Note: To prevent the fabric layers from your left . 2. ATTACHING THE DARNING.../ EMBROIDERY FOOT 1. Lower the feed dogs by moving the drop feed lever to the basting position. Slide the plastic attaching head from shifting, ...
...pattern is fitted into the presser bar. 5. Pull the bobbin thread to the rear and sew one stitch only. 3. No. 5 Basting Stitch Darning/Embroidery Foot A. The arm of darning/embroidery foot should ride onto the shaft of stitching. 5. Note: To prevent the fabric layers from your left . 2. ATTACHING THE DARNING.../ EMBROIDERY FOOT 1. Lower the feed dogs by moving the drop feed lever to the basting position. Slide the plastic attaching head from shifting, ...
Instruction Manual
Page 42
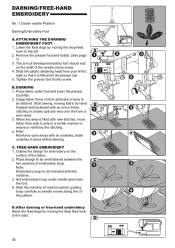
...DARNING 1. Start sewing, moving fabric by moving the drop feed lever to be embroidered between the two sections of embroidery hoop. Outline the design for embroidery on the shaft of the pattern. Slide the plastic attaching head from side to side in closely spaced rows over ...or worn area. 3. Place fabric under needle and lower the foot. 4. a. C. ATTACHING THE DARNING/ EMBROIDERY FOOT 1. FREE-HAND EMBROIDERY 1. Grasp fabric firmly in place before darning. Set embroidery hoop under foot and lower the presser foot lifter. 2. Place design to right so that it is fitted...
...DARNING 1. Start sewing, moving fabric by moving the drop feed lever to be embroidered between the two sections of embroidery hoop. Outline the design for embroidery on the shaft of the pattern. Slide the plastic attaching head from side to side in closely spaced rows over ...or worn area. 3. Place fabric under needle and lower the foot. 4. a. C. ATTACHING THE DARNING/ EMBROIDERY FOOT 1. FREE-HAND EMBROIDERY 1. Grasp fabric firmly in place before darning. Set embroidery hoop under foot and lower the presser foot lifter. 2. Place design to right so that it is fitted...


