
Instruction Manual
Page 8
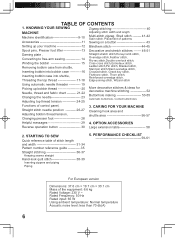
..., Placement of patterns Accessories 11 Sewing on a button 43 Setting up your machine 12 Blindhem stitch 44-45 Spool pins, Presser foot lifter 13 Darning plate , Converting to free-arm sewing 14 Winding the bobbin 15 Removing bobbin case from shuttle, Inserting bobbin into...22 Changing the needle 23 Adjusting top thread tension 24-25 More decorative stitches & ideas for decorative machine stitching 52 Buttonhole making 53-55 Automatic buttonhole, Corded buttonholes Functions of control panel, Straight stitch needle position 26-27 Adjusting bobbin thread tension, Changing presser...
..., Placement of patterns Accessories 11 Sewing on a button 43 Setting up your machine 12 Blindhem stitch 44-45 Spool pins, Presser foot lifter 13 Darning plate , Converting to free-arm sewing 14 Winding the bobbin 15 Removing bobbin case from shuttle, Inserting bobbin into...22 Changing the needle 23 Adjusting top thread tension 24-25 More decorative stitches & ideas for decorative machine stitching 52 Buttonhole making 53-55 Automatic buttonhole, Corded buttonholes Functions of control panel, Straight stitch needle position 26-27 Adjusting bobbin thread tension, Changing presser...

Instruction Manual
Page 11
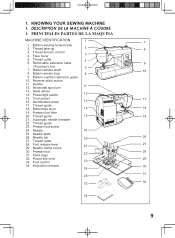
...extension table 4 / Accessory box 5 7. Buttonhole lever 14 19. Thread guide 15 21. Automatic needle threader 22. Needle clamp screw 21 30. Hand wheel 14. Power/light switch 12 15. Thread guide 18. Foot release lever 29. Presser foot 31. DESCRIPTION DE LA MACHINE À ...DE LA MAQUINA MACHINE IDENTIFICATION 1 1. Bobbin winder stop 6 9. Reverse stitch button 11. Presser foot lifter 20. Handle 12. Thread guide 23. Needle plate 26. Foot control 23 34. Pattern number reference guide 10. Cord socket 16. Needle bar 20 27. ...
...extension table 4 / Accessory box 5 7. Buttonhole lever 14 19. Thread guide 15 21. Automatic needle threader 22. Needle clamp screw 21 30. Hand wheel 14. Power/light switch 12 15. Thread guide 18. Foot release lever 29. Presser foot 31. DESCRIPTION DE LA MACHINE À ...DE LA MAQUINA MACHINE IDENTIFICATION 1 1. Bobbin winder stop 6 9. Reverse stitch button 11. Presser foot lifter 20. Handle 12. Thread guide 23. Needle plate 26. Foot control 23 34. Pattern number reference guide 10. Cord socket 16. Needle bar 20 27. ...

Instruction Manual
Page 61
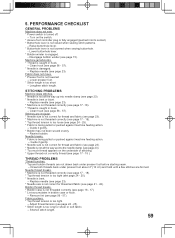
...* Needle is not raised when sewing stitch patterns. - Lower presser foot. * Stitch length is not lowered when sewing buttonhole. - Raise buttonhole lever. * Buttonhole lever is too short - Shorten stitch length. 59 Fabric does not move. * Presser foot is engaged. - Remove lint (see page 15). Disengage bobbin winder ...(see page 56 - 57). Lower buttonhole lever. * Bobbin winder is not lowered - Clean hook (see page 23). * ...
...* Needle is not raised when sewing stitch patterns. - Lower presser foot. * Stitch length is not lowered when sewing buttonhole. - Raise buttonhole lever. * Buttonhole lever is too short - Shorten stitch length. 59 Fabric does not move. * Presser foot is engaged. - Remove lint (see page 15). Disengage bobbin winder ...(see page 56 - 57). Lower buttonhole lever. * Bobbin winder is not lowered - Clean hook (see page 23). * ...
Instruction Manual 3
Page 8
... cm × 30.1 cm Mass of control panel, Straight stitch needle position 26-27 Adjusting bobbin thread tension, Changing presser foot 28 3. KNOWING YOUR SEWING Zigzag stitching 40 MACHINE Adjusting stitch width and length Machine identification 9-10 Multi-stitch zigzag, Shell stitch...22 Changing the needle 23 Adjusting top thread tension 24-25 More decorative stitches & ideas for decorative machine stitching 52 Buttonhole making 53-55 Automatic buttonhole, Corded buttonholes Functions of the equipment: 6.6 kg Rated Voltage: 230 V ~ Rated Frequency: 50 Hz Rated input: 65 W ...
... cm × 30.1 cm Mass of control panel, Straight stitch needle position 26-27 Adjusting bobbin thread tension, Changing presser foot 28 3. KNOWING YOUR SEWING Zigzag stitching 40 MACHINE Adjusting stitch width and length Machine identification 9-10 Multi-stitch zigzag, Shell stitch...22 Changing the needle 23 Adjusting top thread tension 24-25 More decorative stitches & ideas for decorative machine stitching 52 Buttonhole making 53-55 Automatic buttonhole, Corded buttonholes Functions of the equipment: 6.6 kg Rated Voltage: 230 V ~ Rated Frequency: 50 Hz Rated input: 65 W ...
Instruction Manual 3
Page 11
... Needle clamp screw 21 30. KNOWING YOUR SEWING MACHINE 1. Bobbin winding tension disk 2. Bobbin winder stop 6 9. Needle 16 25. Foot control 23 34. DESCRIPTION DE LA MACHINE À COUDRE 1. PRINCIPALES PARTES DE LA MAQUINA MACHINE IDENTIFICATION 1 1. Thread take-up 2 .... Bobbin winder shaft 8. Reverse stitch button 11. Thread tension control 4. Thread cutter 6. Buttonhole lever 14 19. Thread guide 15 21. Automatic needle threader 22. Presser foot screw 24. Foot release lever 29. Power line cord 33. Instruction manual 24 25 32 34 7 8 ...
... Needle clamp screw 21 30. KNOWING YOUR SEWING MACHINE 1. Bobbin winding tension disk 2. Bobbin winder stop 6 9. Needle 16 25. Foot control 23 34. DESCRIPTION DE LA MACHINE À COUDRE 1. PRINCIPALES PARTES DE LA MAQUINA MACHINE IDENTIFICATION 1 1. Thread take-up 2 .... Bobbin winder shaft 8. Reverse stitch button 11. Thread tension control 4. Thread cutter 6. Buttonhole lever 14 19. Thread guide 15 21. Automatic needle threader 22. Presser foot screw 24. Foot release lever 29. Power line cord 33. Instruction manual 24 25 32 34 7 8 ...
Instruction Manual 3
Page 61
... is not lowered - Fabric does not move. * Presser foot is not lowered when sewing buttonhole. - Fabric puckers. * Top thread tension is engaged. - Clean hook (...* Stitch length is too long for thread and fabric (see page 23). * Needle is damaged. - Lower buttonhole lever. * Bobbin winder is too tight. - Disengage bobbin winder (see page 56 - 57). * Needle is not ...all the way up into its socket). * Buttonhole lever is not correct for sheer or soft fabric. - Replace needle (see page 24 - 25). * Needle is...
... is not lowered - Fabric does not move. * Presser foot is not lowered when sewing buttonhole. - Fabric puckers. * Top thread tension is engaged. - Clean hook (...* Stitch length is too long for thread and fabric (see page 23). * Needle is damaged. - Lower buttonhole lever. * Bobbin winder is too tight. - Disengage bobbin winder (see page 56 - 57). * Needle is not ...all the way up into its socket). * Buttonhole lever is not correct for sheer or soft fabric. - Replace needle (see page 24 - 25). * Needle is...

Instruction Manual 2
Page 2
... Foot 8 Changing the Needle 9 Bobbin Winding 10 Inserting the Bobbin Case 12 Upper Threading 14 Drawing up the lower Thread 15 Twin Neelde Threading 16 Setting Patterns 17 (1) Straight Stitch, Zigzag Stitch and Zigzag Pattern Stitches 17 (2) Super Stretch Stitches 18 (3) Buttonholes ...CHART 21 Operation Guide 21 Straight Sewing 22 Zigzag Sewing 25 Elastic Sewing 27 Zipper Sewing 28 Overcasting 29 Overlocking 30 Buttonhole Sewing 31 Sewing on Buttons 34 Blindhem Stitching 35 Mending 37 Attaching Elastic 41 Shell Stitching 42 Roll Hemming 43 ...
... Foot 8 Changing the Needle 9 Bobbin Winding 10 Inserting the Bobbin Case 12 Upper Threading 14 Drawing up the lower Thread 15 Twin Neelde Threading 16 Setting Patterns 17 (1) Straight Stitch, Zigzag Stitch and Zigzag Pattern Stitches 17 (2) Super Stretch Stitches 18 (3) Buttonholes ...CHART 21 Operation Guide 21 Straight Sewing 22 Zigzag Sewing 25 Elastic Sewing 27 Zipper Sewing 28 Overcasting 29 Overlocking 30 Buttonhole Sewing 31 Sewing on Buttons 34 Blindhem Stitching 35 Mending 37 Attaching Elastic 41 Shell Stitching 42 Roll Hemming 43 ...

Instruction Manual 2
Page 5
Straight stitch foot Special foot Zigzag foot Efl Overcasting foot 'T Zipper foot LU LL Roll hemming foot Darning foot A Quilting guide Cording foot Button sewing foot @0 Blind hem stitch guide Cloth guide Buttonhole foot Buttonhole cutter 3
Straight stitch foot Special foot Zigzag foot Efl Overcasting foot 'T Zipper foot LU LL Roll hemming foot Darning foot A Quilting guide Cording foot Button sewing foot @0 Blind hem stitch guide Cloth guide Buttonhole foot Buttonhole cutter 3

Instruction Manual 2
Page 33
Adjustment of stitch width, Adjustment of a butto° diameter Mark guidelines on the foot. 31 see p. 19. Match the starting Iin (1> Place the upper thread under the foot passing through the cut square of the button plus its thickness tells you the right length for children's clothes, shirts, blouses, etc. Mac1iine seting, t*1 ... as the garment. How tosew It is sewn from the front to sew a testing sample first with the arrow mark on the fabric where the buttonhole to be sewn. starting line on the fabric with the same fabric as it will go. The diameter of the...
Adjustment of stitch width, Adjustment of a butto° diameter Mark guidelines on the foot. 31 see p. 19. Match the starting Iin (1> Place the upper thread under the foot passing through the cut square of the button plus its thickness tells you the right length for children's clothes, shirts, blouses, etc. Mac1iine seting, t*1 ... as the garment. How tosew It is sewn from the front to sew a testing sample first with the arrow mark on the fabric where the buttonhole to be sewn. starting line on the fabric with the same fabric as it will go. The diameter of the...

Instruction Manual 2
Page 34
Step-3 left side I Step-4 I ht side column line (1) Set pattern sewing. foot meets *tsmhWheeohmweenosndrsizomleintahektsahintefgoitrpisasolalinmntothete-wnsibehzcueeetrtseosbnaurhttyhtooeltneosha.morrlaoerwsk, (1) Set pattern sewing. foot stop sewing. Cut the buttonhole in pushing the cutter forward. selector di& L and start bssAeoafwcutkeninrdtgos, etttwhhheieenmgfrrioagthnchhtet.insbieadreatuuctcookmluawmtiintchaflrlthyoemstcaltirhctesk (2) When the arrow mark of the the end line, stop Step-5 Step-6 knot (1) ...
Step-3 left side I Step-4 I ht side column line (1) Set pattern sewing. foot meets *tsmhWheeohmweenosndrsizomleintahektsahintefgoitrpisasolalinmntothete-wnsibehzcueeetrtseosbnaurhttyhtooeltneosha.morrlaoerwsk, (1) Set pattern sewing. foot stop sewing. Cut the buttonhole in pushing the cutter forward. selector di& L and start bssAeoafwcutkeninrdtgos, etttwhhheieenmgfrrioagthnchhtet.insbieadreatuuctcookmluawmtiintchaflrlthyoemstcaltirhctesk (2) When the arrow mark of the the end line, stop Step-5 Step-6 knot (1) ...


