Singer 5500 Fashion Mate Support Question
Singer 5500 Fashion Mate Support Question
Find answers below for this question about Singer 5500 Fashion Mate.Need a Singer 5500 Fashion Mate manual? We have 3 online manuals for this item!
Question posted by distant7 on February 5th, 2014
I Have A Singer Fashion Mate 5500, Need Help With Buttonhole Making.
The person who posted this question about this Singer product did not include a detailed explanation. Please use the "Request More Information" button to the right if more details would help you to answer this question.
Current Answers
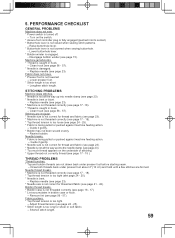
Related Singer 5500 Fashion Mate Manual Pages
Instruction Manual - Page 3

... shock, this sewing machine.
SINGER, is for guidance. or its Affiliates. ©2011 The Singer Company Limited S.à r.l. "To avoid electrical shock never put the machine nor the mains... 19. "Switch the sewing machine off before servicing. "Always unplug sewing machine from the electrical outlet when removing covers, lubricating, or when making any other user servicing adjustments...
Instruction Manual - Page 8

...zippers and piping Piping
5. CARING FOR YOUR MACHINE Cleaning hook area and shuttle area 56-57
Helpful messages 29 4. STARTING TO SEW
Quick reference table of the equipment: 6.6 kg...24-25
More decorative stitches & ideas for decorative machine stitching 52 Buttonhole making 53-55
Automatic buttonhole, Corded buttonholes
Functions of control panel, Straight stitch needle position 26-27...
Instruction Manual - Page 11

... stitch button
11. Horizontal spool pin
11
13. Identification plate
13
17. Buttonhole lever
14
19. Thread guide
15
21. Automatic needle threader
22. Thread ...22
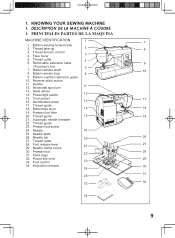
32. PRINCIPALES PARTES DE LA MAQUINA
MACHINE IDENTIFICATION
1
1. Presser foot screw
24. Needle bar
20
27. 1. KNOWING YOUR SEWING MACHINE 1. DESCRIPTION DE LA MACHINE À COUDRE
1. Bobbin winding tension ...
Instruction Manual - Page 23

...bague pourpre
* Pour obtenir les meilleurs résultats de couture, utilisez toujours une aiguille de marque SINGER.
21
LÉGERS Batiste, Gaze, Crêpe
Polyester-coton 100% Polyester Tout usage
MOYENS
...2045 yellow shank
11/80 orange band
14/90 blue band
16/100 purple band
* For best sewing results, always use the same size and type of any fiber: cotton, linen, silk, wool,...
Instruction Manual - Page 61

... cm) and hold until a few stitches are formed. Replace needle (see page 56 - 57). Lower presser foot. * Stitch length is not lowered when sewing buttonhole.
- 5. Remove lint (see page 23). Lower buttonhole lever. * Bobbin winder is being pulled or pushed against machine feeding action.
- Draw both threads back under presser foot before starting seam.
-
Instruction Manual 3 - Page 3
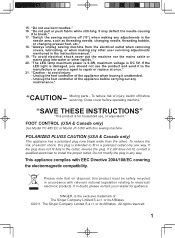
... in a polarized outlet only one blade wider than the other). "Switch the sewing machine off before operating machine." to fit in the instruction manual." 19. Unplug the foot controller of injury, switch off ("0") when making any way.
To reduce the risk of The Singer Company Limited S.à r.l. If the plug does not fit fully in...
Instruction Manual 3 - Page 8
... MACHINE Cleaning hook area and shuttle area 56-57
Helpful...look quilt stitch 38-39 Inserting zippers and piping Piping
5. STARTING TO SEW
Quick reference table of the equipment: 6.6 kg Rated Voltage: 230 ...
More decorative stitches & ideas for decorative machine stitching 52 Buttonhole making 53-55
Automatic buttonhole, Corded buttonholes
Functions of control panel, Straight stitch needle position...
Instruction Manual 3 - Page 11
PRINCIPALES PARTES DE LA MAQUINA
MACHINE IDENTIFICATION
1
1. Bobbin winder shaft
8. Cord socket 16. Buttonhole lever
14
19. Thread guide
15
...13. Power/light switch
12
15. Identification plate
13
17. Automatic needle threader
22. DESCRIPTION DE LA MACHINE À COUDRE
1. Hand wheel 14. Thread guide
23. Pattern number reference guide
10. Foot release ...
Instruction Manual 3 - Page 23

...Tricot double, Jersey, Tricot. The following table is a practical guide to it before a new sewing project.
TISSUS
FIL
Les tissus ci-dessous peuvent être de n'importe quelle fibre: coton, ... les meilleurs résultats de couture, utilisez toujours une aiguille de marque SINGER.
21
TYPE
SIZE
Lightweight
Batiste Chiffon Crepe
Corduroy/Flannel
Medium weight
Gabardine/Gingham...
Instruction Manual 3 - Page 61
Raise buttonhole lever. * Buttonhole lever is engaged.
- Lower buttonhole lever. * Bobbin winder is not lowered when sewing buttonhole.
- Lower presser foot. * Stitch length is being pulled or pushed against machine feeding action.
- Clean hook (see page 16 - 17). * Lint accumulates in bobbin case or hook.
- Guide it gently. * Bobbin has not been wound evenly.
- Bobbin ...
Instruction Manual 2 - Page 2

...
29
Overlocking
30
Buttonhole Sewing
31
Sewing on Buttons
34
Blindhem Stitching
35
Mending
37
Attaching Elastic
41
Shell Stitching
42
Roll Hemming
43
Lapped Seam Sewing
45
Edge to Edge Stitching
47
Quilting
49
Pin Tucking
50
Smocking
51
Cording
52
Embroidering and Monogramming. 53
Applique Work
55
5. BEFORE SEWING
5
Unpacking the Machine
5
Converting the...
Instruction Manual 2 - Page 4
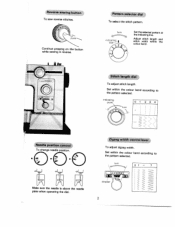
....
turn
Needle position control
needle
Make sure the needle is above the needle plate when operating the dial. at
Adjust stitch stitch width
length within the colour band according to the pattern selected.
indicating point
01234
turn
Set the selected pattern the indicating line. Reverse sewing button
To sew reverse stitches. Continue pressing...
Instruction Manual 2 - Page 5

Straight stitch foot
Special foot
Zigzag foot
Efl Overcasting foot
'T
Zipper foot
LU LL
Roll hemming foot
Darning foot
A
Quilting guide
Cording foot
Button sewing foot
@0
Blind hem stitch guide Cloth guide
Buttonhole foot
Buttonhole cutter 3
Instruction Manual 2 - Page 7
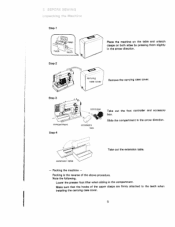
Take out the extension table. Note the following.
Make sure that the hooks of the above procedure.
Packing is the reverse of the... Jr
Remove the carrying case cover. Slide the compartment in the compartment.
I
5
Packing the machine -
compartment Step-4
controer
accessory box
Take out the foot controller and accessory box. Step-i
hook
tooth
Step-2
Place the...
Instruction Manual 2 - Page 9
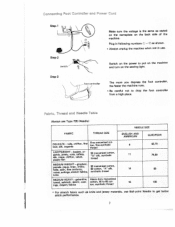
...performance.
7 Plug in following numbers (1- '2) as shown.
* Always unplug the machine when not in use
Switch on the power to drop the foot controller from ...foot controller, the faster the machine runs.
* Be careful not to put on the machine and turn on the back side of the machine.
tulle, chiffon, fine lace... switch
Step-3
Make sure the voltage is the same as stated on the nameplate on the...
Instruction Manual 2 - Page 21

... the orange colour.
I '1
1•IF
Step
Pattern
Actual Stitch
1
automatic
IL
2
automatic
II
Decide the of fabric.
indicating
Iii point
Set within the orange colour.
(3) Buttonholes
For actual sewing, see p.31.
The lower the number the closer the stitch. The bigger the number, the wider the stitch.
I
19
Instruction Manual 2 - Page 23

...
'......' Not explained but can also be used.
:
I c)
1
Overlocking
22
25
27
28
C)
29
CD C) 30
Buttonhole Sewing
31
Button Sewing
34
Blind hem
35
Stitching
() Mending
0
37
Attaching
41
Elastic
Shell Stitching
( 's__' -1
,N
_'
42
Roll
43
Hemmi.
ITh
( rN 1 N N
.___,J
Ed9eEe
DD
0D
Quilting
Pin ...
Instruction Manual 2 - Page 33

...
It is sewn from the front to the back. Adjustment of stitch width, Adjustment of a butto°
diameter
Mark guidelines on the fabric where the buttonhole to sew a testing sample first with the arrow mark on the fabric with the same fabric as it
will go. see p. 19. 3Lto hoe Swin...
Instruction Manual 2 - Page 34

...
Step-5
Step-6
knot
(1) Turn the lever to the "0" position. (2) Sew 5 or 6 stitches to
buttonholes on stretch obtain a better stitch. Cut the buttonhole in pushing the cutter forward.
the
middle
by
* Use a needle to avoid over cut as shown.
*
When sewing the fabrics to make a knot. foot stop sewing.
fabrics,
it
is
recommended
to the starting line...
Instruction Manual 2 - Page 35

same
way
as
an
ordinary
pressing with finger crochet cotton
(3)
After finishing sewing, cord so that the loop other side disappears stitching.
pull the ends of the of the crochet cotton. NOTE -
(4) Cut both ends of the cord on the into the buttonhole
-
I
33 projection
cotton
(1)
jsHelictototiooknhaoolkndintbdhoeothfbuectnrtodocsnh.heotlecoftotoont,
to the pro and to...
Similar Questions

Error E7 On My Singer 5500 Fashion Mate Sewing Machine. What Does It Mean? How C
How to fix the E7 code on a Singer 5500 Fashion Mate
How to fix the E7 code on a Singer 5500 Fashion Mate
(Posted by jkdavis2007 5 years ago)


Singer Fashion Mate 5500
I cannot seem to find the correct part # for a foot controller for this machine. Anyone know the ans...
I cannot seem to find the correct part # for a foot controller for this machine. Anyone know the ans...
(Posted by melindajacobs2121 10 years ago)

Cannot Get Ensign Set Properly For Zig Zag Stitch On Fashion Mate 5500
(Posted by Lojo2155 10 years ago)