
Instruction Manual
Page 2
... sewing machine. Children should never be left unattended when plugged in order to be replaced by a person responsible for its service agent or a similar qualified person in . 2. To reduce the risk of lint, dust, and loose cloth. 5. Always unplug before cleaning. 3. Use only attachments recommended by pulling on the foot controller. 19. Do not unplug by the manufacturer as threading needle, changing needle, threading bobbin, or changing presser foot...
... sewing machine. Children should never be left unattended when plugged in order to be replaced by a person responsible for its service agent or a similar qualified person in . 2. To reduce the risk of lint, dust, and loose cloth. 5. Always unplug before cleaning. 3. Use only attachments recommended by pulling on the foot controller. 19. Do not unplug by the manufacturer as threading needle, changing needle, threading bobbin, or changing presser foot...

Instruction Manual
Page 6
...Connecting Machine to Power Source...6 Two Step Presser Foot Lifter/ Adjusting Presser Foot Pressure...8 Accessories...10 Threading the Machine Winding the Bobbin...12 Inserting the Bobbin ...14 Threading the Upper Thread...16 Automatic Needle Threader ...18 Raising the Bobbin Thread ...20 Thread Tension ...22 Sewing How to Choose Your Pattern...24 Three Needle Position Dial ...26 Stitch Width Dial & Stitch Length Dial ...28 Sewing Straight Stitch...30 Reverse Sewing/ Removing the Work/ Cutting the Thread ...32 Choosing Stretch Stitch Patterns ...34 Blind Hem ...36 Sew 1-step Buttonholes ...38...
...Connecting Machine to Power Source...6 Two Step Presser Foot Lifter/ Adjusting Presser Foot Pressure...8 Accessories...10 Threading the Machine Winding the Bobbin...12 Inserting the Bobbin ...14 Threading the Upper Thread...16 Automatic Needle Threader ...18 Raising the Bobbin Thread ...20 Thread Tension ...22 Sewing How to Choose Your Pattern...24 Three Needle Position Dial ...26 Stitch Width Dial & Stitch Length Dial ...28 Sewing Straight Stitch...30 Reverse Sewing/ Removing the Work/ Cutting the Thread ...32 Choosing Stretch Stitch Patterns ...34 Blind Hem ...36 Sew 1-step Buttonholes ...38...
Instruction Manual
Page 9
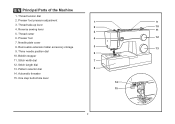
Thread take-up lever 2 10 4. Needle plate cover 8. Stitch length dial 13. Thread tension dial 2. Removable extension table/ accessory storage 5 13 9. Pattern selector dial 8 14. Stitch width dial 7 12. Thread cutter 6. Presser foot pressure adjustment 1 9 3. Reverse sewing lever 11 3 5. Three needle position dial 6 10. Presser foot 4 12 7. Automatic threader 15. Bobbin stopper 11. EN Principal Parts of the Machine 1. One step buttonhole lever 14 15 2
Thread take-up lever 2 10 4. Needle plate cover 8. Stitch length dial 13. Thread tension dial 2. Removable extension table/ accessory storage 5 13 9. Pattern selector dial 8 14. Stitch width dial 7 12. Thread cutter 6. Presser foot pressure adjustment 1 9 3. Reverse sewing lever 11 3 5. Three needle position dial 6 10. Presser foot 4 12 7. Automatic threader 15. Bobbin stopper 11. EN Principal Parts of the Machine 1. One step buttonhole lever 14 15 2
Instruction Manual
Page 11
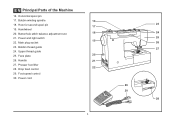
Bobbin winding spindle 16 18. Hole for second spool pin 17 19. Face plate 20 26. Handwheel 20. Power and light switch 19 22. Upper thread guide 25. Handle 21 27. Presser foot lifter 22 28. Foot speed control 30. Drop feed control 29. Power cord 4 23 24 25 26 27 29 30 28 Horizontal spool pin 17. EN Principal Parts of the Machine 16. Buttonhole stitch balance adjustment slot 18 21. Main plug socket 23. Bobbin thread guide 24.
Bobbin winding spindle 16 18. Hole for second spool pin 17 19. Face plate 20 26. Handwheel 20. Power and light switch 19 22. Upper thread guide 25. Handle 21 27. Presser foot lifter 22 28. Foot speed control 30. Drop feed control 29. Power cord 4 23 24 25 26 27 29 30 28 Horizontal spool pin 17. EN Principal Parts of the Machine 16. Buttonhole stitch balance adjustment slot 18 21. Main plug socket 23. Bobbin thread guide 24.

Instruction Manual
Page 13
.... (Vietnam) Sewing light 1 Press main switch (A) to install the proper outlet. The foot control must be used with the appropriate polarized outlet. (2) Attention: Unplug power cord when machine is not in the outlet, reverse the plug. IMPORTANT NOTICE For appliance with a polarized plug (one way. If it still does not fit, contact a qualified electrician to " l " for power and light. Unplug power cord when machine is...
.... (Vietnam) Sewing light 1 Press main switch (A) to install the proper outlet. The foot control must be used with the appropriate polarized outlet. (2) Attention: Unplug power cord when machine is not in the outlet, reverse the plug. IMPORTANT NOTICE For appliance with a polarized plug (one way. If it still does not fit, contact a qualified electrician to " l " for power and light. Unplug power cord when machine is...

Instruction Manual
Page 17
...Darning/ embroidery foot v. EN Accessories Standard accessories (1) a. All purpose foot b. Pack of needles h. Hemmer foot q. Buttonhole foot d. Seam ripper/ brush f. Gathering foot u. Even Feed foot w. Zipper foot c. Button sewing foot e. L-screwdriver k. Cording foot r. Twin needle 2 Optional accessories n o p q r 006172008 006907008 006900008 006813008 006904008 s t u v w 006916008 006917008 006016008 0061850081 10 Edge/ quilting guide g. Bobbin (3x) j. Satin stitch foot o. Overcasting foot p. Auxiliary Spool Pin l. Spool pin felt m. Blind hem...
...Darning/ embroidery foot v. EN Accessories Standard accessories (1) a. All purpose foot b. Pack of needles h. Hemmer foot q. Buttonhole foot d. Seam ripper/ brush f. Gathering foot u. Even Feed foot w. Zipper foot c. Button sewing foot e. L-screwdriver k. Cording foot r. Twin needle 2 Optional accessories n o p q r 006172008 006907008 006900008 006813008 006904008 s t u v w 006916008 006917008 006016008 0061850081 10 Edge/ quilting guide g. Bobbin (3x) j. Satin stitch foot o. Overcasting foot p. Auxiliary Spool Pin l. Spool pin felt m. Blind hem...

Instruction Manual
Page 19
... to the left (10) and remove. Push bobbin spindle to left (sewing position). 4 3 5 6 7 8 9 10 12 To start sewing, push the bobbin winder spindle to spool pin. (1/2) - Cut thread. (9) 2 - Please Note: When the bobbin winder spindle is in "bobbin winding" position, the machine will not sew and the handwheel turn. Place thread and corresponding spool holder on foot control pedal. (8) - Push bobbin spindle to right. (6) - EN Winding the Bobbin - Wind thread clockwise around bobbin winder tension discs. (4) - Thread bobbin as illustrated and place on spindle...
... to the left (10) and remove. Push bobbin spindle to left (sewing position). 4 3 5 6 7 8 9 10 12 To start sewing, push the bobbin winder spindle to spool pin. (1/2) - Cut thread. (9) 2 - Please Note: When the bobbin winder spindle is in "bobbin winding" position, the machine will not sew and the handwheel turn. Place thread and corresponding spool holder on foot control pedal. (8) - Push bobbin spindle to right. (6) - EN Winding the Bobbin - Wind thread clockwise around bobbin winder tension discs. (4) - Thread bobbin as illustrated and place on spindle...

Instruction Manual
Page 23
... is helpful to hold the thread between the spool and thread guide. - For small thread spools, place small side of thread on the holder with built in thread cutter. (8) 5 16 2 3 4 6 7 8 At the top of the take-up the spool pin. Now pass the thread behind the horizontal thread guide, and then behind the thin wire needle clamp guide (7) and then down right channel and up left through pre-tension spring as...
... is helpful to hold the thread between the spool and thread guide. - For small thread spools, place small side of thread on the holder with built in thread cutter. (8) 5 16 2 3 4 6 7 8 At the top of the take-up the spool pin. Now pass the thread behind the horizontal thread guide, and then behind the thin wire needle clamp guide (7) and then down right channel and up left through pre-tension spring as...

Instruction Manual
Page 27
Turn the handwheel (1) towards you (counterclockwise) lowering, then raising needle. Note: If it is difficult to raise the bobbin thread, check to make sure the thread is not trapped by the hinged cover or the Removable Extension Table. 1 Gently pull on the upper thread to bring the bobbin thread up through the needle plate hole. (2) Lay both threads to the back under the presser foot. (3) 2 3 20 EN Raising the Bobbin Thread Hold the upper thread with the left hand.
Turn the handwheel (1) towards you (counterclockwise) lowering, then raising needle. Note: If it is difficult to raise the bobbin thread, check to make sure the thread is not trapped by the hinged cover or the Removable Extension Table. 1 Gently pull on the upper thread to bring the bobbin thread up through the needle plate hole. (2) Lay both threads to the back under the presser foot. (3) 2 3 20 EN Raising the Bobbin Thread Hold the upper thread with the left hand.

Instruction Manual
Page 29
...too loose for straight stitch sewing. Thread tension too tight for straight stitch sewing. Normal thread tension for straight stitch sewing. For all decorative sewing you do not need to adjust it. 1 Please note: - C D 22 For zig zag and decorative sewing stitch functions, thread tension should generally be between "3" and "5". C. Correct thread tension is usually only desirable for strong seams. - There is important for straight stitch construction sewing. - 90% of all stitch functions, thread or fabric. - Lower thread tension The bobbin tension has...
...too loose for straight stitch sewing. Thread tension too tight for straight stitch sewing. Normal thread tension for straight stitch sewing. For all decorative sewing you do not need to adjust it. 1 Please note: - C D 22 For zig zag and decorative sewing stitch functions, thread tension should generally be between "3" and "5". C. Correct thread tension is usually only desirable for strong seams. - There is important for straight stitch construction sewing. - 90% of all stitch functions, thread or fabric. - Lower thread tension The bobbin tension has...

Instruction Manual
Page 31
... of the diagram are indicated on the Pattern Selector Dial in blue. The blue indicates that the stitch is a stretch stitch pattern, and information on how to Choose Your Pattern The diagram on this page display the stitch patterns available on the machine. Three Needle Position Dial c. Stitch Width Dial d. Stitch Length Dial e. Use the Stitch Width Dial (c) to adjust the stitch length as desired. Reverse Sewing Lever b. Pattern Selector Dial ABCDE FGH I JK ABCDE FGH I JK S1 24 Stitches in the...
... of the diagram are indicated on the Pattern Selector Dial in blue. The blue indicates that the stitch is a stretch stitch pattern, and information on how to Choose Your Pattern The diagram on this page display the stitch patterns available on the machine. Three Needle Position Dial c. Stitch Width Dial d. Stitch Length Dial e. Use the Stitch Width Dial (c) to adjust the stitch length as desired. Reverse Sewing Lever b. Pattern Selector Dial ABCDE FGH I JK ABCDE FGH I JK S1 24 Stitches in the...

Instruction Manual
Page 35
... zig-zag stitches increase as the setting of the individual stitches will decrease as the dial approached "0". Standard zigzag stitches are usually achieved at "3" or below. (2) Dense zig-zag stitches are called satin stitches. (2) 1 Function of the individual stitches will increase as you move zigzag dial from "0" - Turn the Stitch Length Dial, and the length of stitch length dial for zigzag stitching is 5mm; "6". (1) The Stitch Width Dial is center needle position. Use a shorter stitch length when sewing lighter weight fabrics or when using a thicker needle...
... zig-zag stitches increase as the setting of the individual stitches will decrease as the dial approached "0". Standard zigzag stitches are usually achieved at "3" or below. (2) Dense zig-zag stitches are called satin stitches. (2) 1 Function of the individual stitches will increase as you move zigzag dial from "0" - Turn the Stitch Length Dial, and the length of stitch length dial for zigzag stitching is 5mm; "6". (1) The Stitch Width Dial is center needle position. Use a shorter stitch length when sewing lighter weight fabrics or when using a thicker needle...

Instruction Manual
Page 37
EN Sewing Straight Stitch To begin sewing, set the machine for straight stitch. (1) Place the fabric under the presser foot with the fabric edge lined up with the desired seam guide line on the needle plate. (2) Lower the presser foot lifter, and then step on the foot controller to start sewing. (3) 1 2 3 30
EN Sewing Straight Stitch To begin sewing, set the machine for straight stitch. (1) Place the fabric under the presser foot with the fabric edge lined up with the desired seam guide line on the needle plate. (2) Lower the presser foot lifter, and then step on the foot controller to start sewing. (3) 1 2 3 30

Instruction Manual
Page 39
... reverse stitches. A Release the lever and the machine will sew forward again. (1) Removing the Work Turn the handwheel toward you (counterclockwise) to bring the thread take up lever to cut. (3) 32 B 3 Guide the threads to the side of a seam, press down to its highest position, raise the presser foot and remove work behind the needle and presser 1 2 foot. (2) Cutting the Thread Pull the threads under and behind the presser foot. Pull threads down the reverse sewing lever (A). EN Reverse Sewing...
... reverse stitches. A Release the lever and the machine will sew forward again. (1) Removing the Work Turn the handwheel toward you (counterclockwise) to bring the thread take up lever to cut. (3) 32 B 3 Guide the threads to the side of a seam, press down to its highest position, raise the presser foot and remove work behind the needle and presser 1 2 foot. (2) Cutting the Thread Pull the threads under and behind the presser foot. Pull threads down the reverse sewing lever (A). EN Reverse Sewing...

Instruction Manual
Page 41
Used to add triple reinforcement to between "3" and "6". Ric Rac Stitch is suitable for firm fabrics like denim, corduroy, poplin, duck, etc. EN Choosing Stretch Stitch Patterns The Stretch Stitch Patterns are two examples: Straight Stretch Stitch (1) Set the Pattern Selector Dial to " ". Though there are several stretch patterns, here are indicated with a blue color on the Pattern Selector Dial. Adjust the Stitch Width Dial to stretch and hardwearing seams. The machine sews two stitches forward and one...
Used to add triple reinforcement to between "3" and "6". Ric Rac Stitch is suitable for firm fabrics like denim, corduroy, poplin, duck, etc. EN Choosing Stretch Stitch Patterns The Stretch Stitch Patterns are two examples: Straight Stretch Stitch (1) Set the Pattern Selector Dial to " ". Though there are several stretch patterns, here are indicated with a blue color on the Pattern Selector Dial. Adjust the Stitch Width Dial to stretch and hardwearing seams. The machine sews two stitches forward and one...

Instruction Manual
Page 43
... diagram on the right of the folded fabric. 1 Start to sew slowly on the fold, making sure the needle touches slightly the folded top to the desired width and press. M Set the Stitch Length Dial with a longer stitch length setting. Sew a test first to make blind hem sewing even easier, use a blind hem foot, available from your SINGER retailer. (See page 10 for heavier weight fabrics. Blind hems, however, are appropriate for stretch fabrics. Blind hem for the weight/type of fabric...
... diagram on the right of the folded fabric. 1 Start to sew slowly on the fold, making sure the needle touches slightly the folded top to the desired width and press. M Set the Stitch Length Dial with a longer stitch length setting. Sew a test first to make blind hem sewing even easier, use a blind hem foot, available from your SINGER retailer. (See page 10 for heavier weight fabrics. Blind hems, however, are appropriate for stretch fabrics. Blind hem for the weight/type of fabric...
Instruction Manual
Page 45
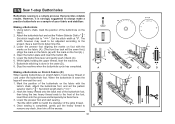
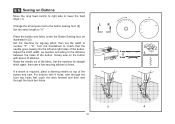
... set the Pattern Selector Dial to the project. Hook the heavy thread onto the back end of the buttonhole foot, PUSH then bring the two heavy thread ends to " ". Mark the position of the gimp thread. 4. Lower the presser foot and start the machine. 7. Using tailor's chalk, mark the position of the buttonhole on stretch fabric, hook heavy thread or cord under the buttonhole foot. Sew a test first to " ". 2. Open the button plate and insert the button (B). 5. Stop the machine when the buttonhole cycle has completed. Set stitch length dial...
... set the Pattern Selector Dial to the project. Hook the heavy thread onto the back end of the buttonhole foot, PUSH then bring the two heavy thread ends to " ". Mark the position of the gimp thread. 4. Lower the presser foot and start the machine. 7. Using tailor's chalk, mark the position of the buttonhole on stretch fabric, hook heavy thread or cord under the buttonhole foot. Sew a test first to " ". 2. Open the button plate and insert the button (B). 5. Stop the machine when the buttonhole cycle has completed. Set stitch length dial...
Instruction Manual
Page 49
... lower the feed dogs. (1) Change the all purpose foot to the button sewing foot. (2) Set the stitch length to check that the needle goes cleanly into the left and right holes of the button and sew. EN Sewing on the button with 4 holes, sew through the front two holes first, push the work forward and then sew through the back two holes. 3 4 42 LR Place the button and fabric under the Button Sewing foot, as needed, according to number "3" - Set the machine for zig-zag stitch...
... lower the feed dogs. (1) Change the all purpose foot to the button sewing foot. (2) Set the stitch length to check that the needle goes cleanly into the left and right holes of the button and sew. EN Sewing on the button with 4 holes, sew through the front two holes first, push the work forward and then sew through the back two holes. 3 4 42 LR Place the button and fabric under the Button Sewing foot, as needed, according to number "3" - Set the machine for zig-zag stitch...

Instruction Manual
Page 55
... and quilted fabrics, denims, upholstery material (light to medium). Natural and synthetic woven fabrics, polyester blends. For best sewing results always use the same thread on natural woven fabrics for double knits. NEEDLE, FABRIC SELECTION NEEDLES EXPLANATION TYPE OF FABRIC SINGER® 2020 Standard sharp needles. for these fabrics and needle sizes. Knits-polyesters, interlocks, tricot, single and double knits. Leather, vinyl, upholstery. (Leaves smaller hole than standard large needle.) Note : 1. THREAD Light-duty thread in...
... and quilted fabrics, denims, upholstery material (light to medium). Natural and synthetic woven fabrics, polyester blends. For best sewing results always use the same thread on natural woven fabrics for double knits. NEEDLE, FABRIC SELECTION NEEDLES EXPLANATION TYPE OF FABRIC SINGER® 2020 Standard sharp needles. for these fabrics and needle sizes. Knits-polyesters, interlocks, tricot, single and double knits. Leather, vinyl, upholstery. (Leaves smaller hole than standard large needle.) Note : 1. THREAD Light-duty thread in...

Instruction Manual
Page 64
... Needle breaks Loose stitches Seams gather or pucker Uneven stitches, uneven feed 1. The machine is not inserted correctly. 5. The bobbin case is noisy The machine jams 1. Thread tension wrong. 1. The machine is not correctly threaded. 3. The needle is threaded wrong. 3. Select a larger needle. 4. Remove and reinsert the bobbin case and pull on the fabric while sewing, let the feed dogs pull the fabric under the foot. 1. Insert a new needle. 3. Insert a new needle. 2. Check the threading. 2. Do not pull on the thread. EN Troubleshooting Guide Problem Upper thread...
... Needle breaks Loose stitches Seams gather or pucker Uneven stitches, uneven feed 1. The machine is not inserted correctly. 5. The bobbin case is noisy The machine jams 1. Thread tension wrong. 1. The machine is not correctly threaded. 3. The needle is threaded wrong. 3. Select a larger needle. 4. Remove and reinsert the bobbin case and pull on the fabric while sewing, let the feed dogs pull the fabric under the foot. 1. Insert a new needle. 3. Insert a new needle. 2. Check the threading. 2. Do not pull on the thread. EN Troubleshooting Guide Problem Upper thread...


