
Instruction Manual
Page 2
...the manufacturer as threading needle, changing needle, threading bobbin, or changing presser foot, and the like. 10. SAVE THESE INSTRUCTIONS This sewing machine is damaged, it has been dropped or damaged, or dropped into any object into water. Always unplug this manual. 3. Use...to be followed, including the following: Read all moving parts. The sound pressure level under normal operating conditions is required around the sewing machine needle. 6. EN IMPORTANT SAFETY INSTRUCTIONS When using an electrical appliance, basic safety should always be used as described in the ...
...the manufacturer as threading needle, changing needle, threading bobbin, or changing presser foot, and the like. 10. SAVE THESE INSTRUCTIONS This sewing machine is damaged, it has been dropped or damaged, or dropped into any object into water. Always unplug this manual. 3. Use...to be followed, including the following: Read all moving parts. The sound pressure level under normal operating conditions is required around the sewing machine needle. 6. EN IMPORTANT SAFETY INSTRUCTIONS When using an electrical appliance, basic safety should always be used as described in the ...
Instruction Manual
Page 6
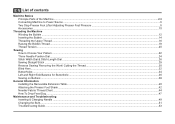
...Threading the Upper Thread ...16 Raising the Bobbin Thread ...18 Thread Tension...20 Sewing How to Choose Your Pattern ...22 Three Needle Position Dial...24 Stitch Width Dial & Stitch Length Dial ...26 Sewing Straight Stitch ...28 Reverse Sewing/ Removing the Work/ Cutting the Thread 30 Blind Hem ...32 Buttonholes ...34... Left and Right Side Balance for Buttonhole ...36 Sewing on Buttons ...38 General Information Installing the Removable Extension Table...40 Attaching the Presser Foot Shank...42 Needle/ Fabric/ Thread Chart ......
...Threading the Upper Thread ...16 Raising the Bobbin Thread ...18 Thread Tension...20 Sewing How to Choose Your Pattern ...22 Three Needle Position Dial...24 Stitch Width Dial & Stitch Length Dial ...26 Sewing Straight Stitch ...28 Reverse Sewing/ Removing the Work/ Cutting the Thread 30 Blind Hem ...32 Buttonholes ...34... Left and Right Side Balance for Buttonhole ...36 Sewing on Buttons ...38 General Information Installing the Removable Extension Table...40 Attaching the Presser Foot Shank...42 Needle/ Fabric/ Thread Chart ......
Instruction Manual
Page 9
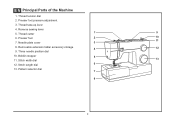
Reverse sewing lever 5. Pattern selector dial 7 8 2 Presser foot pressure adjustment 3. Presser foot 2 10 11 7. Needle plate cover 3 8. Stitch width dial 13 12. Thread tension dial 2. Thread cutter 1 9 6. Bobbin stopper 5 11. EN Principal Parts of the Machine 1. Stitch length dial 6 13. Removable extension table/ accessory storage 4 12 9. Three needle position dial 10. Thread take-up lever 4.
Reverse sewing lever 5. Pattern selector dial 7 8 2 Presser foot pressure adjustment 3. Presser foot 2 10 11 7. Needle plate cover 3 8. Stitch width dial 13 12. Thread tension dial 2. Thread cutter 1 9 6. Bobbin stopper 5 11. EN Principal Parts of the Machine 1. Stitch length dial 6 13. Removable extension table/ accessory storage 4 12 9. Three needle position dial 10. Thread take-up lever 4.
Instruction Manual
Page 13
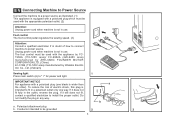
... is not in use . a b a. If it still does not fit, contact a qualified electrician to " l " for power and light. Co., Ltd. (Vietnam) Sewing light 1 Press main switch (A) to install the proper outlet. Do not modify the plug in the outlet, reverse the plug. To reduce the risk of... how to connect machine to power source. Foot control The foot control pedal regulates the sewing speed. (3) Attention: Consult a qualified electrician if in doubt of electric shock, this plug is intended to fit in a polarized outlet only ...
... is not in use . a b a. If it still does not fit, contact a qualified electrician to " l " for power and light. Co., Ltd. (Vietnam) Sewing light 1 Press main switch (A) to install the proper outlet. Do not modify the plug in the outlet, reverse the plug. To reduce the risk of... how to connect machine to power source. Foot control The foot control pedal regulates the sewing speed. (3) Attention: Consult a qualified electrician if in doubt of electric shock, this plug is intended to fit in a polarized outlet only ...
Instruction Manual
Page 15
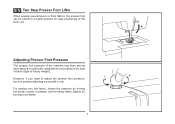
... thin fabric, loosen the pressure by turning it clockwise. 8 EN Two Step Presser Foot Lifter When sewing several layers or thick fabrics, the presser foot can be raised to a higher position for heavy fabric, tighten by turning the screw counter clockwise, and for easy positioning of the work. (A) A Adjusting Presser Foot Pressure...
... thin fabric, loosen the pressure by turning it clockwise. 8 EN Two Step Presser Foot Lifter When sewing several layers or thick fabrics, the presser foot can be raised to a higher position for heavy fabric, tighten by turning the screw counter clockwise, and for easy positioning of the work. (A) A Adjusting Presser Foot Pressure...
Instruction Manual
Page 17
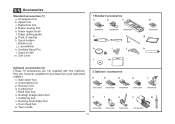
... h. Satin stitch foot o. Gathering foot u. Spool holders i. Auxiliary Spool Pin l. Twin needle 2 Optional accessories n o p q r 006172008 006907008 006900008 006813008 006904008 s t u v w 006916008 006917008 006016008 0061850081 10 Button sewing foot e. L-screwdriver k. Darning/ embroidery foot v. All purpose foot b. they are not supplied with this machine; Soft cover 1 Standard accessories a b c 006806008 e 006905008 006909008 f h i j l m d 006914008 g k Optional accessories...
... h. Satin stitch foot o. Gathering foot u. Spool holders i. Auxiliary Spool Pin l. Twin needle 2 Optional accessories n o p q r 006172008 006907008 006900008 006813008 006904008 s t u v w 006916008 006917008 006016008 0061850081 10 Button sewing foot e. L-screwdriver k. Darning/ embroidery foot v. All purpose foot b. they are not supplied with this machine; Soft cover 1 Standard accessories a b c 006806008 e 006905008 006909008 f h i j l m d 006914008 g k Optional accessories...
Instruction Manual
Page 19
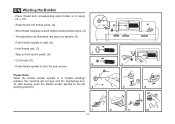
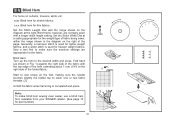
... holder on to right. (6) - Push bobbin spindle to spool pin. (1/2) - Step on spindle. (5) - Push bobbin spindle to the left (10) and remove. To start sewing, push the bobbin winder spindle to left (sewing position). 4 3 5 6 7 8 9 10 12 Please Note: When the bobbin winder spindle is in "bobbin winding" position, the machine will not...
... holder on to right. (6) - Push bobbin spindle to spool pin. (1/2) - Step on spindle. (5) - Push bobbin spindle to the left (10) and remove. To start sewing, push the bobbin winder spindle to left (sewing position). 4 3 5 6 7 8 9 10 12 Please Note: When the bobbin winder spindle is in "bobbin winding" position, the machine will not...
Instruction Manual
Page 23
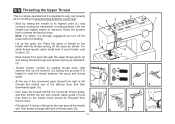
... needle to its highest point (1), and continue turning the handwheel counterclockwise until the needle just slightly begins to descend. Start by not doing so several sewing problems could result. - Raise the presser foot to release the tension discs.
... needle to its highest point (1), and continue turning the handwheel counterclockwise until the needle just slightly begins to descend. Start by not doing so several sewing problems could result. - Raise the presser foot to release the tension discs.
Instruction Manual
Page 27
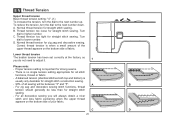
... functions, thread tension should generally be between "3" and "5". D. Correct thread tension is usually only desirable for all decorative sewing you do not need to adjust it. 1 Please note: - EN Thread Tension Upper thread tension Basic thread tension setting: "4". (1) To... on the bottom side of fabric. C D 20 Turn dial to higher number. There is important for straight stitch sewing. - A. Thread tension too loose for straight stitch sewing. C. Lower thread tension The bobbin tension has been set correctly at the factory, so you will be less than ...
... functions, thread tension should generally be between "3" and "5". D. Correct thread tension is usually only desirable for all decorative sewing you do not need to adjust it. 1 Please note: - EN Thread Tension Upper thread tension Basic thread tension setting: "4". (1) To... on the bottom side of fabric. C D 20 Turn dial to higher number. There is important for straight stitch sewing. - A. Thread tension too loose for straight stitch sewing. C. Lower thread tension The bobbin tension has been set correctly at the factory, so you will be less than ...
Instruction Manual
Page 29
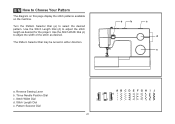
Pattern Selector Dial ABCDE FGH I J 3 4 2 1 22 The Pattern Selector Dial may be turned in either direction. Stitch Width Dial d. Reverse Sewing Lever b. Turn the Pattern Selector Dial (e) to adjust the width of the stitch as desired for the project. Use the Stitch Width Dial (c) to select the desired pattern. Stitch Length Dial e. Three Needle Position Dial c. EN How to adjust the stitch length as desired. Use the Stitch Length Dial (d) to Choose Your Pattern The diagram on this page display the stitch patterns available on the machine. a b c d e a.
Pattern Selector Dial ABCDE FGH I J 3 4 2 1 22 The Pattern Selector Dial may be turned in either direction. Stitch Width Dial d. Reverse Sewing Lever b. Turn the Pattern Selector Dial (e) to adjust the width of the stitch as desired for the project. Use the Stitch Width Dial (c) to select the desired pattern. Stitch Length Dial e. Three Needle Position Dial c. EN How to adjust the stitch length as desired. Use the Stitch Length Dial (d) to Choose Your Pattern The diagram on this page display the stitch patterns available on the machine. a b c d e a.
Instruction Manual
Page 31
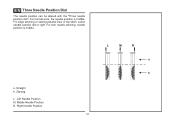
Right Needle Position 24 L M R a b EN Three Needle Position Dial The needle position can be altered with the "Three needle position dial". For edge stitching or sewing parallel lines of top stitch, select needle position left or right. a. Left Needle Position M. Straight b. Middle Needle Position R. For twin needle stitching, needle position is middle. Zig-zag L. For normal work, the needle position is middle.
Right Needle Position 24 L M R a b EN Three Needle Position Dial The needle position can be altered with the "Three needle position dial". For edge stitching or sewing parallel lines of top stitch, select needle position left or right. a. Left Needle Position M. Straight b. Middle Needle Position R. For twin needle stitching, needle position is middle. Zig-zag L. For normal work, the needle position is middle.
Instruction Manual
Page 33
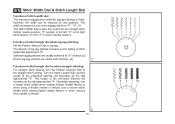
... the setting of stitch length dial while zig-zag stitching Set the Pattern Selector Dial to the straight stitch setting. Use a shorter stitch length when sewing lighter weight fabrics or when using a thicker needle or thread. "0" position is full left, "6" is full right and between "2" and "3" is ...5mm; "6". (1) The Stitch Width Dial is also the control for when straight stitching For straight stitch sewing, turn the Pattern Selector Dial to zig-zag. however, the width can be reduced on any patterns. Generally speaking, use a longer stitch length ...
... the setting of stitch length dial while zig-zag stitching Set the Pattern Selector Dial to the straight stitch setting. Use a shorter stitch length when sewing lighter weight fabrics or when using a thicker needle or thread. "0" position is full left, "6" is full right and between "2" and "3" is ...5mm; "6". (1) The Stitch Width Dial is also the control for when straight stitching For straight stitch sewing, turn the Pattern Selector Dial to zig-zag. however, the width can be reduced on any patterns. Generally speaking, use a longer stitch length ...
Instruction Manual
Page 35
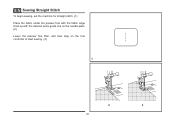
EN Sewing Straight Stitch To begin sewing, set the machine for straight stitch. (1) Place the fabric under the presser foot with the fabric edge lined up with the desired seam guide line on the needle plate. (2) Lower the presser foot lifter, and then step on the foot controller to start sewing. (3) 1 2 3 28
EN Sewing Straight Stitch To begin sewing, set the machine for straight stitch. (1) Place the fabric under the presser foot with the fabric edge lined up with the desired seam guide line on the needle plate. (2) Lower the presser foot lifter, and then step on the foot controller to start sewing. (3) 1 2 3 28
Instruction Manual
Page 37
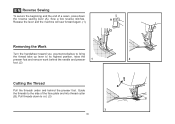
A Release the lever and the machine will sew forward again. (1) Removing the Work Turn the handwheel toward you (counterclockwise) to bring the thread take up lever to the side of a seam, press down ... remove work behind the needle and presser 1 2 foot. (2) Cutting the Thread Pull the threads under and behind the presser foot. Pull threads down the reverse sewing lever (A). Sew a few reverse stitches. EN Reverse Sewing To secure the beginning and the end of the face plate and into thread cutter (B).
A Release the lever and the machine will sew forward again. (1) Removing the Work Turn the handwheel toward you (counterclockwise) to bring the thread take up lever to the side of a seam, press down ... remove work behind the needle and presser 1 2 foot. (2) Cutting the Thread Pull the threads under and behind the presser foot. Pull threads down the reverse sewing lever (A). Sew a few reverse stitches. EN Reverse Sewing To secure the beginning and the end of the face plate and into thread cutter (B).
Instruction Manual
Page 39
...with the range shown on the fold, making sure the needle touches slightly the folded top to sew slowly on the diagram at a setting appropriate for the fabric. Fold back (as shown in... to the right side of the page. Generally, a narrower stitch is used for part number) 32 Sew a test first to the desired width and press. Blind hem for firm fabrics. Blind hem for stretch ...fabrics. Blind Hem: Turn up the hem to make blind hem sewing even easier, use a blind hem foot, available from your SINGER retailer. (See page 10 for heavier weight fabrics. EN Blind Hem ...
...with the range shown on the fold, making sure the needle touches slightly the folded top to sew slowly on the diagram at a setting appropriate for the fabric. Fold back (as shown in... to the right side of the page. Generally, a narrower stitch is used for part number) 32 Sew a test first to the desired width and press. Blind hem for firm fabrics. Blind hem for stretch ...fabrics. Blind Hem: Turn up the hem to make blind hem sewing even easier, use a blind hem foot, available from your SINGER retailer. (See page 10 for heavier weight fabrics. EN Blind Hem ...
Instruction Manual
Page 41
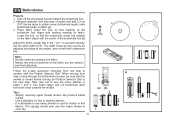
...need to be sure that the needle is advisable to use heavy thread or cord for fine or stretchy fabrics. - Note: Density varies according to sew the buttonhole. Use seam ripper and cut buttonhole open from... the fabric. When moving from step to step through the buttonhole process, be adjusted according to the project, sew a test first to the next step. Set the stitch width at "6". Tips: - Use a stabilizer for... tension will produce better results. - The zig-zag should sew over the heavy thread or cord. (A) 34 M (a) (b) Adjust the Stitch Length Dial in steps 1 and 3.
...need to be sure that the needle is advisable to use heavy thread or cord for fine or stretchy fabrics. - Note: Density varies according to sew the buttonhole. Use seam ripper and cut buttonhole open from... the fabric. When moving from step to step through the buttonhole process, be adjusted according to the project, sew a test first to the next step. Set the stitch width at "6". Tips: - Use a stabilizer for... tension will produce better results. - The zig-zag should sew over the heavy thread or cord. (A) 34 M (a) (b) Adjust the Stitch Length Dial in steps 1 and 3.
Instruction Manual
Page 45
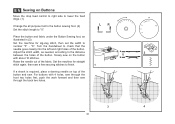
... stitch, then set the width to number "3" - Turn the handwheel to "0". For buttons with about 10 stitches. Raise the needle out of the fabric. "6". EN Sewing on Buttons Move the drop feed control to right side to lower the feed dogs. (1) Change the all purpose foot to the button... sewing foot. (2) Set the stitch length to check that the needle goes cleanly into the left and right holes of the button. Set the machine for ...
... stitch, then set the width to number "3" - Turn the handwheel to "0". For buttons with about 10 stitches. Raise the needle out of the fabric. "6". EN Sewing on Buttons Move the drop feed control to right side to lower the feed dogs. (1) Change the all purpose foot to the button... sewing foot. (2) Set the stitch length to check that the needle goes cleanly into the left and right holes of the button. Set the machine for ...
Instruction Manual
Page 51
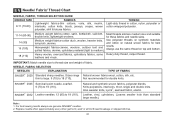
..., FABRIC SELECTION NEEDLES EXPLANATION TYPE OF FABRIC SINGER® 2020 Standard sharp needles. SINGER® 2045 Semi-ball point needle, scarfed. 9 (70) to thread size and weight of fabric. For best sewing results always use the same thread on natural... thread breakage or skipped stitches. 44 Heavy woolen, overcoat fabrics, upholstery fabrics, some Heavy duty thread, carpet thread. Not recommended for best Heavyweight fabrics-canvas, woolens, outdoor tent and quilted fabrics, denims, upholstery material (light to medium). SINGER® 2032 Leather needles. 12 ...
..., FABRIC SELECTION NEEDLES EXPLANATION TYPE OF FABRIC SINGER® 2020 Standard sharp needles. SINGER® 2045 Semi-ball point needle, scarfed. 9 (70) to thread size and weight of fabric. For best sewing results always use the same thread on natural... thread breakage or skipped stitches. 44 Heavy woolen, overcoat fabrics, upholstery fabrics, some Heavy duty thread, carpet thread. Not recommended for best Heavyweight fabrics-canvas, woolens, outdoor tent and quilted fabrics, denims, upholstery material (light to medium). SINGER® 2032 Leather needles. 12 ...

Instruction Manual
Page 54
EN How To Drop Feed Dog For ordinary sewing, keep the feed dog up, for freehand embroidery, sewing on buttons and darning, drop the feed dog. To raise (a) and lower (b) feed dog. (2) 1 2 47 a ba b
EN How To Drop Feed Dog For ordinary sewing, keep the feed dog up, for freehand embroidery, sewing on buttons and darning, drop the feed dog. To raise (a) and lower (b) feed dog. (2) 1 2 47 a ba b
Instruction Manual
Page 56
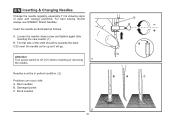
The flat side of wear and causing problems. For best sewing results always use SINGER® Brand Needles. C/D.Insert the needle as far up as follows: A. Loosen the needle clamp screw and tighten again after inserting the new needle. (1) B. Attention: ...
The flat side of wear and causing problems. For best sewing results always use SINGER® Brand Needles. C/D.Insert the needle as far up as follows: A. Loosen the needle clamp screw and tighten again after inserting the new needle. (1) B. Attention: ...


