
Instruction Manual and Troubleshooting Guide
Page 2
... step-by all skill levels so that you enjoy your SINGER® sewing machine. The SINGER® brand has stood for quality in sewing for sewists of all . It is important to us that the joy of our SINGER® Sewing Assistants, at www.singerco.com 3. Happy Sewing! 2 Assistance on -one help and hope that you have the...
... step-by all skill levels so that you enjoy your SINGER® sewing machine. The SINGER® brand has stood for quality in sewing for sewists of all . It is important to us that the joy of our SINGER® Sewing Assistants, at www.singerco.com 3. Happy Sewing! 2 Assistance on -one help and hope that you have the...

Instruction Manual and Troubleshooting Guide
Page 3
...dropped or damaged, or dropped into any adjustment in the needle area, such as contained in the instruction manual. Always unplug this sewing machine from the electric outlet immediately after using and before using an electrical appliance, basic safety precautions should never be followed, including the... following: Read all moving parts. Close attention is necessary when this sewing machine if it has a damaged cord or plug, if it is not working properly, if it to the nearest authorized dealer or ...
...dropped or damaged, or dropped into any adjustment in the needle area, such as contained in the instruction manual. Always unplug this sewing machine from the electric outlet immediately after using and before using an electrical appliance, basic safety precautions should never be followed, including the... following: Read all moving parts. Close attention is necessary when this sewing machine if it has a damaged cord or plug, if it is not working properly, if it to the nearest authorized dealer or ...
Instruction Manual and Troubleshooting Guide
Page 4
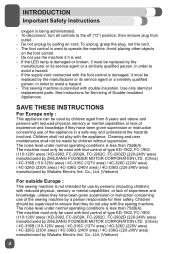
... in a safe way and understand the hazards involved. Children should be supervised to ensure that they do not play with the sewing machine. The machine must be used by Wakaho Electric Ind. 2 INTRODUCTION Important Safety Instructions oxygen is less than 75dB(A). Co., Ltd. (Vietnam) ...to avoid a hazard. - To unplug, grasp the plug, not the cord. - To disconnect, turn all controls to operate the machine. This sewing machine is damaged or broken, it must only be replaced by children without supervision. Cleaning and user maintenance shall not be used with reduced...
... in a safe way and understand the hazards involved. Children should be supervised to ensure that they do not play with the sewing machine. The machine must be used by Wakaho Electric Ind. 2 INTRODUCTION Important Safety Instructions oxygen is less than 75dB(A). Co., Ltd. (Vietnam) ...to avoid a hazard. - To unplug, grasp the plug, not the cord. - To disconnect, turn all controls to operate the machine. This sewing machine is damaged or broken, it must only be replaced by children without supervision. Cleaning and user maintenance shall not be used with reduced...
Instruction Manual and Troubleshooting Guide
Page 6
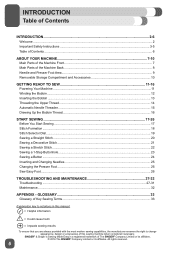
... INTRODUCTION...2-6 Welcome...2 Important Safety Instructions...3-5 Table of Contents...6 ABOUT YOUR MACHINE 7-10 Main Parts of the Machine Front...7 Main Parts of The SINGER® Company Limited or its affiliates. © 2016 The SINGER® Company Limited or its affiliates. GLOSSARY 33 Glossary of Key Sewing Terms...33 Explanation key to notations in this manual: ...
... INTRODUCTION...2-6 Welcome...2 Important Safety Instructions...3-5 Table of Contents...6 ABOUT YOUR MACHINE 7-10 Main Parts of the Machine Front...7 Main Parts of The SINGER® Company Limited or its affiliates. © 2016 The SINGER® Company Limited or its affiliates. GLOSSARY 33 Glossary of Key Sewing Terms...33 Explanation key to notations in this manual: ...

Instruction Manual and Troubleshooting Guide
Page 7
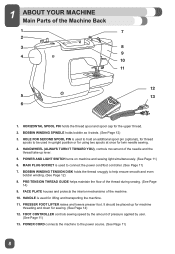
... automatically. (See Page 12) 9. THREAD TAKE-UP LEVER controls the flow of the Machine Front 13 1. THREAD CUTTER is used for example, when securing the beginning and ending of sewing. 4. STITCH SELECTOR DIAL is conveniently located for accessories, and provides access to select stitch... patterns and buttonhole settings. (See Page 19) 11. 1 ABOUT YOUR MACHINE Main Parts of the upper thread while sewing. (See Page 14) 3. REMOVABLE STORAGE COMPARTMENT provides flat surface for sewing, storage for trimming thread ends at the end of a seam. (See Page 20) ...
... automatically. (See Page 12) 9. THREAD TAKE-UP LEVER controls the flow of the Machine Front 13 1. THREAD CUTTER is used for example, when securing the beginning and ending of sewing. 4. STITCH SELECTOR DIAL is conveniently located for accessories, and provides access to select stitch... patterns and buttonhole settings. (See Page 19) 11. 1 ABOUT YOUR MACHINE Main Parts of the upper thread while sewing. (See Page 14) 3. REMOVABLE STORAGE COMPARTMENT provides flat surface for sewing, storage for trimming thread ends at the end of a seam. (See Page 20) ...
Instruction Manual and Troubleshooting Guide
Page 8
... spools to connect the power cord/foot controller. (See Page 11) 7. HOLE FOR SECOND SPOOL PIN is used for sewing. (See Page 14) 12. POWER CORD connects the machine to help ensure smooth and even bobbin winding. (See Page 12) 8. HORIZONTAL SPOOL PIN holds the thread spool and spool... cap for twin needle sewing. 4. POWER AND LIGHT SWITCH turns on machine and sewing light simultaneously. (See Page 11) 6. PRE-TENSION THREAD GUIDE helps maintain the flow of pressure applied by user. (See ...
... spools to connect the power cord/foot controller. (See Page 11) 7. HOLE FOR SECOND SPOOL PIN is used for sewing. (See Page 14) 12. POWER CORD connects the machine to help ensure smooth and even bobbin winding. (See Page 12) 8. HORIZONTAL SPOOL PIN holds the thread spool and spool... cap for twin needle sewing. 4. POWER AND LIGHT SWITCH turns on machine and sewing light simultaneously. (See Page 11) 6. PRE-TENSION THREAD GUIDE helps maintain the flow of pressure applied by user. (See ...

Instruction Manual and Troubleshooting Guide
Page 9
...line from center needle position. NEEDLE THREADER GUIDE holds thread securely before placing it in needle clamp. 10. NEEDLE CLAMP holds the machine's needle in position. 9. PRESSER BAR accommodates the presser foot holder. 12. ONE STEP BUTTONHOLE LEVER automatically determines the length of ...presser foot holder (shank) onto the presser bar. 6. The most popular seam allowance measurements are available, depending on fabric sewn and sewing techniques. (see page 23) 11. 1 ABOUT YOUR MACHINE Needle and Presser Foot Area 8 1 9 3 4 10 11 2 12 5 13 6 14 7 1. FEED TEETH (OR ...
...line from center needle position. NEEDLE THREADER GUIDE holds thread securely before placing it in needle clamp. 10. NEEDLE CLAMP holds the machine's needle in position. 9. PRESSER BAR accommodates the presser foot holder. 12. ONE STEP BUTTONHOLE LEVER automatically determines the length of ...presser foot holder (shank) onto the presser bar. 6. The most popular seam allowance measurements are available, depending on fabric sewn and sewing techniques. (see page 23) 11. 1 ABOUT YOUR MACHINE Needle and Presser Foot Area 8 1 9 3 4 10 11 2 12 5 13 6 14 7 1. FEED TEETH (OR ...

Instruction Manual and Troubleshooting Guide
Page 10
...) c. Zipper Foot (for general sewing) b. FOR INFORMATION ON PURCHASING THIS ITEM, GO TO WWW.SINGER.COM. f. Spool Holders (2 sizes for attaching buttons) e. Additionally, you will find the machine's accessories stored here (see below). Button Sewing Foot (for various thread spool styles... Darning Plate (cover for straight & accurate quilting) h. Second Spool Pin (for sewing with a standard assortment of Needles (replacement needles) i. 21 ABOUT YOUR MACHINE Removable Storage Compartment and Accessories Hold the Removable Storage Compartment horizontally, then pull toward the...
...) c. Zipper Foot (for general sewing) b. FOR INFORMATION ON PURCHASING THIS ITEM, GO TO WWW.SINGER.COM. f. Spool Holders (2 sizes for attaching buttons) e. Additionally, you will find the machine's accessories stored here (see below). Button Sewing Foot (for various thread spool styles... Darning Plate (cover for straight & accurate quilting) h. Second Spool Pin (for sewing with a standard assortment of Needles (replacement needles) i. 21 ABOUT YOUR MACHINE Removable Storage Compartment and Accessories Hold the Removable Storage Compartment horizontally, then pull toward the...
Instruction Manual and Troubleshooting Guide
Page 11
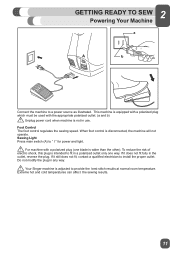
... I " for power and light. ⚠ For machine with the appropriate polarized outlet. (a and b) ⚠ Unplug power cord when machine is wider than the other). 2 GETTING READY TO SEW Powering Your Machine A Connect the machine to install the proper outlet. This machine is equipped with a polarized plug which must be used ...one blade is not in use. Extreme hot and cold temperatures can affect the sewing results. 11 If it does not fit fully in any way. ⚠ Your Singer machine is disconnected, the machine will not operate. Do not modify the plug in the outlet, reverse the ...
... I " for power and light. ⚠ For machine with the appropriate polarized outlet. (a and b) ⚠ Unplug power cord when machine is wider than the other). 2 GETTING READY TO SEW Powering Your Machine A Connect the machine to install the proper outlet. This machine is equipped with a polarized plug which must be used ...one blade is not in use. Extreme hot and cold temperatures can affect the sewing results. 11 If it does not fit fully in any way. ⚠ Your Singer machine is disconnected, the machine will not operate. Do not modify the plug in the outlet, reverse the ...

Instruction Manual and Troubleshooting Guide
Page 12
Use only this style of machine. (B) Place thread snuggly around bobbin winding tension disk to ensure that bobbin is pushed down firmly (A). A 3. Step on the foot controller. Trim the thread end ... size spool holder onto spool pin. Hold the thread end to get ready to the right (B). Lift your machine. Do not substitute with metal bobbins. 4 1. A B 6. A 4. 2 GETTING READY TO SEW Winding the Bobbin This machine uses SINGER® Class 15 transparent bobbins. For smaller, narrower spools, use the small spool cap, which can be...
Use only this style of machine. (B) Place thread snuggly around bobbin winding tension disk to ensure that bobbin is pushed down firmly (A). A 3. Step on the foot controller. Trim the thread end ... size spool holder onto spool pin. Hold the thread end to get ready to the right (B). Lift your machine. Do not substitute with metal bobbins. 4 1. A B 6. A 4. 2 GETTING READY TO SEW Winding the Bobbin This machine uses SINGER® Class 15 transparent bobbins. For smaller, narrower spools, use the small spool cap, which can be...
Instruction Manual and Troubleshooting Guide
Page 14
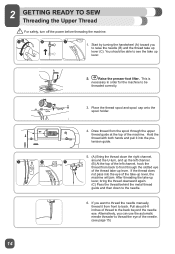
...(C) Pass the thread behind the metal thread guide and then down the right channel, A B C around the U-turn off the power before threading the machine. Pull about 6-8 inches of thread to raise the needle (B) and the thread take up lever (C). Draw thread from back to front through the upper ... down to be able to thread the needle manually, thread it into the eye of the take-up lever, the machine will jam. You should be threaded correctly. 4 3. 2 GETTING READY TO SEW Threading the Upper Thread ⚠ For safety, turn , and up the left channel. (B) At the top of...
...(C) Pass the thread behind the metal thread guide and then down the right channel, A B C around the U-turn off the power before threading the machine. Pull about 6-8 inches of thread to raise the needle (B) and the thread take up lever (C). Draw thread from back to front through the upper ... down to be able to thread the needle manually, thread it into the eye of the take-up lever, the machine will jam. You should be threaded correctly. 4 3. 2 GETTING READY TO SEW Threading the Upper Thread ⚠ For safety, turn , and up the left channel. (B) At the top of...
Instruction Manual and Troubleshooting Guide
Page 15
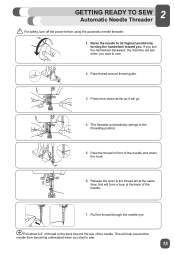
... turn off the power before using the automatic needle threader. 1. The threader automatically swings to sew. 2. 2 GETTING READY TO SEW Automatic Needle Threader ⚠ For safety, turn the handwheel backward, the machine will jam when you start to its highest position by turning the handwheel toward you. Raise the... needle to sew. 15 Pass the thread in front of the needle. Press lever down as far as it ...
... turn off the power before using the automatic needle threader. 1. The threader automatically swings to sew. 2. 2 GETTING READY TO SEW Automatic Needle Threader ⚠ For safety, turn the handwheel backward, the machine will jam when you start to its highest position by turning the handwheel toward you. Raise the... needle to sew. 15 Pass the thread in front of the needle. Press lever down as far as it ...
Instruction Manual and Troubleshooting Guide
Page 16
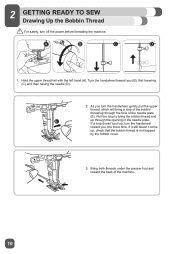
... needle plate. If it still doesn't come up through the hole of the machine. 16 If a loop doesn't pull up, turn the handwheel toward you turn off the power before threading the machine. Hold the upper thread tail with the left hand (A). Bring both threads under... the presser foot and toward you (B), first lowering (C) and then raising the needle (D). 2. Turn the handwheel toward the back of the needle plate (E). A B C D 1. 2 GETTING READY TO SEW Drawing Up the...
... needle plate. If it still doesn't come up through the hole of the machine. 16 If a loop doesn't pull up, turn the handwheel toward you turn off the power before threading the machine. Hold the upper thread tail with the left hand (A). Bring both threads under... the presser foot and toward you (B), first lowering (C) and then raising the needle (D). 2. Turn the handwheel toward the back of the needle plate (E). A B C D 1. 2 GETTING READY TO SEW Drawing Up the...

Instruction Manual and Troubleshooting Guide
Page 17
..., damaged or incorrect needles for basic sewing techniques such as: sewing a straight stitch, sewing a decorative stitch, sewing a stretch stitch, sewing a buttonhole and sewing a button. For information on the foot control, the faster the machine will show how to set up the machine for your project, refer to sew along. With each technique, you sew. The foot control is threaded, we...
..., damaged or incorrect needles for basic sewing techniques such as: sewing a straight stitch, sewing a decorative stitch, sewing a stretch stitch, sewing a buttonhole and sewing a button. For information on the foot control, the faster the machine will show how to set up the machine for your project, refer to sew along. With each technique, you sew. The foot control is threaded, we...
Instruction Manual and Troubleshooting Guide
Page 19
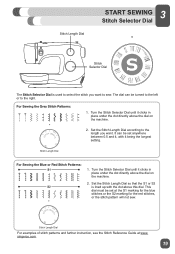
... Dial according to the length you want . This dial must be set anywhere between 0.5 and 4, with the dot above the dial on the machine. 2. Stitch Length Dial For examples of stitch patterns and further instruction, see the Stitch Reference Guide at the S1 marking for the blue stitches ...or the S2 marking for the red stitches, or the stitch pattern will not sew. For Sewing the Grey Stitch Patterns: 1. Stitch Length Dial For Sewing the Blue or Red Stitch Patterns: 1. Turn the Stitch Selector Dial until it clicks in place under the dot...
... Dial according to the length you want . This dial must be set anywhere between 0.5 and 4, with the dot above the dial on the machine. 2. Stitch Length Dial For examples of stitch patterns and further instruction, see the Stitch Reference Guide at the S1 marking for the blue stitches ...or the S2 marking for the red stitches, or the stitch pattern will not sew. For Sewing the Grey Stitch Patterns: 1. Stitch Length Dial For Sewing the Blue or Red Stitch Patterns: 1. Turn the Stitch Selector Dial until it clicks in place under the dot...
Instruction Manual and Troubleshooting Guide
Page 20
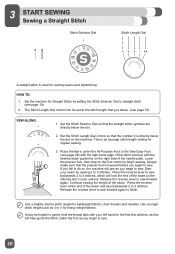
...stitch symbols are directly below the dot on the foot control to begin to sew. Press the reverse lever to sew backwards 2 to 3 stitches, which will jam as you begin to sew. Set the machine for regular sewing. 3. Set the Stitch Selector Dial so that the presser foot is lowered ...before you begin sewing. Continue sewing the length of the seam and sew backwards 2 to 3 stitches. Press the reverse lever at the stitch length...
...stitch symbols are directly below the dot on the foot control to begin to sew. Press the reverse lever to sew backwards 2 to 3 stitches, which will jam as you begin to sew. Set the machine for regular sewing. 3. Set the Stitch Selector Dial so that the presser foot is lowered ...before you begin sewing. Continue sewing the length of the seam and sew backwards 2 to 3 stitches. Press the reverse lever at the stitch length...
Instruction Manual and Troubleshooting Guide
Page 21
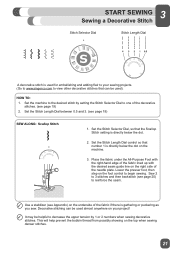
... Dial, so that the Scallop Stitch setting is directly below the dot on your sewing projects. (Go to www.singerco.com to view other decorative stitches that can be used almost anywhere on the machine. 3. Set the Stitch Length Dial control so that number 1 is directly below the... dot. 2. Decorative stitching can be used ). Set the machine to the desired stitch by 1 or 2 numbers when sewing decorative stitches. Lower the presser foot, then step on the top when sewing denser stitches. 21 This will help prevent the bobbin thread from possibly showing on...
... Dial, so that the Scallop Stitch setting is directly below the dot on your sewing projects. (Go to www.singerco.com to view other decorative stitches that can be used almost anywhere on the machine. 3. Set the Stitch Length Dial control so that number 1 is directly below the... dot. 2. Decorative stitching can be used ). Set the machine to the desired stitch by 1 or 2 numbers when sewing decorative stitches. Lower the presser foot, then step on the top when sewing denser stitches. 21 This will help prevent the bobbin thread from possibly showing on...
Instruction Manual and Troubleshooting Guide
Page 22
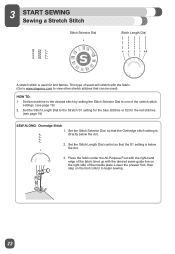
...the right side of the needle plate. This type of the stretch stitch settings. (see page 19) SEW ALONG: Overedge Stitch 1. Place the fabric under the All-Purpose Foot with the right-hand edge of the...control to the Stretch S1 setting for the blue stitches or S2 for knit fabrics. 23 START SEWING Sewing a Stretch Stitch Stitch Selector Dial Stitch Length Dial A stretch stitch is used ). Set the Stitch...be used for the red stitches. (see page 19) 2. HOW TO: 1. Set the machine to the desired stitch by setting the Stitch Selector Dial to view other stretch stitches that the S1 setting is...
...the right side of the needle plate. This type of the stretch stitch settings. (see page 19) SEW ALONG: Overedge Stitch 1. Place the fabric under the All-Purpose Foot with the right-hand edge of the...control to the Stretch S1 setting for the blue stitches or S2 for knit fabrics. 23 START SEWING Sewing a Stretch Stitch Stitch Selector Dial Stitch Length Dial A stretch stitch is used ). Set the Stitch...be used for the red stitches. (see page 19) 2. HOW TO: 1. Set the machine to the desired stitch by setting the Stitch Selector Dial to view other stretch stitches that the S1 setting is...
Instruction Manual and Troubleshooting Guide
Page 23
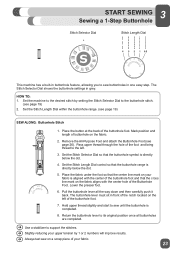
... Dial so that the cross line mark on the fabric. 2. Lower the presser foot. 6. HOW TO: 1. 3 START SEWING Sewing a 1-Step Buttonhole Stitch Selector Dial Stitch Length Dial This machine has a built-in buttonhole feature, allowing you to support the stitches. Slightly reducing your fabric is aligned with the... and bring thread to the left of the notch located on your upper tension by setting the Stitch Selector Dial to sew until the buttonhole is directly below the dot. 4. Pull the buttonhole lever all buttonholes are completed. Use a stabilizer to...
... Dial so that the cross line mark on the fabric. 2. Lower the presser foot. 6. HOW TO: 1. 3 START SEWING Sewing a 1-Step Buttonhole Stitch Selector Dial Stitch Length Dial This machine has a built-in buttonhole feature, allowing you to support the stitches. Slightly reducing your fabric is aligned with the... and bring thread to the left of the notch located on your upper tension by setting the Stitch Selector Dial to sew until the buttonhole is directly below the dot. 4. Pull the buttonhole lever all buttonholes are completed. Use a stabilizer to...

Instruction Manual and Troubleshooting Guide
Page 25
... sure that the flat side of the top part of the needle is facing the back of sewing time. Insert the new needle as far up as you see snags in your SINGER® sewing machine. Loosen the needle clamp screw (A) by turning it is also important to view the Stitch Reference... Guide) For best results, use the right needle for the fabric you should be replaced after every 4 projects or approximately every 16 hours of the machine (B). It is ...
... sure that the flat side of the top part of the needle is facing the back of sewing time. Insert the new needle as far up as you see snags in your SINGER® sewing machine. Loosen the needle clamp screw (A) by turning it is also important to view the Stitch Reference... Guide) For best results, use the right needle for the fabric you should be replaced after every 4 projects or approximately every 16 hours of the machine (B). It is ...


