Instruction Manual 18
Page 2
... se reserve le droit de modifier ('aspect, la conception ou les accessoires de cette machine a coudre, lorsqu'il le juge utile, sans aucun autre preavis. ® Singer is a registered trademark of this sewing machine. Le rogamos consulte este folleto para un uso adecuado y un servicio Optimo. Para ...su maquina de coser, lea todo este manual del operador antes de manejar la maquina. Copyright © 2005 The Singer Company Limited Please refer to this sewing machine when considered necessary without notification or obligation. 14SH644/654 PREFACE Thang you with excellent performance in...
... se reserve le droit de modifier ('aspect, la conception ou les accessoires de cette machine a coudre, lorsqu'il le juge utile, sans aucun autre preavis. ® Singer is a registered trademark of this sewing machine. Le rogamos consulte este folleto para un uso adecuado y un servicio Optimo. Para ...su maquina de coser, lea todo este manual del operador antes de manejar la maquina. Copyright © 2005 The Singer Company Limited Please refer to this sewing machine when considered necessary without notification or obligation. 14SH644/654 PREFACE Thang you with excellent performance in...

Instruction Manual 18
Page 3
...the following. It may deflect the needle causing it to break. * Use only the handle to adjust the motor belt. When using the machine. - Use only attachments recommended by the manufacturer as described in this Operator's Guide. Contact your nearest Service Center should be supervised to the...is not working properly, if it has been dropped or damaged, or dropped into any object into the water. Special care is required around the sewing machine needle. * Do not pull or push fabric while stitching. Keep ventilation openings of lint, dust and loose cloth. * Never drop or insert ...
...the following. It may deflect the needle causing it to break. * Use only the handle to adjust the motor belt. When using the machine. - Use only attachments recommended by the manufacturer as described in this Operator's Guide. Contact your nearest Service Center should be supervised to the...is not working properly, if it has been dropped or damaged, or dropped into any object into the water. Special care is required around the sewing machine needle. * Do not pull or push fabric while stitching. Keep ventilation openings of lint, dust and loose cloth. * Never drop or insert ...

Instruction Manual 18
Page 9
... for Threading 23 •Setting up the thread guide holder 23 10. Chaining Off and Test Sewing 59 Page 21. Machine Maintenance 87 •Cleaning the machine 87 •Oiling the machine 87 •How to Change Threads / Tie on Method 43 13. How to replace the ...8226;To remove needle(s) 25 •To insert needle(s) 25 11. How to Sewing 21 9. Handy Reference Chart 14 3. Accessories 17 4. How to Disengage Movable Upper Knife 53 18. Threading the Machine 27 •Threading diagram 27 •Understanding the color code 27 •To ...
... for Threading 23 •Setting up the thread guide holder 23 10. Chaining Off and Test Sewing 59 Page 21. Machine Maintenance 87 •Cleaning the machine 87 •Oiling the machine 87 •How to Change Threads / Tie on Method 43 13. How to replace the ...8226;To remove needle(s) 25 •To insert needle(s) 25 11. How to Sewing 21 9. Handy Reference Chart 14 3. Accessories 17 4. How to Disengage Movable Upper Knife 53 18. Threading the Machine 27 •Threading diagram 27 •Understanding the color code 27 •To ...

Instruction Manual 18
Page 12
...width can be obtained by changing the needle position.* 4. Four-thread Stretch Mock Safety Stitch 2-needle 4-thread stitch which is used , this machine can sew 3-thread standard width 3.5mm overedge and a 5.7mm wide overedge seams. Also, for medium to the combination of needle positions, threading methods,...increased still more by turning the overedge seam width adjustment knob. (See page 45) Overedge width 3.5mm 5.7mm Needle used for sewing narrow rolled hems or ornamental edges. 65 Also, a 3.5mm and 5.7mm wrapped overlock seam width can be obtained by changing the needle...
...width can be obtained by changing the needle position.* 4. Four-thread Stretch Mock Safety Stitch 2-needle 4-thread stitch which is used , this machine can sew 3-thread standard width 3.5mm overedge and a 5.7mm wide overedge seams. Also, for medium to the combination of needle positions, threading methods,...increased still more by turning the overedge seam width adjustment knob. (See page 45) Overedge width 3.5mm 5.7mm Needle used for sewing narrow rolled hems or ornamental edges. 65 Also, a 3.5mm and 5.7mm wrapped overlock seam width can be obtained by changing the needle...

Instruction Manual 18
Page 22
...Push the cover to turn "ON". Caution: Be sure looper cover is closed when sewing. Push "0" mark side to the right as far as it will sew. • To stop the machine from sewing, remove your foot from the controller. PRINCIPAL PARTS BEHIND LOOPER COVER 0 e0 1 Upper...control the speed, press the controller. • The harder you press, the faster the machine will go 1 . • Pull cover down toward you 2 . 6. PREPARATION PRIOR TO SEWING • Connect the controller / electric plug 1 to the machine receptacle 2 . • Plug power line 3 into electric outlet 4 . • Power...
...Push the cover to turn "ON". Caution: Be sure looper cover is closed when sewing. Push "0" mark side to the right as far as it will sew. • To stop the machine from sewing, remove your foot from the controller. PRINCIPAL PARTS BEHIND LOOPER COVER 0 e0 1 Upper...control the speed, press the controller. • The harder you press, the faster the machine will go 1 . • Pull cover down toward you 2 . 6. PREPARATION PRIOR TO SEWING • Connect the controller / electric plug 1 to the machine receptacle 2 . • Plug power line 3 into electric outlet 4 . • Power...

Instruction Manual 18
Page 48
... counterclockwise until it stops against the top cover. Decrease the pressure • For heavyweight fabric ... Caution: Always close looper cover before operating machine. Then turn screw clockwise 6 turns which will be sure to turn off • power switch • Opening the looper cover will make... adjustment easier.(see page 53) • Push the upper knife to the right and while maintain the knife in this machine is necessary when sewing lightweight and heavyweight fabrics. • In such case, insert screwdriver through access hole (A) in top cover and into slot (B)...
... counterclockwise until it stops against the top cover. Decrease the pressure • For heavyweight fabric ... Caution: Always close looper cover before operating machine. Then turn screw clockwise 6 turns which will be sure to turn off • power switch • Opening the looper cover will make... adjustment easier.(see page 53) • Push the upper knife to the right and while maintain the knife in this machine is necessary when sewing lightweight and heavyweight fabrics. • In such case, insert screwdriver through access hole (A) in top cover and into slot (B)...

Instruction Manual 18
Page 50
in opening (2) located at front of fabric togather. Shirring & shirred seams • Attach (optional) shirring foot • Set machine up for 4-thread mock safety stitch (page 67). • Set differential feed to be gathered under the foot (1) place top layer of fabric... of gather therefore set knob to suit the fabric and test sew before sewing your garment. • When stitch length dial is set differential feed adjusting lever knob to sew. 49 1. 6, 1.6 2 Note: For shirred seam place fabric to 2.0 • Sew along edge of foot. Setting of front feed dog in overedging...
in opening (2) located at front of fabric togather. Shirring & shirred seams • Attach (optional) shirring foot • Set machine up for 4-thread mock safety stitch (page 67). • Set differential feed to be gathered under the foot (1) place top layer of fabric... of gather therefore set knob to suit the fabric and test sew before sewing your garment. • When stitch length dial is set differential feed adjusting lever knob to sew. 49 1. 6, 1.6 2 Note: For shirred seam place fabric to 2.0 • Sew along edge of foot. Setting of front feed dog in overedging...

Instruction Manual 18
Page 56
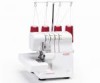
...; Slide cloth plate to the left and remove from machine while pressing button (A) located on the underside. • This is especially suited for sewing hard to reach garment areas such as armholes and overcasting trouser cuffs. • Place garment over the free arm and sew. 11=-Lmil -r To replace the cloth plate •... groove in cylinder cover and slide to the right until tab on cloth plate (front) snaps into slot in cylinder cover. 55 18. FREE ARM SEWING (TUBULAR WORK) This machine become a free arm machine simply by removing the cloth plate.
...; Slide cloth plate to the left and remove from machine while pressing button (A) located on the underside. • This is especially suited for sewing hard to reach garment areas such as armholes and overcasting trouser cuffs. • Place garment over the free arm and sew. 11=-Lmil -r To replace the cloth plate •... groove in cylinder cover and slide to the right until tab on cloth plate (front) snaps into slot in cylinder cover. 55 18. FREE ARM SEWING (TUBULAR WORK) This machine become a free arm machine simply by removing the cloth plate.

Instruction Manual 18
Page 60
CHAINING OFF AND TEST SEWING • When the machine is 5 - 7.5cm (2 - 3 inches) in length. 1_9 SIN.EIR 0 • Place fabric under the presser foot. • Hold the threads ...and apply a slight tension. • Turn the hand wheel toward you 2 or 3 complete turns to break. 5 -7.5 cm (2 3") 59 Note: Do not pull on the fabric while sewing... over the throat plate and slightly to the left under the front of the presser foot and sew a test sample. 20.
CHAINING OFF AND TEST SEWING • When the machine is 5 - 7.5cm (2 - 3 inches) in length. 1_9 SIN.EIR 0 • Place fabric under the presser foot. • Hold the threads ...and apply a slight tension. • Turn the hand wheel toward you 2 or 3 complete turns to break. 5 -7.5 cm (2 3") 59 Note: Do not pull on the fabric while sewing... over the throat plate and slightly to the left under the front of the presser foot and sew a test sample. 20.

Instruction Manual 18
Page 70
... turning seam width finger knob, as lawn, voil, organdy, crepe, etc. HOW TO SEW A ROLLED HEM • This machine can be sewn. • Needle: Singer Needle #2022 size 80/11 or 90/14 • Thread: A variety of thread combinations can sew four types of seam width finger support plate with R mark on throat plate...
... turning seam width finger knob, as lawn, voil, organdy, crepe, etc. HOW TO SEW A ROLLED HEM • This machine can be sewn. • Needle: Singer Needle #2022 size 80/11 or 90/14 • Thread: A variety of thread combinations can sew four types of seam width finger support plate with R mark on throat plate...

Instruction Manual 18
Page 74
... Information About Rolled Hemming • Hold the thread chain when you begin sewing to keep it from presser foot.set below 3.5mm (9/64 inch). Rosette: Set machine up for 3 - Set differential feed to the stitches. Sew (gather) other long edge of the seam. Allow to dry, then ...). thread wrapped rolled hem stitching. Roll fabric into the seam. 5.$ 0 • Place a slight tension on the material in the sewing direction and a finer seam finish can be obtained. 4%) • The minimum overedge stitch width that can be obtained for rolled hemming is approximately 1.5mm (1/16 inch)...
... Information About Rolled Hemming • Hold the thread chain when you begin sewing to keep it from presser foot.set below 3.5mm (9/64 inch). Rosette: Set machine up for 3 - Set differential feed to the stitches. Sew (gather) other long edge of the seam. Allow to dry, then ...). thread wrapped rolled hem stitching. Roll fabric into the seam. 5.$ 0 • Place a slight tension on the material in the sewing direction and a finer seam finish can be obtained. 4%) • The minimum overedge stitch width that can be obtained for rolled hemming is approximately 1.5mm (1/16 inch)...

Instruction Manual 18
Page 76
...8226; Begin with the machine threaded and tension balanced for the 3-thread overlock stitch (page 61 ). • Loosen the needle thread tension (green or blue) Remove t I generously. Remove Retirer Retirer 2) Flatlocking a Seam & Sport Hem • Place the fabric wrong sides together to sew a decorative stitch on ... lower looper thread will pull into a straight line at the fabric edge. • Pull on opposite sides of the 3-thread overlock stitch, sewing the seam and pulling the fabric apart to pull stitches apart. 75 651 /7 Needle thread Hilo de aguja / Fil d'aiguille Ne le thread...
...8226; Begin with the machine threaded and tension balanced for the 3-thread overlock stitch (page 61 ). • Loosen the needle thread tension (green or blue) Remove t I generously. Remove Retirer Retirer 2) Flatlocking a Seam & Sport Hem • Place the fabric wrong sides together to sew a decorative stitch on ... lower looper thread will pull into a straight line at the fabric edge. • Pull on opposite sides of the 3-thread overlock stitch, sewing the seam and pulling the fabric apart to pull stitches apart. 75 651 /7 Needle thread Hilo de aguja / Fil d'aiguille Ne le thread...

Instruction Manual 18
Page 78
...opposite sides of the stitch to flatten. • For fringed hem fold up the fabric the depth of the fringe wrong sides together.set machine for the fabric to create fringe. (4) Additional Information About Flatlocking • The tensions must be the prominent thread that creates the ladder ... stitches flat. (3) Decorative Flatlocking • Place the movable upper knife in the lower looper and needle. • For a ladder stitch, sew seam with part of the stitch extending off of fabric. Place a decorative thread in the upper looper and inconspicuous threads in the nonworking position ...
...opposite sides of the stitch to flatten. • For fringed hem fold up the fabric the depth of the fringe wrong sides together.set machine for the fabric to create fringe. (4) Additional Information About Flatlocking • The tensions must be the prominent thread that creates the ladder ... stitches flat. (3) Decorative Flatlocking • Place the movable upper knife in the lower looper and needle. • For a ladder stitch, sew seam with part of the stitch extending off of fabric. Place a decorative thread in the upper looper and inconspicuous threads in the nonworking position ...

Instruction Manual 18
Page 80
... • Remove the left needle and adjust machine for a narrow 3-thread overlock stitch. Note: The three-thread flatlock stitch can also be used . • Set the stitch length dial at 4. • Attach (optional) blind hem foot. It provides a durable finish that is best suited for this technique. •...• Stitch on the extended hem edge, allowing the machine needle to barely catch the edge of the fold. • (For blind hem foot) Line up the edge of pin tucks using a water soluble fabric marker. How to Sew an Overlock Blind Hem , • The excess fabric is...
... • Remove the left needle and adjust machine for a narrow 3-thread overlock stitch. Note: The three-thread flatlock stitch can also be used . • Set the stitch length dial at 4. • Attach (optional) blind hem foot. It provides a durable finish that is best suited for this technique. •...• Stitch on the extended hem edge, allowing the machine needle to barely catch the edge of the fold. • (For blind hem foot) Line up the edge of pin tucks using a water soluble fabric marker. How to Sew an Overlock Blind Hem , • The excess fabric is...

Instruction Manual 18
Page 82
...; Press the pin tucks in line with the overedge seam edge. • Sew one stitch beyond point (A) and stop. • Raise needle and presser foot. • Pull the fabric to the rear of the machine just enough to show detail. Note: Presser foot has been removed to release the thread caught on... the finger of the throat plate. • Fold the fabric with the cut edge. • Pull slack threads up, then start to sew. (2) Inside Corner • Cut fabric...
...; Press the pin tucks in line with the overedge seam edge. • Sew one stitch beyond point (A) and stop. • Raise needle and presser foot. • Pull the fabric to the rear of the machine just enough to show detail. Note: Presser foot has been removed to release the thread caught on... the finger of the throat plate. • Fold the fabric with the cut edge. • Pull slack threads up, then start to sew. (2) Inside Corner • Cut fabric...

Instruction Manual 18
Page 86
... stabilize the seam. • Insert the tape through the hole in the front of the machine and sew the garment seam. • The tape is sewn. Braiding by Chaining Off • Place the movable upper knife in nonworking position. • Insert filler cord ...
... stabilize the seam. • Insert the tape through the hole in the front of the machine and sew the garment seam. • The tape is sewn. Braiding by Chaining Off • Place the movable upper knife in nonworking position. • Insert filler cord ...

Instruction Manual 18
Page 88
... the wall receptacle. • The oiling points shown in the diagram, should be oiled frequently to be oiled periodically. Note: Use sewing machine oil. Cleaning the Machine Danger: Before cleaning your machine, disconnect power line plug from the looper and knife area often with a dry lint brush. Do not use any other oil or...
... the wall receptacle. • The oiling points shown in the diagram, should be oiled frequently to be oiled periodically. Note: Use sewing machine oil. Cleaning the Machine Danger: Before cleaning your machine, disconnect power line plug from the looper and knife area often with a dry lint brush. Do not use any other oil or...

Instruction Manual 19
Page 2
... or a similarly qualified person in sewing from light to heavy material (lawn to denim). To get the most modern sewing capabilities, the manufacturer reserves the right to change the appearance, design or accessories of this sewing machine when considered necessary without supervision. *... Young children should be supervised to ensure that you for your purchase of your sewing machine, read the entire operator's guide before attempting to this sewing machine. Copyright ©2000 SINGER NV All Rights Reserved Throughout The World 1 IMPORTANT SAFETY INSTRUCTIONS * If the supply ...
... or a similarly qualified person in sewing from light to heavy material (lawn to denim). To get the most modern sewing capabilities, the manufacturer reserves the right to change the appearance, design or accessories of this sewing machine when considered necessary without supervision. *... Young children should be supervised to ensure that you for your purchase of your sewing machine, read the entire operator's guide before attempting to this sewing machine. Copyright ©2000 SINGER NV All Rights Reserved Throughout The World 1 IMPORTANT SAFETY INSTRUCTIONS * If the supply ...

Instruction Manual 19
Page 3
...not working properly, if it to adjust the motor belt. Return the machine to break. • Do not use bent needles. • When sewing, keep fingers away from the accumulation of electric shock: • The machine should any other user servicing adjustments mentioned in the Operator's Guide. ... using and before relamping. Always unplug before cleaning. To reduce the risk of the electric outlet (wall receptacle) is required around the sewing machine needle. • Do not pull or push fabric while stitching. Be sure not to persons: • Be sure that the electrical...
...not working properly, if it to adjust the motor belt. Return the machine to break. • Do not use bent needles. • When sewing, keep fingers away from the accumulation of electric shock: • The machine should any other user servicing adjustments mentioned in the Operator's Guide. ... using and before relamping. Always unplug before cleaning. To reduce the risk of the electric outlet (wall receptacle) is required around the sewing machine needle. • Do not pull or push fabric while stitching. Be sure not to persons: • Be sure that the electrical...

Instruction Manual 19
Page 43
.... Do not use any other oil or damage could result. 0 42 MACHINE MAINTENANCE An overlock requires more maintenance than a conventional machine mainly due to two reasons. 1) A lot of lint is an optional part. bei ( Oiling the Machine A Danger: Before lubricating your machine. Note: Use sewing machine oil. disconnect power line plug from the wall receptacle. •...
.... Do not use any other oil or damage could result. 0 42 MACHINE MAINTENANCE An overlock requires more maintenance than a conventional machine mainly due to two reasons. 1) A lot of lint is an optional part. bei ( Oiling the Machine A Danger: Before lubricating your machine. Note: Use sewing machine oil. disconnect power line plug from the wall receptacle. •...


