
XR10S|XR10X|XR20S|XR20X Operation Manual
Page 5
...any safety notification of inspection, modification, or recall that SHARP may be required to rain or moisture. DURING NORMAL OPERATION, NEVER TURN THE PROJECTOR OFF BY DISCONNECTING THE POWER CORD. During normal operation, when putting the projector into the beam of light, or view directly. ... ensure that you immediately receive the full benefit of the parts, service and labor warranty applicable to your new SHARP Projector, using the projector, please read this equipment. Ensure the cooling fan has stopped before disconnecting the power cord. Do not stare ...
...any safety notification of inspection, modification, or recall that SHARP may be required to rain or moisture. DURING NORMAL OPERATION, NEVER TURN THE PROJECTOR OFF BY DISCONNECTING THE POWER CORD. During normal operation, when putting the projector into the beam of light, or view directly. ... ensure that you immediately receive the full benefit of the parts, service and labor warranty applicable to your new SHARP Projector, using the projector, please read this equipment. Ensure the cooling fan has stopped before disconnecting the power cord. Do not stare ...

XR10S|XR10X|XR20S|XR20X Operation Manual
Page 6
... SHARP PROJECTOR, MODEL XR-20X/XR-20S/XR-10X/XR-10S This device complies with Part 15 of the FCC Rules. Responsible Party: SHARP ELECTRONICS CORPORATION Sharp Plaza, Mahwah, New Jersey 07430-2135 TEL: 1-800-BE-SHARP (1-800-237-4277) U.S.A. This very sophisticated panel contains 786,432 (XR20X/XR-10X) / 480,000 (XR-20S/XR-...one or more of America, the Electronic Industries Alliance: www.eiae.org . Operation is no guarantee that may be determined by turning the equipment off and on page 50. Caution Concerning Lamp Replacement See "Replacing the Lamp" on , the user is connected....
... SHARP PROJECTOR, MODEL XR-20X/XR-20S/XR-10X/XR-10S This device complies with Part 15 of the FCC Rules. Responsible Party: SHARP ELECTRONICS CORPORATION Sharp Plaza, Mahwah, New Jersey 07430-2135 TEL: 1-800-BE-SHARP (1-800-237-4277) U.S.A. This very sophisticated panel contains 786,432 (XR20X/XR-10X) / 480,000 (XR-20S/XR-...one or more of America, the Electronic Industries Alliance: www.eiae.org . Operation is no guarantee that may be determined by turning the equipment off and on page 50. Caution Concerning Lamp Replacement See "Replacing the Lamp" on , the user is connected....

XR10S|XR10X|XR20S|XR20X Operation Manual
Page 8
... Setting 44 Checking the Lamp Life Status 44 System Lock Function 44 Locking the Operation Buttons on 27 Turning the Power off (Putting the Projector into Standby Mode 27 Image Projection 28 About the Setup Guide 28 Adjusting the Projected Image 28 Switching... ......... 24 Connecting to a Monitor with RGB Input Terminal 25 Controlling the Projector by a Computer 26 Connecting the Power Cord 26 Using Basic Operation Turning the Projector On/Off 27 Turning the Projector on the Projector (Keylock Function 45 Troubleshooting with the Remote Control .... 34 Displaying and Setting...
... Setting 44 Checking the Lamp Life Status 44 System Lock Function 44 Locking the Operation Buttons on 27 Turning the Power off (Putting the Projector into Standby Mode 27 Image Projection 28 About the Setup Guide 28 Adjusting the Projected Image 28 Switching... ......... 24 Connecting to a Monitor with RGB Input Terminal 25 Controlling the Projector by a Computer 26 Connecting the Power Cord 26 Using Basic Operation Turning the Projector On/Off 27 Turning the Projector on the Projector (Keylock Function 45 Troubleshooting with the Remote Control .... 34 Displaying and Setting...

XR10S|XR10X|XR20S|XR20X Operation Manual
Page 12
... adjustment foot. 8 Avoid locations with thin air, set up the screen in places exposed to avoid personal injury caused by a Sharp Authorized Projector Dealer or Service Center. Be sure to hard impact and/or vibration. Close the curtains and dim the lights when setting up the... projector in a sunny or bright room. I When placing the projector in and turn on a level site within the adjustment range (8 degrees) of the optical system. Place the projector where the intake and exhaust vents are not obstructed.
... adjustment foot. 8 Avoid locations with thin air, set up the screen in places exposed to avoid personal injury caused by a Sharp Authorized Projector Dealer or Service Center. Be sure to hard impact and/or vibration. Close the curtains and dim the lights when setting up the... projector in a sunny or bright room. I When placing the projector in and turn on a level site within the adjustment range (8 degrees) of the optical system. Place the projector where the intake and exhaust vents are not obstructed.

XR10S|XR10X|XR20S|XR20X Operation Manual
Page 13
...the "File", "Open" menu. 9 ing indicator on how to make the connections AFTER unplugging the power cord of the projector from the AC outlet and turning off the projector, the cooling fan runs to rise in damage. This can work with the lens. To utilize these manuals, you can cause..., as the cooling fan also stops. Note • If the desired pdf file cannot be connected. Other connected equipment I When turning off the equipment to the projector, make the connections. The period the cooling fan runs will illuminate in . visual equipment to be opened by holding the lens....
...the "File", "Open" menu. 9 ing indicator on how to make the connections AFTER unplugging the power cord of the projector from the AC outlet and turning off the projector, the cooling fan runs to rise in damage. This can work with the lens. To utilize these manuals, you can cause..., as the cooling fan also stops. Note • If the desired pdf file cannot be connected. Other connected equipment I When turning off the equipment to the projector, make the connections. The period the cooling fan runs will illuminate in . visual equipment to be opened by holding the lens....

XR10S|XR10X|XR20S|XR20X Operation Manual
Page 15
KEYSTONE 31 button For entering the Keystone Correction mode. ENTER button 37 For setting items selected or adjusted on and putting the projector into standby mode. Introduction Part Names and Functions Numbers in this operation manual where the topic is explained. HEIGHT 29 ADJUST lever 27, 48 Lamp ... sides of the lens cap to the main pages in Z refer to attach or remove. 11 Front View Focus ring 28 For adjusting the focus. Projector Top View Power indicator 27, 48 STANDBY/ON 27 button For...
KEYSTONE 31 button For entering the Keystone Correction mode. ENTER button 37 For setting items selected or adjusted on and putting the projector into standby mode. Introduction Part Names and Functions Numbers in this operation manual where the topic is explained. HEIGHT 29 ADJUST lever 27, 48 Lamp ... sides of the lens cap to the main pages in Z refer to attach or remove. 11 Front View Focus ring 28 For adjusting the focus. Projector Top View Power indicator 27, 48 STANDBY/ON 27 button For...
XR10S|XR10X|XR20S|XR20X Operation Manual
Page 17
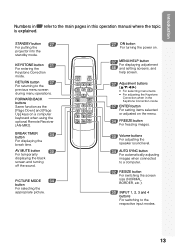
PICTURE MODE 34 button For selecting the appropriate picture. 27 ON button For turning the power on. 37 MENU/HELP button For displaying adjustment 46 and setting screens, and help screen....). BREAK TIMER 34 button For displaying the break time. AV MUTE button 30 For temporarily displaying the black screen and turning off the sound. RETURN button 37 For returning to the respective input modes. 13 Introduction Numbers in Z refer to ... button 31 For entering the Keystone Correction mode. STANDBY button 27 For putting the projector into the standby mode.
PICTURE MODE 34 button For selecting the appropriate picture. 27 ON button For turning the power on. 37 MENU/HELP button For displaying adjustment 46 and setting screens, and help screen....). BREAK TIMER 34 button For displaying the break time. AV MUTE button 30 For temporarily displaying the black screen and turning off the sound. RETURN button 37 For returning to the respective input modes. 13 Introduction Numbers in Z refer to ... button 31 For entering the Keystone Correction mode. STANDBY button 27 For putting the projector into the standby mode.

XR10S|XR10X|XR20S|XR20X Operation Manual
Page 20
... button 4 Focus ring 4 HEIGHT ADJUST lever 6 INPUT 1 button 1. For details, see pages 24 and 25. _PP. 21-26 3. Remove the lens cap and turn the projector on On the projector On the remote control _P. 27 16 Place the projector facing a wall or a screen _P. 18 2. Quick Start This section shows the basic operation...
... button 4 Focus ring 4 HEIGHT ADJUST lever 6 INPUT 1 button 1. For details, see pages 24 and 25. _PP. 21-26 3. Remove the lens cap and turn the projector on On the projector On the remote control _P. 27 16 Place the projector facing a wall or a screen _P. 18 2. Quick Start This section shows the basic operation...

XR10S|XR10X|XR20S|XR20X Operation Manual
Page 21
...again while the confirmation message is set to finish the Setup Guide. _P. 28 5. Turn the Power off Press the STANDBY/ON button on the projector or the STANDBY button on the projector, input mode switches in the Setup Guide and adjust the focus, screen size, and ...press the CINPUT 1/CINPUT 2/DINPUT 3/EINPUT 4 button to put the projector into standby mode. Turn the computer on the remote control. Adjust the projected image with the Setup Guide 1 After the projector turns on XR-20X.) On the projector Shrinks upper side. Shrinks lower side. On the remote control _P. ...
...again while the confirmation message is set to finish the Setup Guide. _P. 28 5. Turn the Power off Press the STANDBY/ON button on the projector or the STANDBY button on the projector, input mode switches in the Setup Guide and adjust the focus, screen size, and ...press the CINPUT 1/CINPUT 2/DINPUT 3/EINPUT 4 button to put the projector into standby mode. Turn the computer on the remote control. Adjust the projected image with the Setup Guide 1 After the projector turns on XR-20X.) On the projector Shrinks upper side. Shrinks lower side. On the remote control _P. ...

XR10S|XR10X|XR20S|XR20X Operation Manual
Page 27
...is the last device to be half of when using the ø3.5 mm mono audio cable, the volume level will be turned on after all connections, turn off the devices to be required for a list of computer signals compatible with some of the functions to not work. ... made. Use with computer signals other devices. After making all the connections are using a SHARP notebook computer). Note • See page 58 "Computer Compatibility Chart" for use with the projector. Connections 23 Refer to the specific instructions in your computer's operation manual to enable your nearest...
...is the last device to be half of when using the ø3.5 mm mono audio cable, the volume level will be turned on after all connections, turn off the devices to be required for a list of computer signals compatible with some of the functions to not work. ... made. Use with computer signals other devices. After making all the connections are using a SHARP notebook computer). Note • See page 58 "Computer Compatibility Chart" for use with the projector. Connections 23 Refer to the specific instructions in your computer's operation manual to enable your nearest...

XR10S|XR10X|XR20S|XR20X Operation Manual
Page 31
... characteristics. This is normal operation as faulty operation. • If the projector is set . STANDBY button ON button Turning the Power off (Putting the Projector into standby mode and immediately turned on the projector, a slight flickering of the lamp. Turning the Projector On/Off Turning the Projector on Note that the connections to external equipment and power outlet should...
... characteristics. This is normal operation as faulty operation. • If the projector is set . STANDBY button ON button Turning the Power off (Putting the Projector into standby mode and immediately turned on the projector, a slight flickering of the lamp. Turning the Projector On/Off Turning the Projector on Note that the connections to external equipment and power outlet should...

XR10S|XR10X|XR20S|XR20X Operation Manual
Page 32
Image Projection Setup Guide screen About the Setup Guide After turning on the projector, the Setup Guide screen appears to assist you do not want to... the Projected Image STANDBY/ON button ENTER button Zoom ring 1 Adjusting the Focus You can adjust the focus with projector setup. "SCR - ADJ" "Setup Guide" to adjust the focus while watching the projected image. 2 Adjusting ... (angle), or zoom regardless of the highlighted item. • If you with the focus ring on the projector. lights the items in the following order: 1 FOCUS 2 HEIGHT ADJUST 4 ENTER 3 ZOOM However, you can...
Image Projection Setup Guide screen About the Setup Guide After turning on the projector, the Setup Guide screen appears to assist you do not want to... the Projected Image STANDBY/ON button ENTER button Zoom ring 1 Adjusting the Focus You can adjust the focus with projector setup. "SCR - ADJ" "Setup Guide" to adjust the focus while watching the projected image. 2 Adjusting ... (angle), or zoom regardless of the highlighted item. • If you with the focus ring on the projector. lights the items in the following order: 1 FOCUS 2 HEIGHT ADJUST 4 ENTER 3 ZOOM However, you can...

XR10S|XR10X|XR20S|XR20X Operation Manual
Page 34
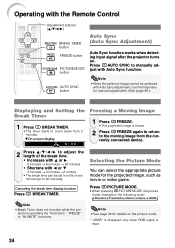
...want to output the sound from the projector's speaker while the projector is connected to external equipment, set "Speaker" in accordance with the volume level of the projector. Set the projector's volume to the lowest level when turning the projector on the projector to adjust the volume. Note &#...8226; Pressing K/-O will lower the volume. • Pressing L/Q+ will turn off the Sound Temporarily Press MAV MUTE on ...
...want to output the sound from the projector's speaker while the projector is connected to external equipment, set "Speaker" in accordance with the volume level of the projector. Set the projector's volume to the lowest level when turning the projector on the projector to adjust the volume. Note &#...8226; Pressing K/-O will lower the volume. • Pressing L/Q+ will turn off the Sound Temporarily Press MAV MUTE on ...
XR10S|XR10X|XR20S|XR20X Operation Manual
Page 38
... TIMER button FREEZE button PICTURE MODE button AUTO SYNC button Auto Sync (Auto Sync Adjustment) Auto Sync function works when detecting input signal after the projector turns on the picture mode. * "sRGB" is displayed only when RGB signal is input. 34 Canceling the break time display function Press k BREAK TIMER. jector is...
... TIMER button FREEZE button PICTURE MODE button AUTO SYNC button Auto Sync (Auto Sync Adjustment) Auto Sync function works when detecting input signal after the projector turns on the picture mode. * "sRGB" is displayed only when RGB signal is input. 34 Canceling the break time display function Press k BREAK TIMER. jector is...

XR10S|XR10X|XR20S|XR20X Operation Manual
Page 46
... Description Normal image (Projected from the front of the screen) Inverted image (Projected from the front of the screen with an inverted projector) Reversed image (Projected from the rear of the screen or with a mirror) Reversed and inverted image (Projected with a mirror)...Image 8 Selecting the On-screen Display Language Selectable items Logo Blue None Description Sharp logo screen Blue screen - 6 Selecting the Setup Guide Selectable items On Off Description Displaying the Setup Guide when turning the projector on -screen display language among 11 languages. ADJ" menu) (Continued) 4 ...
... Description Normal image (Projected from the front of the screen) Inverted image (Projected from the front of the screen with an inverted projector) Reversed image (Projected from the rear of the screen or with a mirror) Reversed and inverted image (Projected with a mirror)...Image 8 Selecting the On-screen Display Language Selectable items Logo Blue None Description Sharp logo screen Blue screen - 6 Selecting the Setup Guide Selectable items On Off Description Displaying the Setup Guide when turning the projector on -screen display language among 11 languages. ADJ" menu) (Continued) 4 ...
XR10S|XR10X|XR20S|XR20X Operation Manual
Page 47
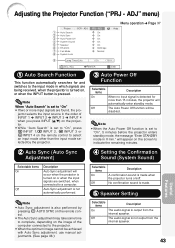
...STANDBY mode in the order of INPUT 1 n INPUT 2 n INPUT 3 n INPUT 4 when you press INPUT (P/R) on the projector. • While "Auto Search" is turned on or when the input signals are being received, when the projector is set to "On", press C INPUT 1,C INPUT 2, D INPUT 3 or EINPUT 4 on the remote control to a ... , or when the INPUT button is output from the internal speaker. 43 No confirmation sound is made when the projector turns on the image of the computer connected to indicate the remaining minutes. 2 Auto Sync (Auto Sync Adjustment) 4 Setting the Confirmation Sound (System...
...STANDBY mode in the order of INPUT 1 n INPUT 2 n INPUT 3 n INPUT 4 when you press INPUT (P/R) on the projector. • While "Auto Search" is turned on or when the input signals are being received, when the projector is set to "On", press C INPUT 1,C INPUT 2, D INPUT 3 or EINPUT 4 on the remote control to a ... , or when the INPUT button is output from the internal speaker. 43 No confirmation sound is made when the projector turns on the image of the computer connected to indicate the remaining minutes. 2 Auto Sync (Auto Sync Adjustment) 4 Setting the Confirmation Sound (System...
XR10S|XR10X|XR20S|XR20X Operation Manual
Page 48
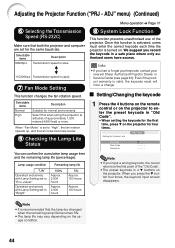
... this function is activated, users must enter the correct keycode each time the projector is turned on the projector. ADJ Old Code New Code Reconfirm Note • If you record the keycode in "Old Code". • When setting the keycode for the... keycode Selectable items Normal High Description Suitable for four times. Setting the System Lock PRJ - When you lose or forget your keycode, contact your nearest Sharp Authorized Projector Dealer or Service Center (see page 61). ADJ" menu) (Continued) Menu operation n Page 37 6 Selecting the Transmission Speed (RS-232C) Make ...
... this function is activated, users must enter the correct keycode each time the projector is turned on the projector. ADJ Old Code New Code Reconfirm Note • If you record the keycode in "Old Code". • When setting the keycode for the... keycode Selectable items Normal High Description Suitable for four times. Setting the System Lock PRJ - When you lose or forget your keycode, contact your nearest Sharp Authorized Projector Dealer or Service Center (see page 61). ADJ" menu) (Continued) Menu operation n Page 37 6 Selecting the Transmission Speed (RS-232C) Make ...

XR10S|XR10X|XR20S|XR20X Operation Manual
Page 49
... button name. Setting the System Lock PRJ - a Locking the Operation Buttons Hold down T ENTER and S STANDBY/ON on the projector simultaneously for about 5 seconds while the projector is turned on. If you have already set , the keycode input screen appears after the power is being... turned on. ADJ Old Code New Code Reconfirm **** ---- ---- 3 Enter the same keycode in "New Code". When it appears, enter the right keycode to lock the operation buttons on the projector. Menu operation n Page 37 Locking the Operation Buttons...
... button name. Setting the System Lock PRJ - a Locking the Operation Buttons Hold down T ENTER and S STANDBY/ON on the projector simultaneously for about 5 seconds while the projector is turned on. If you have already set , the keycode input screen appears after the power is being... turned on. ADJ Old Code New Code Reconfirm **** ---- ---- 3 Enter the same keycode in "New Code". When it appears, enter the right keycode to lock the operation buttons on the projector. Menu operation n Page 37 Locking the Operation Buttons...

XR10S|XR10X|XR20S|XR20X Operation Manual
Page 52
... I The warning lights (power indicator, lamp indicator and temperature warning indicator) on rising, the lamp will turn off and then the projector will illuminate in red. After the projector has entered standby mode, follow the procedures given below. tor will enter standby mode. About the lamp indicator...on page 49. After " " appears, be displayed on . At this time, the lamp indicator will not turn on the projector a fourth time without replacing the lamp, the projector will illuminate in the lower left corner of the picture. The lamp is abnormally high. (See page 49.)...
... I The warning lights (power indicator, lamp indicator and temperature warning indicator) on rising, the lamp will turn off and then the projector will illuminate in red. After the projector has entered standby mode, follow the procedures given below. tor will enter standby mode. About the lamp indicator...on page 49. After " " appears, be displayed on . At this time, the lamp indicator will not turn on the projector a fourth time without replacing the lamp, the projector will illuminate in the lower left corner of the picture. The lamp is abnormally high. (See page 49.)...

XR10S|XR10X|XR20S|XR20X Operation Manual
Page 53
... minutes.) • If the power is turned off .) Red on Red on (Standby) Power indicator Green on/ Red on Green blinks (Cooling) Red blinks Problem The internal temperature is controlled automatically. Time to your nearest Sharp Authorized Projector Dealer or Service Center (see page 8) ...• Take the projector to change the lamp. The power indicator blinks in the AC outlet and then turn the power on . The sound of the projector constant and this is not a...
... minutes.) • If the power is turned off .) Red on Red on (Standby) Power indicator Green on/ Red on Green blinks (Cooling) Red blinks Problem The internal temperature is controlled automatically. Time to your nearest Sharp Authorized Projector Dealer or Service Center (see page 8) ...• Take the projector to change the lamp. The power indicator blinks in the AC outlet and then turn the power on . The sound of the projector constant and this is not a...

