XE-A506 Operation Manual in English and Spanish
Page 6
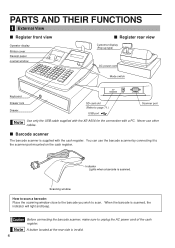
... to page 71.) USB port Scanner port Use only the USB cable supplied with the XE-A506 for the connection with the cash register. You can use other cables. When the barcode is scanned. PARTS AND THEIR FUNCTIONS 1 External View Register front view Register rear ... type) AC power cord Mode switch Keyboard SCANNER Drawer lock Drawer SD card slot (Refer to the scanner port mounted on the cash register. Before connecting the barcode scanner, make sure to scan. Indicator Lights when a barcode is scanned, the indicator will light and beep. Scanning window How to scan a barcode...
... to page 71.) USB port Scanner port Use only the USB cable supplied with the XE-A506 for the connection with the cash register. You can use other cables. When the barcode is scanned. PARTS AND THEIR FUNCTIONS 1 External View Register front view Register rear ... type) AC power cord Mode switch Keyboard SCANNER Drawer lock Drawer SD card slot (Refer to the scanner port mounted on the cash register. Before connecting the barcode scanner, make sure to scan. Indicator Lights when a barcode is scanned, the indicator will light and beep. Scanning window How to scan a barcode...
XE-A506 Operation Manual in English and Spanish
Page 10
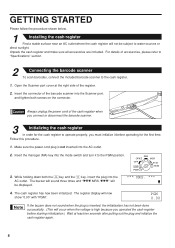
...ten seconds after pulling out the plug and initialize the cash register again. 8 Always unplug the power cord of the cash register when you connect or disconnect the barcode scanner. 3 Initializing the cash register In order for the cash register to operate properly, you operated the cash register before... into the mode switch and turn it before starting initialization.) Wait at the right side of accessories, please refer to "Specifications" section. 2 Connecting the barcode scanner To scan barcodes, connect the included barcode scanner to water sources or direct sunlight.
...ten seconds after pulling out the plug and initialize the cash register again. 8 Always unplug the power cord of the cash register when you connect or disconnect the barcode scanner. 3 Initializing the cash register In order for the cash register to operate properly, you operated the cash register before... into the mode switch and turn it before starting initialization.) Wait at the right side of accessories, please refer to "Specifications" section. 2 Connecting the barcode scanner To scan barcodes, connect the included barcode scanner to water sources or direct sunlight.
XE-A506 Operation Manual in English and Spanish
Page 11
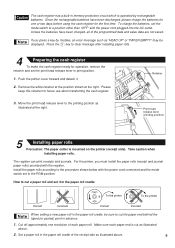
... by rechargeable batteries. Make sure each paper roll. If you must install the paper rolls (receipt and journal paper rolls) provided with the power cord connected and the mode switch set the print head release lever in the paper roll cradle of each paper end is mounted on the printer (receipt...
... by rechargeable batteries. Make sure each paper roll. If you must install the paper rolls (receipt and journal paper rolls) provided with the power cord connected and the mode switch set the print head release lever in the paper roll cradle of each paper end is mounted on the printer (receipt...
XE-A506 Operation Manual in English and Spanish
Page 14
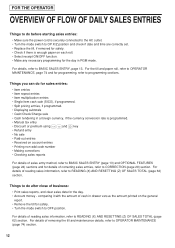
... is enough paper on the general report. • Remove the till for details of cash in a foreign currency, if the currency conversion rate is securely connected to the AC outlet. • Turn the mode switch to OPERATOR MAINTENANCE (page 74) section. 12 Things to READING (X) AND RESETTING (Z) OF SALES TOTAL (page...
... is enough paper on the general report. • Remove the till for details of cash in a foreign currency, if the currency conversion rate is securely connected to the AC outlet. • Turn the mode switch to OPERATOR MAINTENANCE (page 74) section. 12 Things to READING (X) AND RESETTING (Z) OF SALES TOTAL (page...
XE-A506 Operation Manual in English and Spanish
Page 77
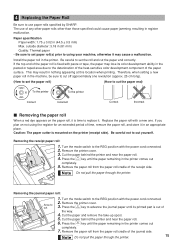
... of any other paper rolls other than those specified could cause paper jamming, resulting in register malfunction. Replace the paper roll with the power cord connected. 2. Removing the receipt paper roll: 1. Cut the paper behind the printer and near the paper roll. { 4. Turn the mode switch to the REG ... the paper roll cradle of the receipt side. Press the key until the paper remaining in an appropriate place. The use paper rolls specified by SHARP. Cut the paper behind the printer and near the paper roll. } 6. If the top end of time, remove the paper roll, and store ...
... of any other paper rolls other than those specified could cause paper jamming, resulting in register malfunction. Replace the paper roll with the power cord connected. 2. Removing the receipt paper roll: 1. Cut the paper behind the printer and near the paper roll. { 4. Turn the mode switch to the REG ... the paper roll cradle of the receipt side. Press the key until the paper remaining in an appropriate place. The use paper rolls specified by SHARP. Cut the paper behind the printer and near the paper roll. } 6. If the top end of time, remove the paper roll, and store ...
XE-A506 Operation Manual in English and Spanish
Page 78
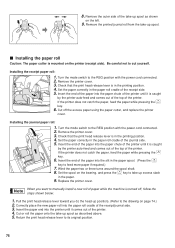
... in the printing position. 4. Return the print head release lever to cut yourself. Turn the mode switch to the REG position with the power cord connected. 2. Remove the printer cover. 3. Replace the printer cover. Cut or roll the paper onto the take up spool as shown on the printer (receipt... you (to the head-up position). (Refer to the drawing on the bearing, and press the key to the REG position with the power cord connected. 2. 8. Remove the outer side of the paper into the slit in the paper. 9. Remove the printer cover. 3. Pull the print head release lever ...
... in the printing position. 4. Return the print head release lever to cut yourself. Turn the mode switch to the REG position with the power cord connected. 2. Remove the printer cover. 3. Replace the printer cover. Cut or roll the paper onto the take up spool as shown on the printer (receipt... you (to the head-up position). (Refer to the drawing on the bearing, and press the key to the REG position with the power cord connected. 2. 8. Remove the outer side of the paper into the slit in the paper. 9. Remove the printer cover. 3. Pull the print head release lever ...
XE-A506 Operation Manual in English and Spanish
Page 81
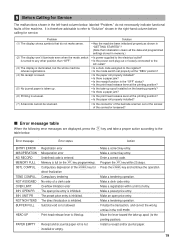
... the data and programmed settings stored in memory.) • Is power supplied to the electrical outlet? • Is the power cord plug out or loosely connected to the AC outlet? • Is a clerk code assigned to any other position than "OFF". (3) The display is illuminated, but the whole machine refuses registrations...
... the data and programmed settings stored in memory.) • Is power supplied to the electrical outlet? • Is the power cord plug out or loosely connected to the AC outlet? • Is a clerk code assigned to any other position than "OFF". (3) The display is illuminated, but the whole machine refuses registrations...
XE-A506 Operation Manual in English and Spanish
Page 82
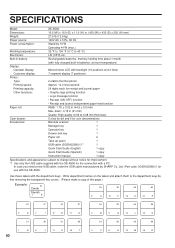
... 38 1 E 6 J 11 O 16 T 80 3 C 8 H 13 M 18 R Use these labels with the XE-A506. diam.: 3.18 in (81 mm) Quality: High quality (0.06 to 0.08 mm thickness) Cash drawer: 5 slots for ...: Approx. 13.3 lines/second Printing capacity: 24 digits each for the connection with the XE-A506 for receipt and journal paper Other functions: • Graphic logo printing function...44.5 ± 0.5 mm) Max. Ltd. (Part code: 0GS5422580///) for use with the department keys. SPECIFICATIONS Model: XE-A506 Dimensions: 16.5 (W) x 16.9 (D) x 11.9 (H) in. (420 (W) x 430 (D) x 302 (H) mm...
... 38 1 E 6 J 11 O 16 T 80 3 C 8 H 13 M 18 R Use these labels with the XE-A506. diam.: 3.18 in (81 mm) Quality: High quality (0.06 to 0.08 mm thickness) Cash drawer: 5 slots for ...: Approx. 13.3 lines/second Printing capacity: 24 digits each for the connection with the XE-A506 for receipt and journal paper Other functions: • Graphic logo printing function...44.5 ± 0.5 mm) Max. Ltd. (Part code: 0GS5422580///) for use with the department keys. SPECIFICATIONS Model: XE-A506 Dimensions: 16.5 (W) x 16.9 (D) x 11.9 (H) in. (420 (W) x 430 (D) x 302 (H) mm...
Quick Start Guide
Page 1
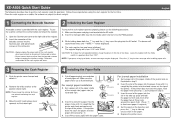
...(MA) key into the mode switch and turn it is not inserted into the AC outlet. NOTE: If you connect or disconnect the barcode scanner. • Never connect devices other than the barcode scanner before turning on a stable, flat surface not subject to clear message after installing ...each paper roll. To use the scanner, connect the scanner before changing the interface setting. MA REG OPX/Z MGR OFF X1/Z1 VOID X2/Z2 PGM 4. Place the cash register on the register. 1. Insert the end of the printer. XE-A506 Quick Start Guide The following procedure: 1. ...
...(MA) key into the mode switch and turn it is not inserted into the AC outlet. NOTE: If you connect or disconnect the barcode scanner. • Never connect devices other than the barcode scanner before turning on a stable, flat surface not subject to clear message after installing ...each paper roll. To use the scanner, connect the scanner before changing the interface setting. MA REG OPX/Z MGR OFF X1/Z1 VOID X2/Z2 PGM 4. Place the cash register on the register. 1. Insert the end of the printer. XE-A506 Quick Start Guide The following procedure: 1. ...


