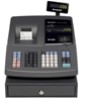
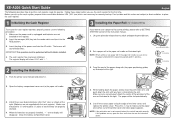
XE-A206 Operation Manual in English and Spanish
Page 2
... operated in a commercial environment. These limits are located on the right side of loss or theft. Operation of this equipment. These numbers are designed to Part 15 of Purchase Space is provided for a Class A digital device, pursuant to provide reasonable protection against harmful interference when the equipment is likely to cause...
XE-A206 Operation Manual in English and Spanish
Page 4
CONTENTS INTRODUCTION ...1 IMPORTANT ...1 CONTENTS...2 PARTS AND THEIR FUNCTIONS...4 1 External View ...4 2 Printer ...4 3 Mode Switch and Mode Keys ...5 4 Keyboard...5 5 Displays ...6 6 Drawer Lock Key...6 GETTING STARTED...7 FOR THE OPERATOR OVERVIEW OF FLOW OF ...
XE-A206 Operation Manual in English and Spanish
Page 6
... slot (Refer to page 64.) USB port Use only the USB cable (manufactured by SHARP) supplied with the XE-A206 for the connection with the print roller arm locked. To re-install, hook the pawls on the printer cover. PARTS AND THEIR FUNCTIONS 1 External View Front view Operator display Customer display (Pop-up spool...
XE-A206 Operation Manual in English and Spanish
Page 11
.... If the paper end does not come out, open the arm, and close the print roller arm, and push down the center of the wing part of sales, you must change it before programming. When using the edge of the printer cover, and replace the cover. Make sure securely you must...
XE-A206 Operation Manual in English and Spanish
Page 72
.... Remove the printer cover. 3. Cut the paper and remove the take -up the print roller release lever to advance the journal paper until its printed part is mounted on the printer cover. Lift up the print roller release lever to a position other than OFF with the power cord connected. 2. Turn the...
XE-A206 Operation Manual in English and Spanish
Page 73
... the printer cover. 3. Feed the end of the printer cover and clean paper appears. Make sure securely you push down the center of the wing part of the paper into the slit in OP X/Z, X1/Z1, and X2/Z2 modes even if you push down the center of the wing... part of the printer cover, and replace the cover. If this case, set the roll paper to wind reports. The paper will not print correctly. F 7. Wind ...
XE-A206 Operation Manual in English and Spanish
Page 76
... x 281 (H) mm) Weight: 17.6 Ib (8 kg) Power source: 120V AC ± 10%, 60 Hz Power consumption: Stand-by SHARP) supplied with the XE-A206 for use with the XE-A206. Write department names on the labels and attach them to 40 °C) Electronics: LSI (CPU) etc. diam.: 3.15 in (80 mm...(manufactured by 7.7 W Operating 28 W (max.) Working temperature: 32 °F to 104 °F (0 °C to the department keys by SHARP Co. Ltd. (Part code: 0GS5422580) for the connection with the department keys. Use these labels with a PC. In case you need a new USB cable, order the...
XE-A206 Operation Manual in English and Spanish
Page 115
...remanufactured equipment at 1-800-BE-SHARP. TO OBTAIN PRODUCT INFORMATION, CALL 1-800-BE-SHARP OR VISIT www.sharpusa.com Model Specific Section (Carry-in Service) Your Product Model Number & Description: XE-A206 Cash Register (Be sure to the Purchaser for parts or labor for any warranties other... than an authorized servicer. Where to Obtain Service: From a Sharp Authorized Servicer located in any way responsible for the period...
Quick Start Guide
Page 1
... cradle. 3. Feed the end of the arm as illustrated at the right. (Batteries are not supplied with " ". 2 Installing the Batteries 1. XE-A206 Quick Start Guide English The following procedure: 1. Follow these steps before you securely push down the paper, slowly close the arm as illustrated right. ...printer Correct To the printer Incorrect 2. When the batteries are properly oriented. 4. While holding down the center of the wing part of the paper along with the paper positioning guides as illustrated at the right. If this problem occurs, open the print roller arm....