XE-A203 Operation Manual in English and Spanish
Page 5
...key 38 4 Text programming...39 ADVANCED PROGRAMMING ...44 1 Register Number and Consecutive Number Programming 44 2 Electronic Journal (EJ) Programming ...45 3 Various Function Selection Programming 1 47 Function selection for miscellaneous keys 47 Print format ...48 Receipt print...Logo message print format ...51 Online time out setting ...52 Thermal printer density ...52 Language selection...53 Training clerk specification for training mode 53 AUTO key... Replacing the Batteries...69 5 Replacing the Paper Roll ...69 6 Removing a Paper Jam ...72 7 Cleaning the Printer (Print ...
...key 38 4 Text programming...39 ADVANCED PROGRAMMING ...44 1 Register Number and Consecutive Number Programming 44 2 Electronic Journal (EJ) Programming ...45 3 Various Function Selection Programming 1 47 Function selection for miscellaneous keys 47 Print format ...48 Receipt print...Logo message print format ...51 Online time out setting ...52 Thermal printer density ...52 Language selection...53 Training clerk specification for training mode 53 AUTO key... Replacing the Batteries...69 5 Replacing the Paper Roll ...69 6 Removing a Paper Jam ...72 7 Cleaning the Printer (Print ...
XE-A203 Operation Manual in English and Spanish
Page 8
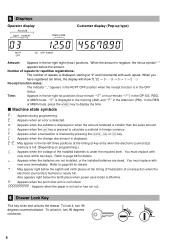
...tenth place when power save mode is effective. : Appears when the print roller arm is not locked. : Appears when the paper is displayed, starting at "2" and incremental with each repeat. V : Appears when the key is in the afternoon (PM). When you have registered ten times, the display will show "0."(2 → 3 ..... ...left three positions at the timing of finalization of repeats is not set or has run out. 6 Drawer Lock Key This key locks and unlocks the drawer. You must replace with new ones within two days. Time: Appears in the far-right six positions (hour-minute -" " or...
...tenth place when power save mode is effective. : Appears when the print roller arm is not locked. : Appears when the paper is displayed, starting at "2" and incremental with each repeat. V : Appears when the key is in the afternoon (PM). When you have registered ten times, the display will show "0."(2 → 3 ..... ...left three positions at the timing of finalization of repeats is not set or has run out. 6 Drawer Lock Key This key locks and unlocks the drawer. You must replace with new ones within two days. Time: Appears in the far-right six positions (hour-minute -" " or...
XE-A203 Operation Manual in English and Spanish
Page 9
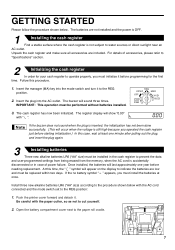
.... Open the battery compartment cover next to the REG position. 2. Unpack the cash register and make sure all accessories are low and must install the batteries at least one year before needing replacement. For details of power failure. Insert the manager (MA) key into the AC outlet. IMPORTANT: This operation must initialize it . Push...
.... Open the battery compartment cover next to the REG position. 2. Unpack the cash register and make sure all accessories are low and must install the batteries at least one year before needing replacement. For details of power failure. Insert the manager (MA) key into the AC outlet. IMPORTANT: This operation must initialize it . Push...
XE-A203 Operation Manual in English and Spanish
Page 11
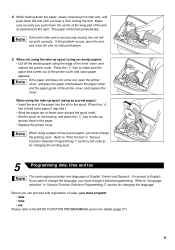
... the key to feed more paper if required.) • Wind the paper two or three turns around the spool shaft. If you want to the BASIC FUNCTION PROGRAMMING section for changing the printing style. 5 Programming date, time and tax The cash register provides text languages of the printer cover, and replace the ...as illustrated at the right. The paper will not print correctly. F • Set the spool on the bearing, and press the key to take -up excess slack in the spool. (Press the key to make sure the paper end comes out of the inner cover, and F replace the printer cover. 4.
... the key to feed more paper if required.) • Wind the paper two or three turns around the spool shaft. If you want to the BASIC FUNCTION PROGRAMMING section for changing the printing style. 5 Programming date, time and tax The cash register provides text languages of the printer cover, and replace the ...as illustrated at the right. The paper will not print correctly. F • Set the spool on the bearing, and press the key to take -up excess slack in the spool. (Press the key to make sure the paper end comes out of the inner cover, and F replace the printer cover. 4.
XE-A203 Operation Manual in English and Spanish
Page 13
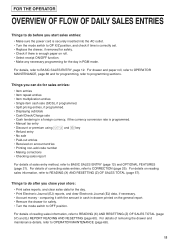
key • Refund entry • No sale • Paid-out entries • Received on reading sales information, refer to READING (X) AND RESETTING (Z) OF SALES TOTAL (page 57). For details on account entries • Printing...entries • Single item cash sale (SICS), if programmed. • Split pricing entries, if programmed. • Displaying subtotals • Cash/Check/Charge sale • Cash tendering in PGM mode. ... mode switch to OP X/Z position, and check if time is correctly set. • Replace the drawer, if removed for safety. • Check if there is enough paper on ...
key • Refund entry • No sale • Paid-out entries • Received on reading sales information, refer to READING (X) AND RESETTING (Z) OF SALES TOTAL (page 57). For details on account entries • Printing...entries • Single item cash sale (SICS), if programmed. • Split pricing entries, if programmed. • Displaying subtotals • Cash/Check/Charge sale • Cash tendering in PGM mode. ... mode switch to OP X/Z position, and check if time is correctly set. • Replace the drawer, if removed for safety. • Check if there is enough paper on ...
XE-A203 Operation Manual in English and Spanish
Page 29
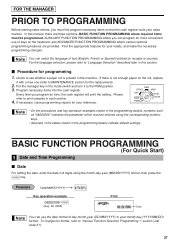
... items into the cash register. Check to MAINTENANCE section for the replacement). 2. Every time you must first program necessary items so that the cash register suits your sales manner. REG OPX/Z MGR OFF X1/Z1 VOID X2/Z2 PGM • On the procedures and key operation examples shown ... sales entries, you program an item, the cash register will print the setting. BASIC FUNCTION PROGRAMMING (For Quick Start) 1 Date and Time Programming Date For setting the date, enter the date in 8 digits using the corresponding numeric keys. • Asterisks in the tables shown in...
... items into the cash register. Check to MAINTENANCE section for the replacement). 2. Every time you must first program necessary items so that the cash register suits your sales manner. REG OPX/Z MGR OFF X1/Z1 VOID X2/Z2 PGM • On the procedures and key operation examples shown ... sales entries, you program an item, the cash register will print the setting. BASIC FUNCTION PROGRAMMING (For Quick Start) 1 Date and Time Programming Date For setting the date, enter the date in 8 digits using the corresponding numeric keys. • Asterisks in the tables shown in...
XE-A203 Operation Manual in English and Spanish
Page 65
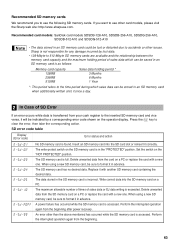
...key to format it in advance. Insert an SD memory card into the SD memory card on a PC. The SD memory card is incorrect. The data stored in advance. When using a new SD memory card, be sure to use other card models, please visit the Sharp... web site: http://www.sharpusa.com. Delete unwanted data from the card on a PC or replace the card with a new one . The SD memory card has no desired data. Replace... card slot or reinsert it correctly. Delete unwanted data from your cash register to use the following SD memory cards. Perform the interrupted operation again...
...key to format it in advance. Insert an SD memory card into the SD memory card on a PC. The SD memory card is incorrect. The data stored in advance. When using a new SD memory card, be sure to use other card models, please visit the Sharp... web site: http://www.sharpusa.com. Delete unwanted data from the card on a PC or replace the card with a new one . The SD memory card has no desired data. Replace... card slot or reinsert it correctly. Delete unwanted data from your cash register to use the following SD memory cards. Perform the interrupted operation again...
XE-A203 Operation Manual in English and Spanish
Page 72
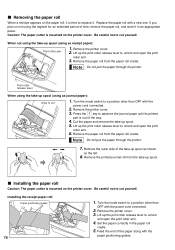
..., and store it . Press the key to unlock and open the print roller arm. 6. Lift up the print roller release lever to unlock and open the print roller arm. 4. Remove the paper roll... place. Be careful not to a position other than OFF with the power cord connected. 2. Replace the paper roll with the paper positioning guides. Cut the paper and remove the take -up ...on not using the register for an extended period of the way. 4. Remove the printer cover. 2. Print roller release lever When using the take -up spool (using as receipt paper): Print roller arm 1. Remove ...
..., and store it . Press the key to unlock and open the print roller arm. 6. Lift up the print roller release lever to unlock and open the print roller arm. 4. Remove the paper roll... place. Be careful not to a position other than OFF with the power cord connected. 2. Replace the paper roll with the paper positioning guides. Cut the paper and remove the take -up ...on not using the register for an extended period of the way. 4. Remove the printer cover. 2. Print roller release lever When using the take -up spool (using as receipt paper): Print roller arm 1. Remove ...

XE-A203 Operation Manual in English and Spanish
Page 73
... the arm. While holding down the paper, slowly close the arm as instructed above. 7. The paper will be convenient to wind reports. F 9. If the print roller arm is used for issuance of the arm as illustrated at the left . Installing the journal paper roll: 1. F 7. This may be fed automatically..... Set the paper correctly in the paper. 10. Set the spool on the bearing, and press the key to make sure the paper end comes out of the inner cover, and F replace the printer cover. Feed the end of the arm as illustrated at the left . Wind the paper two...
... the arm. While holding down the paper, slowly close the arm as instructed above. 7. The paper will be convenient to wind reports. F 9. If the print roller arm is used for issuance of the arm as illustrated at the left . Installing the journal paper roll: 1. F 7. This may be fed automatically..... Set the paper correctly in the paper. 10. Set the spool on the bearing, and press the key to make sure the paper end comes out of the inner cover, and F replace the printer cover. Feed the end of the arm as illustrated at the left . Wind the paper two...
Service Manual
Page 4
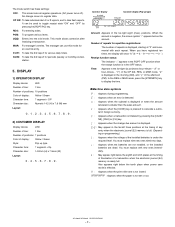
...and incremental with each repeat. In the REG or MGR mode, press the [#/TM/SBTL] key to display the time. ■Machine state symbols : Appears during programming. : Appears when ...an override entry. You must replace with new ones immediately. : May appear right below the tenth place when power save mode is effective. : Appears when the print roller arm is not locked... afternoon (PM). XE-A203U/XE-A203A SPECIFICATIONS - 2 - Time: Appears in the OP X/Z, REG, or MGR mode. " " or hour-minute - The mode switch has these settings: OFF: This mode locks all register operations. (AC ...
...and incremental with each repeat. In the REG or MGR mode, press the [#/TM/SBTL] key to display the time. ■Machine state symbols : Appears during programming. : Appears when ...an override entry. You must replace with new ones immediately. : May appear right below the tenth place when power save mode is effective. : Appears when the print roller arm is not locked... afternoon (PM). XE-A203U/XE-A203A SPECIFICATIONS - 2 - Time: Appears in the OP X/Z, REG, or MGR mode. " " or hour-minute - The mode switch has these settings: OFF: This mode locks all register operations. (AC ...


