
VLWD450U|VLWD650U Operation Manual
Page 1
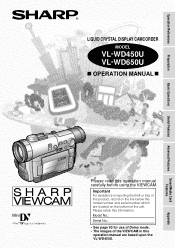
Operation References Preparation LIQUID CRYSTAL DISPLAY CAMCORDER MODEL VL-WD450U VL-WD650U OPERATION MANUAL Basic Operations Useful Features Advanced Features SmartMedia Card Features ;;;;;; Model No.: Serial No.: • See page 93 for use of Demo mode. &#... manual are located on the bottom of this product, record on the line below the model number and serial number which are based upon the VL-WD450U.
Operation References Preparation LIQUID CRYSTAL DISPLAY CAMCORDER MODEL VL-WD450U VL-WD650U OPERATION MANUAL Basic Operations Useful Features Advanced Features SmartMedia Card Features ;;;;;; Model No.: Serial No.: • See page 93 for use of Demo mode. &#... manual are located on the bottom of this product, record on the line below the model number and serial number which are based upon the VL-WD450U.
VLWD450U|VLWD650U Operation Manual
Page 2
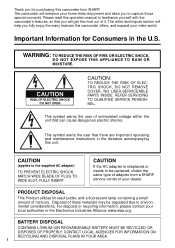
The video techniques section will help you fully enjoy the many features this camcorder from a SHARP service center of your home video enjoyment and allow you to capture those special moments. REFER SERVICING TO QUALIFIED SERVICE ... alerts the user that can cause dangerous electric shocks. This symbol warns the user of adapter from SHARP. BATTERY DISPOSAL CONTAINS LITHIUM-ION RECHARGEABLE BATTERY. Important Information for purchasing this camcorder offers, and expand your local authorities or the Electronics Industries Alliance: www.eiae.org. CAUTION If ...
The video techniques section will help you fully enjoy the many features this camcorder from a SHARP service center of your home video enjoyment and allow you to capture those special moments. REFER SERVICING TO QUALIFIED SERVICE ... alerts the user that can cause dangerous electric shocks. This symbol warns the user of adapter from SHARP. BATTERY DISPOSAL CONTAINS LITHIUM-ION RECHARGEABLE BATTERY. Important Information for purchasing this camcorder offers, and expand your local authorities or the Electronics Industries Alliance: www.eiae.org. CAUTION If ...
VLWD450U|VLWD650U Operation Manual
Page 3
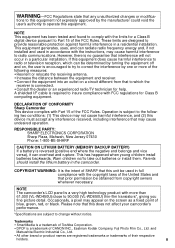
... from that to which can be used in the camcorder. This has happened when young children install batteries backwards. tions to this equipment not expressly approved by one or more than 61,000 (VL-WD450U)/close to 90,000 (VL-WD650U) thin-film transistors*, giving you fine picture ...with the copyright laws of CANON INC., Eastman Kodak Company, Fuji Photo Film Co., Ltd. RESPONSIBLE PARTY: SHARP ELECTRONICS CORPORATION Sharp Plaza, Mahwah, New Jersey 07430 Phone: 1-800-BE-SHARP CAUTION ON LITHIUM BATTERY (MEMORY BACKUP BATTERY) If a battery is a trademark of the United States and ...
... from that to which can be used in the camcorder. This has happened when young children install batteries backwards. tions to this equipment not expressly approved by one or more than 61,000 (VL-WD450U)/close to 90,000 (VL-WD650U) thin-film transistors*, giving you fine picture ...with the copyright laws of CANON INC., Eastman Kodak Company, Fuji Photo Film Co., Ltd. RESPONSIBLE PARTY: SHARP ELECTRONICS CORPORATION Sharp Plaza, Mahwah, New Jersey 07430 Phone: 1-800-BE-SHARP CAUTION ON LITHIUM BATTERY (MEMORY BACKUP BATTERY) If a battery is a trademark of the United States and ...
VLWD450U|VLWD650U Operation Manual
Page 6
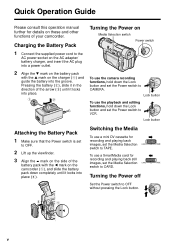
Pressing the battery (2), slide it in the direction of your camcorder. v Quick Operation Guide Please consult this operation manual further for recording and playing back images, set the Media Selection switch to TAPE. mark on the ... the arrow (3) until it locks into place (2). Turning the Power on Media Selection switch Power switch To use a mini DV cassette for details on the camcorder (1), and slide the battery pack down the Lock button and set to OFF without pressing the Lock button.
Pressing the battery (2), slide it in the direction of your camcorder. v Quick Operation Guide Please consult this operation manual further for recording and playing back images, set the Media Selection switch to TAPE. mark on the ... the arrow (3) until it locks into place (2). Turning the Power on Media Selection switch Power switch To use a mini DV cassette for details on the camcorder (1), and slide the battery pack down the Lock button and set to OFF without pressing the Lock button.
VLWD450U|VLWD650U Operation Manual
Page 7
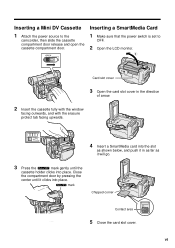
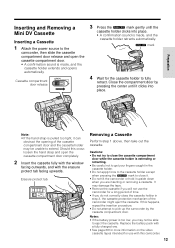
... DV Cassette 1 Attach the power source to OFF. 2 Open the LCD monitor. Inserting a SmartMedia Card 1 Make sure that the power switch is set to the camcorder, then slide the cassette compartment door release and open the cassette compartment door.
... DV Cassette 1 Attach the power source to OFF. 2 Open the LCD monitor. Inserting a SmartMedia Card 1 Make sure that the power switch is set to the camcorder, then slide the cassette compartment door release and open the cassette compartment door.

VLWD450U|VLWD650U Operation Manual
Page 8
... release button (1), and open the LCD monitor to a 90° angle to T (1) (telephoto) or W (2) (wide angle) side. Zooming Push the Power Zoom control to the camcorder body (2).
... release button (1), and open the LCD monitor to a 90° angle to T (1) (telephoto) or W (2) (wide angle) side. Zooming Push the Power Zoom control to the camcorder body (2).
VLWD450U|VLWD650U Operation Manual
Page 9
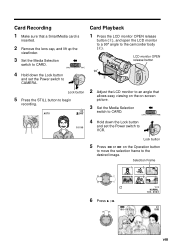
... and set the Power switch to CAMERA. 1 Press the LCD monitor OPEN release button (1), and open the LCD monitor to a 90° angle to the camcorder body (2). Selection Frame 1 2 3 4 5 6 6 Press y. 100- 0003 12 NORMAL 100- 0003 CARD NORMA L 3 10 viii Lock button 5 Press e or r on -screen picture. 3 Set the Media Selection...
... and set the Power switch to CAMERA. 1 Press the LCD monitor OPEN release button (1), and open the LCD monitor to a 90° angle to the camcorder body (2). Selection Frame 1 2 3 4 5 6 6 Press y. 100- 0003 12 NORMAL 100- 0003 CARD NORMA L 3 10 viii Lock button 5 Press e or r on -screen picture. 3 Set the Media Selection...
VLWD450U|VLWD650U Operation Manual
Page 10
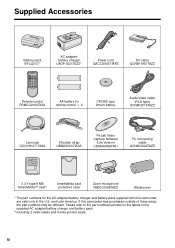
ix and Latin America. If this camcorder are valid only in the U.S. Supplied Accessories Battery pack BT-L221n*1 AC adapter/ battery charger UADP-0321TAZZ*1 Power cord QACCD0031TAPZ DC cable QCNW-1957TAZZ Remote ...™ card*2 SmartMedia card protective case Zoom microphone RMICC0098TAZZ Windscreen *1 The part numbers for the AC adapter/battery charger and battery pack supplied with this camcorder was purchased outside of the supplied AC adapter/battery charger and battery pack. *2 Including 2 index labels and 4 write-protect seals. Please refer to the part...
ix and Latin America. If this camcorder are valid only in the U.S. Supplied Accessories Battery pack BT-L221n*1 AC adapter/ battery charger UADP-0321TAZZ*1 Power cord QACCD0031TAPZ DC cable QCNW-1957TAZZ Remote ...™ card*2 SmartMedia card protective case Zoom microphone RMICC0098TAZZ Windscreen *1 The part numbers for the AC adapter/battery charger and battery pack supplied with this camcorder was purchased outside of the supplied AC adapter/battery charger and battery pack. *2 Including 2 index labels and 4 write-protect seals. Please refer to the part...
VLWD450U|VLWD650U Operation Manual
Page 12
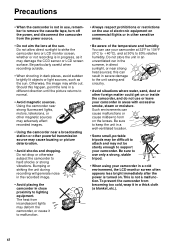
...shocks and dropping. xi You can cause malfunctions or cause mildew to hard shocks or strong vibrations. Do not drop or otherwise subject the camcorder to form on commercial flights or in other powerful transmission source may white out. Such environments can use of electronic equipment on the lenses.... strong heat sources; Bumping or striking the unit during recording will generate noise in the recorded image. • Avoid placing the camcorder in close proximity to L40°C), and at the sun. The heat from becoming too cold, wrap it in a well-ventilated location. •...
...shocks and dropping. xi You can cause malfunctions or cause mildew to hard shocks or strong vibrations. Do not drop or otherwise subject the camcorder to form on commercial flights or in other powerful transmission source may white out. Such environments can use of electronic equipment on the lenses.... strong heat sources; Bumping or striking the unit during recording will generate noise in the recorded image. • Avoid placing the camcorder in close proximity to L40°C), and at the sun. The heat from becoming too cold, wrap it in a well-ventilated location. •...
VLWD450U|VLWD650U Operation Manual
Page 13
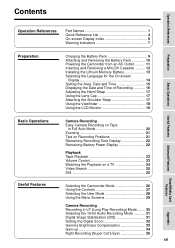
...Reference List 4 On-screen Display Index 5 Warning Indicators 7 Preparation Charging the Battery Pack 9 Attaching and Removing the Battery Pack 10 Powering the Camcorder from an AC Outlet 11 Inserting and Removing a Mini DV Cassette .......... 12 Installing the Lithium Memory Battery 13 Selecting the Language for the ...Display 22 Playback Tape Playback 23 Volume Control 23 Watching the Playback on a TV 24 Video Search 25 Still 25 Selecting the Camcorder Mode 26 Using the Controls 27 Selecting the User Mode 28 Using the Menu Screens 29 Camera Recording Recording in LP (Long ...
...Reference List 4 On-screen Display Index 5 Warning Indicators 7 Preparation Charging the Battery Pack 9 Attaching and Removing the Battery Pack 10 Powering the Camcorder from an AC Outlet 11 Inserting and Removing a Mini DV Cassette .......... 12 Installing the Lithium Memory Battery 13 Selecting the Language for the ...Display 22 Playback Tape Playback 23 Volume Control 23 Watching the Playback on a TV 24 Video Search 25 Still 25 Selecting the Camcorder Mode 26 Using the Controls 27 Selecting the User Mode 28 Using the Menu Screens 29 Camera Recording Recording in LP (Long ...

VLWD450U|VLWD650U Operation Manual
Page 19
...; To quickly return the tape to the end of the picture during playback. - See page 60 (Playback Zoom) • To brighten the dark portion of camcorder's features. • To record the subject with higher-quality audio. - Operation References Quick Reference List Below are made when you operate the...
...; To quickly return the tape to the end of the picture during playback. - See page 60 (Playback Zoom) • To brighten the dark portion of camcorder's features. • To record the subject with higher-quality audio. - Operation References Quick Reference List Below are made when you operate the...

VLWD450U|VLWD650U Operation Manual
Page 22
...T E NOT RE CORDA BL E. THE TAPE ENDS SOON. PROT EC T. Replace it with a new cassette (see page 12). Dew has formed inside the camcorder. E J ECT THE CASSE TTE. CHANGE THE CAS SE T T E . Replace it with a fully charged battery pack (see page 10). The video ... 135°. Insert a cassette (see page 12). Call your local authorized Sharp dealer to end. E JECT THE CASSE TTE. Wait for the first 3 seconds Displayed after this warning appears, the camcorder automatically turns off. Operation References Operation References Warning Indicators If a warning indicator ...
...T E NOT RE CORDA BL E. THE TAPE ENDS SOON. PROT EC T. Replace it with a new cassette (see page 12). Dew has formed inside the camcorder. E J ECT THE CASSE TTE. CHANGE THE CAS SE T T E . Replace it with a fully charged battery pack (see page 10). The video ... 135°. Insert a cassette (see page 12). Call your local authorized Sharp dealer to end. E JECT THE CASSE TTE. Wait for the first 3 seconds Displayed after this warning appears, the camcorder automatically turns off. Operation References Operation References Warning Indicators If a warning indicator ...
VLWD450U|VLWD650U Operation Manual
Page 23
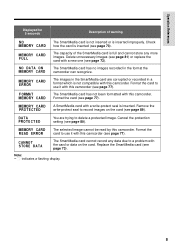
... card are trying to record images on the card. Format the card to use it with this camcorder (see page 73). MEMORY CARD READ ERROR The selected image cannot be read by this camcorder. Check how the card is inserted (see page 73). The SmartMedia card has not been formatted ...with the card or data on the card (see page 81) or replace the card with this camcorder. Replace the SmartMedia card (see page 73). Remove the write-protect seal to delete a protected image. CANNOT STORE DAT A The SmartMedia card cannot ...
... card are trying to record images on the card. Format the card to use it with this camcorder (see page 73). MEMORY CARD READ ERROR The selected image cannot be read by this camcorder. Check how the card is inserted (see page 73). The SmartMedia card has not been formatted ...with the card or data on the card (see page 81) or replace the card with this camcorder. Replace the SmartMedia card (see page 73). Remove the write-protect seal to delete a protected image. CANNOT STORE DAT A The SmartMedia card cannot ...
VLWD450U|VLWD650U Operation Manual
Page 24
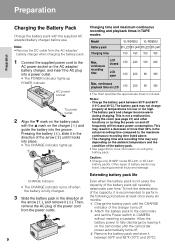
continuous playback time on LCD 100 200 90 180 • The chart specifies the approximate times in TAPE modes Model Battery pack Charging time VL-WD450U VL-WD650U BT-L221 BT-L441 BT-L221 BT-L441 100 160 100 160 Max. Notes: • Charge the battery pack between 50°F and ... turns off . 2 Attach the battery pack to the camcorder, and set the Power switch to perform the following procedure at temperatures too low or too high. • The battery pack and charger become warm during charging. Caution: • Charge only SHARP model BT-L221 or BT-L441 battery packs. Then, ...
continuous playback time on LCD 100 200 90 180 • The chart specifies the approximate times in TAPE modes Model Battery pack Charging time VL-WD450U VL-WD650U BT-L221 BT-L441 BT-L221 BT-L441 100 160 100 160 Max. Notes: • Charge the battery pack between 50°F and ... turns off . 2 Attach the battery pack to the camcorder, and set the Power switch to perform the following procedure at temperatures too low or too high. • The battery pack and charger become warm during charging. Caution: • Charge only SHARP model BT-L221 or BT-L441 battery packs. Then, ...
VLWD450U|VLWD650U Operation Manual
Page 25
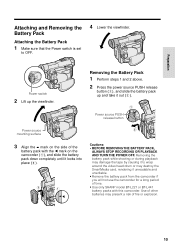
...batteries may present a risk of fire or explosion. 10 Power source PUSH release button Power source mounting surface 3 Align the - mark on the camcorder (1), and slide the battery pack down completely until it out (2). Removing the battery pack while shooting or during playback may damage the tape by ... destroy the SmartMedia card, rendering it unreadable and unwritable. • Remove the battery pack from the camcorder if you will not use the camcorder for a long period of time. • Use only SHARP model BT-L221 or BT-L441 battery packs with the q mark on the side of the battery ...
...batteries may present a risk of fire or explosion. 10 Power source PUSH release button Power source mounting surface 3 Align the - mark on the camcorder (1), and slide the battery pack down completely until it out (2). Removing the battery pack while shooting or during playback may damage the tape by ... destroy the SmartMedia card, rendering it unreadable and unwritable. • Remove the battery pack from the camcorder if you will not use the camcorder for a long period of time. • Use only SHARP model BT-L221 or BT-L441 battery packs with the q mark on the side of the battery ...
VLWD450U|VLWD650U Operation Manual
Page 26
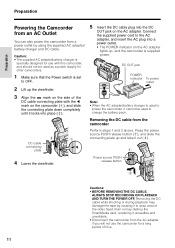
... plate down completely until it locks into place (2). Removing the DC cable from the AC adapter if you will not use the camcorder for other camcorders. 1 Make sure that the Power switch is specially designed for use with the q mark on the side of time. 11 ...Removing the DC cable while shooting or during playback may destroy the SmartMedia card, rendering it unreadble and unwritable. • Disconnect the camcorder from the camcorder Perform steps 1 and 2 above. Power source PUSH release button Cautions: • BEFORE REMOVING THE DC CABLE, ALWAYS STOP RECORDING OR PLAYBACK...
... plate down completely until it locks into place (2). Removing the DC cable from the AC adapter if you will not use the camcorder for other camcorders. 1 Make sure that the Power switch is specially designed for use with the q mark on the side of time. 11 ...Removing the DC cable while shooting or during playback may destroy the SmartMedia card, rendering it unreadble and unwritable. • Disconnect the camcorder from the camcorder Perform steps 1 and 2 above. Power source PUSH release button Cautions: • BEFORE REMOVING THE DC CABLE, ALWAYS STOP RECORDING OR PLAYBACK...
VLWD450U|VLWD650U Operation Manual
Page 27
...not apply force to the cassette holder except when pressing the W mark to close the cassette holder in step 3, the cassette protection mechanism of the camcorder might eject the cassette. Should this happens, repeat the insertion procedure. • Do not attempt to extend. W mark 4 Wait for a long... period of the cassette compartment door and the cassette holder may not be unable to pick up the camcorder by pressing the center until the cassette holder clicks into place. Notes: • If the battery power is made , and the cassette holder...
...not apply force to the cassette holder except when pressing the W mark to close the cassette holder in step 3, the cassette protection mechanism of the camcorder might eject the cassette. Should this happens, repeat the insertion procedure. • Do not attempt to extend. W mark 4 Wait for a long... period of the cassette compartment door and the cassette holder may not be unable to pick up the camcorder by pressing the center until the cassette holder clicks into place. Notes: • If the battery power is made , and the cassette holder...
VLWD450U|VLWD650U Operation Manual
Page 28
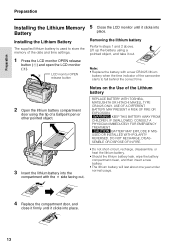
... monitor OPEN release button 5 Close the LCD monitor until it clicks into the compartment with a new CR2025 lithium battery when the time indicator of the camcorder starts to store the memory of the Lithium battery REPLACE BATTERY WITH TOSHIBA, MATSUSHITA OR HITACHI MAXELL TYPE CR2025 ONLY.
... monitor OPEN release button 5 Close the LCD monitor until it clicks into the compartment with a new CR2025 lithium battery when the time indicator of the camcorder starts to store the memory of the Lithium battery REPLACE BATTERY WITH TOSHIBA, MATSUSHITA OR HITACHI MAXELL TYPE CR2025 ONLY.
VLWD450U|VLWD650U Operation Manual
Page 29
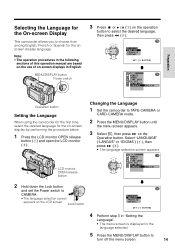
...until the menu screen appears. 3 Select I, then press r on the Operation button. Preparation Selecting the Language for the On-screen Display This camcorder allows you to choose from among English, French or Spanish for the on-screen display by performing the procedure below. 1 Press the LCD ... and open the LCD monitor (2). Lock button L ANGUAGE ENGL I SH FRANÇ A I SH Operation button Setting the Language When using the camcorder for the first time, select the desired language for the onscreen display language. LCD monitor OPEN release button Changing the Language 1 Set the...
...until the menu screen appears. 3 Select I, then press r on the Operation button. Preparation Selecting the Language for the On-screen Display This camcorder allows you to choose from among English, French or Spanish for the on-screen display by performing the procedure below. 1 Press the LCD ... and open the LCD monitor (2). Lock button L ANGUAGE ENGL I SH FRANÇ A I SH Operation button Setting the Language When using the camcorder for the first time, select the desired language for the onscreen display language. LCD monitor OPEN release button Changing the Language 1 Set the...
VLWD450U|VLWD650U Operation Manual
Page 32
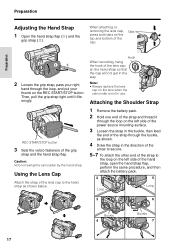
... lens cap to the hand strap as shown. 4 Draw the strap in the direction of the arrow to the loop on the lens when the camcorder is not in the buckle, then feed the end of the lens cap on the REC START/STOP button. Preparation Preparation Adjusting the Hand Strap... 1 Open the hand strap flap (1) and the grip strap (2). Caution: • Do not swing the camcorder by the hand strap. Note: • Always replace the lens cap on the left side of the power source mounting surface. 3 Loosen the strap in...
... lens cap to the hand strap as shown. 4 Draw the strap in the direction of the arrow to the loop on the lens when the camcorder is not in the buckle, then feed the end of the lens cap on the REC START/STOP button. Preparation Preparation Adjusting the Hand Strap... 1 Open the hand strap flap (1) and the grip strap (2). Caution: • Do not swing the camcorder by the hand strap. Note: • Always replace the lens cap on the left side of the power source mounting surface. 3 Loosen the strap in...


