
Operation Manual
Page 3
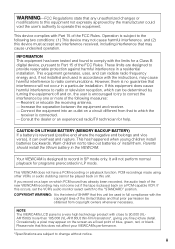
... recording or playback function. PCM recordings made using other VCRs or audio dubbing cannot be obtained from that to correct the interference by one or more than 105,000 (VL-AH160U) thin-film transistors*, giving you record on a tape on which can overheat and rupture. COPYRIGHT WARNING: It is the intent of SHARP that this unit be used in SP mode only. Operation is played back...
... recording or playback function. PCM recordings made using other VCRs or audio dubbing cannot be obtained from that to correct the interference by one or more than 105,000 (VL-AH160U) thin-film transistors*, giving you record on a tape on which can overheat and rupture. COPYRIGHT WARNING: It is the intent of SHARP that this unit be used in SP mode only. Operation is played back...
Operation Manual
Page 5
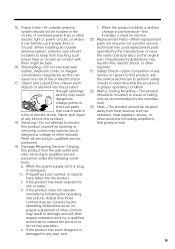
... has been dropped or damaged in any service or repairs to this product, ask the service technician to perform safety checks to dangerous voltage or other electric light or power circuits, or where it can result in damage and will often require extensive work by the operating instructions as the original part. Replacement Parts-When replacement parts are covered by a qualified technician to restore...
... has been dropped or damaged in any service or repairs to this product, ask the service technician to perform safety checks to dangerous voltage or other electric light or power circuits, or where it can result in damage and will often require extensive work by the operating instructions as the original part. Replacement Parts-When replacement parts are covered by a qualified technician to restore...
Operation Manual
Page 7
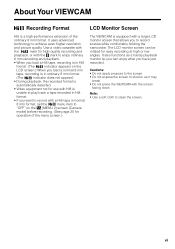
... Recording Format LCD Monitor Screen Hi8 is equipped with a large LCD monitor screen that allows you to record scenes while comfortably holding the camcorder. It uses advanced technology to clean the screen. Use a video cassette with the mark for high-quality recording and playback, or with the mark to enjoy ordinary 8 mm recording and playback. • When you load a Hi8 tape, recording is in Hi8 format. (The indicator appears on the (MENU 2) screen (Camera mode...
... Recording Format LCD Monitor Screen Hi8 is equipped with a large LCD monitor screen that allows you to record scenes while comfortably holding the camcorder. It uses advanced technology to clean the screen. Use a video cassette with the mark for high-quality recording and playback, or with the mark to enjoy ordinary 8 mm recording and playback. • When you load a Hi8 tape, recording is in Hi8 format. (The indicator appears on the (MENU 2) screen (Camera mode...
Operation Manual
Page 10
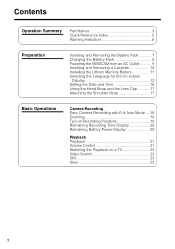
... 7 Charging the Battery Pack 8 Powering the VIEWCAM from an AC Outlet........... 9 Inserting and Removing a Cassette 10 Installing the Lithium Memory Battery 11 Selecting the Language for the On-screen Display 12 Setting the Date and Time 16 Using the Hand Strap and the Lens Cap 17 Attaching the Shoulder Strap 17 Basic Operations Camera Recording Easy Camera Recording with Full Auto Mode ... 18 Zooming 19 Tips on Recording Positions 19 Remaining Recording Time Display 20 Remaining Battery Power Display 20 Playback Playback 21 Volume Control...
... 7 Charging the Battery Pack 8 Powering the VIEWCAM from an AC Outlet........... 9 Inserting and Removing a Cassette 10 Installing the Lithium Memory Battery 11 Selecting the Language for the On-screen Display 12 Setting the Date and Time 16 Using the Hand Strap and the Lens Cap 17 Attaching the Shoulder Strap 17 Basic Operations Camera Recording Easy Camera Recording with Full Auto Mode ... 18 Zooming 19 Tips on Recording Positions 19 Remaining Recording Time Display 20 Remaining Battery Power Display 20 Playback Playback 21 Volume Control...
Operation Manual
Page 11
Operation Summary Preparation Basic Operations Camera Recording Useful Features Operations of the On-screen Controls Using the Control Buttons 24 Selecting the Mode/Menu Screens 24 Adjusting the Menu Settings 25 Recording the Date and Time 26 Setting the Digital Zoom 27 Digital Quick Zoom (Extend Zoom 28 Still Recording 29 Strobe Recording 30 Digital Image Stabilization (DIS 30 Fade In and Fade Out 31 Quick Review 32 Quick Return 33 Edit Search 33 Gamma Brightness Compensation 34 Gain-up (Cat's Eye 35 Wide Screen (16...
Operation Summary Preparation Basic Operations Camera Recording Useful Features Operations of the On-screen Controls Using the Control Buttons 24 Selecting the Mode/Menu Screens 24 Adjusting the Menu Settings 25 Recording the Date and Time 26 Setting the Digital Zoom 27 Digital Quick Zoom (Extend Zoom 28 Still Recording 29 Strobe Recording 30 Digital Image Stabilization (DIS 30 Fade In and Fade Out 31 Quick Review 32 Quick Return 33 Edit Search 33 Gamma Brightness Compensation 34 Gain-up (Cat's Eye 35 Wide Screen (16...
Operation Manual
Page 14
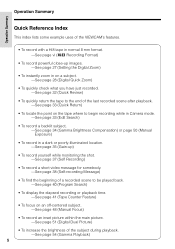
Operation Summary Operation Summary Quick Reference Index This index lists some example uses of the VIEWCAM's features. • To record with a Hi8 tape in normal 8 mm format. -See page vi ( Recording Format) • To record powerful close-up images. -See page 27 (Setting the Digital Zoom) • To instantly zoom in on a subject. -See page 28 (Digital Quick Zoom) • To quickly check what you have just recorded. -See page 32 (Quick Review) • To...
Operation Summary Operation Summary Quick Reference Index This index lists some example uses of the VIEWCAM's features. • To record with a Hi8 tape in normal 8 mm format. -See page vi ( Recording Format) • To record powerful close-up images. -See page 27 (Setting the Digital Zoom) • To instantly zoom in on a subject. -See page 28 (Digital Quick Zoom) • To quickly check what you have just recorded. -See page 32 (Quick Review) • To...

Operation Manual
Page 17
... other functions or turning the power on using the battery pack. This may burst, causing personal injury and damage. Other types of battery packs may result in a decrease of more information on and off frequently will light up in red. Caution: • Charge only SHARP model BT-H22 or BT-H32 battery packs. continuous recording time Max. DC IN jack To power outlet 4 When the battery is...
... other functions or turning the power on using the battery pack. This may burst, causing personal injury and damage. Other types of battery packs may result in a decrease of more information on and off frequently will light up in red. Caution: • Charge only SHARP model BT-H22 or BT-H32 battery packs. continuous recording time Max. DC IN jack To power outlet 4 When the battery is...
Operation Manual
Page 27
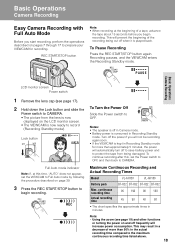
.... REC START/STOP button Note: • When recording at this , set the VIEWCAM to begin recording. P AUS E Basic Operations Camera Recording LCD monitor screen Power switch 1 Remove the lens cap (see page 19) and other functions or turning the power on page 39. 3 Press the REC START/STOP button to Full Auto mode by following the procedure described on and off when it is played back. To continue recording after this time, "AUTO" does not appear, set the Power switch...
.... REC START/STOP button Note: • When recording at this , set the VIEWCAM to begin recording. P AUS E Basic Operations Camera Recording LCD monitor screen Power switch 1 Remove the lens cap (see page 19) and other functions or turning the power on page 39. 3 Press the REC START/STOP button to Full Auto mode by following the procedure described on and off when it is played back. To continue recording after this time, "AUTO" does not appear, set the Power switch...
Operation Manual
Page 29
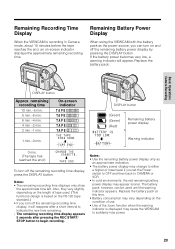
... the zoom function when the warning indicator is displayed may vary depending on -screen indicator displays the approximate remaining recording time. The battery pack, however, can turn off the remaining recording time display, press the DISPLAY button. DISPLAY button (Green) (Green) (Red) Remaining battery power display Warning indicator 0 min. (The tape has reached the end.) To turn on the P6-120 tape standard.) • If you turn off the remaining battery power display by pressing the DISPLAY button. Replace the battery...
... the zoom function when the warning indicator is displayed may vary depending on -screen indicator displays the approximate remaining recording time. The battery pack, however, can turn off the remaining recording time display, press the DISPLAY button. DISPLAY button (Green) (Green) (Red) Remaining battery power display Warning indicator 0 min. (The tape has reached the end.) To turn on the P6-120 tape standard.) • If you turn off the remaining battery power display by pressing the DISPLAY button. Replace the battery...
Operation Manual
Page 30
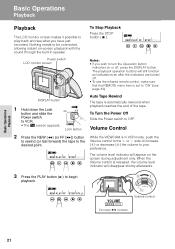
... STOP ST I LL Power switch LCD monitor screen Notes: • If you have just recorded. The playback operation buttons will disappear shortly afterwards. 3 Press the PLAY button (D) to be connected, allowing instant on the screen during adjustment only. Lock button Auto Tape Rewind The tape is released, the volume level indicator will still function as indicated even after the indicators are turned off , press the DISPLAY button. Basic Operations Playback Playback The LCD monitor screen makes it possible to play...
... STOP ST I LL Power switch LCD monitor screen Notes: • If you have just recorded. The playback operation buttons will disappear shortly afterwards. 3 Press the PLAY button (D) to be connected, allowing instant on the screen during adjustment only. Lock button Auto Tape Rewind The tape is released, the volume level indicator will still function as indicated even after the indicators are turned off , press the DISPLAY button. Basic Operations Playback Playback The LCD monitor screen makes it possible to play...

Operation Manual
Page 31
... the operation manual of the components left turned on may cause picture noise or a malfunction. Making connections with the supplied audio/video cable, as you make connections. Operate the TV as shown. 3 Turn on the VIEWCAM in VCR mode, and begin tape playback (see page 21). • Close the terminal cover after use. POWER TV/VCR SET UP PLAY PAUSE /STILL STOP/ EJECT CHANNEL REC Yellow: To VIDEO IN jack White: To AUDIO IN (L) jack Audio/video cable (supplied) To AUDIO/VIDEO...
... the operation manual of the components left turned on may cause picture noise or a malfunction. Making connections with the supplied audio/video cable, as you make connections. Operate the TV as shown. 3 Turn on the VIEWCAM in VCR mode, and begin tape playback (see page 21). • Close the terminal cover after use. POWER TV/VCR SET UP PLAY PAUSE /STILL STOP/ EJECT CHANNEL REC Yellow: To VIDEO IN jack White: To AUDIO IN (L) jack Audio/video cable (supplied) To AUDIO/VIDEO...
Operation Manual
Page 34
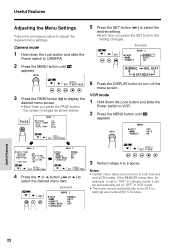
... Useful Features Adjusting the Menu Settings Follow the procedure below . Example MENU 2 SET FADE NORMA L AUTO REMOT E ON DEMO MODE O F F L ANGUA GE 33 P I CSET TURE PAGE 4 Press the ĭ or İ button (C or D) to adjust the desired menu settings. Camera mode 1 Hold down the Lock button and slide the Power switch to VCR. 2 Press the MENU button until appears. 5 Press the SET button (B) to select the desired setting. • Each time you press the PAGE button, the screen changes...
... Useful Features Adjusting the Menu Settings Follow the procedure below . Example MENU 2 SET FADE NORMA L AUTO REMOT E ON DEMO MODE O F F L ANGUA GE 33 P I CSET TURE PAGE 4 Press the ĭ or İ button (C or D) to adjust the desired menu settings. Camera mode 1 Hold down the Lock button and slide the Power switch to VCR. 2 Press the MENU button until appears. 5 Press the SET button (B) to select the desired setting. • Each time you press the PAGE button, the screen changes...
Operation Manual
Page 46
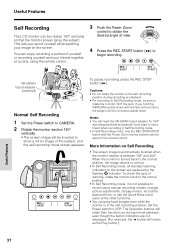
... screen image will be recorded upside down with the lens at a party, using manual recording modes, change picture adjustments, display menus, record the date and time, or use a tripod when recording in the self recording position. If you hold the VIEWCAM upside down . When the monitor is not possible to record using the remote control. 3 Push the Power Zoom control to obtain the desired angle of view. 4 Press the REC START button (B) to begin recording. Set the Power switch to the self recording...
... screen image will be recorded upside down with the lens at a party, using manual recording modes, change picture adjustments, display menus, record the date and time, or use a tripod when recording in the self recording position. If you hold the VIEWCAM upside down . When the monitor is not possible to record using the remote control. 3 Push the Power Zoom control to obtain the desired angle of view. 4 Press the REC START button (B) to begin recording. Set the Power switch to the self recording...

Operation Manual
Page 52
... set any of the various functions on the monitor. • When the batteries are depleted and the remote control does not operate, replace them with new AA (R6 or UM/SUM-3) batteries. • You can also turn off the menu screen. 43 REWind/Reverse Search button RECord START/STOP button Power Zoom Telephoto/ Wide angle control buttons Fast Forward/ Forward Search button SLOW button PLAY button STOP button VOLUME buttons PAUSE/STILL button Notes: • Be careful not to allow direct...
... set any of the various functions on the monitor. • When the batteries are depleted and the remote control does not operate, replace them with new AA (R6 or UM/SUM-3) batteries. • You can also turn off the menu screen. 43 REWind/Reverse Search button RECord START/STOP button Power Zoom Telephoto/ Wide angle control buttons Fast Forward/ Forward Search button SLOW button PLAY button STOP button VOLUME buttons PAUSE/STILL button Notes: • Be careful not to allow direct...
Operation Manual
Page 62
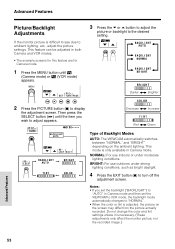
... from the picture actually recorded. P I T mode is adjusted, the picture on the ambient lighting. NORMAL: For use outdoors under moderate lighting conditions. BRIGHT: For use indoors or under strong lighting conditions, such as bright daylight. 4 Press the EXIT button () to turn off the adjustment screen. Notes: • If you set the backlight ("BACKLIGHT") to "AUTO" in Camera mode and then set the VIEWCAM to VCR mode, the backlight mode automatically changes to...
... from the picture actually recorded. P I T mode is adjusted, the picture on the ambient lighting. NORMAL: For use outdoors under moderate lighting conditions. BRIGHT: For use indoors or under strong lighting conditions, such as bright daylight. 4 Press the EXIT button () to turn off the adjustment screen. Notes: • If you set the backlight ("BACKLIGHT") to "AUTO" in Camera mode and then set the VIEWCAM to VCR mode, the backlight mode automatically changes to...
Operation Manual
Page 64
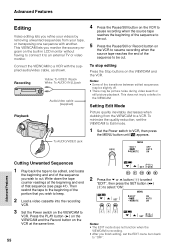
... one sequence with the supplied audio/video cable, as shown. Recording Yellow: To VIDEO IN jack White: To AUDIO IN (L) jack POWER TV/VCR SET UP PLAY PAUSE /STILL STOP/ EJECT CHANNEL REC Audio/video cable (supplied) Playback To AUDIO/VIDEO jack 4 Press the Pause/Still button on the VCR to pause recording when the source tape reaches the beginning of the sequence to be cut. 5 Press the Pause/Still or Record button on the VCR to cut . Notes: • Some...
... one sequence with the supplied audio/video cable, as shown. Recording Yellow: To VIDEO IN jack White: To AUDIO IN (L) jack POWER TV/VCR SET UP PLAY PAUSE /STILL STOP/ EJECT CHANNEL REC Audio/video cable (supplied) Playback To AUDIO/VIDEO jack 4 Press the Pause/Still button on the VCR to pause recording when the source tape reaches the beginning of the sequence to be cut. 5 Press the Pause/Still or Record button on the VCR to cut . Notes: • Some...
Operation Manual
Page 68
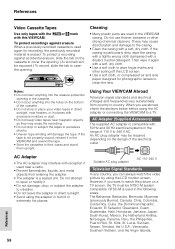
... plastic parts are abroad, check the sections below before using the LCD monitor screen. When you are used in the VIEWCAM casing. Suitable AC plug adapter AC 110-240 V Television Signal Standards In any country, you want to watch the video picture by using the AC adapter or connecting the VIEWCAM to a TV. References Video Cassette Tapes Use only tapes with the with a soft, dry cloth. • Use a soft...
... plastic parts are abroad, check the sections below before using the LCD monitor screen. When you are used in the VIEWCAM casing. Suitable AC plug adapter AC 110-240 V Television Signal Standards In any country, you want to watch the video picture by using the AC adapter or connecting the VIEWCAM to a TV. References Video Cassette Tapes Use only tapes with the with a soft, dry cloth. • Use a soft...
Operation Manual
Page 70
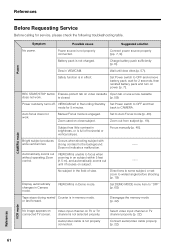
...). Charge battery pack sufficiently (p. 8). Set Power switch to Auto Focus mode (p. 48). REC START/STOP button Erasure-protect tab on subject within 5 feet (1.5 m), and automatically zooms out until dew dries (p. 57). is not properly connected. back to "OFF" (p. 60). Zoom used on connected TV screen. Bright subject produces Occurs when shooting subject with wide vertical lines. Does not indicate a malfunction. -- VIEWCAM is in Recording Standby Set Power switch to focus when zooming in on video cassette Open...
...). Charge battery pack sufficiently (p. 8). Set Power switch to Auto Focus mode (p. 48). REC START/STOP button Erasure-protect tab on subject within 5 feet (1.5 m), and automatically zooms out until dew dries (p. 57). is not properly connected. back to "OFF" (p. 60). Zoom used on connected TV screen. Bright subject produces Occurs when shooting subject with wide vertical lines. Does not indicate a malfunction. -- VIEWCAM is in Recording Standby Set Power switch to focus when zooming in on video cassette Open...
Operation Manual
Page 71
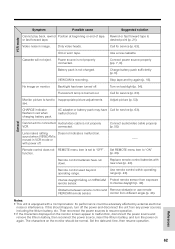
... service (p. 63). Connect audio/video cable properly (p. 55). Replace remote control batteries with a microprocessor. control from exposure remote sensor. Cassette will not eject. Then reconnect the power sources to resume operation. • If the characters displayed on VIEWCAM Protect remote sensor from different angle (p. 43). Rewind or fast forward tape to "OFF". desired point (p. 21). Intense daylight falling on the monitor screen appear to Inappropriate picture adjustments. Set the date and time, then resume operation...
... service (p. 63). Connect audio/video cable properly (p. 55). Replace remote control batteries with a microprocessor. control from exposure remote sensor. Cassette will not eject. Then reconnect the power sources to resume operation. • If the characters displayed on VIEWCAM Protect remote sensor from different angle (p. 43). Rewind or fast forward tape to "OFF". desired point (p. 21). Intense daylight falling on the monitor screen appear to Inappropriate picture adjustments. Set the date and time, then resume operation...
Operation Manual
Page 80
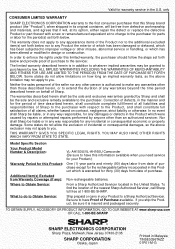
... period of time described herein, shall constitute complete fulfillment of all claims, whether based on contract, negligence, strict liability or otherwise. In no charge to a Sharp Authorized Servicer. Some states do to Obtain Service: VL-AH150U/VL-AH160U Camcorder (Be sure to have Proof of purchase to have this limited warranty, the purchaser should follow the steps set forth below...
... period of time described herein, shall constitute complete fulfillment of all claims, whether based on contract, negligence, strict liability or otherwise. In no charge to a Sharp Authorized Servicer. Some states do to Obtain Service: VL-AH150U/VL-AH160U Camcorder (Be sure to have Proof of purchase to have this limited warranty, the purchaser should follow the steps set forth below...


