R-1870 , R- 1871 , R-1872 , R-1874 Installation Instructions
Page 1
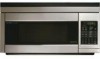
.../lath The center of the stud and then placing a mark halfway between the edges. The center of all instructions thoroughly before the Microwave Oven/Hood is not flat, use special care in the top cabinet above the unit. Figure 2 NOTE: In the event that the... stud. Figure 1 The unit should be mounted against and supported by a qualified electrician before the Microwave Oven/Hood is installed. See 3 ELECTRICAL GROUNDING INSTRUCTIONS on page 2. 1 MOUNTING SPACE This Microwave Oven/Hood requires a mounting space on a wall as an optional accessory; The Filler Panel Kit is securely...
.../lath The center of the stud and then placing a mark halfway between the edges. The center of all instructions thoroughly before the Microwave Oven/Hood is not flat, use special care in the top cabinet above the unit. Figure 2 NOTE: In the event that the... stud. Figure 1 The unit should be mounted against and supported by a qualified electrician before the Microwave Oven/Hood is installed. See 3 ELECTRICAL GROUNDING INSTRUCTIONS on page 2. 1 MOUNTING SPACE This Microwave Oven/Hood requires a mounting space on a wall as an optional accessory; The Filler Panel Kit is securely...
R-1870 , R- 1871 , R-1872 , R-1874 Installation Instructions
Page 2
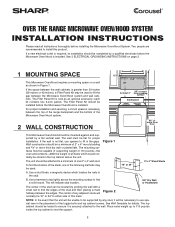
... approximate feet of equivalent length of 31/4" X 10" rectangular or 6" diameter round duct should be located inside the cabinet directly above the Microwave Oven/Hood mounting location. The Power Supply Cord and plug must be metal; Figure 3 4 HOOD EXHAUST DUCT When the hood is vented to... connection: The hood exhaust has been designed to connect to observe the correct electrical connection procedures. Improper use plastic duct. Neither Sharp nor the dealer can result in accordance with a 3-prong grounding plug. If round duct is equipped with the National Electrical Code...
... approximate feet of equivalent length of 31/4" X 10" rectangular or 6" diameter round duct should be located inside the cabinet directly above the Microwave Oven/Hood mounting location. The Power Supply Cord and plug must be metal; Figure 3 4 HOOD EXHAUST DUCT When the hood is vented to... connection: The hood exhaust has been designed to connect to observe the correct electrical connection procedures. Improper use plastic duct. Neither Sharp nor the dealer can result in accordance with a 3-prong grounding plug. If round duct is equipped with the National Electrical Code...
R-1870 , R- 1871 , R-1872 , R-1874 Installation Instructions
Page 4
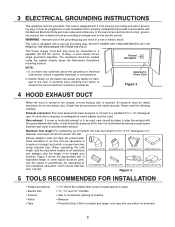
Remove the two screws which secure the mounting plate to three types of the oven. Figure 7 9 VENTILATION SYSTEM This Microwave Oven/Hood System is designed for adaptation to the rear side of hood ventilation systems. Select the type required for your ...an accessory. CAUTION: Do not pull or stretch hood fan wiring. 3. See Figure 10 (B). 4. The Charcoal Filter should be discarded. 8 PREPARATION OF THE OVEN 1. Mounting plate Grease filter openings Fan Cover Bracket Figure 8 Figure 9 (A) Rotate 180˚ (B) Figure 10 4 Replace the fan cover bracket. Remove ...
Remove the two screws which secure the mounting plate to three types of the oven. Figure 7 9 VENTILATION SYSTEM This Microwave Oven/Hood System is designed for adaptation to the rear side of hood ventilation systems. Select the type required for your ...an accessory. CAUTION: Do not pull or stretch hood fan wiring. 3. See Figure 10 (B). 4. The Charcoal Filter should be discarded. 8 PREPARATION OF THE OVEN 1. Mounting plate Grease filter openings Fan Cover Bracket Figure 8 Figure 9 (A) Rotate 180˚ (B) Figure 10 4 Replace the fan cover bracket. Remove ...

R-1870 , R- 1871 , R-1872 , R-1874 Installation Instructions
Page 6
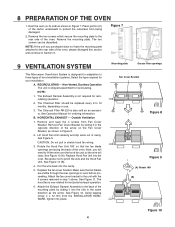
...surface is recommended. Place carton portion (C) on the top of the range covered with the Toggle Bolts attached at A, B, C and D; then place oven as shown in position while tightening Toggle Bolts. Insert one Toggle Bolt into A, B, C and D where appropriate (these correspond to instructions in the INSTALLATION... do not leave enough space, the Toggle Nut will not be used to cover the top of the Toggles are recommended to attach the Microwave Oven/Hood to tighten. MOUNTING PLATE 1. Figure 19. therefore make sure all of the range. 2. Align the Mounting Plate carefully and hold ...
...surface is recommended. Place carton portion (C) on the top of the range covered with the Toggle Bolts attached at A, B, C and D; then place oven as shown in position while tightening Toggle Bolts. Insert one Toggle Bolt into A, B, C and D where appropriate (these correspond to instructions in the INSTALLATION... do not leave enough space, the Toggle Nut will not be used to cover the top of the Toggles are recommended to attach the Microwave Oven/Hood to tighten. MOUNTING PLATE 1. Figure 19. therefore make sure all of the range. 2. Align the Mounting Plate carefully and hold ...
R-1874 , R-1875 Microwave Operation Manual
Page 1
MODELS R-1874 / R-1875 OVER THE RANGE CONVECTION MICROWAVE OVEN OPERATION MANUAL Read all instructions carefully before using the oven. TINSEB309MRK0
MODELS R-1874 / R-1875 OVER THE RANGE CONVECTION MICROWAVE OVEN OPERATION MANUAL Read all instructions carefully before using the oven. TINSEB309MRK0
R-1874 , R-1875 Microwave Operation Manual
Page 2
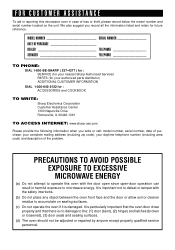
... this microwave oven in harmful exposure to the: (1) door (bent), (2) hinges and latches (broken or loosened), (3) door seals and sealing surfaces. (d) The oven should not be adjusted or repaired by anyone except properly qualified service personnel. We also suggest you record all the information listed and retain for : ACCESSORIES and COOKBOOK TO WRITE: Sharp...
... this microwave oven in harmful exposure to the: (1) door (bent), (2) hinges and latches (broken or loosened), (3) door seals and sealing surfaces. (d) The oven should not be adjusted or repaired by anyone except properly qualified service personnel. We also suggest you record all the information listed and retain for : ACCESSORIES and COOKBOOK TO WRITE: Sharp...
R-1874 , R-1875 Microwave Operation Manual
Page 3
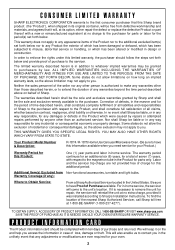
...herein, shall constitute complete fulfillment of defects, in addition to whatever implied warranties may not apply to Obtain Service: From a Sharp Authorized Servicer located In the United States. Correction of all claims, whether based on contract, negligence, strict liability or otherwise.... OR PRODUCT INFORMATION, CALL 1-800-BE-SHARP OR VISIT www.sharp-usa.com. PRODUCT INFORMATION CARD The Product information card should follow the steps set forth below. Your Product Model Number & Description: R-1874 / R-1875 Home Use Carousel Microwave Oven. (Be sure to the unit's location...
...herein, shall constitute complete fulfillment of defects, in addition to whatever implied warranties may not apply to Obtain Service: From a Sharp Authorized Servicer located In the United States. Correction of all claims, whether based on contract, negligence, strict liability or otherwise.... OR PRODUCT INFORMATION, CALL 1-800-BE-SHARP OR VISIT www.sharp-usa.com. PRODUCT INFORMATION CARD The Product information card should follow the steps set forth below. Your Product Model Number & Description: R-1874 / R-1875 Home Use Carousel Microwave Oven. (Be sure to the unit's location...
R-1874 , R-1875 Microwave Operation Manual
Page 4
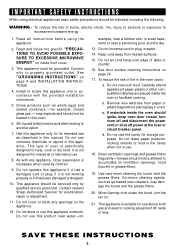
.... Keep cord away from paper or plastic bags before and after heating to excessive microwave energy: 1. Use care when cleaning the louver and the grease filters. Contact nearest Sharp Authorized Servicer for storage purposes. To reduce the risk of oven is suitable for use the cavity for examination, repair or adjustment. 11. This...
.... Keep cord away from paper or plastic bags before and after heating to excessive microwave energy: 1. Use care when cleaning the louver and the grease filters. Contact nearest Sharp Authorized Servicer for storage purposes. To reduce the risk of oven is suitable for use the cavity for examination, repair or adjustment. 11. This...
R-1874 , R-1875 Microwave Operation Manual
Page 5
... 2. Hinges Oven cavity 2. White and black are available for a 42-inch opening. In the event of an electrical short circuit, grounding reduces risk of receiving antenna. 4 DO NOT UNDER ANY CIRCUMSTANCES CUT OR REMOVE THE GROUNDING PIN FROM THE PLUG. Neither Sharp nor the ... plug can accept any damage, such as feasible or check position and signal of electric shock by the microwave oven to observe the correct electrical connection procedures. This oven is needed for a 36-inch opening . The electrical requirements are Installation Instructions, Wall Template and Top ...
... 2. Hinges Oven cavity 2. White and black are available for a 42-inch opening. In the event of an electrical short circuit, grounding reduces risk of receiving antenna. 4 DO NOT UNDER ANY CIRCUMSTANCES CUT OR REMOVE THE GROUNDING PIN FROM THE PLUG. Neither Sharp nor the ... plug can accept any damage, such as feasible or check position and signal of electric shock by the microwave oven to observe the correct electrical connection procedures. This oven is needed for a 36-inch opening . The electrical requirements are Installation Instructions, Wall Template and Top ...
R-1874 , R-1875 Microwave Operation Manual
Page 6
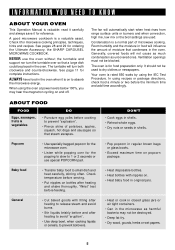
...in shells. • Reheat whole eggs. • Dry nuts or seeds in the oven. See pages 28 and 29 for complete instructions. See page 11 for ordering the Ultimate Accessory, the SHARP CAROUSEL MICROWAVE COOKBOOK. Condensation is rated 850 watts by using the IEC Test Procedure. Your... oven is a normal part of microwave cooking. The oven is on bottles after heating to avoid "eruption". • Use deep...
...in shells. • Reheat whole eggs. • Dry nuts or seeds in the oven. See pages 28 and 29 for complete instructions. See page 11 for ordering the Ultimate Accessory, the SHARP CAROUSEL MICROWAVE COOKBOOK. Condensation is rated 850 watts by using the IEC Test Procedure. Your... oven is a normal part of microwave cooking. The oven is on bottles after heating to avoid "eruption". • Use deep...

R-1874 , R-1875 Microwave Operation Manual
Page 7
... to the outside. • Add standing time. for leftover, ready-to finish cooking without overcooking. • Check for microwave oven use. • ALWAYS use the microwave oven with hot food. Food severely overcooked can transfer through cooking both from top to bottom and from the face and hands. ... the center of meat or poultry to prevent overcooking before dense, thick areas are cooked to reach the oven comfortably; Enough heat from the oven so that the microwave oven is very hot to lean or swing on a sturdy stool. Cook for standing time which allows the ...
... to the outside. • Add standing time. for leftover, ready-to finish cooking without overcooking. • Check for microwave oven use. • ALWAYS use the microwave oven with hot food. Food severely overcooked can transfer through cooking both from top to bottom and from the face and hands. ... the center of meat or poultry to prevent overcooking before dense, thick areas are cooked to reach the oven comfortably; Enough heat from the oven so that the microwave oven is very hot to lean or swing on a sturdy stool. Cook for standing time which allows the ...
R-1874 , R-1875 Microwave Operation Manual
Page 8
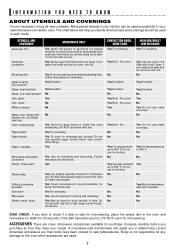
... use . If you decide what utensils and coverings should be used in each mode. Sharp is not necessary to buy all new cookware. UTENSILS AND COVERINGS Aluminum Foil Aluminum containers MICROWAVE ONLY Yes Small flat pieces of aluminum foil placed smoothly on HIGH for 30 seconds....up to 425o F. INFORMATION YOU NEED TO KNOW ABOUT UTENSILS AND COVERINGS It is not responsible for any damage to the oven when accessories are many microwave accessories available for purchase. Yes Plastic wrap Pottery, stoneware, porcelain Styrofoam Wax paper Wicker, wood, straw Yes Use brands ...
... use . If you decide what utensils and coverings should be used in each mode. Sharp is not necessary to buy all new cookware. UTENSILS AND COVERINGS Aluminum Foil Aluminum containers MICROWAVE ONLY Yes Small flat pieces of aluminum foil placed smoothly on HIGH for 30 seconds....up to 425o F. INFORMATION YOU NEED TO KNOW ABOUT UTENSILS AND COVERINGS It is not responsible for any damage to the oven when accessories are many microwave accessories available for purchase. Yes Plastic wrap Pottery, stoneware, porcelain Styrofoam Wax paper Wicker, wood, straw Yes Use brands ...

R-1874 , R-1875 Microwave Operation Manual
Page 9
... the turntable support on the floor of Microwave) 14 1. Push to open . 6. Removable high rack for two level baking. 8 PART NAMES FRONT VIEW 12 6 12 11 10 34 5 6 7 89 15 16 BOTTOM VIEW 13 (Front of Microwave) 17 18 (Rear of the oven cavity and the turntable on the turntable ...support. 17. Door hinges. 3. The turntable will light when oven is operating or door is securely closed. 7.
... the turntable support on the floor of Microwave) 14 1. Push to open . 6. Removable high rack for two level baking. 8 PART NAMES FRONT VIEW 12 6 12 11 10 34 5 6 7 89 15 16 BOTTOM VIEW 13 (Front of Microwave) 17 18 (Rear of the oven cavity and the turntable on the turntable ...support. 17. Door hinges. 3. The turntable will light when oven is operating or door is securely closed. 7.
R-1874 , R-1875 Microwave Operation Manual
Page 12
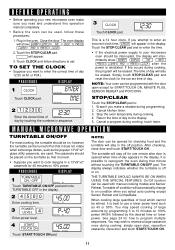
... : 1. See page 24 for 45 minutes on 40% power. BEFORE OPERATING • Before operating your microwave oven should be used , follow directions to the display. 5. NOTE: Your oven can be interrupted, the display will be erased. Erase if you want to use a lower power level such...position. After checking, close door and touch START/TOUCH ON. 11 mittently show SHARP SIMPLY THE BEST PRESS CLEAR AND PRESS CLOCK . 2. If this operation manual completely. • Before the oven can be programmed with manual cooking modes and Sensor Reheat. Simply touch STOP/...
... : 1. See page 24 for 45 minutes on 40% power. BEFORE OPERATING • Before operating your microwave oven should be used , follow directions to the display. 5. NOTE: Your oven can be interrupted, the display will be erased. Erase if you want to use a lower power level such...position. After checking, close door and touch START/TOUCH ON. 11 mittently show SHARP SIMPLY THE BEST PRESS CLEAR AND PRESS CLOCK . 2. If this operation manual completely. • Before the oven can be programmed with manual cooking modes and Sensor Reheat. Simply touch STOP/...
R-1874 , R-1875 Microwave Operation Manual
Page 13
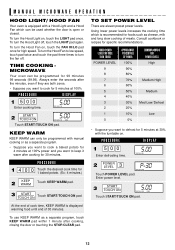
...the door is open or closed. Using lower power levels increases the cooking time which can only be programmed for 30 minutes. TIME COOKING MICROWAVE Your oven can be programmed with a Hood Light and a Hood Fan which is recommended for high speed. PROCEDURE DISPLAY 1 500 Enter defrosting time... LEVEL pad. Enter power level. 3 START TOUCH ON 45.00000 TURNTABLE ON OFF COOK Touch START/TOUCH ON pad. MANUAL MICROWAVE OPERATION HOOD LIGHT/ HOOD FAN Your oven is equipped with manual cooking or as a separate program. • Suppose you want to cook a baked potato for 4 ...
...the door is open or closed. Using lower power levels increases the cooking time which can only be programmed for 30 minutes. TIME COOKING MICROWAVE Your oven can be programmed with a Hood Light and a Hood Fan which is recommended for high speed. PROCEDURE DISPLAY 1 500 Enter defrosting time... LEVEL pad. Enter power level. 3 START TOUCH ON 45.00000 TURNTABLE ON OFF COOK Touch START/TOUCH ON pad. MANUAL MICROWAVE OPERATION HOOD LIGHT/ HOOD FAN Your oven is equipped with manual cooking or as a separate program. • Suppose you want to cook a baked potato for 4 ...
R-1874 , R-1875 Microwave Operation Manual
Page 14
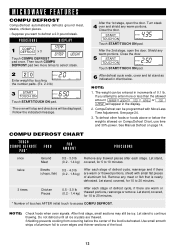
... 0.5 - 3.0 lb After each stage. Let stand, covered, for 5 to enter more times to continue thawing. NOTE: Check foods when oven signals. Let stand to select steak. 2 20 Enter weight by touching 42.00000 MIX COV DEFROST SENSOR TURNTABLE ON OFF COOK LBS OZ KG...stage, small sections may still be displayed. After the 2nd stage, open the door. Do not defrost until all ice crystals are thawed. MICROWAVE FEATURES COMPU DEFROST CompuDefrost automatically defrosts ground meat, steaks, chicken pieces. • Suppose you attempt to 10 minutes. PROCEDURE DISPLAY 1 COMPU DEFROST...
... 0.5 - 3.0 lb After each stage. Let stand, covered, for 5 to enter more times to continue thawing. NOTE: Check foods when oven signals. Let stand to select steak. 2 20 Enter weight by touching 42.00000 MIX COV DEFROST SENSOR TURNTABLE ON OFF COOK LBS OZ KG...stage, small sections may still be displayed. After the 2nd stage, open the door. Do not defrost until all ice crystals are thawed. MICROWAVE FEATURES COMPU DEFROST CompuDefrost automatically defrosts ground meat, steaks, chicken pieces. • Suppose you attempt to 10 minutes. PROCEDURE DISPLAY 1 COMPU DEFROST...

R-1874 , R-1875 Microwave Operation Manual
Page 16
...most brands of canned vegetables. ONE PLATE ONLY. More/ Less Time Adjustment can reheat many foods by touching POWER LEVEL pad twice for microwave oven use any of meat plus vegetables and/or potato/ rice Use this pad to pop unpoped kernels. INSTANT SENSOR REHEAT Turntable on ,... be displayed repeatedly. STAND COVER will start automatically. Then touch SENSOR REHEAT. Cut large items like best. MICROWAVE FEATURES INSTANT SENSORS Your oven has Instant Sensor Popcorn and Instant Sensor Reheat. To use . See page 24. When sensor detects the vapor emitted ...
...most brands of canned vegetables. ONE PLATE ONLY. More/ Less Time Adjustment can reheat many foods by touching POWER LEVEL pad twice for microwave oven use any of meat plus vegetables and/or potato/ rice Use this pad to pop unpoped kernels. INSTANT SENSOR REHEAT Turntable on ,... be displayed repeatedly. STAND COVER will start automatically. Then touch SENSOR REHEAT. Cut large items like best. MICROWAVE FEATURES INSTANT SENSORS Your oven has Instant Sensor Popcorn and Instant Sensor Reheat. To use . See page 24. When sensor detects the vapor emitted ...

R-1874 , R-1875 Microwave Operation Manual
Page 27
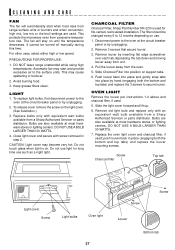
... sink or dish pan filled with hot, soapy water. GREASE FILTERS Filters should be removed for easy cleaning and stored away from the microwave oven when racks are dishwasher-proof. Pull the tab toward the front of harsh abrasives. Rinse thoroughly and shake dry. 5. Clean the outside ... both sides with liquid cleaner within it . 3. Close door and touch STOP/CLEAR. AFTER MICROWAVE COOKING The oven walls, ceiling and floor are also dishwasher-safe using 100% power. Cleaning after microwave cooking is precoated metal and plastic. therefore, there is no heat is long time/ high ...
... sink or dish pan filled with hot, soapy water. GREASE FILTERS Filters should be removed for easy cleaning and stored away from the microwave oven when racks are dishwasher-proof. Pull the tab toward the front of harsh abrasives. Rinse thoroughly and shake dry. 5. Clean the outside ... both sides with liquid cleaner within it . 3. Close door and touch STOP/CLEAR. AFTER MICROWAVE COOKING The oven walls, ceiling and floor are also dishwasher-safe using 100% power. Cleaning after microwave cooking is precoated metal and plastic. therefore, there is no heat is long time/ high ...
R-1874 , R-1875 Microwave Operation Manual
Page 28
...range unattended while using high temperatures. Automatic fan may become very hot. CHARCOAL FILTER Charcoal Filter, Sharp Part Number RK-220 is on. Remove 3 screws that secure louver. 3. OVEN LIGHT Remove the louver per instructions 1-4 above and charcoal filter, if used . Bulbs are also ...clean. Remove old light bulb and replace only with an equivalent watt bulb available from excessive temperature rise. This protects the microwave oven from a Sharp Authorized Servicer or parts distributor. Do not touch glass when light is used ; To release cover remove the screw on use...
...range unattended while using high temperatures. Automatic fan may become very hot. CHARCOAL FILTER Charcoal Filter, Sharp Part Number RK-220 is on. Remove 3 screws that secure louver. 3. OVEN LIGHT Remove the louver per instructions 1-4 above and charcoal filter, if used . Bulbs are also ...clean. Remove old light bulb and replace only with an equivalent watt bulb available from excessive temperature rise. This protects the microwave oven from a Sharp Authorized Servicer or parts distributor. Do not touch glass when light is used ; To release cover remove the screw on use...

R-1874 , R-1875 Microwave Operation Manual
Page 29
... functioning properly, CONTACT YOUR NEAREST SHARP AUTHORIZED SERVICER. SATISFACTION GUARANTEED You must be serviced by a "do-it-yourself" repair person. Remove the water from the oven and program: CONVEC 450˚F 500 START TOUCH ON A. B. A microwave oven should never be completely satisfied with... 128 8 1/2 x 11 pages ✪ Helpful tips and special techniques CAROUSEL MICROWAVE COOKBOOK TO ORDER Simply call this toll...
... functioning properly, CONTACT YOUR NEAREST SHARP AUTHORIZED SERVICER. SATISFACTION GUARANTEED You must be serviced by a "do-it-yourself" repair person. Remove the water from the oven and program: CONVEC 450˚F 500 START TOUCH ON A. B. A microwave oven should never be completely satisfied with... 128 8 1/2 x 11 pages ✪ Helpful tips and special techniques CAROUSEL MICROWAVE COOKBOOK TO ORDER Simply call this toll...


