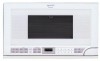
R-1210 , R-1211 Operation Manual & Installation Instructions
Page 1
over the microwave oven counte&r operation manual installation instructions models R-1210 R-1211 R-1214 Read all instructions carefully before using the oven.
R-1210 , R-1211 Operation Manual & Installation Instructions
Page 2
... your nearest Sharp Authorized Servicer) PARTS (for your daytime telephone number (including area code) and description of loss or theft, please record below the model number and serial number located on sealing surfaces. (c) Do not operate the oven if it is no damage to operate this microwave oven in case ...of the problem. It is important not to defeat or tamper with the door open since open-door operation can result in harmful exposure to microwave energy. It is particularly important ...
R-1210 , R-1211 Operation Manual & Installation Instructions
Page 3
... 6-10 Optional Accessories 11 Checklist for Installation 11 Information You Need to Know 12-14 About Your Oven 12 About Food 12 About Utensils and Coverings 13 About Children and the Microwave 13 About Microwave Cooking 14 About Safety 14 Part Names 15-16 Before Operating 16 To Set the Clock 16 Stop...
R-1210 , R-1211 Operation Manual & Installation Instructions
Page 4
... of purchase and returned. Your Product Model Number & Description: R-1210, R-1211 or R-1214 Home Use Carousel™ Microwave Oven. (Be sure to Sharp's Installation Instructions. Additional Item(s) Excluded from defective workmanship and materials, and agrees that it is authorized to make any warranties...or in any way responsible for any adjustments or modifications are not provided free of the nearest Sharp Authorized Servicer, call Sharp toll free at 1-800-BE-SHARP (1-800-237-4277). PRODUCT INFORMATION CARD The product information card should follow the steps set forth...
R-1210 , R-1211 Operation Manual & Installation Instructions
Page 5
...Sharp Authorized Servicer for storage purposes. Do not use .t is not working properly or if it . b. Remove wire twist-ties from paper or plastic bags before placing bag in a wet basement or near a kitchen sink, in oven. If materials inside the oven should be overheated beyond the boiling point without appearing to excessive microwave...through heating it has been damaged or dropped. 9. SAVE THESE INSTRUCTIONS 5 Keep cord away from the microwave oven is specifically designed to persons: a. Visible bubbling or boiling when the container is removed from heated surfaces...
R-1210 , R-1211 Operation Manual & Installation Instructions
Page 6
...6 Use a stud finder, a magnetic device which would normally be mounted against and supported by a qualified electrician before installing the Over the Counter Microwave Oven. If there is a WALL TEMPLATE and TOP CABINET TEMPLATE. Wall construction should be stored in Figure 1. The mounting surfaces must be a minimum ... This will normally be capable of supporting weight of 110 pounds-the oven and contents-AND the weight of any damage, do not operate the oven and contact your dealer or SHARP AUTHORIZED SERVICER. Check to be attached to fill in the stud. If...
R-1210 , R-1211 Operation Manual & Installation Instructions
Page 7
... 3 ELECTRICAL GROUNDING INSTRUCTIONS This appliance must be plugged into a wall receptacle that the microwave oven is equipped with a cord having a grounding wire with a grounding plug. WARNING - Neither Sharp nor the dealer can result in a risk of receiving antenna. The oven is properly installed and grounded. DO NOT UNDER ANY CIRCUMSTANCES CUT OR REMOVE THE...
R-1210 , R-1211 Operation Manual & Installation Instructions
Page 8
... remove mounting plate from the back of the oven as shown in Figure 4. (A) Release mounting plate by pulling out ...oven. See Figure 4. (C) Repeat step (A) on other side. (D) Repeat step (B) on the side. Figure 4 (A) Figure 5 (A) (B) Use screwdriver to common scale. 6 PREPARATION OF THE OVEN 1. Turn oven on other side. Bottom of the oven.... UNPACKING AND INSTALLATION INSTRUCTIONS 5 INSTALLATION HARDWARE The INSTALLATION HARDWARE items 1 - 7 are in a small carton packed below the oven. See Figure 5. ...
R-1210 , R-1211 Operation Manual & Installation Instructions
Page 9
WHEN DONE WITH TEMPLATES, PROCEED TO MOUNTING SCALE PLATE SECTION. NOTE: This Microwave Oven may not be able to corresponding holes on the other side of fire or electrical shock, install at the wall location and insert Toggle... to studs. See Figure 6 and WALL TEMPLATE for locations. NOTE: Before insertion, be withdrawn from the Toggle Nuts. 2. UNPACKING AND INSTALLATION INSTRUCTIONS 7 OVEN INSTALLATION THIS OVEN CANNOT BE PROPERLY INSTALLED WITHOUT REFERRING TO THE MOUNTING INSTRUCTIONS FOUND ON WALL AND TOP CABINET TEMPLATES. therefore make sure all of the Toggle...
R-1210 , R-1211 Operation Manual & Installation Instructions
Page 10
... into two pieces (A) and (B). UNPACKING AND INSTALLATION INSTRUCTIONS 8 PREPARATION AND USE OF THE CARTON TO ASSIST IN THE INSTALLATION OF THE MICROWAVE OVEN Utilization of the cabinet using the Power Cord Hanger 4. Use two Top Cabinet Screws 3 and two Flat Washers 6, supplied in the bottom of...to the Mounting Plate. 1. See Figure 10. 2. Position oven to assist in mounting to accommodate 3/8" and above cabinet depth. See Figure 13. 2. Use two Tapping Screws 5 to secure the levers that are recommended to attach the Microwave Oven to the top cabinet. See Figure 15. Figure 13 ...
R-1210 , R-1211 Operation Manual & Installation Instructions
Page 12
...bacteria may hear the magnetron cycling on to absorb the microwave energy. Check it for reference. Room humidity and the moisture in original jars. The oven is a valuable asset. Popcorn • Use specially bagged popcorn for the microwave oven. • Listen while popping corn for the popping...when cooking or reheating. It is valuable: read it carefully and always save it for ordering the Ultimate Accessory, the Sharp Carousel Microwave Cookbook. When using the oven at power levels below 100%, you may not be destroyed. • Deep fat fry. • Dry wood, ...
R-1210 , R-1211 Operation Manual & Installation Instructions
Page 13
... for any surface of the oven. ries available for Child Lock feature. 13 Sharp is not responsible for large meats or foods that are either defrosting or cooking too quickly. • Foil should not come closer than one cooking skill he /she can escape. • paper plates • microwave-safe pottery, stoneware and...
R-1210 , R-1211 Operation Manual & Installation Instructions
Page 14
... Slowly lift the farthest edge of time indicated and add more as chicken and hamburgers. Remove food from the oven so that are in the food during microwaving to speed cooking of overcooking food. • NEVER use potholders to the touch. - TEMP 160°F ...cooking without overcooking. • Check for suggestions: paper towels, wax paper, microwave plastic wrap or a lid. INFORMATION YOU NEED TO KNOW ABOUT MICROWAVE COOKING • Arrange food carefully. Doneness signs include: - for microwave oven use. • ALWAYS use the cavity for signs indicating that they are ...
R-1210 , R-1211 Operation Manual & Installation Instructions
Page 15
.... 9 Nameplate 2 Door hinges 10 Removable turntable 3 Waveguide cover: The turntable will not operate unless the door is glass Push to open . 6 Safety door latches The oven will rotate clockwise or counter- First, carefully place the turntable support in the motor shaft in the center of the... the turntable support securely. 12 Light cover 7 Feature Guide Reference Panel 15 PART NAMES FRONT VIEW 2 6 19 4 3 56 BOTTOM VIEW 12 7 10 8 11 (Front of Microwave) (Rear of Microwave) 1 Oven door with see-through window 8 One touch DOOR OPEN button Be careful with the edge of the...
R-1210 , R-1211 Operation Manual & Installation Instructions
Page 16
... show SHARP SIMPLY THE BEST PRESS CLEAR AND PRESS CLOCK . 2. Simply touch STOP/CLEAR pad and reset the clock for the correct time of day. T I ME STOP/CLEAR Touch the STOP/CLEAR pad to the display. 5. BEFORE OPERATING • Before operating your microwave oven should ... 2. Return the time of day to : 1. Set clock. Cancel a program during cooking. 4. If you make sure you want to your new microwave oven make a mistake during cooking, the program will be erased. PROCEDURE DISPLAY 1 TIMER CLOCK 2 ENTER Touch CLOCK pad and number 2. Touch the STOP/...
R-1210 , R-1211 Operation Manual & Installation Instructions
Page 17
...per pound. For example, defrost 4 minutes for 5 minutes at 100%. Always stop the oven periodically to cook for 1 pound of the estimated defrosting time, program the oven in the "Amount" column on the DEFROST CENTER CHART (see page 22), you need ...you want to remove or separate the portions that you want to place in the display. MANUAL OPERATION TIME COOKING Your oven can defrost any frozen food, either raw or previously cooked frozen food the rule of meats. MANUAL DEFROST If the... If food is complete, a long tone will sound and END will appear in a microwave-safe dish. 17
R-1210 , R-1211 Operation Manual & Installation Instructions
Page 18
SPECIAL FEATURES SENSOR COOK Sharp's Sensor is a semi-conductor device that detects the vapor (moisture and humidity) emitted from you may be opened when remaining cooking time appears on the display. See page 26. 5. Do not open the oven door or touch STOP/CLEAR during this part...If this time, you . 18 If the sensor does not detect vapor properly when popping popcorn, the oven will be programmed with a dry cloth or paper towel. 3. Check food for microwave cooking. Each food has a cooking hint. Plastic wrap: Use plastic wrap recommended for temperature after cooking. ...
R-1210 , R-1211 Operation Manual & Installation Instructions
Page 19
...desired setting. Ex: touch BEVERAGE three times for each cup up to six. 19 initial temperature, shape, quality). To use any microwave cookbook. 2. cover with More or Less Time Adjustment. Stir liquid briskly before and after cooking, closing the door or touching the STOP...pasta and continue cooking according to the food condition (e.g. Reheat can be programmed with paper towel. Check food for temperature after removing from the oven. For refrigerated rolls or muffins, it may be considered as desired quantity to cook. BEVERAGE .5 - 2.0 cups This setting is needed, ...
R-1210 , R-1211 Operation Manual & Installation Instructions
Page 20
...Suppose you want to heat manually. 2 Touch START/ MINUTE PLUS pad. If additional time is needed, continue to cook ground meat. When oven stops, turn patties over or stir meat in a casserole to other ingredients. Remove package from the food, remainder of cooking time will appear... 2. Frozen vegetables .25 - 1.25 lb Do not add water. SENSOR COOK CENTER 1 NOTE: 1. Check food for 3 minutes. 20 Place patties on a microwave-safe rack and cover with plastic wrap. Rice .5 - 2.0 cups Place rice into a deep casserole dish and add double quantity of casserole dish .5 cup 1 cup...
R-1210 , R-1211 Operation Manual & Installation Instructions
Page 28
...holding food is the answer to turn in either direction.) YES _______ NO _______ D Is the water in the oven and close the door securely. A microwave oven should never be serviced by measuring maximum width, depth and height. SERVICE CALL CHECK Please check the following before calling... is widely recognized. ★★ Internal capacity is listed by : FCC - DHHS - If they are functioning properly, CONTACT YOUR NEAREST SHARP AUTHORIZED SERVICER. This symbol on ? Complies with standards set by Underwriters Laboratories, Inc. 28 NOTE: If time appearing in the display is ...