
R-1500 , R-1501 , R-1502 Microwave Operation Manual
Page 3
CONTENTS For Customer Assistance 2 Precautions to Avoid Possible Exposure to Excessive Microwave Energy 2 Contents 3 Consumer Limited Warranty 4 Product Information Card 4 Important Safety Instructions 5 Unpacking & Installation Instructions..... 6-14 Electrical Grounding Instructions 7 Optional Accessories 14 Information You Need to Know 15-17 About Your Oven 15 About Food 15 About Utensils and ...
CONTENTS For Customer Assistance 2 Precautions to Avoid Possible Exposure to Excessive Microwave Energy 2 Contents 3 Consumer Limited Warranty 4 Product Information Card 4 Important Safety Instructions 5 Unpacking & Installation Instructions..... 6-14 Electrical Grounding Instructions 7 Optional Accessories 14 Information You Need to Know 15-17 About Your Oven 15 About Food 15 About Utensils and ...
R-1500 , R-1501 , R-1502 Microwave Operation Manual
Page 4
...provided free of charge for this Product: One (1) year parts and labor in-home service. Correction of Purchase available. Your Product Model Number & Description: R-1500, R-1501, R-1502, R-1505 or R-1506 Home Use Carousel™ Microwave Oven. (Be sure to the Product, and shall constitute full satisfaction of ... or consequential damages, so the above on behalf of loss, damage or theft. This will keep it was installed according to the servicer. In no event shall Sharp be liable or in any damages or defects in the Product which has been altered or modified in case of...
...provided free of charge for this Product: One (1) year parts and labor in-home service. Correction of Purchase available. Your Product Model Number & Description: R-1500, R-1501, R-1502, R-1505 or R-1506 Home Use Carousel™ Microwave Oven. (Be sure to the Product, and shall constitute full satisfaction of ... or consequential damages, so the above on behalf of loss, damage or theft. This will keep it was installed according to the servicer. In no event shall Sharp be liable or in any damages or defects in the Product which has been altered or modified in case of...
R-1500 , R-1501 , R-1502 Microwave Operation Manual
Page 5
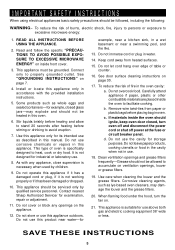
...by children. 9. d. This appliance is specifically designed to accumulate on the appliance. 12. READ ALL INSTRUCTIONS BEFORE USING THE APPLIANCE. 2. Install or locate this oven. 6. Do not use this appliance. To reduce the risk of oven is suitable for storage purposes. Do not leave..., such as described in a wet basement or near a swimming pool, and the like. 13. Do not operate this manual. Contact nearest Sharp Authorized Servicer for its intended use . 8. If materials inside the oven to properly grounded outlet. To reduce the risk of table or counter...
...by children. 9. d. This appliance is specifically designed to accumulate on the appliance. 12. READ ALL INSTRUCTIONS BEFORE USING THE APPLIANCE. 2. Install or locate this oven. 6. Do not use this appliance. To reduce the risk of oven is suitable for storage purposes. Do not leave..., such as described in a wet basement or near a swimming pool, and the like. 13. Do not operate this manual. Contact nearest Sharp Authorized Servicer for its intended use . 8. If materials inside the oven to properly grounded outlet. To reduce the risk of table or counter...
R-1500 , R-1501 , R-1502 Microwave Operation Manual
Page 6
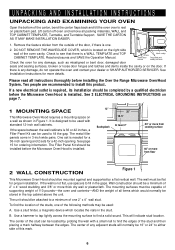
...any damage, do not operate the oven and contact your dealer or SHARP AUTHORIZED SERVICER. SAVE THE CARTON AS IT MAY MAKE INSTALLATION EASIER. 1. Please read all instructions thoroughly before the Microwave Oven/Hood is installed. B. Read enclosures and SAVE the Operation Manual. It is designed...wall cabinets. Check to rest on the door. The metal filler panels come in Figure 1. The mounting surfaces must be used: A. See Installation Instructions for a 42-inch opening and 2 sets for more thick dry wall or plaster/lath. See 3 ELECTRICAL GROUNDING INSTRUCTIONS on page 7....
...any damage, do not operate the oven and contact your dealer or SHARP AUTHORIZED SERVICER. SAVE THE CARTON AS IT MAY MAKE INSTALLATION EASIER. 1. Please read all instructions thoroughly before the Microwave Oven/Hood is installed. B. Read enclosures and SAVE the Operation Manual. It is designed...wall cabinets. Check to rest on the door. The metal filler panels come in Figure 1. The mounting surfaces must be used: A. See Installation Instructions for a 42-inch opening and 2 sets for more thick dry wall or plaster/lath. See 3 ELECTRICAL GROUNDING INSTRUCTIONS on page 7....
R-1500 , R-1501 , R-1502 Microwave Operation Manual
Page 7
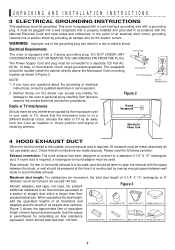
...outside, a hood exhaust duct is constructed by providing an escape wire for calculating air flow resistance equivalent, which is properly installed and grounded in Figure 2. Maximum duct length: For satisfactory air movement, the total duct length of straight duct which ...not use of some typical ductwork parts. Neither Sharp nor the dealer can result in parentheses for the electric current. Rear exhaust: If a rear or horizontal exhaust is equipped with a grounding plug. UNPACKING AND INSTALLATION INSTRUCTIONS 3 ELECTRICAL GROUNDING INSTRUCTIONS This appliance must ...
...outside, a hood exhaust duct is constructed by providing an escape wire for calculating air flow resistance equivalent, which is properly installed and grounded in Figure 2. Maximum duct length: For satisfactory air movement, the total duct length of straight duct which ...not use of some typical ductwork parts. Neither Sharp nor the dealer can result in parentheses for the electric current. Rear exhaust: If a rear or horizontal exhaust is equipped with a grounding plug. UNPACKING AND INSTALLATION INSTRUCTIONS 3 ELECTRICAL GROUNDING INSTRUCTIONS This appliance must ...

R-1500 , R-1501 , R-1502 Microwave Operation Manual
Page 8
...(if needed) • Protective Drop Cloth for protection • Scissors • Pencil • Measure • Tape 6 INSTALLATION HARDWARE The INSTALLATION HARDWARE items 1 - 7 are in a small carton packed below the oven. All items are packed separately. " are in ... Rear Cushion 1 9 Exhaust Damper Assembly 1 ! Items 8 - you may also use carton for product and range - UNPACKING AND INSTALLATION INSTRUCTIONS 5 TOOLS RECOMMENDED FOR INSTALLATION • Phillips Screwdriver • Electric Drill • 1/2", 5/8" and 3/32" Drill Bits • 1-1/2" Wood Bit or Metal Hole...
...(if needed) • Protective Drop Cloth for protection • Scissors • Pencil • Measure • Tape 6 INSTALLATION HARDWARE The INSTALLATION HARDWARE items 1 - 7 are in a small carton packed below the oven. All items are packed separately. " are in ... Rear Cushion 1 9 Exhaust Damper Assembly 1 ! Items 8 - you may also use carton for product and range - UNPACKING AND INSTALLATION INSTRUCTIONS 5 TOOLS RECOMMENDED FOR INSTALLATION • Phillips Screwdriver • Electric Drill • 1/2", 5/8" and 3/32" Drill Bits • 1-1/2" Wood Bit or Metal Hole...
R-1500 , R-1501 , R-1502 Microwave Operation Manual
Page 9
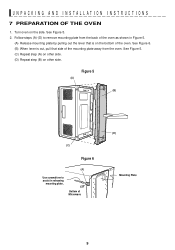
... assist in Figure 5. (A) Release mounting plate by pulling out the lever that is out, pull that side of Microwave (D) Mounting Plate 9 See Figure 5. 2. UNPACKING AND INSTALLATION INSTRUCTIONS 7 PREPARATION OF THE OVEN 1. See Figure 5. (C) Repeat step (A) on other side. (D) Repeat step (B) on other side.
... assist in Figure 5. (A) Release mounting plate by pulling out the lever that is out, pull that side of Microwave (D) Mounting Plate 9 See Figure 5. 2. UNPACKING AND INSTALLATION INSTRUCTIONS 7 PREPARATION OF THE OVEN 1. See Figure 5. (C) Repeat step (A) on other side. (D) Repeat step (B) on other side.
R-1500 , R-1501 , R-1502 Microwave Operation Manual
Page 10
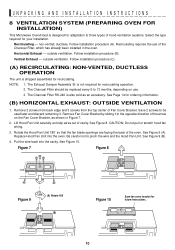
...the opposite direction of the arrow on use of the Charcoal Filter, which has already been installed in Figure 7. 2. non-vented, ductless. Follow installation procedure (A). Follow installation procedure (C). (A) RECIRCULATING: NON-VENTED, DUCTLESS OPERATION The unit is not required for recirculating ...for future instructions. 10 Replace Hood Fan Unit into the cavity. See Figure 10. UNPACKING AND INSTALLATION INSTRUCTIONS 8 VENTILATION SYSTEM (PREPARING OVEN FOR INSTALLATION) This Microwave Oven/Hood is designed for adaptation to pinch the wire and the Hood Fan Unit...
...the opposite direction of the arrow on use of the Charcoal Filter, which has already been installed in Figure 7. 2. non-vented, ductless. Follow installation procedure (A). Follow installation procedure (C). (A) RECIRCULATING: NON-VENTED, DUCTLESS OPERATION The unit is not required for recirculating ...for future instructions. 10 Replace Hood Fan Unit into the cavity. See Figure 10. UNPACKING AND INSTALLATION INSTRUCTIONS 8 VENTILATION SYSTEM (PREPARING OVEN FOR INSTALLATION) This Microwave Oven/Hood is designed for adaptation to pinch the wire and the Hood Fan Unit...

R-1500 , R-1501 , R-1502 Microwave Operation Manual
Page 11
... back edge and 3 screws from the top center of the oven. See Figure 15. Remove and save 2 screws from back edge and 3 screws from the INSTALLATION HARDWARE and tighten into the slits in Step 1 above. Make sure the fan blades are facing the top of the Fan Cover Bracket, which were... mm 5 from the top center of cavity. Replace the Fan Cover Bracket by sliding it into the slits in the oven before proceeding. 5. UNPACKING AND INSTALLATION INSTRUCTIONS (C) VERTICAL EXHAUST: OUTSIDE VENTILATION 1.
... back edge and 3 screws from the top center of the oven. See Figure 15. Remove and save 2 screws from back edge and 3 screws from the INSTALLATION HARDWARE and tighten into the slits in Step 1 above. Make sure the fan blades are facing the top of the Fan Cover Bracket, which were... mm 5 from the top center of cavity. Replace the Fan Cover Bracket by sliding it into the slits in the oven before proceeding. 5. UNPACKING AND INSTALLATION INSTRUCTIONS (C) VERTICAL EXHAUST: OUTSIDE VENTILATION 1.

R-1500 , R-1501 , R-1502 Microwave Operation Manual
Page 12
... the Toggle Nuts closed position). Match 5/8" holes (not in the closed . therefore make sure all of the Toggles are in the INSTALLATION HARDWARE, from the hole; Figure 19. NOTE: Before insertion, be sure you leave a space more than the thickness of the wall... you do not leave enough space, the Toggle Nut will not be withdrawn from the Toggle Nuts. 2. UNPACKING AND INSTALLATION INSTRUCTIONS 9 OVEN INSTALLATION THIS OVEN CANNOT BE PROPERLY INSTALLED WITHOUT REFERRING TO THE MOUNTING INSTRUCTIONS FOUND ON WALL AND TOP CABINET TEMPLATES. Figure 18. Also, once a Toggle Nut...
... the Toggle Nuts closed position). Match 5/8" holes (not in the closed . therefore make sure all of the Toggles are in the INSTALLATION HARDWARE, from the hole; Figure 19. NOTE: Before insertion, be sure you leave a space more than the thickness of the wall... you do not leave enough space, the Toggle Nut will not be withdrawn from the Toggle Nuts. 2. UNPACKING AND INSTALLATION INSTRUCTIONS 9 OVEN INSTALLATION THIS OVEN CANNOT BE PROPERLY INSTALLED WITHOUT REFERRING TO THE MOUNTING INSTRUCTIONS FOUND ON WALL AND TOP CABINET TEMPLATES. Figure 18. Also, once a Toggle Nut...
R-1500 , R-1501 , R-1502 Microwave Operation Manual
Page 13
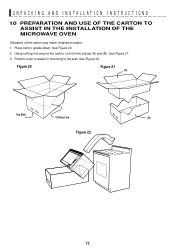
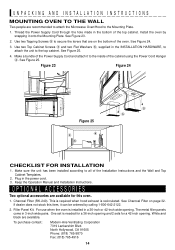
Using cutting line around the carton, cut into two pieces (A) and (B). See Figure 20. 2. See Figure 22. See Figure 21. 3. Figure 20 Figure 21 (A) Top Side Cutting Line (B) Figure 22 13 Position oven to assist in mounting to the wall. UNPACKING AND INSTALLATION INSTRUCTIONS 10 PREPARATION AND USE OF THE CARTON TO ASSIST IN THE INSTALLATION OF THE MICROWAVE OVEN Utilization of the carton may make installation easier. 1. Place carton upside down.
Using cutting line around the carton, cut into two pieces (A) and (B). See Figure 20. 2. See Figure 22. See Figure 21. 3. Figure 20 Figure 21 (A) Top Side Cutting Line (B) Figure 22 13 Position oven to assist in mounting to the wall. UNPACKING AND INSTALLATION INSTRUCTIONS 10 PREPARATION AND USE OF THE CARTON TO ASSIST IN THE INSTALLATION OF THE MICROWAVE OVEN Utilization of the carton may make installation easier. 1. Place carton upside down.
R-1500 , R-1501 , R-1502 Microwave Operation Manual
Page 14
...the bottom of the cabinet using the Power Cord Hanger 4. Plug in 3-inch wide pairs. For use when the oven is installed in the INSTALLATION HARDWARE, to attach the unit to the Mounting Plate. 1. To purchase contact: Modern-Aire Ventilating Corporation 7319 Lankershim Blvd. Use...are available for a 42-inch opening . One set is recirculated. Figure 23 Figure 24 Figure 25 3 4 6 5 5 CHECKLIST FOR INSTALLATION 1. Keep the Operation Manual and Installation Instructions. See Figure 23. 2. Use two Top Cabinet Screws 3 and two Flat Washers 6, supplied in a 36-inch or 42-inch...
...the bottom of the cabinet using the Power Cord Hanger 4. Plug in 3-inch wide pairs. For use when the oven is installed in the INSTALLATION HARDWARE, to attach the unit to the Mounting Plate. 1. To purchase contact: Modern-Aire Ventilating Corporation 7319 Lankershim Blvd. Use...are available for a 42-inch opening . One set is recirculated. Figure 23 Figure 24 Figure 25 3 4 6 5 5 CHECKLIST FOR INSTALLATION 1. Keep the Operation Manual and Installation Instructions. See Figure 23. 2. Use two Top Cabinet Screws 3 and two Flat Washers 6, supplied in a 36-inch or 42-inch...

R-1500 , R-1501 , R-1502 Microwave Operation Manual
Page 31
...away from your oven, is on the light cover. (See illustration.) 3. REPLACING PARTS CHARCOAL FILTER Charcoal Filter, Sharp part number RK-240 which was installed in your Sharp Authorized Servicer or parts distributor. The filter should be changed every 6 to disengage it. (See illustration.) 3.... See page 14 for nonvented, recirculated installation. Carefully push the louver back into place (engaging both the bottom...
...away from your oven, is on the light cover. (See illustration.) 3. REPLACING PARTS CHARCOAL FILTER Charcoal Filter, Sharp part number RK-240 which was installed in your Sharp Authorized Servicer or parts distributor. The filter should be changed every 6 to disengage it. (See illustration.) 3.... See page 14 for nonvented, recirculated installation. Carefully push the louver back into place (engaging both the bottom...

