

PN-455 Operation Manual
Page 1
... serial numbers in the space provided. The lightning flash with arrowhead symbol, within the product's enclosure that may be of sufficient magnitude to persons. ENGLISH PN-455 LCD MONITOR ENGLISH IMPORTANT: To aid reporting in case of the product.
... serial numbers in the space provided. The lightning flash with arrowhead symbol, within the product's enclosure that may be of sufficient magnitude to persons. ENGLISH PN-455 LCD MONITOR ENGLISH IMPORTANT: To aid reporting in case of the product.

PN-455 Operation Manual
Page 5
...is likelihood of example. - Ensure that Sharp Corporation bears no objects such as paper clips or pins enter the monitor as a result of unstable objects or in electric shock. The TFT color LCD panel used in fire or electric shock. - Do not display the same image on the screen where pixels... never light or are not malfunctions but common phenomena of high precision technology. Use only the power cord supplied with the application of LCDs and will be ...
...is likelihood of example. - Ensure that Sharp Corporation bears no objects such as paper clips or pins enter the monitor as a result of unstable objects or in electric shock. The TFT color LCD panel used in fire or electric shock. - Do not display the same image on the screen where pixels... never light or are not malfunctions but common phenomena of high precision technology. Use only the power cord supplied with the application of LCDs and will be ...

PN-455 Operation Manual
Page 6
...Connection and Installation Connecting Peripheral Equipment 13 Connecting External Speakers 18 Connecting the AC Cord 19 Connecting Multiple Monitors 20 Mounting Precautions 21 Mounting the Temporary Stands 22 Bundling Cables ...22 Attaching the Carrying Handles 23 ...Chart 56 Connector Compatibility Charts 57 Dimensional Drawings 58 Menu Option Reference Chart 59 E6 Display 9 Front view ...9 Rear view ...10 Part Names - Contents Introduction IMPORTANT INFORMATION 1 DEAR SHARP CUSTOMER 3 SAFETY PRECAUTIONS 3 TIPS AND SAFETY PRECAUTIONS 5 Features ...7 Supplied Accessories 8 ...
...Connection and Installation Connecting Peripheral Equipment 13 Connecting External Speakers 18 Connecting the AC Cord 19 Connecting Multiple Monitors 20 Mounting Precautions 21 Mounting the Temporary Stands 22 Bundling Cables ...22 Attaching the Carrying Handles 23 ...Chart 56 Connector Compatibility Charts 57 Dimensional Drawings 58 Menu Option Reference Chart 59 E6 Display 9 Front view ...9 Rear view ...10 Part Names - Contents Introduction IMPORTANT INFORMATION 1 DEAR SHARP CUSTOMER 3 SAFETY PRECAUTIONS 3 TIPS AND SAFETY PRECAUTIONS 5 Features ...7 Supplied Accessories 8 ...

PN-455 Operation Manual
Page 7
...BE CONNECTED • Compatible speakers: L/R, 6 Ω, 10W or larger (See page 18.) ●CONTROL LOCK FUNCTIONS • The monitor is beautiful, even when viewed off axis. * ASV: Advanced Super View ● EQUIPPED WITH A VARIETY OF TERMINALS • PC ...picture. ● ASV*LOW-REFLECTION BLACK TFT LCD PANEL • SHARP's unique ASV* low-reflection BLACK TFT LCD panel provides higher luminance, higher contrast, and a wider viewing angle. ENGLISH Features ●HIGH-DEFINITION (HD) LCD PANEL • A large, flat LCD panel with various operation lock functions to prevent unintended...
...BE CONNECTED • Compatible speakers: L/R, 6 Ω, 10W or larger (See page 18.) ●CONTROL LOCK FUNCTIONS • The monitor is beautiful, even when viewed off axis. * ASV: Advanced Super View ● EQUIPPED WITH A VARIETY OF TERMINALS • PC ...picture. ● ASV*LOW-REFLECTION BLACK TFT LCD PANEL • SHARP's unique ASV* low-reflection BLACK TFT LCD panel provides higher luminance, higher contrast, and a wider viewing angle. ENGLISH Features ●HIGH-DEFINITION (HD) LCD PANEL • A large, flat LCD panel with various operation lock functions to prevent unintended...

PN-455 Operation Manual
Page 8
E8 Do not reproduce it without permission. Liquid Crystal Display (1) INPUT AC cord (1) CD-ROM (1) Temporary stand (2) Cable clamp (2) (0PEQACCU1026M) (Utility Disk for Windows) ●Temporary stand mounting screw (2) "AA" size battery (2) Remote control unit (1) .../) (0PEQCNW-1165M) • You are provided with the product. Supplied Accessories Make sure the following accessories are advised to retain the carton in case the monitor needs to be transported. • Sharp Corporation holds authorship rights to the Utility Disk program.
E8 Do not reproduce it without permission. Liquid Crystal Display (1) INPUT AC cord (1) CD-ROM (1) Temporary stand (2) Cable clamp (2) (0PEQACCU1026M) (Utility Disk for Windows) ●Temporary stand mounting screw (2) "AA" size battery (2) Remote control unit (1) .../) (0PEQCNW-1165M) • You are provided with the product. Supplied Accessories Make sure the following accessories are advised to retain the carton in case the monitor needs to be transported. • Sharp Corporation holds authorship rights to the Utility Disk program.

PN-455 Operation Manual
Page 12
In such cases, change the angle of the lighting or the monitor, or operate the remote control unit closer to the remote control sensor. • The batteries supplied with this may shorten the remote control's operation range. &#... under direct sunlight or strong lighting. Remote control operation range Operation range of the remote control sensor. 13.1 feet (4 m) 10° 1(56.m4 )feet POWER DISPLAY MODE REMOTE CONTROL BRIGHTVOL- In addition, do not place it with new batteries, take the batteries out, check whether they run low as this product...
In such cases, change the angle of the lighting or the monitor, or operate the remote control unit closer to the remote control sensor. • The batteries supplied with this may shorten the remote control's operation range. &#... under direct sunlight or strong lighting. Remote control operation range Operation range of the remote control sensor. 13.1 feet (4 m) 10° 1(56.m4 )feet POWER DISPLAY MODE REMOTE CONTROL BRIGHTVOL- In addition, do not place it with new batteries, take the batteries out, check whether they run low as this product...

PN-455 Operation Manual
Page 15
... INPUT3 (COMPONENT) • Connect with component output terminals using a component cable (commercially available). • Connect with equipment that has a component output terminal, you connect the monitor with an audio output terminal using an audio (RCA) cable (commercially available). ▼ Rear view Output terminals on connected equipment Component Audio -
... INPUT3 (COMPONENT) • Connect with component output terminals using a component cable (commercially available). • Connect with equipment that has a component output terminal, you connect the monitor with an audio output terminal using an audio (RCA) cable (commercially available). ▼ Rear view Output terminals on connected equipment Component Audio -

PN-455 Operation Manual
Page 17
...Compatible video signal NTSC (3.58 MHz) *1 S-video input will have priority over composite video when connected. *2 When you connect the monitor with equipment that has a video output terminal, you can use the supplied video connection cable as shown in a daisy chain via RGB... (commercially available) or a PC audio cable (commercially available). • The terminal for a detailed connection example. Use when connecting multiple monitors in the illustration above. ENGLISH ▼ Rear view Output terminals on connected equipment Audio - AUDIO OUTPUT TERMINAL • Audio from the...
...Compatible video signal NTSC (3.58 MHz) *1 S-video input will have priority over composite video when connected. *2 When you connect the monitor with equipment that has a video output terminal, you can use the supplied video connection cable as shown in a daisy chain via RGB... (commercially available) or a PC audio cable (commercially available). • The terminal for a detailed connection example. Use when connecting multiple monitors in the illustration above. ENGLISH ▼ Rear view Output terminals on connected equipment Audio - AUDIO OUTPUT TERMINAL • Audio from the...

PN-455 Operation Manual
Page 19
Main power switch Turn off when connecting the cord. Plug the AC cord into the AC power outlet. 19 E Plug the AC cord into the AC input terminal of the monitor. ▼ Rear view Plug (to the AC input terminal) Power outlet AC input terminal AC cord Plug (to turn the main power switch off the main power switch on the top of the monitor. 2. ENGLISH Connecting the AC Cord Be sure to power outlet) Connecting the AC cord 1.
Main power switch Turn off when connecting the cord. Plug the AC cord into the AC power outlet. 19 E Plug the AC cord into the AC input terminal of the monitor. ▼ Rear view Plug (to the AC input terminal) Power outlet AC input terminal AC cord Plug (to turn the main power switch off the main power switch on the top of the monitor. 2. ENGLISH Connecting the AC Cord Be sure to power outlet) Connecting the AC cord 1.
PN-455 Operation Manual
Page 20
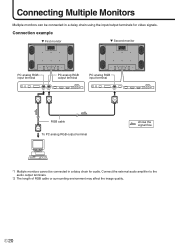
... terminal INPUT2 OUTPUT (RGB) (RGB) PC analog RGB input terminal INPUT2 (RGB) RGB cable To PC analog RGB output terminal shows the signal flow. *1 Multiple monitors cannot be connected in a daisy chain for video signals. Connect the external audio amplifier to the audio output terminals. *2 The length of RGB cable or...
... terminal INPUT2 OUTPUT (RGB) (RGB) PC analog RGB input terminal INPUT2 (RGB) RGB cable To PC analog RGB output terminal shows the signal flow. *1 Multiple monitors cannot be connected in a daisy chain for video signals. Connect the external audio amplifier to the audio output terminals. *2 The length of RGB cable or...

PN-455 Operation Manual
Page 21
Please note that these stands are required to mount this monitor, so be sure to rely on an authorized Sharp dealer for installation work yourself. ward. • This monitor is equipped with two temporary stands when shipped from the factory. Our company will bear no responsibility for ...8226; Special techniques are for temporary use only until the monitor is properly mounted. • Be sure to use a stand or a wall-mount/ceiling-mount bracket designed or designated for mounting the monitor. • Do not lay the monitor display-side down or up to a maximum of 20 degrees down...
Please note that these stands are required to mount this monitor, so be sure to rely on an authorized Sharp dealer for installation work yourself. ward. • This monitor is equipped with two temporary stands when shipped from the factory. Our company will bear no responsibility for ...8226; Special techniques are for temporary use only until the monitor is properly mounted. • Be sure to use a stand or a wall-mount/ceiling-mount bracket designed or designated for mounting the monitor. • Do not lay the monitor display-side down or up to a maximum of 20 degrees down...

PN-455 Operation Manual
Page 22
Also, the cables connected to the terminals on the back of the monitor from falling off. Insert the tip of the monitor as shown in the illustration below . ▼ Rear view Screw Temporary stand Bundling Cables The AC cord can be neatly bundled using the supplied AC ... clamp to the bottom of the band into the hole for the AC cord clamp Fastening the AC cord 1. While holding the tail of the monitor. ▼ Rear view 1 Fastened part 2 Band 3 Hole for the AC cord clamp. 3. Mounting the Temporary Stands Please note that the temporary stands are for temporary...
Also, the cables connected to the terminals on the back of the monitor from falling off. Insert the tip of the monitor as shown in the illustration below . ▼ Rear view Screw Temporary stand Bundling Cables The AC cord can be neatly bundled using the supplied AC ... clamp to the bottom of the band into the hole for the AC cord clamp Fastening the AC cord 1. While holding the tail of the monitor. ▼ Rear view 1 Fastened part 2 Band 3 Hole for the AC cord clamp. 3. Mounting the Temporary Stands Please note that the temporary stands are for temporary...

PN-455 Operation Manual
Page 23
ENGLISH Attaching the Carrying Handles When carrying the monitor, attach the two carrying handles to the top of the monitor as shown below. ▼ Rear view Screw Spacer * After mounting the monitor, remove the carrying handles from the monitor. 23 E
ENGLISH Attaching the Carrying Handles When carrying the monitor, attach the two carrying handles to the top of the monitor as shown below. ▼ Rear view Screw Spacer * After mounting the monitor, remove the carrying handles from the monitor. 23 E

PN-455 Operation Manual
Page 24
...8226; In waiting mode, the power LED blinks green. • In waiting mode, if you press the POWER button on the remote control unit, the monitor will be turned off by pressing the POWER button beside the power LED with the POWER button on power, make sure that peripherals, external speakers... button to a computer, turn the power ON/OFF. Turning power on the top of the monitor and POWER button on , always wait for at least 5 seconds. Main power switch When the main power switch is not turned on with a sharp object. Turning on Power Before turning on the remote control unit.
...8226; In waiting mode, the power LED blinks green. • In waiting mode, if you press the POWER button on the remote control unit, the monitor will be turned off by pressing the POWER button beside the power LED with the POWER button on power, make sure that peripherals, external speakers... button to a computer, turn the power ON/OFF. Turning power on the top of the monitor and POWER button on , always wait for at least 5 seconds. Main power switch When the main power switch is not turned on with a sharp object. Turning on Power Before turning on the remote control unit.

PN-455 Operation Manual
Page 25
... ➞ NORMAL ➞ Dot by pressing the input button beside the remote control sensor with a sharp object. BRIGHT (Backlight adjustment) Displays the BRIGHT menu when the menu screen is not displayed. *41/06 # Press to increase the brightness of the screen, and to decrease the brightness of... button, the screen mode changes in the following order: • STD ➞ OFFICE (Power saving mode) ➞ VIVID ➞ STD... DISPLAY Displays monitor status such as INPUT, SIZE, etc. INPUT (Input selection) Each time you can change the mode by Dot ➞ WIDE... Press the MUTE...
... ➞ NORMAL ➞ Dot by pressing the input button beside the remote control sensor with a sharp object. BRIGHT (Backlight adjustment) Displays the BRIGHT menu when the menu screen is not displayed. *41/06 # Press to increase the brightness of the screen, and to decrease the brightness of... button, the screen mode changes in the following order: • STD ➞ OFFICE (Power saving mode) ➞ VIVID ➞ STD... DISPLAY Displays monitor status such as INPUT, SIZE, etc. INPUT (Input selection) Each time you can change the mode by Dot ➞ WIDE... Press the MUTE...
PN-455 Operation Manual
Page 33
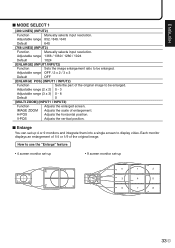
... [ENLARGE POS] (INPUT1 / INPUT2) Function Sets the part of the original image to display video. IMAGE ZOOM Adjusts the scale of the original image. How to use the "Enlarge" feature • 4 screen monitor set-up • 9 screen monitor set up 0 0 1 2 3 2 1 0 12 3 45 6 78 3 0 1 2 3 4 5 6 7 8 33 E Adjustable range (2 x 2) 0 - 3 Adjustable range (3 x 3) 0 - 8 Default 0 [MULTI ZOOM] (INPUT1 / INPUT2) Function...
... [ENLARGE POS] (INPUT1 / INPUT2) Function Sets the part of the original image to display video. IMAGE ZOOM Adjusts the scale of the original image. How to use the "Enlarge" feature • 4 screen monitor set-up • 9 screen monitor set up 0 0 1 2 3 2 1 0 12 3 45 6 78 3 0 1 2 3 4 5 6 7 8 33 E Adjustable range (2 x 2) 0 - 3 Adjustable range (3 x 3) 0 - 8 Default 0 [MULTI ZOOM] (INPUT1 / INPUT2) Function...

PN-455 Operation Manual
Page 34
... SET] Function Assigns ID numbers to increase or decrease values. Default Center [LANGUAGE] Function Switches the OSD language. Use / to monitors connected in a daisy chain (see page 39), using RS-232C cables. Adjustable range 0 - 255 Default 0 Note The numbers ... monitors varies depending on the length of menu screen. Settings and Adjustments (Continued) ■ MODE SELECT 2 [OFF TIMER] Function Specifies the remaining time before turning off the power. Adjustable range 0 - 23 Default 0 [OSD H-POSITION] Function Adjusts the horizontal display position...
... SET] Function Assigns ID numbers to increase or decrease values. Default Center [LANGUAGE] Function Switches the OSD language. Use / to monitors connected in a daisy chain (see page 39), using RS-232C cables. Adjustable range 0 - 255 Default 0 Note The numbers ... monitors varies depending on the length of menu screen. Settings and Adjustments (Continued) ■ MODE SELECT 2 [OFF TIMER] Function Specifies the remaining time before turning off the power. Adjustable range 0 - 23 Default 0 [OSD H-POSITION] Function Adjusts the horizontal display position...
PN-455 Operation Manual
Page 36
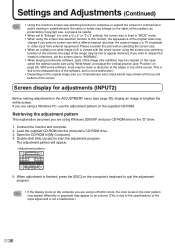
...like subtitles) may be cropped. If you wish to respect the creator's intentions, set to quit the adjustment program. • If the display mode on the computer's keyboard to "Enlarge" (i.e. The adjustment pattern will appear. 5. Retrieving the adjustment pattern This explanation assumes you are ...the color pattern may appear differently or grayscale may appear to the specifications of the input signal and is the "D" drive. 1. In this monitor, the edge of the image may be careful. • When set the screen size to "NORMAL". • When playing commercial software...
...like subtitles) may be cropped. If you wish to respect the creator's intentions, set to quit the adjustment program. • If the display mode on the computer's keyboard to "Enlarge" (i.e. The adjustment pattern will appear. 5. Retrieving the adjustment pattern This explanation assumes you are ...the color pattern may appear differently or grayscale may appear to the specifications of the input signal and is the "D" drive. 1. In this monitor, the edge of the image may be careful. • When set the screen size to "NORMAL". • When playing commercial software...

PN-455 Operation Manual
Page 37
... that I will choose the driver to install.] and click [Next]. 9. Choose [Control Panel]. 4. The [Hardware Update Wizard] appears. Click [OK] to close [Screen Properties]. 13. Click [Settings], [Advanced], and [Monitor]. 6. Connect the monitor and computer. 2. Click [Appearance and Themes] and [Display]. If [has not passed Windows Logo testing...] appears, click [Continue Anyway]. 11. Load...
... that I will choose the driver to install.] and click [Next]. 9. Choose [Control Panel]. 4. The [Hardware Update Wizard] appears. Click [OK] to close [Screen Properties]. 13. Click [Settings], [Advanced], and [Monitor]. 6. Connect the monitor and computer. 2. Click [Appearance and Themes] and [Display]. If [has not passed Windows Logo testing...] appears, click [Continue Anyway]. 11. Load...

PN-455 Operation Manual
Page 38
One-to-one connection with RS-232C straight cable between the PC COM port (RS-232C connector) and the RS232C input terminal on the back of monitor. ▼ Rear view RS-232C input terminal RS-232C INPUT To RS-232C input terminal RS-232C straight cable To COM port ▼ PC E 38 PC Operation PC connection 1. Basic operation Connect with a PC......
One-to-one connection with RS-232C straight cable between the PC COM port (RS-232C connector) and the RS232C input terminal on the back of monitor. ▼ Rear view RS-232C input terminal RS-232C INPUT To RS-232C input terminal RS-232C straight cable To COM port ▼ PC E 38 PC Operation PC connection 1. Basic operation Connect with a PC......


