
PG-F211X , PG-F261X Operation Manual
Page 6
... Controlling the Projector by a Computer 24 Connecting the Power Cord 24 Using Basic Operation Turning the Projector On/Off 25 Turning the Projector on 25 Turning the Power off (Putting the Projector into Standby Mode 25 Image Projection 26 About the Setup Guide 26 Adjusting the Projected Image 26 Correcting Trapezoidal Distortion ........ 28 Switching the Input Mode 29 Adjusting the Volume 29 Displaying the Black Screen and Turning off the Sound Temporarily .... 29 Resize Mode 30 Useful Features Operating with the "Help" Menu ... 46 Utilizing the "Help" Menu...
... Controlling the Projector by a Computer 24 Connecting the Power Cord 24 Using Basic Operation Turning the Projector On/Off 25 Turning the Projector on 25 Turning the Power off (Putting the Projector into Standby Mode 25 Image Projection 26 About the Setup Guide 26 Adjusting the Projected Image 26 Correcting Trapezoidal Distortion ........ 28 Switching the Input Mode 29 Adjusting the Volume 29 Displaying the Black Screen and Turning off the Sound Temporarily .... 29 Resize Mode 30 Useful Features Operating with the "Help" Menu ... 46 Utilizing the "Help" Menu...
PG-F211X , PG-F261X Operation Manual
Page 10
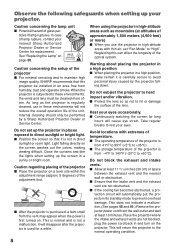
... injury caused by a Sharp Authorized Projector Dealer or Service Center. When using the projector in these environments, the vents and lens must be performed by the projector falling down. Avoid locations with thin air, set up the screen in a high position, make certain it is subjected to +60°C). Do not set "Fan Mode" to direct sunlight or bright light. ■ Position the screen so that the...
... injury caused by a Sharp Authorized Projector Dealer or Service Center. When using the projector in these environments, the vents and lens must be performed by the projector falling down. Avoid locations with thin air, set up the screen in a high position, make certain it is subjected to +60°C). Do not set "Fan Mode" to direct sunlight or bright light. ■ Position the screen so that the...
PG-F211X , PG-F261X Operation Manual
Page 11
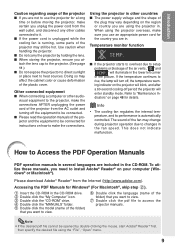
... lens. ■ When storing the projector, ensure you are not to rise, the lamp will enter standby mode. dicators" on your computer (Windows® or Macintosh®). Accessing the PDF Manuals for details. Using the projector in the CD-ROM. When using the "File", "Open" menu. 9 If the temperature continues to use an appropriate power cord for a long time or before moving the projector, make certain you unplug the power cord...
... lens. ■ When storing the projector, ensure you are not to rise, the lamp will enter standby mode. dicators" on your computer (Windows® or Macintosh®). Accessing the PDF Manuals for details. Using the projector in the CD-ROM. When using the "File", "Open" menu. 9 If the temperature continues to use an appropriate power cord for a long time or before moving the projector, make certain you unplug the power cord...
PG-F211X , PG-F261X Operation Manual
Page 13
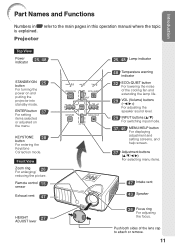
... projector into standby mode. Projector Top View Power indicator 25, 48 STANDBY/ON 25 button For turning the power on the menu. Push both sides of the cooling fan and extending the lamp life. 29 VOL (Volume) buttons (-O/Q+) For adjusting the speaker sound level. 29 INPUT buttons (P/R) For switching input mode. 37, 46 MENU/HELP button For displaying adjustment and setting screens, and help screen. 37 Adjustment buttons (P/R/O/Q) For selecting menu items. 47 Intake vent 43 Speaker HEIGHT 27 ADJUST lever 26 Focus ring For adjusting the focus. KEYSTONE 28 button...
... projector into standby mode. Projector Top View Power indicator 25, 48 STANDBY/ON 25 button For turning the power on the menu. Push both sides of the cooling fan and extending the lamp life. 29 VOL (Volume) buttons (-O/Q+) For adjusting the speaker sound level. 29 INPUT buttons (P/R) For switching input mode. 37, 46 MENU/HELP button For displaying adjustment and setting screens, and help screen. 37 Adjustment buttons (P/R/O/Q) For selecting menu items. 47 Intake vent 43 Speaker HEIGHT 27 ADJUST lever 26 Focus ring For adjusting the focus. KEYSTONE 28 button...

PG-F211X , PG-F261X Operation Manual
Page 15
... displaying the spotlight. 37 ENTER button For setting items selected or adjusted on a computer keyboard, when with the USB connection (using a USB cable or the optional remote receiver). • For returning to the previous menu screen during menu operations. 37 MENU/HELP button 46 For displaying adjustment and setting screens, and help screen. 30 RESIZE button For switching the picture size (NORMAL, BORDER, etc.). 33 PICTURE MODE button For selecting the appropriate picture. 13 Introduction STANDBY button 25 For putting the projector into the standby mode. KEYSTONE button...
... displaying the spotlight. 37 ENTER button For setting items selected or adjusted on a computer keyboard, when with the USB connection (using a USB cable or the optional remote receiver). • For returning to the previous menu screen during menu operations. 37 MENU/HELP button 46 For displaying adjustment and setting screens, and help screen. 30 RESIZE button For switching the picture size (NORMAL, BORDER, etc.). 33 PICTURE MODE button For selecting the appropriate picture. 13 Introduction STANDBY button 25 For putting the projector into the standby mode. KEYSTONE button...

PG-F211X , PG-F261X Operation Manual
Page 27
... set . Green: The lamp is warming up. Blinking in green: The lamp is on. On-screen display (confirmation message) Info • Direct Power Off function: You can unplug the power cord from the outlet or the breaker switch is turned off (Putting the Projector into Standby Mode) Press STANDBY/ON on the projector or STANDBY on the remote control, then press that button again while the confirmation message is displayed, to put into standby mode. • The projector...
... set . Green: The lamp is warming up. Blinking in green: The lamp is on. On-screen display (confirmation message) Info • Direct Power Off function: You can unplug the power cord from the outlet or the breaker switch is turned off (Putting the Projector into Standby Mode) Press STANDBY/ON on the projector or STANDBY on the remote control, then press that button again while the confirmation message is displayed, to put into standby mode. • The projector...

PG-F211X , PG-F261X Operation Manual
Page 35
...for the projected image, such as movie or video game. Auto Sync (Auto Sync Adjustment) Auto Sync function works when detecting input signal after the projector turns on the picture mode. * "sRGB" is displayed only when RGB signal is frozen. 2 Press FREEZE again to return to manually adjust with Auto Sync adjustment, use the help menu for manual adjustments. (See page 46.) Freezing a Moving Image 1 Press FREEZE. • The projected image is input. Selecting the Picture Mode FREEZE button PICTURE MODE button AUTO SYNC button You can select the appropriate picture mode for details...
...for the projected image, such as movie or video game. Auto Sync (Auto Sync Adjustment) Auto Sync function works when detecting input signal after the projector turns on the picture mode. * "sRGB" is displayed only when RGB signal is frozen. 2 Press FREEZE again to return to manually adjust with Auto Sync adjustment, use the help menu for manual adjustments. (See page 46.) Freezing a Moving Image 1 Press FREEZE. • The projected image is input. Selecting the Picture Mode FREEZE button PICTURE MODE button AUTO SYNC button You can select the appropriate picture mode for details...

PG-F211X , PG-F261X Operation Manual
Page 44
... INPUT/VOLUME/AV MUTE/FREEZE/ AUTO SYNC/RESIZE/PICTURE MODE/ "An invalid button has been pressed." Not displaying the Setup Guide. The projector can switch the on . Adjusting the Projected Image ("SCR - are displayed. Selectable items Front Ceiling + Front Rear Ceiling + Rear Description Normal image (Projected from the front of the screen) Inverted image (Projected from the front of the screen with an inverted projector) Reversed image (Projected from the rear of the screen or with a mirror) Reversed and inverted image (Projected...
... INPUT/VOLUME/AV MUTE/FREEZE/ AUTO SYNC/RESIZE/PICTURE MODE/ "An invalid button has been pressed." Not displaying the Setup Guide. The projector can switch the on . Adjusting the Projected Image ("SCR - are displayed. Selectable items Front Ceiling + Front Rear Ceiling + Rear Description Normal image (Projected from the front of the screen) Inverted image (Projected from the front of the screen with an inverted projector) Reversed image (Projected from the rear of the screen or with a mirror) Reversed and inverted image (Projected...

PG-F211X , PG-F261X Operation Manual
Page 45
... Audio 1 9600 bps Normal Disable Help Lamp Timer(Life) 0h 0 min 100% SEL./ADJ. The projector does not turn on . 5 Speaker Setting Selectable items On Off Description The audio signal is detected for each input mode. ENTER END Menu operation n Page 37 3 STANDBY Mode When set to select an appropriate combination of audio input terminals for more than 15 minutes, the projector will appear on the screen to "Eco", power consumption is turned...
... Audio 1 9600 bps Normal Disable Help Lamp Timer(Life) 0h 0 min 100% SEL./ADJ. The projector does not turn on . 5 Speaker Setting Selectable items On Off Description The audio signal is detected for each input mode. ENTER END Menu operation n Page 37 3 STANDBY Mode When set to select an appropriate combination of audio input terminals for more than 15 minutes, the projector will appear on the screen to "Eco", power consumption is turned...

PG-F211X , PG-F261X Operation Manual
Page 46
... the lamp be changed when the remaining lamp life becomes 5%. • The lamp life may vary depending on the projector for normal environments. P R 115200bps Transmission speed is set to enter the preset keycode in a safe place where only authorized users have access. Adjusting the Projector Function ("PRJ - We suggest you press the R button four times, the keycord input screen disappears. 44 ADJ Setting the System Lock Old Code New Code...
... the lamp be changed when the remaining lamp life becomes 5%. • The lamp life may vary depending on the projector for normal environments. P R 115200bps Transmission speed is set to enter the preset keycode in a safe place where only authorized users have access. Adjusting the Projector Function ("PRJ - We suggest you press the R button four times, the keycord input screen disappears. 44 ADJ Setting the System Lock Old Code New Code...
PG-F211X , PG-F261X Operation Manual
Page 47
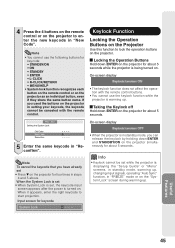
... keycode that you used the buttons on the projector in setting your keycode, the keycode cannot be set while the projector is turned on the projector for about 5 seconds while the projector is warming up . If you have already set , the keycode input screen appears after the power is : displaying the "Setup Guide" or "Menu" screens, in standby mode, warming up, changing input signals, operating "Auto Sync" function, in "Reconfirm". ADJ Setting the System Lock Old Code New Code Reconfirm **** ---- ---- 5 Enter...
... keycode that you used the buttons on the projector in setting your keycode, the keycode cannot be set while the projector is turned on the projector for about 5 seconds while the projector is warming up . If you have already set , the keycode input screen appears after the power is : displaying the "Setup Guide" or "Menu" screens, in standby mode, warming up, changing input signals, operating "Auto Sync" function, in "Reconfirm". ADJ Setting the System Lock Old Code New Code Reconfirm **** ---- ---- 5 Enter...

PG-F211X , PG-F261X Operation Manual
Page 51
... 8.) • Take the projector to your nearest Sharp Authorized Projector Dealer or Service Center (see page 64) for repair. • Disconnect the power cord from the AC outlet, replace the power cord in red and the lamp may change the lamp. Lamp indicator Green on (Green blinks when the lamp is controlled automatically. Maintenance indicator Temperature warning indicator Normal Off Abnormal Red on (Standby) Problem The internal temperature is securely installed, contact your nearest Sharp Authorized Projector Dealer or Service Center (see page...
... 8.) • Take the projector to your nearest Sharp Authorized Projector Dealer or Service Center (see page 64) for repair. • Disconnect the power cord from the AC outlet, replace the power cord in red and the lamp may change the lamp. Lamp indicator Green on (Green blinks when the lamp is controlled automatically. Maintenance indicator Temperature warning indicator Normal Off Abnormal Red on (Standby) Problem The internal temperature is securely installed, contact your nearest Sharp Authorized Projector Dealer or Service Center (see page...

PG-F211X , PG-F261X Operation Manual
Page 52
... gas contained in the bulb cracking. ■ When the lamp replacement indicator and on -screen display. (See page 44.) ■ Purchase a replacement lamp of type AN-XR30LP from the projector right after the power cord is recommended that failure can be obtained through a Sharp Authorized Projector Dealer or Service Center. The lamp life (percentage) can be checked with a new one hour after use . For the name of the projector. It is important...
... gas contained in the bulb cracking. ■ When the lamp replacement indicator and on -screen display. (See page 44.) ■ Purchase a replacement lamp of type AN-XR30LP from the projector right after the power cord is recommended that failure can be obtained through a Sharp Authorized Projector Dealer or Service Center. The lamp life (percentage) can be checked with a new one hour after use . For the name of the projector. It is important...

PG-F211X , PG-F261X Operation Manual
Page 54
... lamp timer and continue to use the same lamp, this time, keep the lamp unit horizontal and do not tilt it in the direction of the projector. 2 52 Reset the lamp timer. • While simultaneously holding down MENU/HELP, ENTER and R on the projector, press STANDBY/ON on the projector. • "LAMP 0000H" is displayed, indicating that the lamp timer is connected to close it. Then tighten the user service screw (3) to reset the lamp timer only when replacing...
... lamp timer and continue to use the same lamp, this time, keep the lamp unit horizontal and do not tilt it in the direction of the projector. 2 52 Reset the lamp timer. • While simultaneously holding down MENU/HELP, ENTER and R on the projector, press STANDBY/ON on the projector. • "LAMP 0000H" is displayed, indicating that the lamp timer is connected to close it. Then tighten the user service screw (3) to reset the lamp timer only when replacing...

PG-F211X , PG-F261X Operation Manual
Page 58
... sending an input selection command and then receiving an "OK" response code, the projector may take some time to process the command. "TABN _ _ _ 1" "TLPS _ _ _ 1" "TPOW _ _ _ 1" "TLPN _ _ _ 1" "TLTT _ _ _ 1" "TLTL _ _ _ 1" "TNAM _ _ _ 1" "MNRD _ _ _ 1" "PJN0 _ _ _ 1" - RS-232C Specifications and Command Settings Computer control A computer can be used by connecting an RS-232C serial control cable (cross type, sold separately) to the projector. (See page 24 for connection.) Communication conditions Set the serial port settings of...
... sending an input selection command and then receiving an "OK" response code, the projector may take some time to process the command. "TABN _ _ _ 1" "TLPS _ _ _ 1" "TPOW _ _ _ 1" "TLPN _ _ _ 1" "TLTT _ _ _ 1" "TLTL _ _ _ 1" "TNAM _ _ _ 1" "MNRD _ _ _ 1" "PJN0 _ _ _ 1" - RS-232C Specifications and Command Settings Computer control A computer can be used by connecting an RS-232C serial control cable (cross type, sold separately) to the projector. (See page 24 for connection.) Communication conditions Set the serial port settings of...

PG-F211X , PG-F261X Operation Manual
Page 59
... Keystone AV Mute Freeze Auto Sync Resize Volume(0 - 60) Volume up/down(-10 - +10) -168 - +168 On Off On Off Start Computer Normal Stretch Border DVI Normal Stretch Border RETURN COMMAND PARAMETER Power ON Standby mode (or 30-second startup time) P O W R _ _ _ 1 OK or ERR P O W R _ _ _ 0 OK OK OK or ERR P OWR ? ? ? ? 1 T A B N _ _ _ 1 0: Normal 0 0: Normal 1: Temp High 1: Temp High 8: Lamp Life 5% or less 2: Fan Error 16: Lamp Burn-out 4: Lamp Cover Open 32: Lamp Ignition Failure 8: Lamp Life...
... Keystone AV Mute Freeze Auto Sync Resize Volume(0 - 60) Volume up/down(-10 - +10) -168 - +168 On Off On Off Start Computer Normal Stretch Border DVI Normal Stretch Border RETURN COMMAND PARAMETER Power ON Standby mode (or 30-second startup time) P O W R _ _ _ 1 OK or ERR P O W R _ _ _ 0 OK OK OK or ERR P OWR ? ? ? ? 1 T A B N _ _ _ 1 0: Normal 0 0: Normal 1: Temp High 1: Temp High 8: Lamp Life 5% or less 2: Fan Error 16: Lamp Burn-out 4: Lamp Cover Open 32: Lamp Ignition Failure 8: Lamp Life...

PG-F211X , PG-F261X Operation Manual
Page 64
... set. 40 • Make adjustments of "Color" and "Tint" in "Picture Mode" and lower the "Bright Boost" value. (Video Input only) • Video input system is incorrectly set when connecting notebook computer. • The lamp unit cover is not installed correctly. • If the connected DVI digital equipment is turned on before the "DVI-D" input mode is selected on the projector, the image may not be projected properly or may not be displayed...
... set. 40 • Make adjustments of "Color" and "Tint" in "Picture Mode" and lower the "Bright Boost" value. (Video Input only) • Video input system is incorrectly set when connecting notebook computer. • The lamp unit cover is not installed correctly. • If the connected DVI digital equipment is turned on before the "DVI-D" input mode is selected on the projector, the image may not be projected properly or may not be displayed...

PG-F211X , PG-F261X Operation Manual
Page 65
... lamp life draws to the projector or the connected equipment works improperly. • Select "Vertical stripes or flickering image appear" in red. If this happens frequently, replace the lamp. The lamp does not light • The lamp indicator is too bright and • Image adjustments are locked. projector turns on COMPUTER (Component)/ DVI (Component). • Change the input signal type setting. • When you cannot select an input signal type, select "Color is green on . Appendix 63 Picture...
... lamp life draws to the projector or the connected equipment works improperly. • Select "Vertical stripes or flickering image appear" in red. If this happens frequently, replace the lamp. The lamp does not light • The lamp indicator is too bright and • Image adjustments are locked. projector turns on COMPUTER (Component)/ DVI (Component). • Change the input signal type setting. • When you cannot select an input signal type, select "Color is green on . Appendix 63 Picture...

PG-F211X , PG-F261X Operation Manual
Page 66
... East Fze 971-4-81-5311 [email protected].sharp.co.jp Thailand Sharp Thebnakorn Co. For SHARP Assistance If you encounter any problems during setup or operation of this operation manual does not answer your question, please contact the SHARP Service departments listed below. Ltd. 1300-135-022 http://www.sharp.net.au New Zealand Sharp Corporation of Canada Ltd. (905) 568-7140...
... East Fze 971-4-81-5311 [email protected].sharp.co.jp Thailand Sharp Thebnakorn Co. For SHARP Assistance If you encounter any problems during setup or operation of this operation manual does not answer your question, please contact the SHARP Service departments listed below. Ltd. 1300-135-022 http://www.sharp.net.au New Zealand Sharp Corporation of Canada Ltd. (905) 568-7140...

PG-F211X , PG-F261X Operation Manual
Page 69
... adjustment foot 27 Red 40 Remote control 13 Remote control sensor 15 Replacing the lamp 50, 51 Resize 30, 41 RESIZE button 30 RGB cable 21 RS-232C terminal 24 SCR - ADJ 41 Screen Size and Projection Distance 20 Setup Guide 26, 42 Sharp 40 Speaker 43 SPOT button 32 STANDBY button 25 STANDBY Mode 43 STANDBY/ON button 25 Storage case 53 STRETCH 30, 31 Supplied accessories 10 S-VIDEO button 29 S-VIDEO terminal 22 System Lock 44 System Sound 43 Temperature warning indicator...
... adjustment foot 27 Red 40 Remote control 13 Remote control sensor 15 Replacing the lamp 50, 51 Resize 30, 41 RESIZE button 30 RGB cable 21 RS-232C terminal 24 SCR - ADJ 41 Screen Size and Projection Distance 20 Setup Guide 26, 42 Sharp 40 Speaker 43 SPOT button 32 STANDBY button 25 STANDBY Mode 43 STANDBY/ON button 25 Storage case 53 STRETCH 30, 31 Supplied accessories 10 S-VIDEO button 29 S-VIDEO terminal 22 System Lock 44 System Sound 43 Temperature warning indicator...


