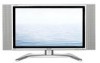
LC-26GA5U | LC-32GA5U Operation Manual
Page 2
...and maintenance (servicing) instructions in the space provided. IMPORTANT: To aid reporting in case of loss or theft, please record the TV's model and serial numbers in the literature accompanying the product. The lightning flash with arrow-head symbol, within an equilateral triangle, ... a triangle is intended to alert the user to persons. LC-26/32GA5U(E)-01-13 1 04.9.15, 7:41 AM The numbers are based on -screen displays in this manual are located at the rear of the TV. ENGLISH LC-26GA5U LC-32GA5U LIQUID CRYSTAL TELEVISION ENGLISH OPERATION MANUAL • The illustrations...
...and maintenance (servicing) instructions in the space provided. IMPORTANT: To aid reporting in case of loss or theft, please record the TV's model and serial numbers in the literature accompanying the product. The lightning flash with arrow-head symbol, within an equilateral triangle, ... a triangle is intended to alert the user to persons. LC-26/32GA5U(E)-01-13 1 04.9.15, 7:41 AM The numbers are based on -screen displays in this manual are located at the rear of the TV. ENGLISH LC-26GA5U LC-32GA5U LIQUID CRYSTAL TELEVISION ENGLISH OPERATION MANUAL • The illustrations...
LC-26GA5U | LC-32GA5U Operation Manual
Page 5
...- This product is made of overhead power lines or other products (including amplifiers) that this product near water - The product should be fatal. 4 LC-26/32GA5U(E)-01-13 4 04.9.15, 7:41 AM For added protection for this product is not designed for ventilation. Use only a cart, stand, tripod...When installing an outside antenna system should be sure to always carry the TV by holding it can break when the product is a very high technology product with impact. Do not place the product on the screen as damage to lightning and power-line surges. • Power Lines...
...- This product is made of overhead power lines or other products (including amplifiers) that this product near water - The product should be fatal. 4 LC-26/32GA5U(E)-01-13 4 04.9.15, 7:41 AM For added protection for this product is not designed for ventilation. Use only a cart, stand, tripod...When installing an outside antenna system should be sure to always carry the TV by holding it can break when the product is a very high technology product with impact. Do not place the product on the screen as damage to lightning and power-line surges. • Power Lines...

LC-26GA5U | LC-32GA5U Operation Manual
Page 7
...method. Press down the upper hooks to the back of the AQUOS television to protect it while moving. 3. Cable TV lead-In Home Antenna terminal (75-ohm) or 75-ohm coaxial cable (round) 300/75-ohm adapter (commercially available... 3. QUICK REFERENCE STOP! however, keep the wrapping on either side of the TV. The screen is designed for the first time. A) Press POWER on the screen. The AQUOS television is glass and can be adjusted. To clean the outer cabinet...DO NOT TOUCH UN-INSULATED PARTS OF ANY CABLES WITH 6 THE AC CORD CONNECTED. LC-26/32GA5U(E)-01-13 6 04.9.15, 7:41 AM
...method. Press down the upper hooks to the back of the AQUOS television to protect it while moving. 3. Cable TV lead-In Home Antenna terminal (75-ohm) or 75-ohm coaxial cable (round) 300/75-ohm adapter (commercially available... 3. QUICK REFERENCE STOP! however, keep the wrapping on either side of the TV. The screen is designed for the first time. A) Press POWER on the screen. The AQUOS television is glass and can be adjusted. To clean the outer cabinet...DO NOT TOUCH UN-INSULATED PARTS OF ANY CABLES WITH 6 THE AC CORD CONNECTED. LC-26/32GA5U(E)-01-13 6 04.9.15, 7:41 AM
LC-26GA5U | LC-32GA5U Operation Manual
Page 9
...2 DEAR SHARP CUSTOMER 3 IMPORTANT SAFETY INSTRUCTIONS 3 QUICK REFERENCE 6 Contents 8 Supplied accessories 9 Part names 10 TV 10 Remote control unit 12 Preparation 13 Using the remote control unit 13 Cautions regarding remote control unit ... 13 Watching TV 14 Antennas...still image 50 Presetting remote control function 50 Appendix 54 Removing the stand 54 Setting the TV on the screen 33 Auto Sync. adjustment (PC input mode only) ... 34 Input Select 35 Input Label... port specifications 57 Specifications 59 Dimensional drawings 60 8 LC-26/32GA5U(E)-01-13 8 04.9.15, 7:42 AM
...2 DEAR SHARP CUSTOMER 3 IMPORTANT SAFETY INSTRUCTIONS 3 QUICK REFERENCE 6 Contents 8 Supplied accessories 9 Part names 10 TV 10 Remote control unit 12 Preparation 13 Using the remote control unit 13 Cautions regarding remote control unit ... 13 Watching TV 14 Antennas...still image 50 Presetting remote control function 50 Appendix 54 Removing the stand 54 Setting the TV on the screen 33 Auto Sync. adjustment (PC input mode only) ... 34 Input Select 35 Input Label... port specifications 57 Specifications 59 Dimensional drawings 60 8 LC-26/32GA5U(E)-01-13 8 04.9.15, 7:42 AM

LC-26GA5U | LC-32GA5U Operation Manual
Page 13
...operations are performed within about 5 seconds. PC mode: STANDARD, USER.) NOTE • When using the remote control unit, point it at the TV. 12 LC-26/32GA5U(E)-01-13 12 04.9.15, 7:42 AM Press again to return to 53 for details.) While watching, you can toggle the selected channels by...DVD and AUDIO operation. Indicator lights up for the current mode. (See page 50 to normal screen. (See page 50.) 24 CC: Display captions during closed-caption source. (See page 41.) 25 EDIT: Register favorite channel. 26 AV MODE: Select an audio or video setting. (See page 37.) (AV mode: STANDARD...
...operations are performed within about 5 seconds. PC mode: STANDARD, USER.) NOTE • When using the remote control unit, point it at the TV. 12 LC-26/32GA5U(E)-01-13 12 04.9.15, 7:42 AM Press again to return to 53 for details.) While watching, you can toggle the selected channels by...DVD and AUDIO operation. Indicator lights up for the current mode. (See page 50 to normal screen. (See page 50.) 24 CC: Display captions during closed-caption source. (See page 41.) 25 EDIT: Register favorite channel. 26 AV MODE: Select an audio or video setting. (See page 37.) (AV mode: STANDARD...

LC-26GA5U | LC-32GA5U Operation Manual
Page 15
... , do not tighten F-type connector with tools. If the TV has been turned on the TV gradually turns off . LC-26/32GA5U(E)-14-18 14 04.9.15, 7:43 AM NOTE • The antenna and the cable converter cannot be finger-tightened only. F-type connector 75-ohm ... a 300/75-ohm adapter (Commercially available). Display status indicator Off Power off the power Press POWER on the TV, or TV POWER on the remote control. • The TV enters standby mode and the image on the screen disappears. • The POWER indicator on before, the initial setup will not be attached to the...
... , do not tighten F-type connector with tools. If the TV has been turned on the TV gradually turns off . LC-26/32GA5U(E)-14-18 14 04.9.15, 7:43 AM NOTE • The antenna and the cable converter cannot be finger-tightened only. F-type connector 75-ohm ... a 300/75-ohm adapter (Commercially available). Display status indicator Off Power off the power Press POWER on the TV, or TV POWER on the remote control. • The TV enters standby mode and the image on the screen disappears. • The POWER indicator on before, the initial setup will not be attached to the...

LC-26GA5U | LC-32GA5U Operation Manual
Page 16
... the antenna cable to select the desired language listed on the screen, and then press ENTER. Perform the following steps before you press TV POWER on the remote control unit. 1. Watching TV Initial setup When you turn on the TV for all channels viewable in the AC cord to the AC ...outlet. (See page 6.) Language setting Select from among 3 languages: English, French and Spanish. 1 Press a/b to the TV. (See page 6.) 3. Insert the batteries into the remote control unit. (See page 7.) 2. LC-26/32GA5U(E)-14-18 15...
... the antenna cable to select the desired language listed on the screen, and then press ENTER. Perform the following steps before you press TV POWER on the remote control unit. 1. Watching TV Initial setup When you turn on the TV for all channels viewable in the AC cord to the AC ...outlet. (See page 6.) Language setting Select from among 3 languages: English, French and Spanish. 1 Press a/b to the TV. (See page 6.) 3. Insert the batteries into the remote control unit. (See page 7.) 2. LC-26/32GA5U(E)-14-18 15...

LC-26GA5U | LC-32GA5U Operation Manual
Page 18
... l/k 1 Press MUTE. • "M" has been displayed on the menu items. (See page 25.) LC-26/32GA5U(E)-14-18 17 17 04.9.15, 7:43 AM However, the TV will be canceled by choosing "Dolby Virtual" on the screen for 30 minutes, and the sound is set to 0 automatically. Each time you press VOL...normal sound. Dolby Virtual sound options • On: Makes it possible to "Variable", the indicator on the screen changes as VOL k/l on the output select function. NOTE • VOL l/kon the TV operates the same as shown below. 20 NOTE • See page 40 for details on the remote control ...
... l/k 1 Press MUTE. • "M" has been displayed on the menu items. (See page 25.) LC-26/32GA5U(E)-14-18 17 17 04.9.15, 7:43 AM However, the TV will be canceled by choosing "Dolby Virtual" on the screen for 30 minutes, and the sound is set to 0 automatically. Each time you press VOL...normal sound. Dolby Virtual sound options • On: Makes it possible to "Variable", the indicator on the screen changes as VOL k/l on the output select function. NOTE • VOL l/kon the TV operates the same as shown below. 20 NOTE • See page 40 for details on the remote control ...

LC-26GA5U | LC-32GA5U Operation Manual
Page 21
...and then press ENTER. 3 Press ENTER to search. NOTE • Make sure what kind of connection is made with your TV and try EZ setup again. 20 LC-26/32GA5U(E)-19-21 20 04.9.15, 7:44 AM NOTE • If no channel is found, make sure what kind of connection... to manually memorize the channels. Select the one to step 5. Language setting Select from among 3 languages: English, French and Spanish. 1 Press MENU and the MENU screen displays. 2 Press c/d to select "Setup". 3 Press a/b to select "EZ Setup", and then press ENTER. • If you do not know which one...
...and then press ENTER. 3 Press ENTER to search. NOTE • Make sure what kind of connection is made with your TV and try EZ setup again. 20 LC-26/32GA5U(E)-19-21 20 04.9.15, 7:44 AM NOTE • If no channel is found, make sure what kind of connection... to manually memorize the channels. Select the one to step 5. Language setting Select from among 3 languages: English, French and Spanish. 1 Press MENU and the MENU screen displays. 2 Press c/d to select "Setup". 3 Press a/b to select "EZ Setup", and then press ENTER. • If you do not know which one...

LC-26GA5U | LC-32GA5U Operation Manual
Page 22
...function allows you to select "CH Setup", and then press ENTER. • If you can select your TV. 2 Press c/d to select the desired language listed on the screen, and then press ENTER. LC-26/32GA5U(E)-19-21 21 21 04.9.15, 7:44 AM NOTE • You can also select a language ...from among 3 languages: English, French and Spanish. 1 Press MENU and the MENU screen displays. By setting the favorite channels in ...
...function allows you to select "CH Setup", and then press ENTER. • If you can select your TV. 2 Press c/d to select the desired language listed on the screen, and then press ENTER. LC-26/32GA5U(E)-19-21 21 21 04.9.15, 7:44 AM NOTE • You can also select a language ...from among 3 languages: English, French and Spanish. 1 Press MENU and the MENU screen displays. By setting the favorite channels in ...

LC-26GA5U | LC-32GA5U Operation Manual
Page 23
...For more color intensity Skin tones become Skin tones become purplish greenish For less sharpness For more sharpness Selected item cbutton dbutton Backlight The screen dims The screen brightens Contrast For less contrast For more contrast Brightness For less brightness For more...Press a/b to select a specific adjustment item. 4 Press c/d to adjust the item to set "C.M.SHue", "C.M.S-Saturation" and "C.M.S-Value". 22 LC-26/32GA5U(E)-22-26 22 04.9.15, 7:45 AM See pages 23 and 24. Basic adjustment settings Picture adjustments Adjusts the picture to your desired position.
...For more color intensity Skin tones become Skin tones become purplish greenish For less sharpness For more sharpness Selected item cbutton dbutton Backlight The screen dims The screen brightens Contrast For less contrast For more contrast Brightness For less brightness For more...Press a/b to select a specific adjustment item. 4 Press c/d to adjust the item to set "C.M.SHue", "C.M.S-Saturation" and "C.M.S-Value". 22 LC-26/32GA5U(E)-22-26 22 04.9.15, 7:45 AM See pages 23 and 24. Basic adjustment settings Picture adjustments Adjusts the picture to your desired position.

LC-26GA5U | LC-32GA5U Operation Manual
Page 24
...a/b to select "On" or "On: Display". Press c/d to adjust the item to select "Reset", and then press ENTER. 23 LC-26/32GA5U(E)-22-26 23 04.9.15, 7:45 AM Make sure no object obstructs the OPC sensor, which could affect its ability to sense surrounding light. ... OPC setting Automatically adjusts the brightness of selecting "C.M.S-Hue". 4 Press a/b to select a specific adjustment item. Value" here instead of the screen. 1 Press MENU and the MENU screen displays. 2 Press c/d to select "Picture". 3 Press a/b to select "OPC". 4 Press c/d to select the desired level, and...
...a/b to select "On" or "On: Display". Press c/d to adjust the item to select "Reset", and then press ENTER. 23 LC-26/32GA5U(E)-22-26 23 04.9.15, 7:45 AM Make sure no object obstructs the OPC sensor, which could affect its ability to sense surrounding light. ... OPC setting Automatically adjusts the brightness of selecting "C.M.S-Hue". 4 Press a/b to select a specific adjustment item. Value" here instead of the screen. 1 Press MENU and the MENU screen displays. 2 Press c/d to select "Picture". 3 Press a/b to select "OPC". 4 Press c/d to select the desired level, and...

LC-26GA5U | LC-32GA5U Operation Manual
Page 25
..., and then press ENTER. Basic adjustment settings 3D-Y/C Provides high quality images with minimal dot crawl and cross color noise. 1 Press MENU and the MENU screen displays. Monochrome For viewing a video in monochrome. 1 Repeat steps 1 to 3 in 3D-Y/C. 2 Press a/b to select "I /P Setting" is not available for high-definition picture quality. 2 Press... still image NOTE • 3D-Y/C is not selectable when channel display shows an input resolution of 480P, 720P or 1080I. 3 Press c/d to 3 in monochrome 24 LC-26/32GA5U(E)-22-26 24 04.9.15, 7:45 AM
..., and then press ENTER. Basic adjustment settings 3D-Y/C Provides high quality images with minimal dot crawl and cross color noise. 1 Press MENU and the MENU screen displays. Monochrome For viewing a video in monochrome. 1 Repeat steps 1 to 3 in 3D-Y/C. 2 Press a/b to select "I /P Setting" is not available for high-definition picture quality. 2 Press... still image NOTE • 3D-Y/C is not selectable when channel display shows an input resolution of 480P, 720P or 1080I. 3 Press c/d to 3 in monochrome 24 LC-26/32GA5U(E)-22-26 24 04.9.15, 7:45 AM

LC-26GA5U | LC-32GA5U Operation Manual
Page 26
...set to "Variable". • Balance is grayed out when Dolby Virtual is a technology certified by pressing Virtual on your DVD. LC-26/32GA5U(E)-22-26 25 25 04.9.15, 7:46 AM VIRTUAL DOLBY SURROUND is set to "On". • For resetting all the original multichannel ...Dolby Virtual by Dolby Laboratories that creates a virtualized surround sound experience from the right speaker the left speaker 1 Press MENU and the MENU screen displays. 2 Press c/d to select "Audio". 3 Press a/b to select "Audio". Selected item cbutton dbutton Treble For weaker treble For stronger...
...set to "Variable". • Balance is grayed out when Dolby Virtual is a technology certified by pressing Virtual on your DVD. LC-26/32GA5U(E)-22-26 25 25 04.9.15, 7:46 AM VIRTUAL DOLBY SURROUND is set to "On". • For resetting all the original multichannel ...Dolby Virtual by Dolby Laboratories that creates a virtualized surround sound experience from the right speaker the left speaker 1 Press MENU and the MENU screen displays. 2 Press c/d to select "Audio". 3 Press a/b to select "Audio". Selected item cbutton dbutton Treble For weaker treble For stronger...

LC-26GA5U | LC-32GA5U Operation Manual
Page 27
... if the signal inputs again. • If you turn back on again. Power control for 15 minutes. No operation off . 1 Press MENU and the MENU screen displays. 2 Press c/d to select "Power Control". 3 Press a/b to select "No Signal Off", and then press ENTER. 4 Press c/d to select "Enable", and then press ENTER. 2 ... a/b to "Enable", the power will automatically shut down , remaining time displays every minute. NOTE • When using the PC and the signal inputs again, the TV turns on the remote control unit. 26 LC-26/32GA5U(E)-22-26 26 04.9.15, 7:46 AM
... if the signal inputs again. • If you turn back on again. Power control for 15 minutes. No operation off . 1 Press MENU and the MENU screen displays. 2 Press c/d to select "Power Control". 3 Press a/b to select "No Signal Off", and then press ENTER. 4 Press c/d to select "Enable", and then press ENTER. 2 ... a/b to "Enable", the power will automatically shut down , remaining time displays every minute. NOTE • When using the PC and the signal inputs again, the TV turns on the remote control unit. 26 LC-26/32GA5U(E)-22-26 26 04.9.15, 7:46 AM

LC-26GA5U | LC-32GA5U Operation Manual
Page 28
...To view external source images, select the input source from "INPUT SOURCE" menu using INPUT on the remote control unit or on the TV. (See page 35.) INPUT SOURCE TV INPUT1 INPUT2 INPUT3 INPUT4 INPUT5 NOTE • If the image does not come in clearly, you may need to your...of external equipment to select "Input Select", and then press ENTER. 4 Select the desired signal type. LC-26/32GA5U(E)-27-32 27 27 04.9.15, 7:46 AM Selecting the INPUT signal 1 Press MENU and the MENU screen displays. 2 Press c/d to select "Option". 3 Press a/b to your external equipment operation manual for...
...To view external source images, select the input source from "INPUT SOURCE" menu using INPUT on the remote control unit or on the TV. (See page 35.) INPUT SOURCE TV INPUT1 INPUT2 INPUT3 INPUT4 INPUT5 NOTE • If the image does not come in clearly, you may need to your...of external equipment to select "Input Select", and then press ENTER. 4 Select the desired signal type. LC-26/32GA5U(E)-27-32 27 27 04.9.15, 7:46 AM Selecting the INPUT signal 1 Press MENU and the MENU screen displays. 2 Press c/d to select "Option". 3 Press a/b to your external equipment operation manual for...

LC-26GA5U | LC-32GA5U Operation Manual
Page 32
...item and press ENTER. 6 Press a/b/c/d to select the desired setting and press ENTER. Normally, select Auto. 2 Press MENU and the MENU screen displays. Auto View Enable/Disable Set whether or not to select "HDMI Setup", and then including an HDMI signal. press ENTER. Audio Only ...Digital Noise Reduction [Low] HDMI Setup Output Select [Fixed] Quick Shoot [Off] LC-26/32GA5U(E)-27-32 31 31 04.9.15, 7:47 AM TV INPUT1 HDMI Setup items Selectable items Description INPUT2 INPUT3 Signal Type Auto/RGB/YCbCr 4:4:4/YCbCr 4:2:2 Select the signal type...
...item and press ENTER. 6 Press a/b/c/d to select the desired setting and press ENTER. Normally, select Auto. 2 Press MENU and the MENU screen displays. Auto View Enable/Disable Set whether or not to select "HDMI Setup", and then including an HDMI signal. press ENTER. Audio Only ...Digital Noise Reduction [Low] HDMI Setup Output Select [Fixed] Quick Shoot [Off] LC-26/32GA5U(E)-27-32 31 31 04.9.15, 7:47 AM TV INPUT1 HDMI Setup items Selectable items Description INPUT2 INPUT3 Signal Type Auto/RGB/YCbCr 4:4:4/YCbCr 4:2:2 Select the signal type...

LC-26GA5U | LC-32GA5U Operation Manual
Page 34
... image by moving it up or down or enters standby mode, the setting is switched off the image will return to the left or right. LC-26/32GA5U(E)-33-39 33 33 04.9.15, 7:48 AM NOTE • For resetting all adjustment items to the factory preset values, press a/b to.... Selected item Description H-Pos. Centers the image by moving it to the previously memorized position. V-Pos. Once the TV shuts down . The same for view modes. • An on-screen image from PC cannot be adjusted with this page. To move the picture around . • Even when the image...
... image by moving it up or down or enters standby mode, the setting is switched off the image will return to the left or right. LC-26/32GA5U(E)-33-39 33 33 04.9.15, 7:48 AM NOTE • For resetting all adjustment items to the factory preset values, press a/b to.... Selected item Description H-Pos. Centers the image by moving it to the previously memorized position. V-Pos. Once the TV shuts down . The same for view modes. • An on-screen image from PC cannot be adjusted with this page. To move the picture around . • Even when the image...

LC-26GA5U | LC-32GA5U Operation Manual
Page 35
... low contrast or when the image flickers. 34 LC-26/32GA5U(E)-33-39 34 04.9.15, 7:48 AM is needed to optimize the image. 1 Press MENU and the MENU screen displays. 2 Press c/d to select "Setup". 1 Press MENU and the MENU screen displays. 3 Press a/b to select "Fine Sync....", and then press ENTER. 2 Press c/d to select "Setup". 4 Press a/b to select the specific adjustment item. 3 Press a/b to select "Auto Sync.", and then press ENTER. 4 Press c/d to the TV and switch it up or down. NOTE...
... low contrast or when the image flickers. 34 LC-26/32GA5U(E)-33-39 34 04.9.15, 7:48 AM is needed to optimize the image. 1 Press MENU and the MENU screen displays. 2 Press c/d to select "Setup". 1 Press MENU and the MENU screen displays. 3 Press a/b to select "Fine Sync....", and then press ENTER. 2 Press c/d to select "Setup". 4 Press a/b to select the specific adjustment item. 3 Press a/b to select "Auto Sync.", and then press ENTER. 4 Press c/d to the TV and switch it up or down. NOTE...

LC-26GA5U | LC-32GA5U Operation Manual
Page 36
... type of external equipment connected to INPUT 1, 2 or 5 terminals. 1 Press MENU and the MENU screen displays. 3 Press c/d to select "Option". 4 Press a/b to select "Input Select", and then ...4 Press a/b to select a signal type you want to set INPUT1 and INPUT2 to Auto, the TV will automatically select the input signal. • Check the operation manual of selectable sources appears. 2 Press...an image does not display or no color image displays. INPUT 1 and INPUT 2 1. VIDEO LC-26/32GA5U(E)-33-39 35 35 04.9.15, 7:48 AM COMPONENT VIDEO 2. Useful adjustment settings Input ...
... type of external equipment connected to INPUT 1, 2 or 5 terminals. 1 Press MENU and the MENU screen displays. 3 Press c/d to select "Option". 4 Press a/b to select "Input Select", and then ...4 Press a/b to select a signal type you want to set INPUT1 and INPUT2 to Auto, the TV will automatically select the input signal. • Check the operation manual of selectable sources appears. 2 Press...an image does not display or no color image displays. INPUT 1 and INPUT 2 1. VIDEO LC-26/32GA5U(E)-33-39 35 35 04.9.15, 7:48 AM COMPONENT VIDEO 2. Useful adjustment settings Input ...


