CV-P10RC Operation Manual
Page 3
...; INSTALLATION AND REMOVAL OF EXHAUST HOSE .........E-14 • PRE-OPERATION CHECKS E-16 • COOL MODE E-18 • DEHUMIDIFICATION MODE E-19 • FAN MODE E-20 • VENTILATION MODE E-20 • TO CHANGE AIR FLOW DIRECTION E-21 • PLASMACLUSTER OPERATION E-22 • MEGA COOL OPERATION E-23 • ONE-HOUR OFF TIMER E-23 • TIMER OPERATION E-24 • MAIN UNIT OPERATION E-26 • DRAINAGE E-27 • MAINTENANCE E-28 • BEFORE CALLING FOR SERVICE E-29 Declaration of Conformity SHARP ROOM AIR CONDITIONER CV-P10RC This...
...; INSTALLATION AND REMOVAL OF EXHAUST HOSE .........E-14 • PRE-OPERATION CHECKS E-16 • COOL MODE E-18 • DEHUMIDIFICATION MODE E-19 • FAN MODE E-20 • VENTILATION MODE E-20 • TO CHANGE AIR FLOW DIRECTION E-21 • PLASMACLUSTER OPERATION E-22 • MEGA COOL OPERATION E-23 • ONE-HOUR OFF TIMER E-23 • TIMER OPERATION E-24 • MAIN UNIT OPERATION E-26 • DRAINAGE E-27 • MAINTENANCE E-28 • BEFORE CALLING FOR SERVICE E-29 Declaration of Conformity SHARP ROOM AIR CONDITIONER CV-P10RC This...
CV-P10RC Operation Manual
Page 4
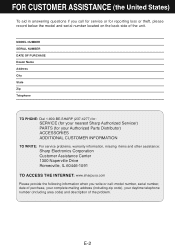
... Sharp Authorized Servicer) PARTS (for reporting loss or theft, please record below the model and serial number located on the back side of the problem. E-2 FOR CUSTOMER ASSISTANCE (the United States) To aid in answering questions if you write or call for service or for your Authorized Parts Distributor) ACCESSORIES ADDITIONAL CUSTOMER INFORMATION TO WRITE: For service problems, warranty information, missing items and other assistance: Sharp Electronics Corporation Customer...
... Sharp Authorized Servicer) PARTS (for reporting loss or theft, please record below the model and serial number located on the back side of the problem. E-2 FOR CUSTOMER ASSISTANCE (the United States) To aid in answering questions if you write or call for service or for your Authorized Parts Distributor) ACCESSORIES ADDITIONAL CUSTOMER INFORMATION TO WRITE: For service problems, warranty information, missing items and other assistance: Sharp Electronics Corporation Customer...
CV-P10RC Operation Manual
Page 5
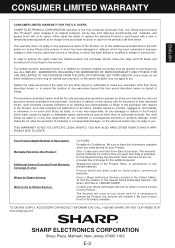
... person is in the manner and for the Sealed Cooling System parts; The limited warranty described herein is authorized to enforce the rights under this information available when you . Correction of defects, in addition to whatever implied warranties may not apply to Obtain Service: CV-P10RC Portable Air Conditioner. Nor shall Sharp be free from date of Purchase available. Neither the sales...
... person is in the manner and for the Sealed Cooling System parts; The limited warranty described herein is authorized to enforce the rights under this information available when you . Correction of defects, in addition to whatever implied warranties may not apply to Obtain Service: CV-P10RC Portable Air Conditioner. Nor shall Sharp be free from date of Purchase available. Neither the sales...
CV-P10RC Operation Manual
Page 6
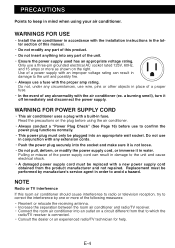
... right. WARNINGS FOR USE • Install the air conditioner in accordance with the air conditioner (ex. Replacement must be replaced with a new power supply cord obtained from that to the unit and possibly fire. • Always use a three-pin grounded electrical AC socket rated 125V, 60Hz, and 15 amps or more of this manual. • Do not modify any abnormality with the installation instructions in fuse. Pulling or misuse...
... right. WARNINGS FOR USE • Install the air conditioner in accordance with the air conditioner (ex. Replacement must be replaced with a new power supply cord obtained from that to the unit and possibly fire. • Always use a three-pin grounded electrical AC socket rated 125V, 60Hz, and 15 amps or more of this manual. • Do not modify any abnormality with the installation instructions in fuse. Pulling or misuse...

CV-P10RC Operation Manual
Page 7
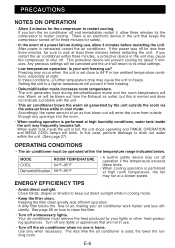
... plugged into the room. • Do not block the exhaust air outlet with a cord that is properly installed and grounded. Screw Grounding adapter Grounding wire Tab for the electric current. The drained water may spill out into the room. • The temperature around the drainage hose must be below freezing point when used , make sure the electrical box is fully grounded. Drained water may be performed whenever moving the air conditioner...
... plugged into the room. • Do not block the exhaust air outlet with a cord that is properly installed and grounded. Screw Grounding adapter Grounding wire Tab for the electric current. The drained water may spill out into the room. • The temperature around the drainage hose must be below freezing point when used , make sure the electrical box is fully grounded. Drained water may be performed whenever moving the air conditioner...
CV-P10RC Operation Manual
Page 8
... room temperature. This protective device will blink. When water tank inside the unit may frequently become full. If the power was off any openings into the room. • When cooling operation is full, the unit stops operating and TIMER, OPERATION and MEGA COOL lamps will prevent cooling for the compressor to keep out direct sunlight while in the unit may run at least three minutes before restarting the unit. If you turn the air conditioner...
... room temperature. This protective device will blink. When water tank inside the unit may frequently become full. If the power was off any openings into the room. • When cooling operation is full, the unit stops operating and TIMER, OPERATION and MEGA COOL lamps will prevent cooling for the compressor to keep out direct sunlight while in the unit may run at least three minutes before restarting the unit. If you turn the air conditioner...
CV-P10RC Operation Manual
Page 9
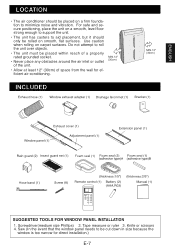
... to support the unit. • The unit has casters to aid placement, but it should be rolled on smooth, flat least 12" (30cm) of space from the wall for direct installation.) E-7 Use caution when rolling on carpet surfaces. ENGLISH LOCATION • The air conditioner should only be placed on a firm foundation to be placed within reach of a properly rated...
... to support the unit. • The unit has casters to aid placement, but it should be rolled on smooth, flat least 12" (30cm) of space from the wall for direct installation.) E-7 Use caution when rolling on carpet surfaces. ENGLISH LOCATION • The air conditioner should only be placed on a firm foundation to be placed within reach of a properly rated...
CV-P10RC Operation Manual
Page 10
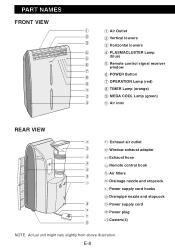
PART NAMES FRONT VIEW 1 1 Air Outlet 2 2 Vertical louvers 3 3 Horizontal louvers 4 4 PLASMACLUSTER Lamp 5 (blue) 6 5 Remote control signal receiver window 7 6 POWER Button 8 9 7 OPERATION Lamp (red) 0 8 TIMER Lamp (orange) 0 9 MEGA COOL Lamp (green) 0 0 Air inlet REAR VIEW q q Exhaust air outlet w w Window exhaust adapter e e Exhaust hose r r Remote control hook t t Air filters y u y Drainage nozzle and stopcock u Power supply cord hooks i Drainpipe nozzle and stopcock i o Power supply cord o p Power plug p a a Casters(4) NOTE: Actual unit ...
PART NAMES FRONT VIEW 1 1 Air Outlet 2 2 Vertical louvers 3 3 Horizontal louvers 4 4 PLASMACLUSTER Lamp 5 (blue) 6 5 Remote control signal receiver window 7 6 POWER Button 8 9 7 OPERATION Lamp (red) 0 8 TIMER Lamp (orange) 0 9 MEGA COOL Lamp (green) 0 0 Air inlet REAR VIEW q q Exhaust air outlet w w Window exhaust adapter e e Exhaust hose r r Remote control hook t t Air filters y u y Drainage nozzle and stopcock u Power supply cord hooks i Drainpipe nozzle and stopcock i o Power supply cord o p Power plug p a a Casters(4) NOTE: Actual unit ...

CV-P10RC Operation Manual
Page 11
...REMOTE CONTROL 1 2 3 4 5 6 7 8 9 0 q w e r t 1 Transmitter 2 Display 3 POWER Button 4 LIGHTS Button 5 TEMPERATURE Button 6 PLASMACLUSTER Button 7 1 hr OFF Button 8 MODE Button 9 ON TIMER Button 0 FAN Button q OFF TIMER Button w CANCEL Button e LOUVERS Button r RESET Button t MEGA COOL Button REMOTE CONTROL DISPLAY y MODE SYMBOLS : COOL : DEHUMIDIFICATION y : FAN : VENTILATION u p u MEGA COOL SYMBOL i i PLASMACLUSTER SYMBOL a o FAN SPEED SYMBOLS : AUTO Quiet : Manual setting o s Low High p TEMPERATURE AND TIMER COUNT DOWN INDICATOR a TRANSMITTING SYMBOL s ON TIMER / OFF TIMER...
...REMOTE CONTROL 1 2 3 4 5 6 7 8 9 0 q w e r t 1 Transmitter 2 Display 3 POWER Button 4 LIGHTS Button 5 TEMPERATURE Button 6 PLASMACLUSTER Button 7 1 hr OFF Button 8 MODE Button 9 ON TIMER Button 0 FAN Button q OFF TIMER Button w CANCEL Button e LOUVERS Button r RESET Button t MEGA COOL Button REMOTE CONTROL DISPLAY y MODE SYMBOLS : COOL : DEHUMIDIFICATION y : FAN : VENTILATION u p u MEGA COOL SYMBOL i i PLASMACLUSTER SYMBOL a o FAN SPEED SYMBOLS : AUTO Quiet : Manual setting o s Low High p TEMPERATURE AND TIMER COUNT DOWN INDICATOR a TRANSMITTING SYMBOL s ON TIMER / OFF TIMER...
CV-P10RC Operation Manual
Page 18
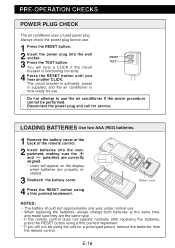
... the wall socket. 3 Press the TEST button. The circuit breaker is activated, power is supplied, and the air conditioner is functioning correctly. 4 Press the RESET button until you will appear on the display when batteries are the same type. • If the remote control does not operate normally after replacing the batteries, press the RESET button using a thin pointed implement. LOADING BATTERIES Use two AAA (R03) batteries. 1 Remove the battery cover...
... the wall socket. 3 Press the TEST button. The circuit breaker is activated, power is supplied, and the air conditioner is functioning correctly. 4 Press the RESET button until you will appear on the display when batteries are the same type. • If the remote control does not operate normally after replacing the batteries, press the RESET button using a thin pointed implement. LOADING BATTERIES Use two AAA (R03) batteries. 1 Remove the battery cover...

CV-P10RC Operation Manual
Page 20
... turn the drainage nozzle to the CLOSE position, and check the drainage nozzle is securely inserted into the lower drainpipe nozzle and that the nozzle has not been damaged. 1 Press the MODE button to set the desired fan speed. COOL DEHUM FAN VENT 2 Press the POWER button to start operation. 2 • The red OPERATION lamp on the unit will light. 3 3 Press the TEMPERATURE button to set the desired temperature. • The temperature...
... turn the drainage nozzle to the CLOSE position, and check the drainage nozzle is securely inserted into the lower drainpipe nozzle and that the nozzle has not been damaged. 1 Press the MODE button to set the desired fan speed. COOL DEHUM FAN VENT 2 Press the POWER button to start operation. 2 • The red OPERATION lamp on the unit will light. 3 3 Press the TEMPERATURE button to set the desired temperature. • The temperature...
CV-P10RC Operation Manual
Page 21
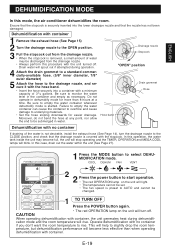
... the room temperature, but dehumidification performance will blink. In this mode, the air conditioner dehumidifies the room. ENGLISH DEHUMIDIFICATION MODE In this case, drain out the water within the unit (See Page 27). 1 Press the MODE button to select DEHUMIDIFICATION mode. Be sure to underlying materials. • Set the hose sloping downwards for more than when operating dehumidification with container 1 Remove the exhaust hose...
... the room temperature, but dehumidification performance will blink. In this mode, the air conditioner dehumidifies the room. ENGLISH DEHUMIDIFICATION MODE In this case, drain out the water within the unit (See Page 27). 1 Press the MODE button to select DEHUMIDIFICATION mode. Be sure to underlying materials. • Set the hose sloping downwards for more than when operating dehumidification with container 1 Remove the exhaust hose...

CV-P10RC Operation Manual
Page 22
... no air blows 3 out into the room, the external ventilation fan speed changes. COOL DEHUM FAN VENT 2 2 Press the POWER button to start operation. • The red OPERATION lamp on the unit will light. • The temperature cannot be set. 1 3 Press the FAN button to set the desired fan speed. E-20 Ensure that the nozzle has not been damaged. 1 Press the MODE button to select VENT mode. QUIET LOW HIGH TO TURN OFF Press the POWER button again...
... no air blows 3 out into the room, the external ventilation fan speed changes. COOL DEHUM FAN VENT 2 2 Press the POWER button to start operation. • The red OPERATION lamp on the unit will light. • The temperature cannot be set. 1 3 Press the FAN button to set the desired fan speed. E-20 Ensure that the nozzle has not been damaged. 1 Press the MODE button to select VENT mode. QUIET LOW HIGH TO TURN OFF Press the POWER button again...
CV-P10RC Operation Manual
Page 24
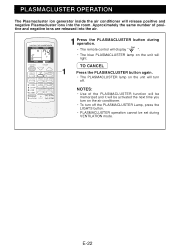
... air. 1 Press the PLASMACLUSTER button during operation. • The remote control will display " ". • The blue PLASMACLUSTER lamp on the unit will be activated the next time you turn on the air conditioner. • To turn off the PLASMACLUSTER Lamp, press the LIGHTS button. • PLASMACLUSTER operation cannot be memorized and it will light. Approximately the same number of the PLASMACLUSTER function will be set during VENTILATION mode...
... air. 1 Press the PLASMACLUSTER button during operation. • The remote control will display " ". • The blue PLASMACLUSTER lamp on the unit will be activated the next time you turn on the air conditioner. • To turn off the PLASMACLUSTER Lamp, press the LIGHTS button. • PLASMACLUSTER operation cannot be memorized and it will light. Approximately the same number of the PLASMACLUSTER function will be set during VENTILATION mode...
CV-P10RC Operation Manual
Page 25
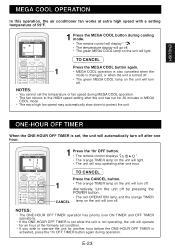
... 1hr OFF button. • The remote control displays " ". • The orange TIMER lamp on the unit will light. • The unit will stop operating after the unit has run for an hour at extra high speed with a setting temperature of 59°F. 1 Press the MEGA COOL button during cooling mode. • The remote control will display " " . • The temperature display will go off. • The green MEGA COOL lamp on the unit will turn off...
... 1hr OFF button. • The remote control displays " ". • The orange TIMER lamp on the unit will light. • The unit will stop operating after the unit has run for an hour at extra high speed with a setting temperature of 59°F. 1 Press the MEGA COOL button during cooling mode. • The remote control will display " " . • The temperature display will go off. • The green MEGA COOL lamp on the unit will turn off...

CV-P10RC Operation Manual
Page 26
... ON TIMER, the temperature will show the re- Select the mode, temperature, fan speed setting and PLASMACLUSTER operation as follows. 0.5h 1.0h 1.5h 10h 11h 12h 1 Display shown when you can be set the unit to your setting. TO CANCEL TIMER Press the CANCEL button. • The orange TIMER lamp on the unit will turn on automatically according to turn on the unit will light. • The unit will operate using the...
... ON TIMER, the temperature will show the re- Select the mode, temperature, fan speed setting and PLASMACLUSTER operation as follows. 0.5h 1.0h 1.5h 10h 11h 12h 1 Display shown when you can be set the unit to your setting. TO CANCEL TIMER Press the CANCEL button. • The orange TIMER lamp on the unit will turn on automatically according to turn on the unit will light. • The unit will operate using the...

CV-P10RC Operation Manual
Page 27
... the button down to a maximum of 12 hours. Point the remote control at the signal receiver window on the remote control display the next time you set the OFF TIMER or ON TIMER. • The OFF TIMER and ON TIMER can not be set the time as desired. • The time setting will change as you can be retrieved even after the power is set, the TIMER setting will...
... the button down to a maximum of 12 hours. Point the remote control at the signal receiver window on the remote control display the next time you set the OFF TIMER or ON TIMER. • The OFF TIMER and ON TIMER can not be set the time as desired. • The time setting will change as you can be retrieved even after the power is set, the TIMER setting will...

CV-P10RC Operation Manual
Page 29
... OPERATION lamps will light. 3 When drainage water stops running out from the hose, turn the unit off by pressing POWER button. • This will take about one minute. If the unit stops operating and the TIMER, OPERATION and MEGA COOL lamps are blinking. (This indicates that may be drained out is not used . 9 Turn the drainage nozzle to the drainage nozzle, and secure it with the hose band. • Prepare for draining, as drain water will come...
... OPERATION lamps will light. 3 When drainage water stops running out from the hose, turn the unit off by pressing POWER button. • This will take about one minute. If the unit stops operating and the TIMER, OPERATION and MEGA COOL lamps are blinking. (This indicates that may be drained out is not used . 9 Turn the drainage nozzle to the drainage nozzle, and secure it with the hose band. • Prepare for draining, as drain water will come...
CV-P10RC Operation Manual
Page 30
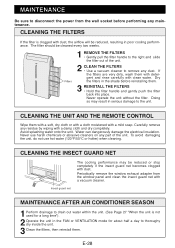
... of the unit. Water can dangerously damage the electrical insulation. Insect guard net MAINTENANCE AFTER AIR CONDITIONER SEASON 1 Perform drainage to drain out water within the unit. (See Page 27 "When the unit is clogged with dust. CLEANING THE UNIT AND THE REMOTE CONTROL Wipe them . Never operate the unit without the filter. CLEANING THE FILTERS If the filter is not used for a long time"). 2 Operate the unit in the...
... of the unit. Water can dangerously damage the electrical insulation. Insect guard net MAINTENANCE AFTER AIR CONDITIONER SEASON 1 Perform drainage to drain out water within the unit. (See Page 27 "When the unit is clogged with dust. CLEANING THE UNIT AND THE REMOTE CONTROL Wipe them . Never operate the unit without the filter. CLEANING THE FILTERS If the filter is not used for a long time"). 2 Operate the unit in the...
CV-P10RC Operation Manual
Page 31
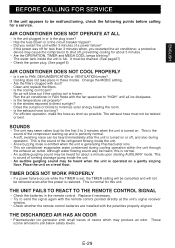
... unit within the unit through the exhaust air outlet. Place the unit on a gently sloping floor. It must not be drained. (See page27) • Check the power plug. (See page16) AIR CONDITIONER DOES NOT COOL PROPERLY • Is it set properly? • Is the window exposed to minimize solar energy heating the room. • Is the exhaust hose too long? Clean and replace the filters. • Is the cooling coil...
... unit within the unit through the exhaust air outlet. Place the unit on a gently sloping floor. It must not be drained. (See page27) • Check the power plug. (See page16) AIR CONDITIONER DOES NOT COOL PROPERLY • Is it set properly? • Is the window exposed to minimize solar energy heating the room. • Is the exhaust hose too long? Clean and replace the filters. • Is the cooling coil...


